Eclipse Edje + Eclipse IoT: Towards a full IoT Stack for Microcontrollers
Developing for the embedded world is a really interesting challenge, as any object may become part of the Internet of Things (IoT). Unfortunately, to achieve that goal, companies may not be able to afford high end processors (such as the one found in a Rasberry Pi 3) for every device. Even though you have “only” few dollars to put in your “Thing” to make it smart, you can still manage to run multiple IoT libraries on it. Using processors like the ARM Cortex-M also enables you to reduce your device’s power consumption and extend your device’s precious battery lifetime.
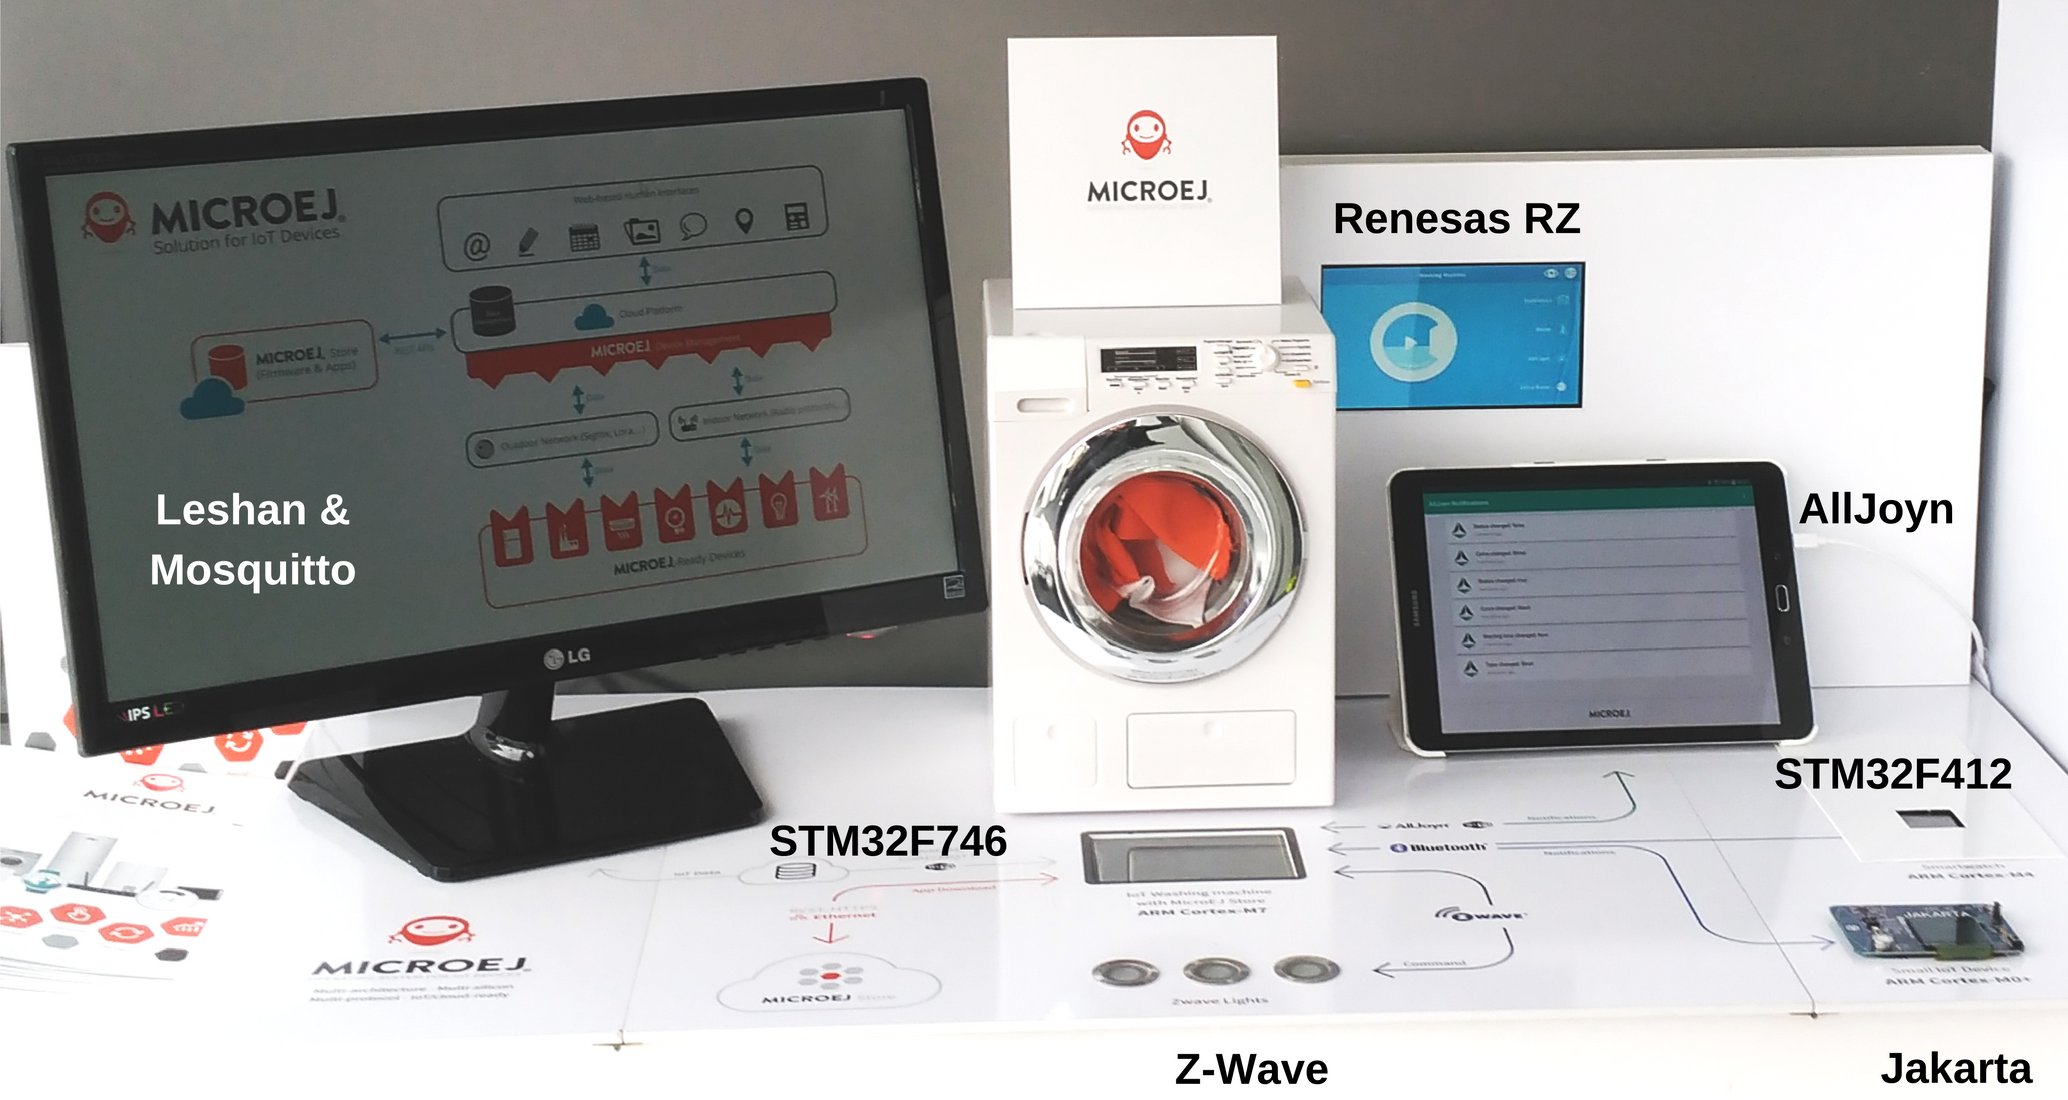
For my latest demo, I worked on a connected washing machine. From the user’s perspective, this washing machine should have an intuitive and appealing graphical user interface (GUI) and be able to send notifications to other mobile or IoT devices. The company manufacturing this device should be able to remotely manage it (installing new software, starting/stopping applications, getting use information…). As always, it should use cheap microelectronic parts. The GUI also needs to be portable for other devices and the IoT software components should be reusable and independent from each other.
Smart Appliance Demo Comes to Life
Hardware Requirements
In order to use a cheap and low-power device, I targeted an ARM Cortex-M7 chip. The STM32F746G-DISCO evaluation board from STMicroelectronics was selected to be at the heart of the system because it meets all my requirements:
- Small
- Low-power
- An LCD and touch display with 2D graphics acceleration
- Arduino port
- USB port
- Ethernet port
- Extra external RAM and storage (SD card) if needed
- Available low-level board support package (BSP) and C toolchain
I also selected a STMicroelectronics STM32F412-DISCO (ARM Cortex-M4) board to simulate a smartwatch and an EBV Jakarta (ARM Cortex-M0+) as a small device capable of receiving notifications over a wireless connection.
The rest of the hardware includes:
- A PC as a server, hosting services that would normally run on the Internet
- A tablet to receive some notifications over a Bluetooth connection
- A Z-Wave switch and dongle to control a light
- An actual washing machine toy to play with its motor
- Other MCU boards for running the same washing machine application on different hardware (Renesas RZ, NXP Tower K65…). Note that a specific AllJoyn thin client is only available for Renesas boards at this time.
Demo Setup
Software Integration and Development
Now that the hardware background was set, I had to select the software bricks to build my washing machine application. Browsing through Eclipse IoT projects gave me the components I needed:
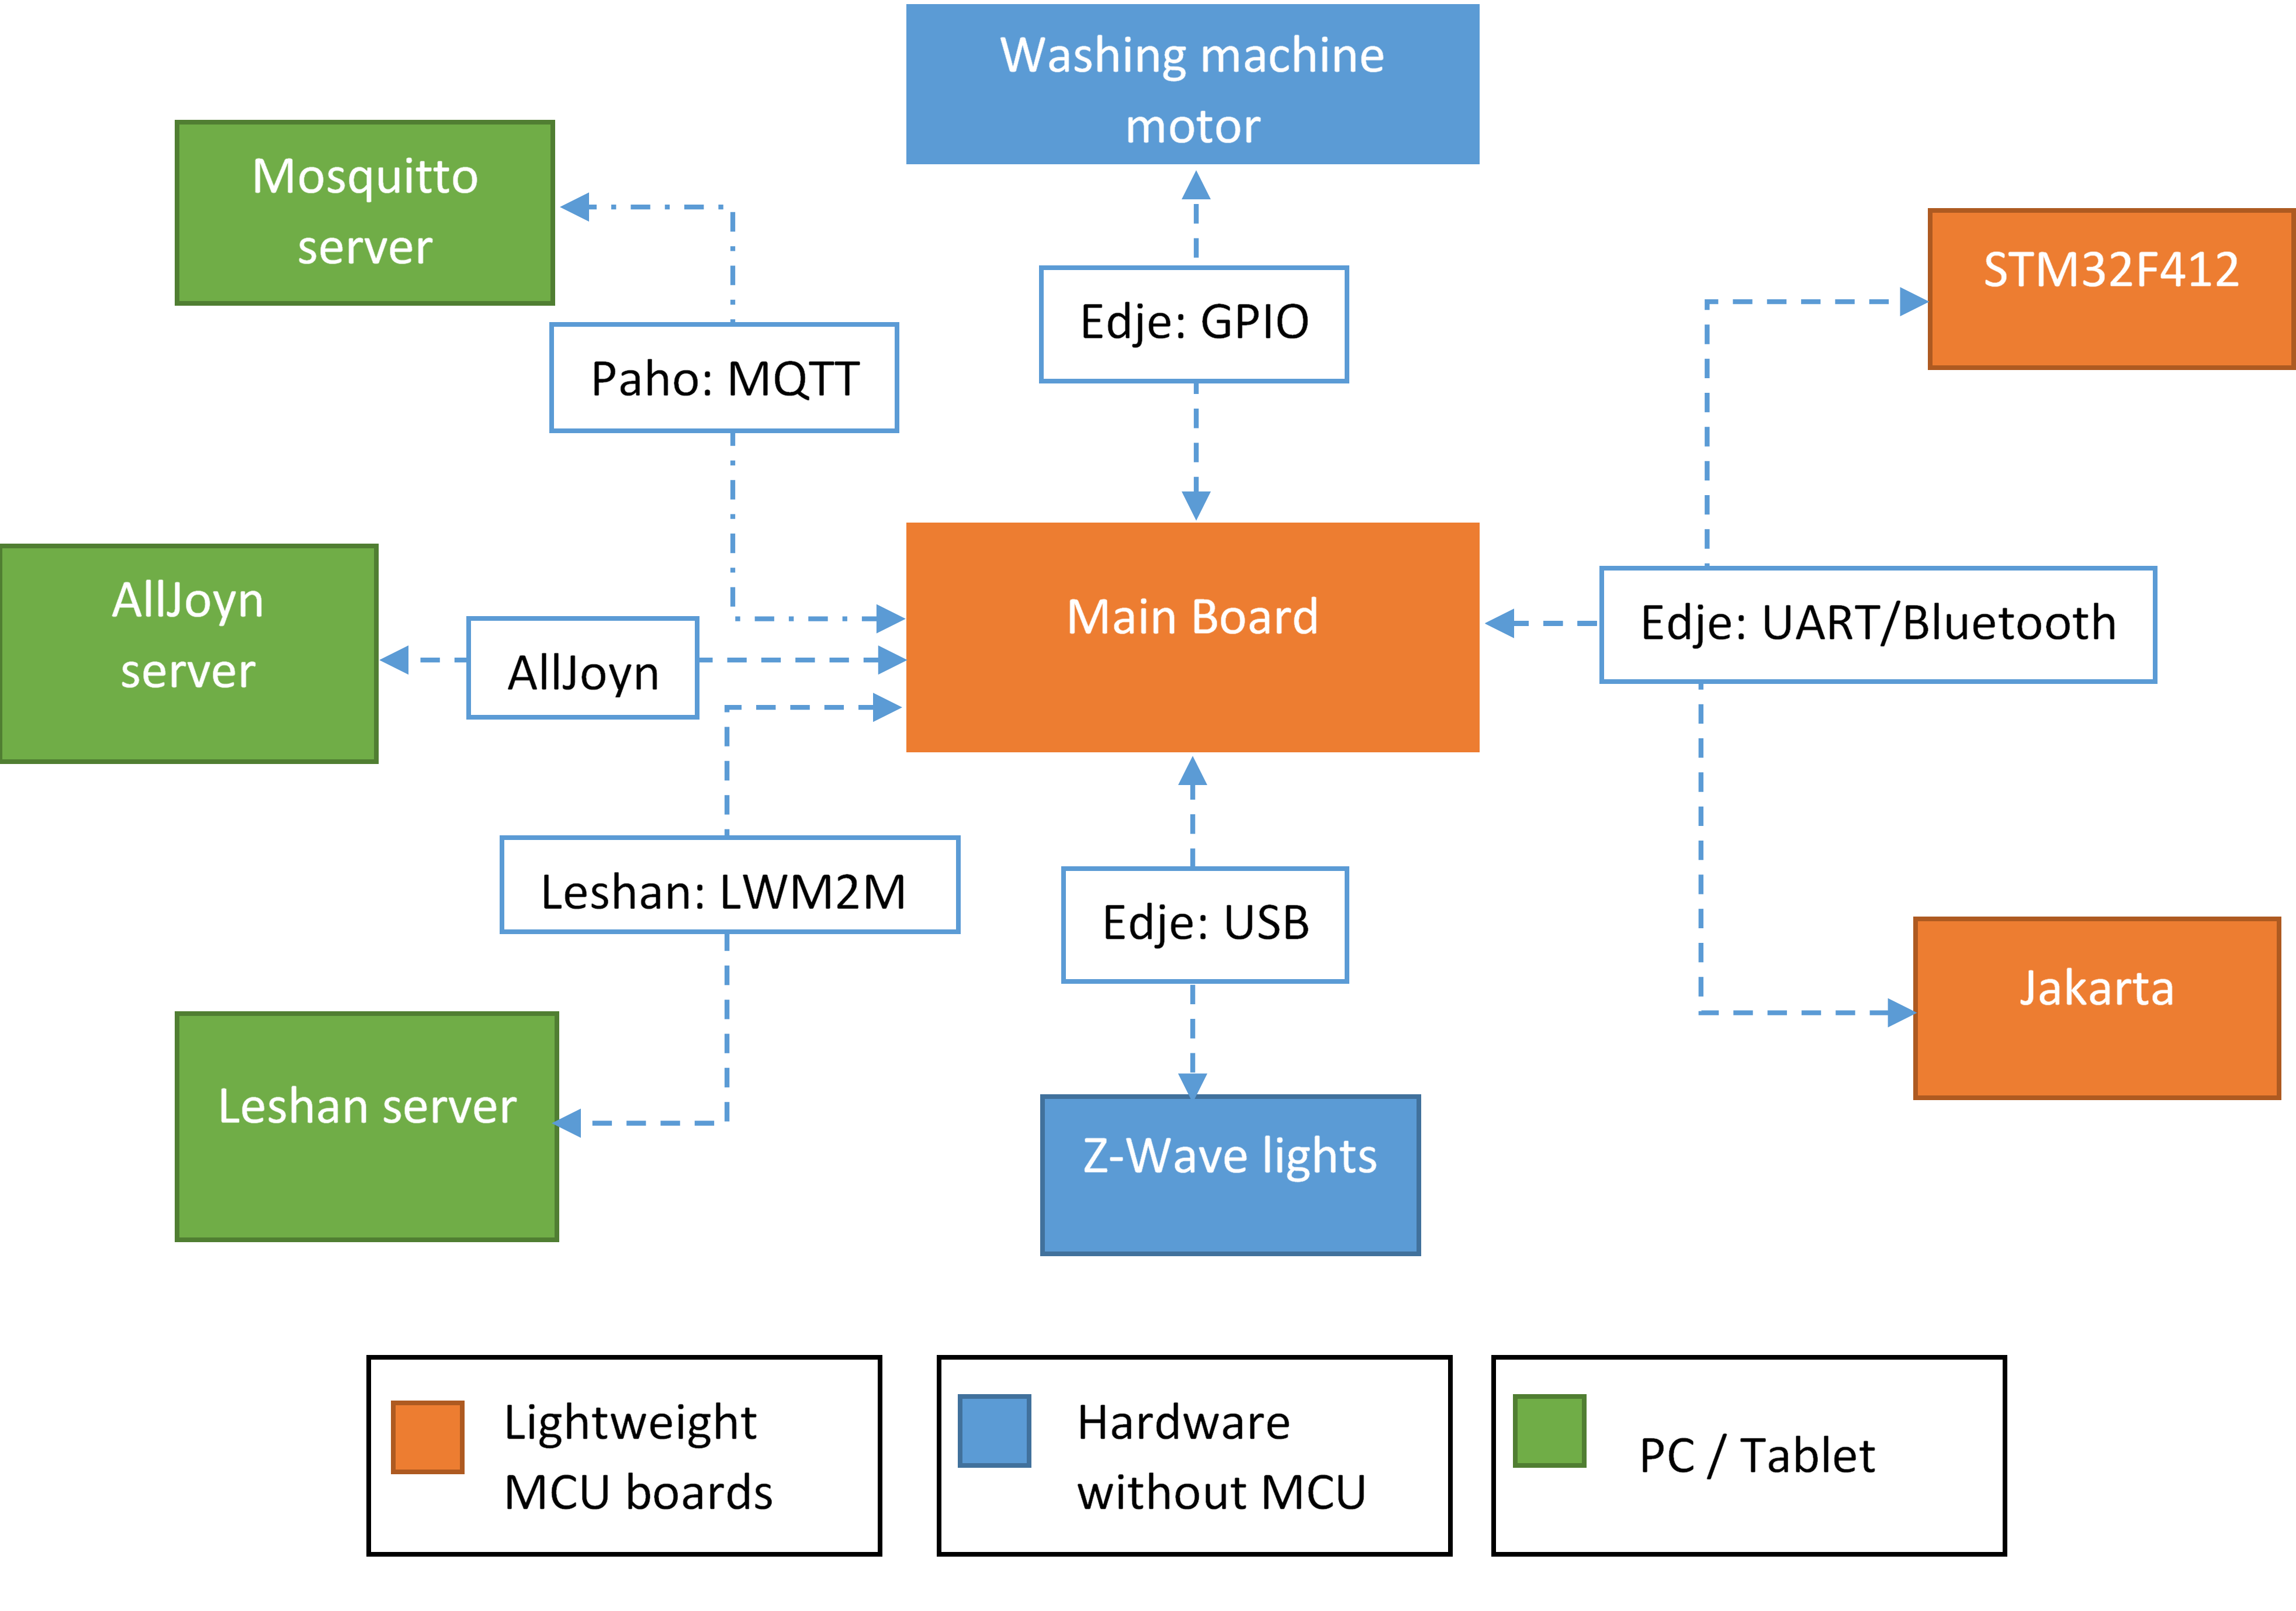
- Paho : An implementation of MQ Telemetry Transport (MQTT) messaging protocol. I used it to send notifications (device state, choice of program…) from the STM32F746 to a server.
- Mosquitto : A server implementation for the MQTT messaging protocol. I used it on a Windows PC to receive the notifications from the washing machine application running on the STM32F746. Leshan : A Lightweight M2M (LWM2M) protocol implementation. It relies on Eclipse’s project Californium (implementing the Constrained Application Protocol: CoAP). I used both a Leshan server on a Windows PC and a Leshan client on the STM32F746. This demonstrates the device management, from the server I could get some information about the board (id, memory used, installed applications), and command it (start/stop applications).
- Edje It defines a standard and portable high-level Java API called Hardware Abstraction Layer (HAL) for accessing hardware features delivered by microcontrollers. I used it in order to manage the motor's general purpose inputs/outputs (GPIO), a Bluetooth dongle through a UART port and a Z-Wave dongle over USB.
I developed my application using the Java language running on MicroEJ OS because:
- All needed Eclipse IoT projects have an implementation in the Java language.
- MicroEJ OS provided me the virtualization I need to get my washing machine to run on different hardware.
- I had a really short deadline and using object oriented programming with Eclipse tools saves a lot of time.
- Thanks to MicroEJ Simulator, I could work on the GUI without losing time to flash the board.
- MicroEJ OS provides most of the libraries I needed.
Demo Overview
Adapting the Eclipse IoT Projects to Embedded Targets
After adapting the Eclipse projects I selected to make them run on the MicroEJ OS runtime, I could integrate them to work together.
With only 340 KB of RAM available for both application needs and the different buffers (display, network), all libraries could not run at the same time as there were too many threads. As most of them were timers and “Executors” (a Java language implementation of a Command design pattern). I could reduce the actual number of threads by using MicroEJ OS service framework.
This framework presents a way to share services using a "Singleton" design pattern for each service. I declare Executors and timers as services. Then I could load the Singletons, instead of creating new threads each time.
// Gets the service loader Singleton.
ServiceLoader serviceLoader = ServiceLoaderFactory.getServiceLoader();
// Load a shared Timer.
Timer timer = serviceLoader.getService(Timer.class);
if(timer!=null){
   timer.schedule(myTask, 0);
}
To keep the GUI reactive and smooth, I played with the thread priorities. Every thread managing the GUI has a higher priority than the background tasks. For instance, the controller uses a low-priority Executor notifying all the registered applications one by one, even though it may add a delay for the notification.
Using the Eclipse Edje Framework to Support Z-Wave over USB
I used a Z-Wave plug paired to a Z-Wave dongle to switch on some lights when the washing machine was running.
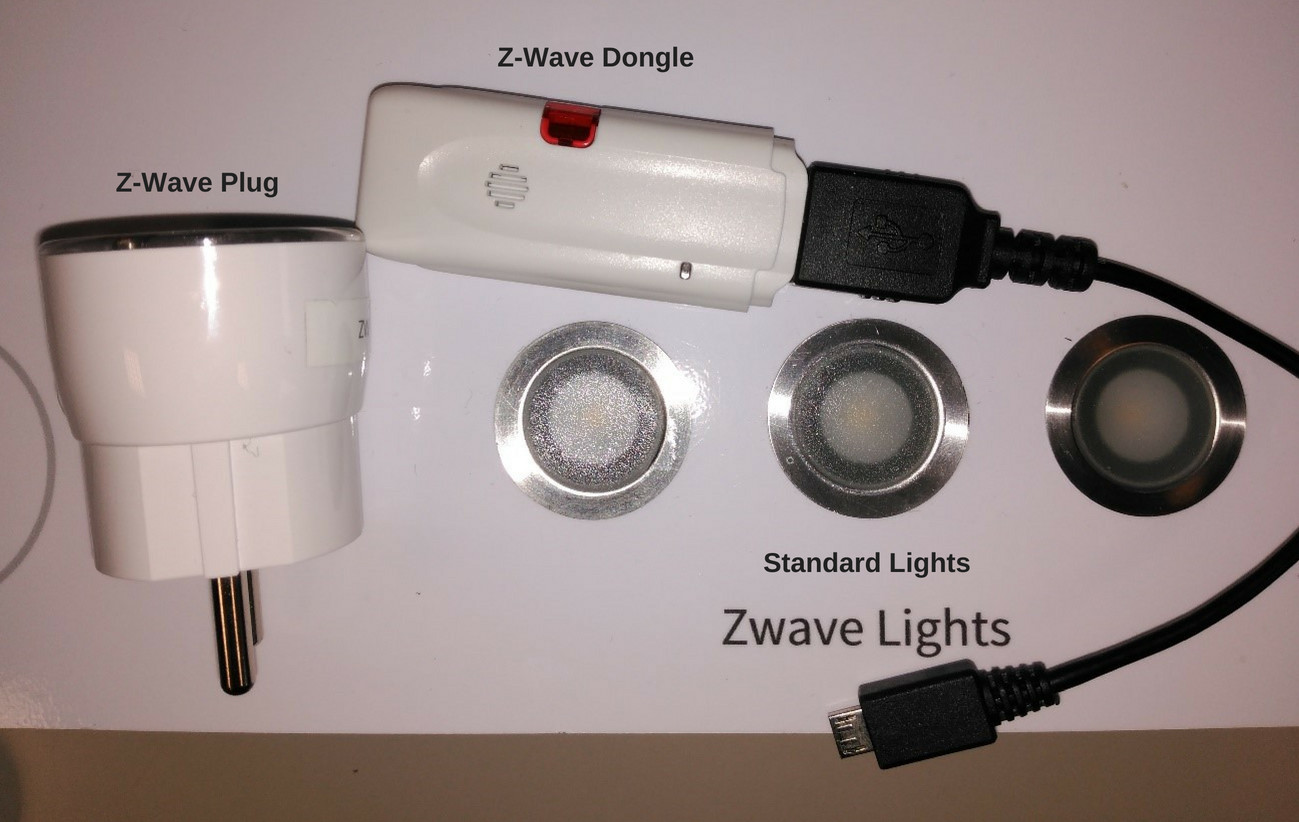
MicroEJ OS provides a driver for using a Z-Wave dongle over USB. When the dongle is plugged to the USB port, the OS populates the peripheral manager with the paired devices. I could then load the Z-Wave switches and switch them on/off.
/**
 * Washing Machine status callback.
 *
 * @param status
 *            true if the washing machine is running.
 */
public void statusChanged(boolean status) {
  // Iterator for the SwitchWithReturnState devices (such as ZWave
  // switches).
  Iterator iterator = PeripheralManager.list(SwitchWithReturnState.class);
  while (iterator.hasNext()) {
    try {
       SwitchWithReturnState switchWithReturnState = iterator.next();
       if (status) {
	switchWithReturnState.on();
       } else {
	switchWithReturnState.off();
       }
    } catch (IOException e) {
       // A communication error with the device occured,
       e.printStackTrace();
    }
  }
Using the Eclipse Edje Framework to Support GPIO
The washing machine commands were tuned to interface with some GPIOs:
| Motor cycle ON on rising edge (idle state HIGH) | OUTPUT |
| Motor cycle OFF on rising edge (idle state HIGH) | OUTPUT |
| Motor State: Low Level = motor off, High Level = motor on | INPUT (open drain) |
| Door State: Low Level = closed door, High Level = opened door | INPUT (pull up) |
Once I connected the Arduino connector to the STM32F746 board and wired it to the motor, I could play with the motor using Edje's GPIO interface.
public class HalNotificationHandler implements WashingMachineListener {
  private static final int DOOR_PIN = 2;
  private static final int MOTOR_ON_PIN = 2;
  private static final int MOTOR_OFF_PIN = 3;

  private Port doorPort;
  private Port motorOnPort;
  private Port motorOffPort;


  public HalNotificationHandler() {
    super();
    // Initialize GPIOs
    doorPort = GPIO.getPort(“DIGITAL_ARDUINO”);
    motorOnPort = GPIO.getPort(“DIGITAL_ARDUINO”);
    motorOffPort = GPIO.getPort(“DIGITAL_ARDUINO”);

    doorPort.setMode(DOOR_PIN, GPIO.Mode.DIGITAL_INPUT_PULLUP);
    motorOnPort.setMode(MOTOR_ON_PIN, GPIO.Mode.DIGITAL_OUTPUT);
    motorOffPort.setMode(MOTOR_OFF_PIN, GPIO.Mode.DIGITAL_OUTPUT);

    motorOnPort.setDigitalValue(MOTOR_ON_PIN, true);
    motorOffPort.setDigitalValue(MOTOR_OFF_PIN, true);
  }

  /**
   * Washing Machine status callback.
   *
   * @param status
   *            true if the washing machine is running.
   */
  public void statusChanged(boolean status) {
    if (status) {
      // If door close
      if (!doorPort.getDigitalValue(DOOR_PIN))) {
        press(motorOnPort, MOTOR_ON_PIN);
      }
    } else {
      press(motorOffPort, MOTOR_OFF_PIN);
    }
  }

   /**
   * Press a button and release it.
   */
  public void press(Port port, int pin) {
    port.setDigitalValue(pin, false);
    sleep();
    port.setDigitalValue(pin, true);
  }

 //
  …
 //
}
Using the Eclipse Edje Framework to Support Bluetooth over UART
I used HC-05 Bluetooth modules (a Bluetooth SPP - Serial Port Protocol - module) to exchange data between the STM32F746, STM32F412 and Jakarta boards. This module provides an UART-like connection over Bluetooth. I could use Edje’s Com connection to drive the modules.
// Parameters for the connection. Com 42 is the virtual port linked by MicroEJ to the PIN CN4 D0 and D1.
final String CONNECTION_STRING = "comm:com42;baudrate=9600;bitsperchar=8;stopbits=1;parity=none";
try{
  String text = notification_value;
  CommConnection comm = (CommConnection)Connector.open(connectionString);
  OutputStream out = comm.openOutputStream();
  out.write(text.getBytes());
} catch(Exception e){
  //
  …
  //
}
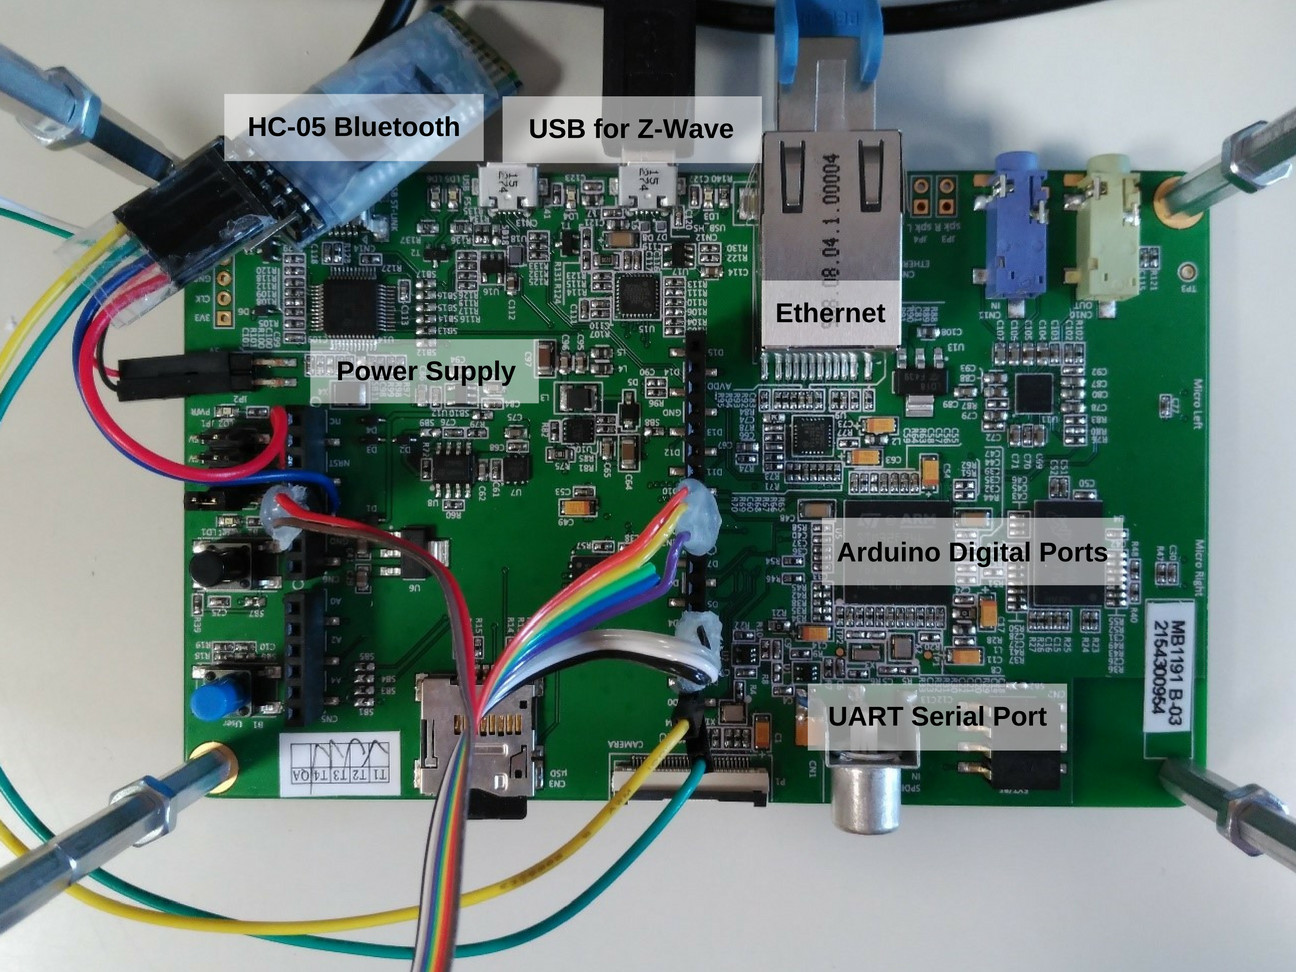
STM32F746 Connectors
Using the Eclipse Paho Framework to Support MQTT
For this demo, I setup a Mosquitto broker on a Windows PC with a fixed IP address. This went flawlessly, I just had to use the Microsoft Windows installer and install its dependencies. Adding MQTT notifications to the board was pretty easy, I just needed to create the client with my broker’s address.
MqttClient client = new MqttClient(BROKER, PUBLISHER_ID);
client.connect();
Then, I created a new message for any of the notifications sent by the washing-machine (e.g. program changed, laundry started, laundry stopped…)
MqttMessage message = new MqttMessage();
String text = notification_value;
message.setPayload(text.getBytes());
client.publish(NOTIFICATION_TOPIC, message);
Using the Eclipse Leshan Framework to Support LWM2M
To demonstrate the use of LWM2M, I designed the notification services as distinct applications that register themselves as shared services.
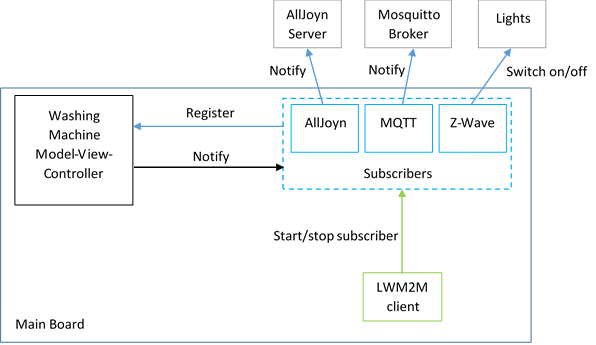
Main Board Software Overview
The LWM2M client connects to the server at a known address. Then the server can request information about the board (id, available memory, current number of threads…). It also asks for the available applications and start or stop them.
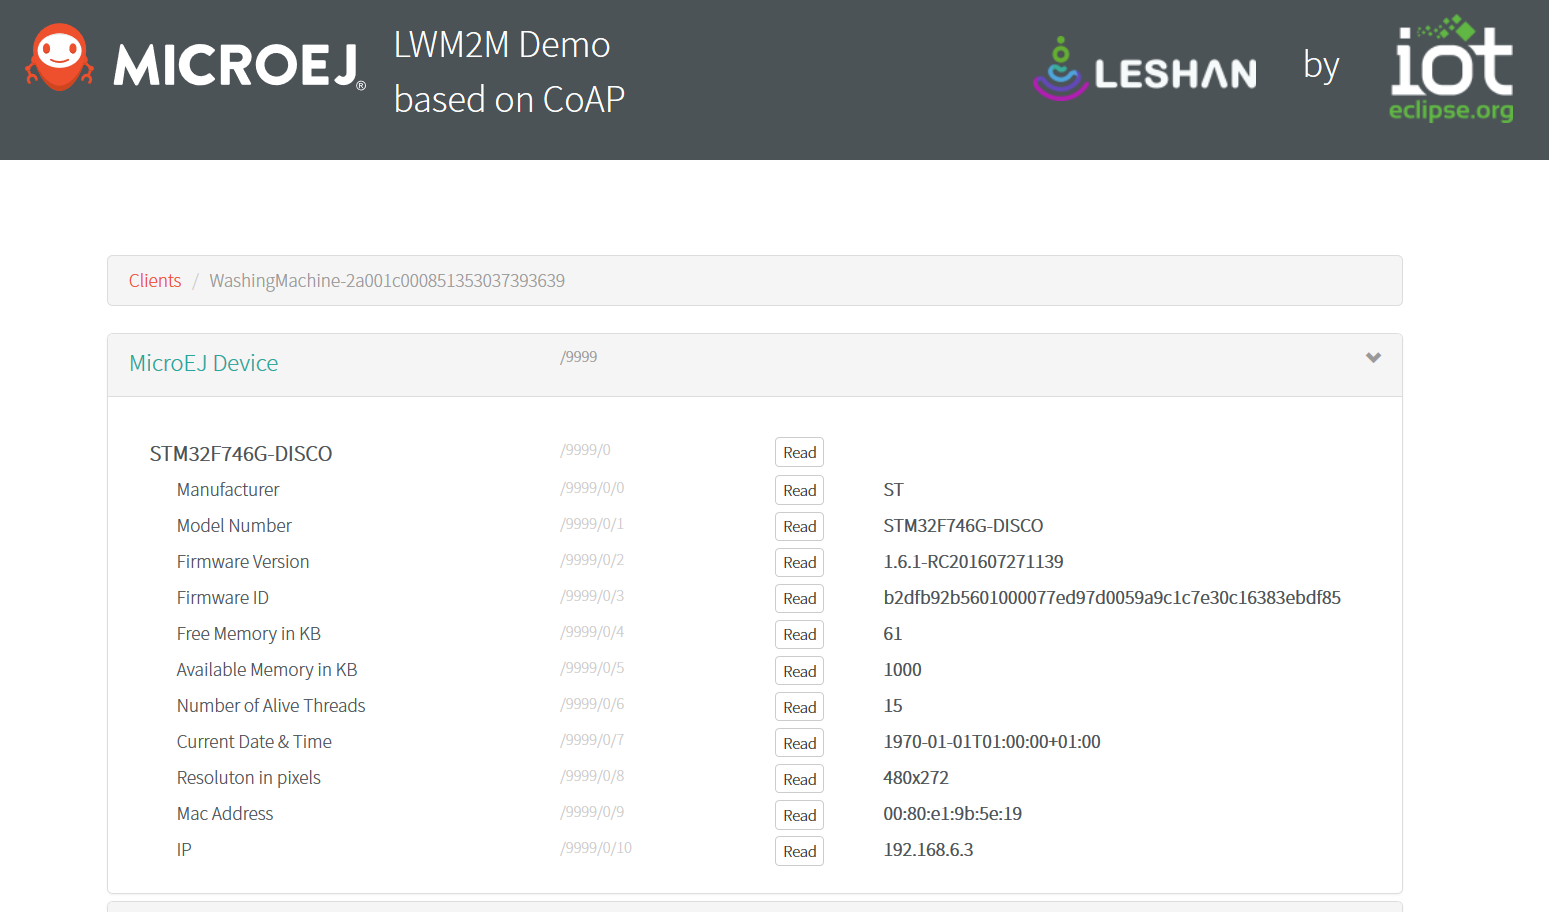
Leshan Server UI
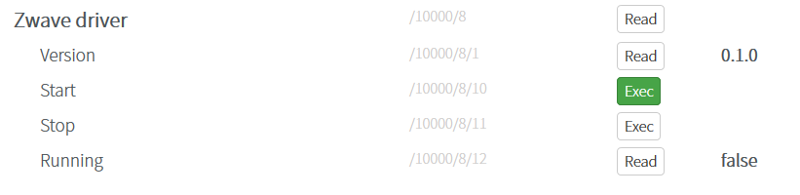
Leshan Server UI Detail
The Demo is Alive!
Thanks to all those Eclipse frameworks, I achieved my goals and managed to get many protocols running on the same MCU, connecting the main board to two servers on a PC (Leshan, Mosquitto), two other MCU boards (Jakarta and STM32F412) and a couple of hardware elements (Z-Wave lights and the actual washing machine toy). And above all I could meet my deadline!
Thanks to MicroEJ, my main washing machine application is small, efficient and maintainable with elegant architecture choices, appealing with different GUI skins, internationalized with multiple languages, and portable so it can be reused on a wide range of hardware platforms.
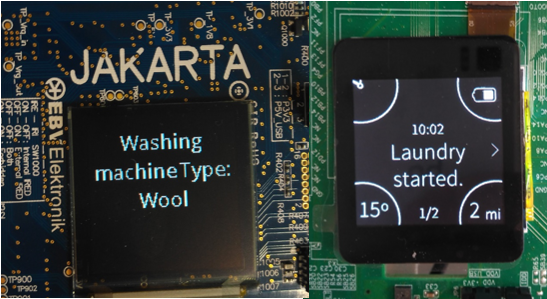
Jakarta and STM32F412 GUI
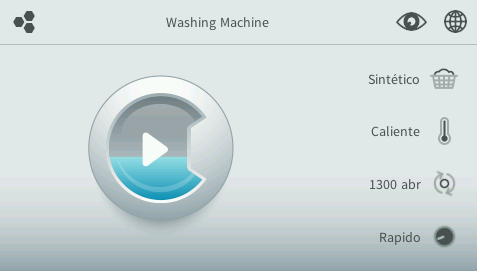
STM32F746 GUI
About the Authors