Hi !
I have updated and partially revised the structure, text and links of the internet pages. You can find the result here: BIRT BIRT | BIRT (chloetz.github.io)
To able to finalize the pages I need the info below. Who is able to procure the info and mail it to me?
@you all
Please edit the text and give me feedback on what you would like to see changed, improved, complemented.
I need your information and image to be mentioned on the About page.
I removed the blog menu as I have no blog entries for the moment. It can be complemented at any time.
@Wayne
Where shall I publish the final pages?
Which Link shall I use as download page? Or what is the github address under which BIRT can be downloaded?
Which link shall I use if somebody wants to subscribe the BIRT mailing list?
Which link shall I give to someone who wants to join in as contributor?
Do I need you approval that the text can be released. Or is there somebody else’s approval that is necessary?
@Wim or some else ?
I need somebody to update the text and hardcopies below and sends the update back to me.
Building BIRT
Introduction
This document describes how to get the BIRT source from CVS and build it under Eclipse. If you simply want to use BIRT, it is easier to simply download an existing build.
Building BIRT 2.1.1 is described below.
Requirements
Download the BIRT all in one designer. It is listed under "Report Designer Full Eclipse Install" on the download page. It is possible to build BIRT with an existing Eclipse install, but this method is the quickest, as all the required files, with the exception of iText.jar and iTextAsian.jar are present.
Configuring Eclipse
The BIRT source code uses some features that are only present in JDK 1.4.2 or later. In order for it to successfully build you need to set your compiler compliance to 1.4. Make sure this is not set to 5.0. You can set this for the entire workbench as follows:
· From the menu, choose Window->Preferences.
· In the tree, expand Java and choose Compiler.
· On Compiler compliance level, select 1.4.
· Unselect Use default compliance settings.
· On Generated .class files compatibility, select 1.4.
· On Source compatibility, select 1.4.
The following illustration shows these settings.
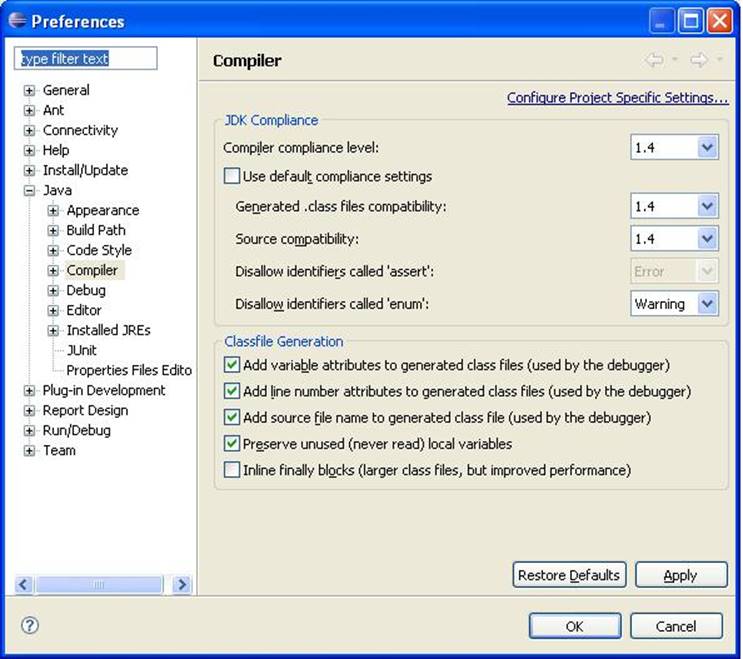
· Choose OK.
Understanding the CVS Structure
The BIRT modules are available in CVS in the source folder under /home/birt. BIRT has over 150 modules, some of these are described below.
Project Folder | Contents |
org.eclipse.birt.chart.device.extension | Extension classes for the device renderer framework for charts |
org.eclipse.birt.chart.engine | Chart model and factory classes |
org.eclipse.birt.chart.engine.extension | Extension classes for the model renderer framework for charts |
org.eclipse.birt.chart.reportitem | Classes for the chart module to interact with the BIRT designer and runtime engine |
org.eclipse.birt.chart.shared | Classes shared between different components of the chart module |
org.eclipse.birt.chart.ui | Chart builder UI classes |
org.eclipse.birt.chart.ui.extension | Extensions for the chart builder UI |
org.eclipse.birt.chart.device.extension | Chart engine extension plugin containing device renderers implementations (Swing, SWT, PNG, GIF, JPG, BMP) |
org.eclipse.birt.chart.device.svg | Chart engine extension plugin containing SVG device renderer's implementation |
org.eclipse.birt.converters | Contains converters that can convert reports from other formats to the BIRT report format |
org.eclipse.birt.core | Provides the framework for loading the plugins at run-time and contains other classes that can be used by any other module |
org.eclipse.birt.data | Provides the data engine implementation and the ODA factory implementation. It also contains classes for applying transformations on the data. |
org.eclipse.birt.data.oda | ODA public interface: the classes and interfaces used to create data extensions. |
org.eclipse.birt.data.oda.adapter.dtp | Adapter for Data Tools project |
org.eclipse.birt.report.data.oda.flatfile | The ODA driver for accessing flat file data sources |
org.eclipse.birt.report.data.oda.flatfile.ui | The user interface for the ODA flat file driver |
org.eclipse.birt.data.oda.jdbc | The ODA driver for accessing JDBC data sources |
org.eclipse.birt.data.oda.jdbc.ui | The user interface for the ODA JDBC driver |
org.eclipse.birt.report.data.oda.sampledb | The ODA driver for accessing the sample Derby data base |
org.eclipse.birt.report.data.oda.sampledb.ui | The user interface for the ODA sample database driver |
org.eclipse.birt.data.oda.xml | The ODA driver for accessing XML data sources |
org.eclipse.birt.data.oda.xml.ui | The user interface for the ODA XML driver |
org.eclipse.birt.report.debug.ui | Used for creating launch configuration when debugging reports that contain Java events |
org.eclipse.birt.report.designer.core | The core classes of the BIRT report designer, including classes that interact with the BIRT model, and localization and other utility classes |
org.eclipse.birt.report.designer.lib | The classes used for library manipulation |
org.eclipse.birt.report.designer.lib.explorer | Handles browsing and exploring library contents |
org.eclipse.birt.report.designer.ui | The BIRT report designer |
org.eclipse.birt.report.designer.ui.rcp | The BIRT RCP report designer |
org.eclipse.birt.report.engine | The BIRT reporting engine that generates the report from a report design |
org.eclipse.birt.report.engine.emitter.fo | The emitter for generating report output using FO |
org.eclipse.birt.report.engine.emitter.html | The emitter that generates report output in HTML |
org.eclipse.birt.report.engine.emitter.pdf | The emitter that generates report output in PDF |
org.eclipse.birt.report.model | The BIRT report model |
org.eclipse.birt.report.viewer | The BIRT report viewer (BIRT web app) |
org.eclipse.birt-feature | The BIRT feature |
Checking out Code from CVS
Configure the Repository Under Eclipse
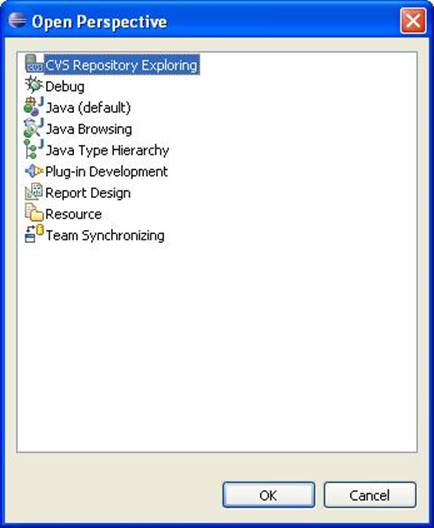
· To open the CVS Repository Exploring perspective, choose Window -> Open Perspective -> Other. In Select Perspective, select CVS Repository Exploring and choose OK.
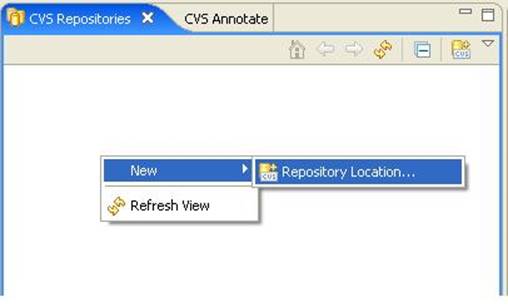
· Right-click on the CVS repositories window. From the context menu, choose New -> Repository Location.
· On Add CVS Repository, set the following values:
Host | dev.eclipse.org |
Repository path | /cvsroot/birt |
User | anonymous |
Connection type | pserver |
Use Default Port | Selected |
· 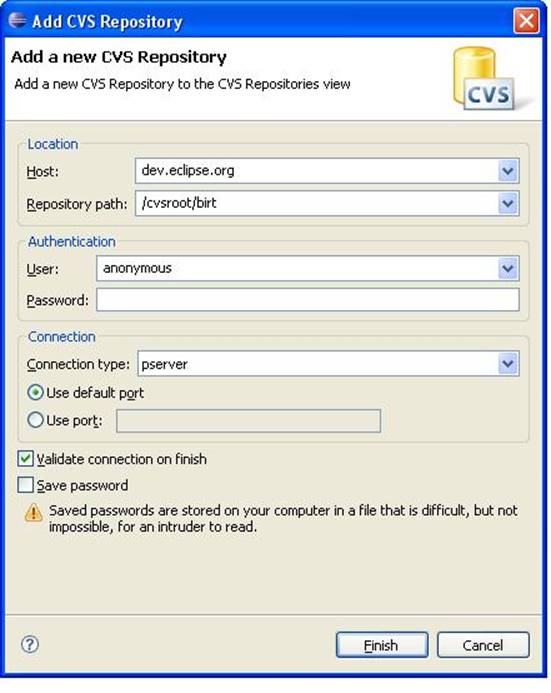
· Choose Finish
A new node appears in the CVS Repositories window.
Check Out Code for the First Time
· Expand the new node in the repositories tree.
· Select Versions
· Select source
· Open the source BIRT_2_1_1_Release_20060927 node
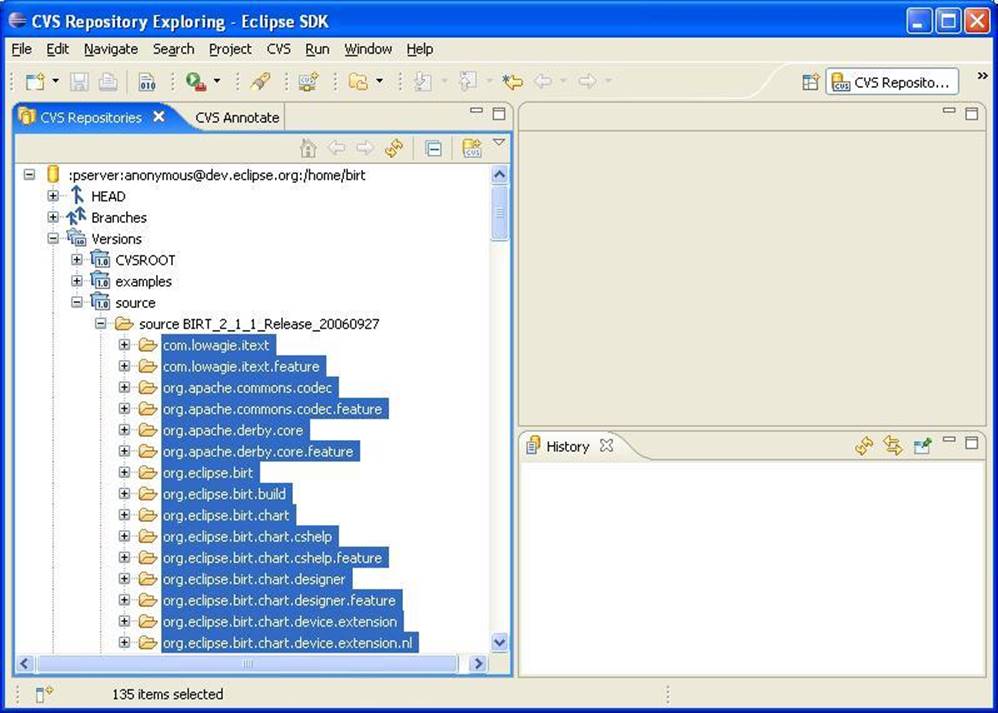
· Select all the nodes under this node, with the exception of the these projects:
org.eclipse.birt.report.data.oda.flatfile
org.eclipse.birt.report.data.oda.flatfile.nl
org.eclipse.birt.report.data.oda.flatfile.ui
org.eclipse.birt.report.data.oda.flatfile.ui.nl
org.eclipse.birt.report.tests.engine
org.eclipse.birt.report.tests.model
org.eclipse.birt.report.tests.viewer
org.eclipse.birt.test.performance
org.eclipse.birt.tests.core
org.eclipse.birt.tests.data
· On CVS Repositories, right-click and choose Check Out from the context menu.
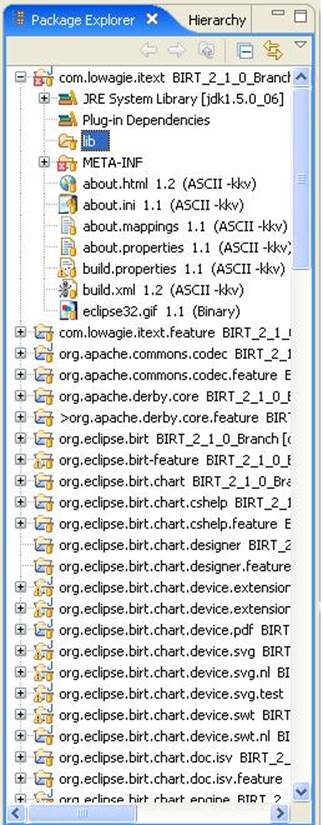
This will get the BIRT projects from CVS and load them into your Eclipse workspace folder. This will take some time. Once finished, change to the Java perspective.
Import Additional Files
Import iText 1.3 and iTextAsian into the com.lowagie.itext/lib directory.
If your Eclipse environment is not setup to build automatically, build the source now. This designer should build correctly. If you wish to build the Web Viewer proceed to the next section. Do this if you wish to make changes to the deployable Web Viewer Example.
Preparing the Viewer
The viewer project contains an ant build script that builds the Web Viewer. When executed it will create a birt_web directory in the root of the viewer project. This directory can then be exported and deployed in a similar fasion to the Web Viewer example in the Report Engine download. To use this script, perform the following steps.
· Copy the following plugins from the all in one download to the source directory of the workspace you are currently using to build BIRT.
org.apache.batik.pdf_1.6.0.v20060623-1511
org.apache.batik_1.6.0.v20060623-1511
org.apache.xerces_2.8.0.v20060815-0630
When copying these plugins rename them to the following:
org.apache.batik.pdf
org.apache.batik
org.apache.xerces
eg. If you have checked the projects out to c:/work/birt2.1.1/source and your all in one distribution is located under c:/birt2.1.1, copy the three plugins from c:/birt2.1.1/eclipse/plugins to c:/work/birt2.1.1/source and rename them as stated above.
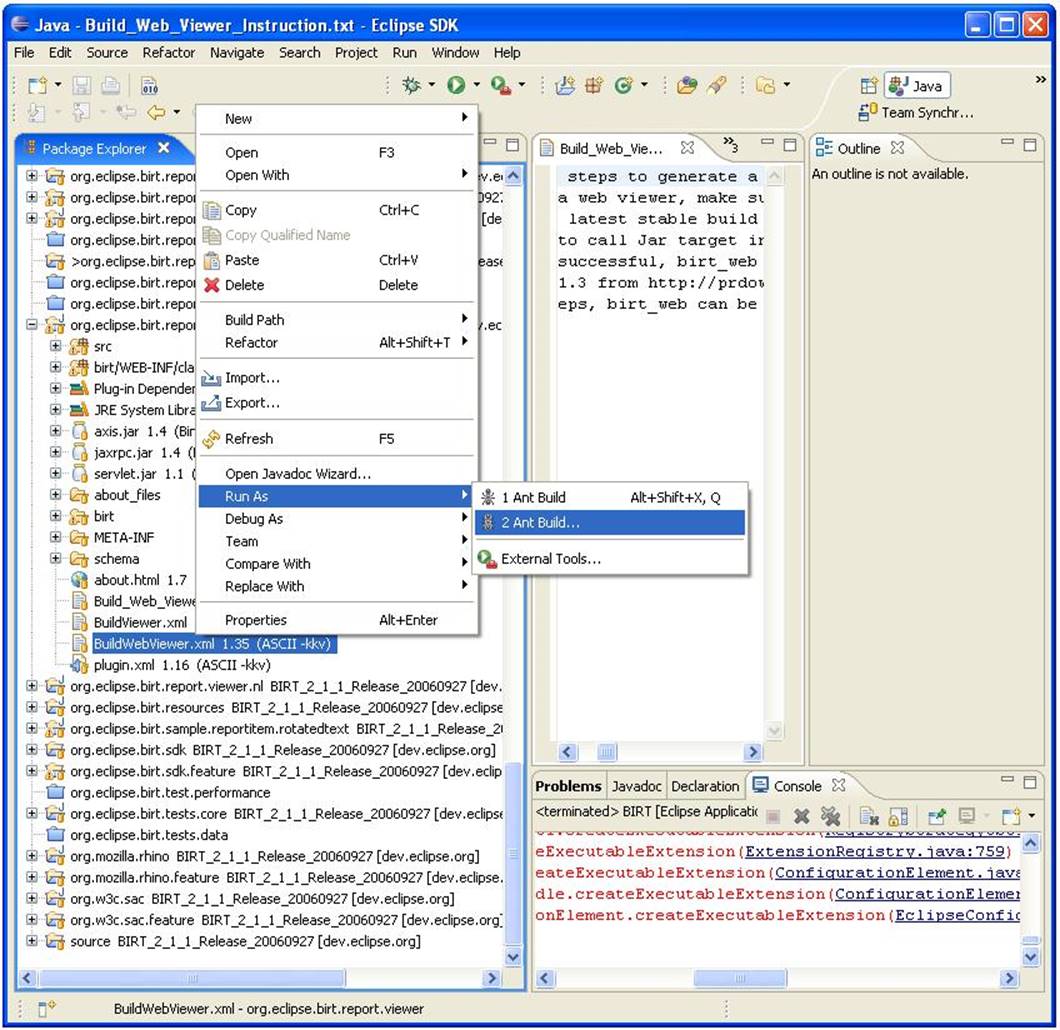
· In Package Explorer, expand the org.eclipse.birt.report.viewer project.
· Right-click the BuildWebViewer.xml file. From the context menu, choose Run -> Ant Build....
· In the org.eclipse.birt.report.viewer BuildViewer.xml, select the Properties tab. Unselect Use global properties specified in the Ant runtime preferences as shown in the following illustration. Add the eclipse.home property and set it to your all in one Eclipse install directory.
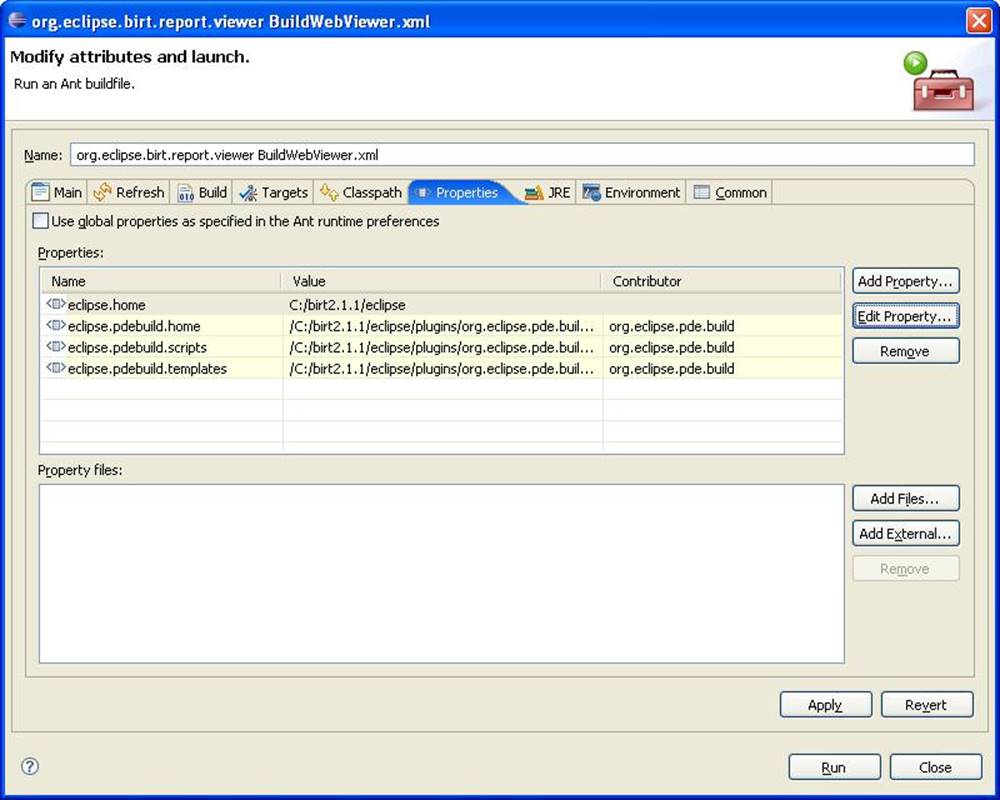
· Choose Run. The ant build of the Web Viewer runs in the console. This will create the birt_web directory within the project that contains the Web Viewer. Refresh the viewer project and the birt_web directory will be displayed.
Running BIRT
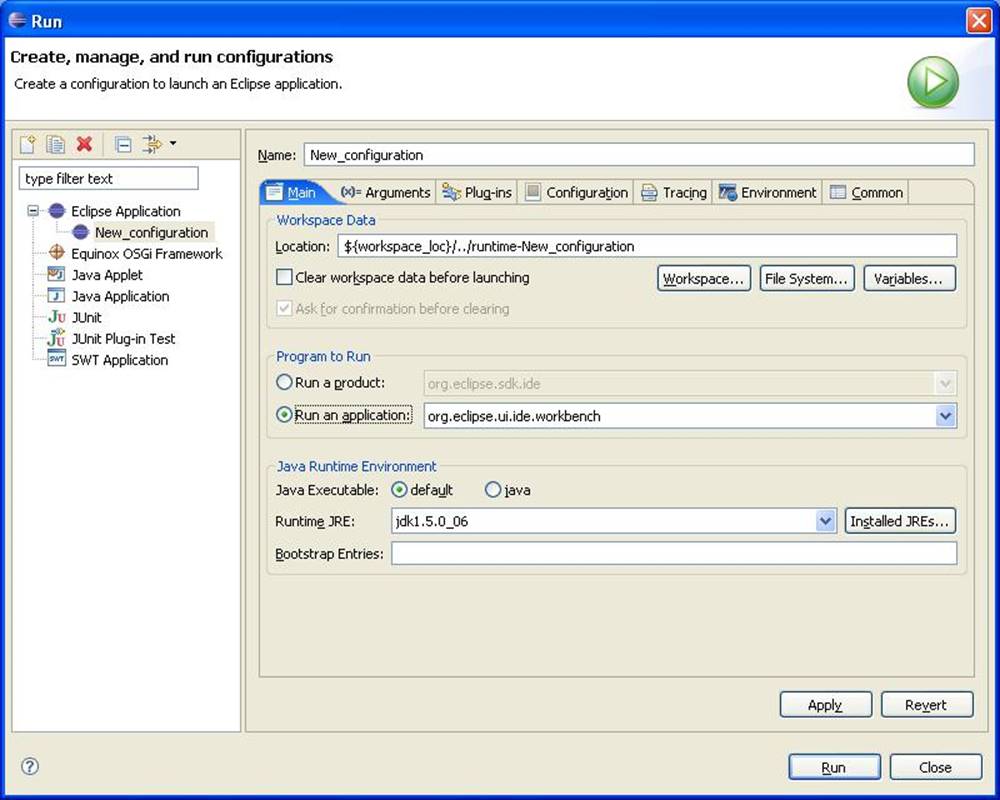
Start BIRT by running it as an Eclipse Application. This can be done as follows:
· Select Run... from the Run menu on the menu bar
· Select Eclipse Applicaiton from the list on the left and click on the New button as shown in the following illustration:
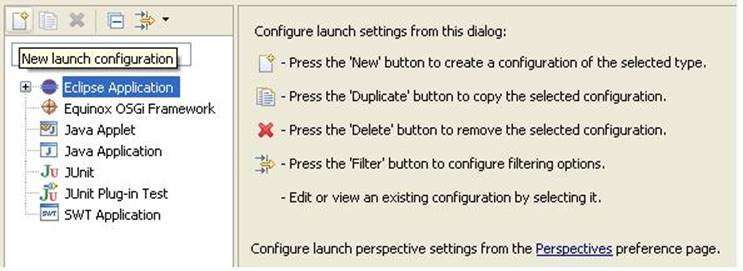
· Click the Run button to launch the Eclipse Application. In the new Eclipse application start a new BIRT project and build reports as usual. You should be able to step through and debug the BIRT code.
Instructions for Running JUnit Tests
· Open debug perspective
· click on Run --> Run --> Double click on JUnit Plug-in Test , this will create a new configuration. In the window, you can select among different options.
To run all tests in a selected project, click on the option 'Run all tests in selected project,package or source folder'. On the right side, select the package to run tests for by clicking on Search and selecting a required source folder.
In this example, we will run tests in org.eclipse.birt.report.engine project. So lets name this configuration as ReportEngineTests in the 'Name:' box on the top of the configuration window. And then click 'Apply' to save the changes.
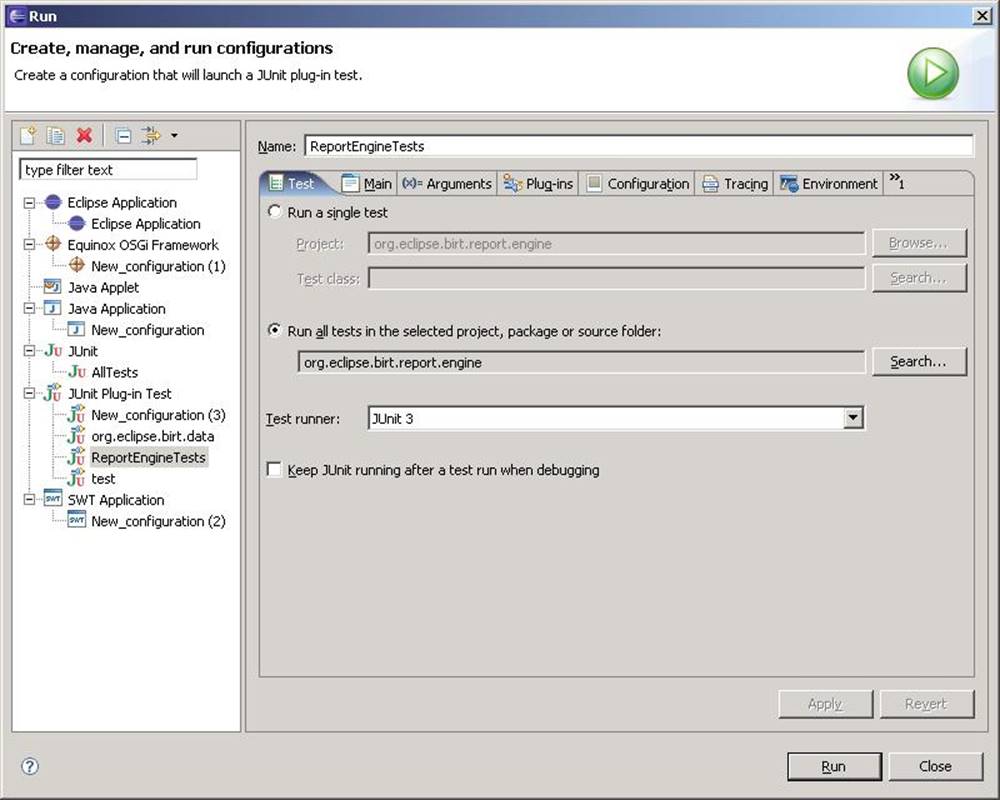
To run the test, in the ReportEngineTests window, click on 'Run'. This will run all tests in org.eclipse.birt.report.engine.

If you want to see the progress of the tests, look at the JUnit window.
The results for birt2_1_1_Release_20060927 should be 613 tests ran, with 2 failures and no errors.
Sample Database
Install
The sample database is available in two forms:
· Apache Derby database, which is included in the BIRT download
· Scripts to load a MySQL database (Instructions below)
The scripts to load a MySQL database are contained in the sample database zip file. This zip also has documentation and logos for the sample database.
MySQL Version
To install the MySQL version of the sample database, you must have MySQL installed. See mysql.com for instructions.
Install the MySQL JDBC driver into BIRT:
· Download and unzip MySQL Connector/J 3.1 JDBC driver located at:
http://dev.mysql.com/downloads/
· Install the JDBC driver using the instructions on the install page. Enter the following for the URL template:
jdbc:mysql://[host][,failoverhost...][:port]/[database]...
You are now ready to create the Classic Models database:
· Download the zip file containing the MySQL database scripts.
· Expand the zip file into a convenient location.
· Expanding the zip file created the ClassicModels/mysql directory with some MySQL scripts. From the command line, move to the this directory:
% cd /ClassicModels/mysql
· Start the mysql utility, giving the name (and password, if needed) of a user permission to create databases. For example, to use the default root user:
% mysql --user=root
· Create the ClassicModels database and load the schema. (Loading the schema the schema the first time will give error messages as it attemps to empty any existing tables, just ignore these.)
mysql> create database ClassicModels;
mysql> use ClassicModels;
mysql> source create_classicmodels.sql;
· Load the table contents:
mysql> source load_classicmodels.sql;
· Exit from mysql:
mysql> quit;
Localized Version of the Sample Database
Following is the Derby Database localized into French, German, Spanish, Japanese, Korean, and Simplified Chinese.
· Localized Derby Sample Database
Usage
You can now use the sample database within BIRT to create reports. The key information you need to get started is how to create a data source for the database. The details vary depending on the database system you selected.
Apache Derby
The Apache Derby version of the database is included in the BIRT download as a built-in data source. To access it, simply select the "Classic Models Inc. Sample Database" entry in the new data source dialog.
MySQL
Data source properties for the MySQL sample database:
Driver Class: | com.mysql.jdbc.Driver |
URL: | jdbc:mysql://localhost/classicmodels |
User Name: | root |
Password: | |
Christophe Loetz
--------------------------------------------------------------------------------------------------
Compex Systemhaus GmbH, Hebelstraße 22, D-69115 Heidelberg
Telefon: +49 (6221) 53 81-138
Mobil: +49 (173) 315 36 00
www.compex-commerce.com
Sitz / Siège Social / Registered Office: Heidelberg
Geschäftsführer / Gérant / General Manager: Christophe Loetz
Registergericht / Numéro de Registre / Commercial Register: Mannheim HRB 334033
Diese E-Mail bzw. die Anlagen enthalten vertrauliche oder rechtlich geschützte Informationen. Wenn Sie nicht der rechtmäßige Empfänger sind oder diese E-Mail irrtümlich erhalten haben, informieren Sie bitte sofort den Absender und vernichten diese E-Mail bzw. die Anlagen unverzüglich. Sie dürfen den Inhalt dieser e-Mail bzw. die Anlagen weder kopieren, verbreiten noch benutzen.
Ce courriel et les éventuelles pièces jointes contiennent des informations confidentielles ou protégées juridiquement. Si vous n’êtes pas la personne spécifiée ou que vous avez reçu ce courriel par erreur, nous vous remercions d’en informer l’expéditeur tout de suite et de détruire ce courriel et les éventuelles pièces jointes immédiatement. La copie, la divulgation ou l’utilisation du contenu de ce courriel et des éventuelles pièces jointes sont interdites.
This e-mail and its attachments may contain confidential or privileged information. If you are not the intended recipient or have received this e-mail or its attachments in error, please inform the sender immediately and destroy this e-mail and its attachments at once. You are not authorized to copy, disclose or use the content of this e-mail or its attachments.