Regression testing with RCP Testing Tool
This article demonstrates how to create UI tests with RCP Testing Tool. Existing Eclipse bugs from Eclipse bugzilla were used as scenarios for test cases.
What is RCP Testing Tool?
RCP Testing Tool (RCPTT) is an open-source Eclipse project for UI testing of Eclipse-based applications. It does not test web, Swing or JavaFX. It works only with Eclipse applications, but does it in the best possible way. The focus on a single platform allows our development team to build the solution that dramatically increases productivity of test case design and reliability of test results. It is easy to demonstrate and I will do this below.
Here is a very short list of what I consider the strongest points of RCPTT:
- State control. RCPTT uses declarative contexts to represent a state of Eclipse application, required by a test case. There are various kinds of contexts for describing different aspects of an application state – workspace, workbench, preferences, launch configurations, etc. So, if a test case is intended to test an editor, it just describes the required state (i.e. there should be a project in workspace and some file should be opened in an editor) using contexts. Think about contexts as reusable pieces of application state description – once a state is captured, any number of test cases can reuse it. This feature significantly speeds up test case development and isolates test cases from each other – test cases can be executed in any order, and test case failures don't affect other tests.
- Recording. By any means it gives a huge productivity boost, which is hard to overestimate. There are few cases when recorded script can not be replayed as is (for instance when you need to provide some unique name), but even in these cases recording gives an excellent starting point for further modifications.
- Smart runtime. During test case execution, RCPTT runtime automatically tracks all asynchronous operations inside an application and waits for its completion. Hence, if UI action triggers some operation which should be waited for, the next action won't start until background operation completes. This eleminates, in particular, the necessity to put manual waitings or operation retry logic.
- Flexible DSL. ECL is the scripting language used for test cases. It easy to read and understand and you don't need to be a programmer to do this. At the same time ECL is a programming language. Complicated business logic, extension with user-defined commands? No problem.
In this article, I'm going to illustrate the process of test case design. I took few real Eclipse UI bugs from Eclipse Bugzilla and created test cases for them.
Preparing test development environment
This is straightforward process and takes less than 10 minutes:
- Download, unpack, and launch RCPTT.
- In a context menu of 'Test Explorer' view select 'New → RCP Testing Tool Project'.
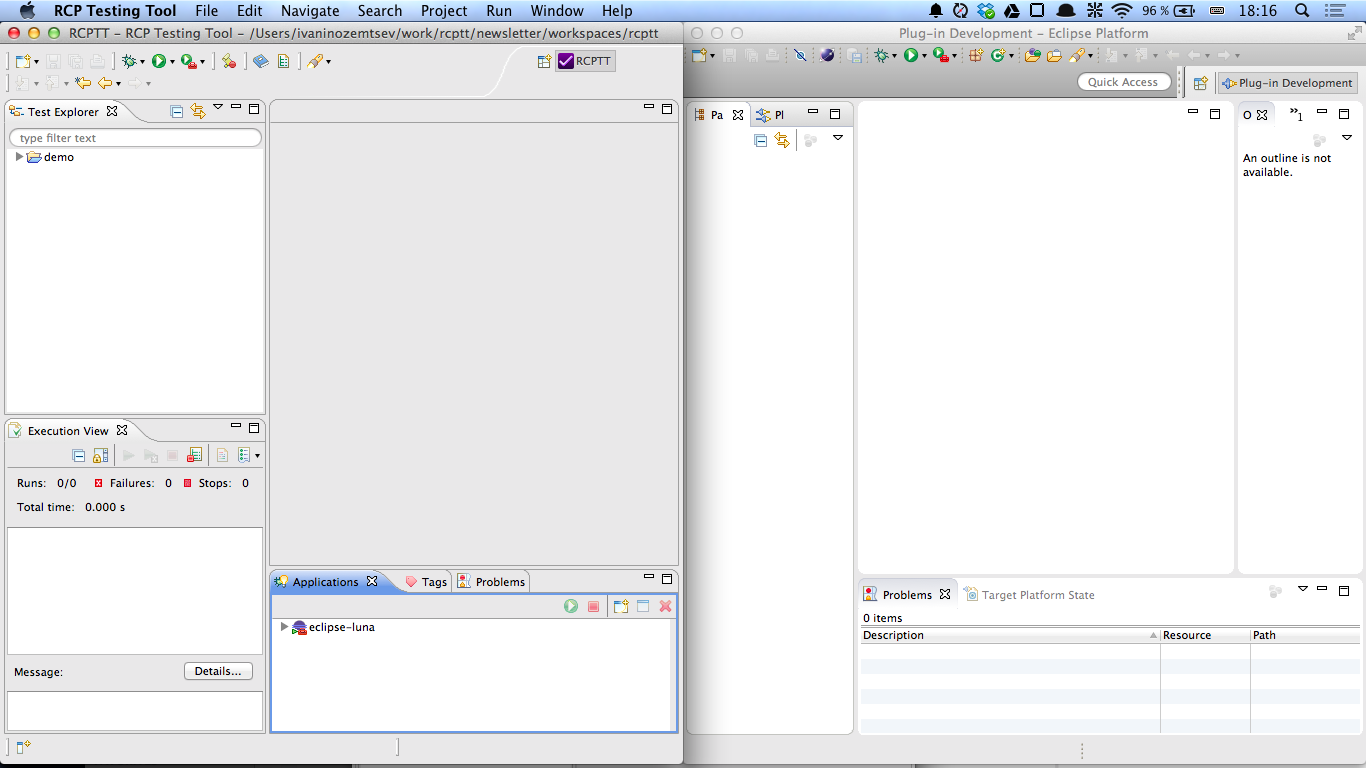
- In a context menu of 'Applications' view select 'New…' and browse for an application-under-test (I'm going to use Eclipse Luna).
- Once you add an application-under-test, double-click it in 'Applications' view to launch.
The final setup should look like this:
That's it. Now you are ready to go. The general workflow for test case design looks like this:
- Describe an initial state using contexts.
- Create a test case with required context references.
- Record actions and assertions.
- Modify recorded script if necessary.
Now, let's design our first test case.
Eclipse bugzilla #318826: Comparing identical files opens editor instead of showing dialog
That is pretty old and not really annoying bug. You can easily reproduce it manually – just select two files with the same content and compare them with each other:
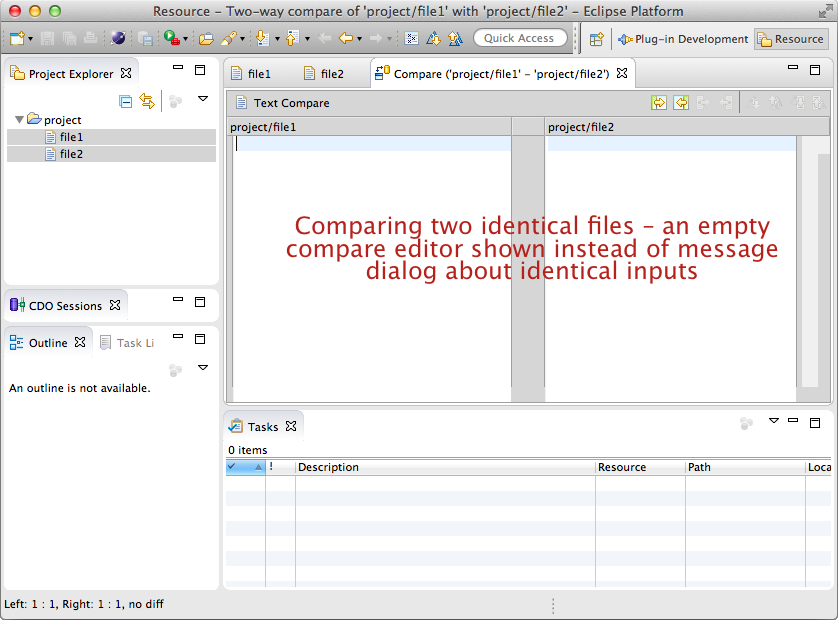
However how difficult is it to create an automated UI test for this, and how much time would it take? For me it took just 3 minutes and 15 seconds, because I was talking over the phone at the same time =). The process in details:
Describing initial state
For initial state of test, assume the following:
- There is a resource project in workspace, named
project, with foldersfolder1andfolder2. Each folder contains an empty filefile.txt. - Project Explorer view is open.
To describe this state, we need to create workspace context with required project, and workbench context with required view.
You can do the following to create a required workspace context:
- Right-click project, select 'New → Context' select Workspace context type, name it like "workspace for comparison" and click 'Finish'. Empty workspace context is created and opened in the editor.
- Go to application-under-test and bring your workspace into desired state manually (i.e. create project, folders and files).
- Go back to RCPTT IDE and click 'Capture' button in context editor – all projects from the workspace will be copied from an application-under-test into a context.
The resulting workspace context editor should look like this:
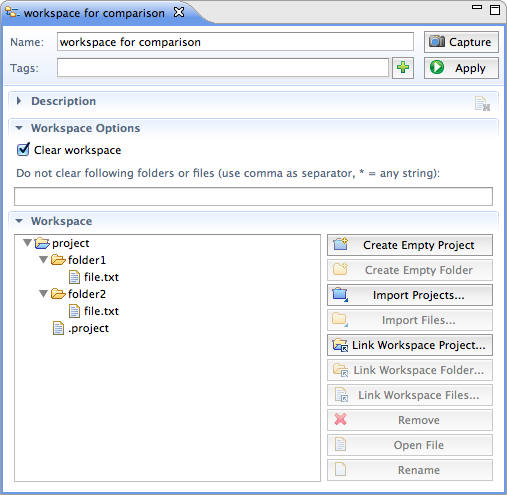
Now this workspace context contains a copy of a project from application-under-test workspace. When this context is applied, it automatically replaces existing projects from a workspace with it's contents. Test case does not care about the previous state of a workspace – context guarantees that it will match test's expectations.
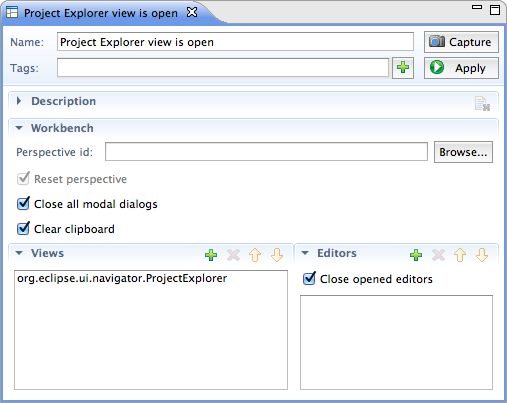
Let's create a workbench context. The process of context creation is the same as above, but this time you should select Workbench context type and name it like "Project Explorer view is open". You can capture it from AUT, so it would automatically remember selected perspective, open views and open editors. However, for a current test case you don't care about perspective and editors – you just want to ensure that Project Explorer view is open. You can just click a Plus icon in Views section and add project explorer view. Your Workbench context should look like the following:
Recording a test case
Right-click a project in Test Explorer to create a test case, select 'New → Test Case', set test case name as "318826 Comparing identical resources" and click 'Finish'. Your new test case will be automatically opened in the editor. Add contexts to a test case in 'Contexts' section of an editor and hit 'Record' button. RCPTT IDE will minimize itself, open Control Panel, activate AUT, apply contexts and start recording your actions.
Now you can do the the following actions (control panel will be updated with recorded script immediately):
- Select
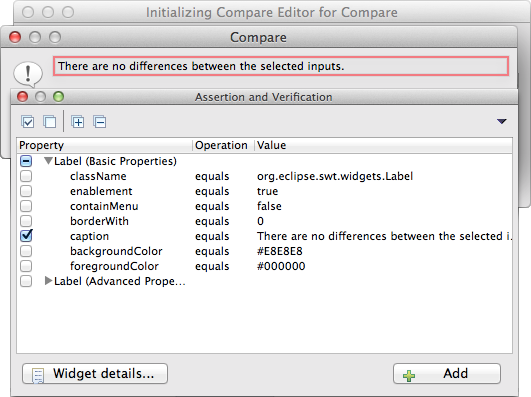
folder1andfolder2in Project explorer, right-click and hit 'Compare → With each other'. - Switch to assertion
mode as soon as the message dialog appear. Click the label
'There are no differences between selected inputs', and specify
that you want to assert it's caption:
>
- Switch back to recording mode and close the message dialog.
- Select
folder1/fileandfolder2/filein project explorer and compare them with each other again. - Simply close an empty compare editor.
Recording is done. Go back to Control panel, stop recording, save a test case and click Home icon on toolbar to go back to RCPTT IDE.
Now your test case editor should look like this:
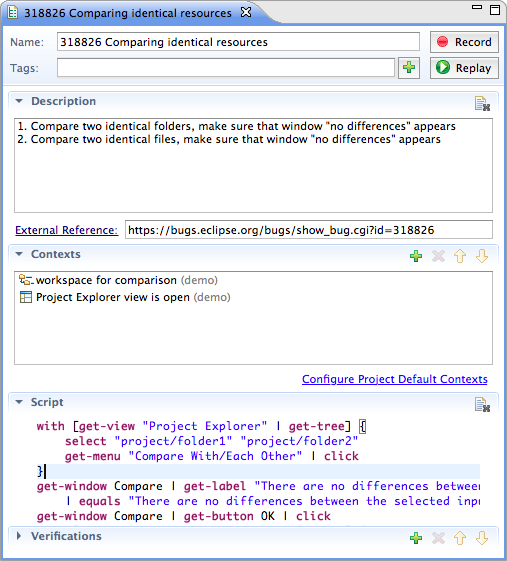
In addition (if you want) you can provide some test case description and specify a link to external resource (i.e. bug tracker).
You can replay this test case right from the editor. It will be executed successfully, however that's not what you really want – right now test case verifies wrong behavior, caused by a bug in an application. The test case should pass only after the bug will be fixed. Before describing a way to make this test case failing, let's quickly go through recorded script:
with [get-view "Package Explorer" | get-tree] {
    select "project/folder1" "project/folder2"
    get-menu "Compare With/Each Other" | click
}
get-window Compare | get-label "There are no differences between the selected inputs." | get-property caption
    | equals "There are no differences between the selected inputs." | verify-true
get-window Compare | get-button OK | click
with [get-view "Package Explorer" | get-tree] {
    select "project/folder1/file.txt" "project/folder2/file.txt"
    get-menu "Compare With/Each Other" | click
}
get-editor "Compare ('project/folder1/file.txt' - 'project/folder2/file.txt')" | close
The scripting language (ECL) is inspired by TCL and Powershell
– it consists of commands with arguments, connected by pipes
and an output of the left command can be passed as an input to the
right command. Square brackets (
[]
) are used to pass an output of a command as an argument to
another command. Curly brackets (
{}
) are used to pass a script as an argument. It allows command to
execute this script in some context.
Here the script begins with
with
command. This command takes two arguments – object and
script. This command executes the script, while passing given
object as an input to each command in the script. The first four
lines can be interpreted as this:
- Take a Project Explorer view (
get-view "Project
          Explorer"
). - Find a tree in this view (
get-tree). - With this tree, perform the following actions:
- Select two elements, denoted by paths (
select
              "project/folder1"...
). - Click 'Compare With → Each Other' in context menu.
- Select two elements, denoted by paths (
Next line,
get-window Compare | get-label ...
, was recorded from an assertion mode. The general pattern here
looks like this:
get some UI object | get-property 'propertyName' | equals/not-equals 'expectedValue' | verify-true
In this particular case, we added an assertion for a property,
which is used to control location, so in fact there is some
repetition here, that does not affect anything, but we could just
use
get-window Compare | get-label "There are..."
as well – in case when there's no label with this text, the
test would fail any way.
Another important thing to notice about this script is that it does not contain any waiting logic – it waits for background operations automatically (calculation of comparison results in this case).
Make test to fail
Now let's make our test case to fail correctly. At first, we don't
need a last line (
get-editor ... | close
), because in correct behaviour, there should be no such editor.
Instead we want to ensure that there is a window with correct
label, so I'm replacing a last line of this script with this:
get-window Compare | get-label "There are no differences between the selected inputs."
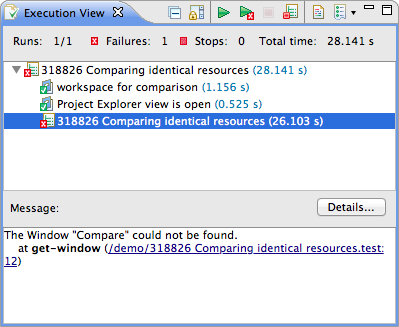
Now, if you execute the resulting test case, it will fail as expected:
Summary
- Contexts are used to describe an initial state of an application.
- Recorded script can be modified.
- During replay, RCPTT runtime automatically waits for background operations.
Let's take a fresh regression bug for the next test case. It has been introduced in Luna, so we can run test on Kepler and Luna to see that it affects only Luna.
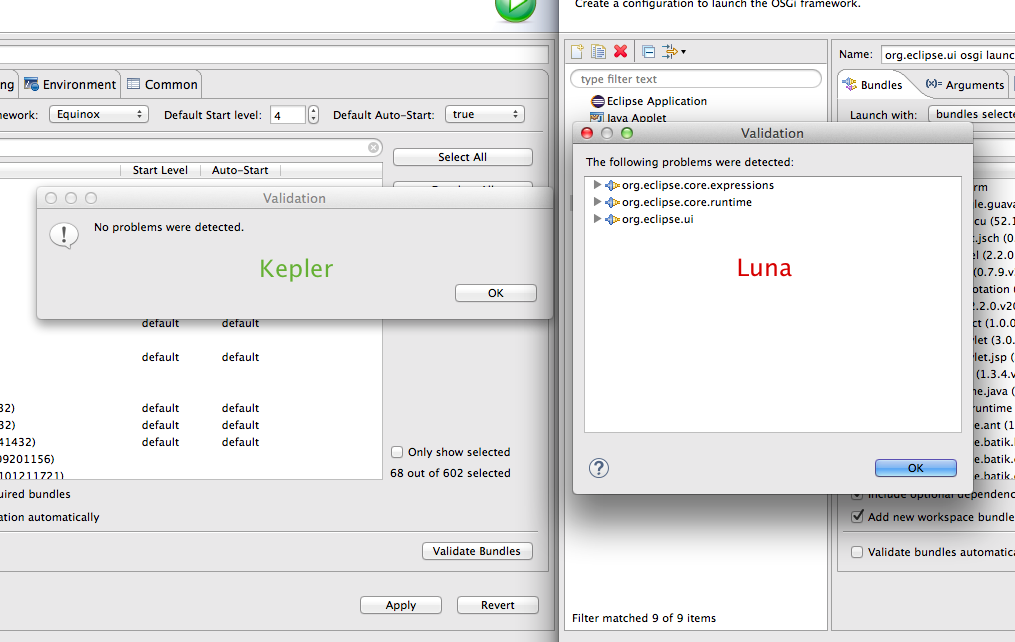
Eclipse bugzilla #443671: Add required bundles option looks completely broken
For this bug we can create a test case, that will be doing the following:
- Open launch configurations dialog.
- Select OSGi launch configuration, which includes only
org.eclipse.uiplugin. - Press 'Add Required Bundles'.
- Press 'Validate Bundles'.
- Make sure that validation message box says that no problems detected.
State description
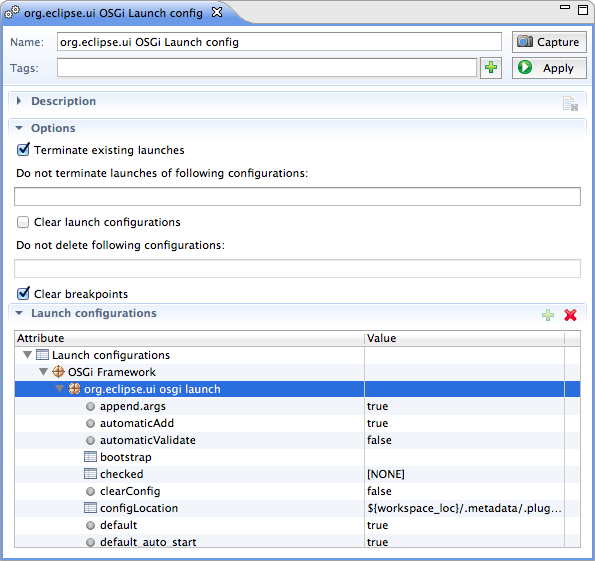
We don't care about workspace for this test case, but instead but we care about current launch configurations. And there is a perfect match for this in RCPTT – Launch contexts. So we go to AUT, create launch configuration, create launch context and capture it. The resulting Launch context looks like this:
We are going to use 'Run → Run Configurations…' menu, so we need to ensure that this menu item exist. As there are perspectives without Run menu (i.e. Resources perspective), we want to state that this test case requires some perspective, which definitely has 'Run' menu, for instance 'Plug-in Development' perspective. To do this, we create a workbench context, switch AUT to 'Plug-in Development' perspective, and capture workbench context from AUT.
Recording actions
As usual, create a test case, add launch and workbench contexts to it, and record test actions – open 'Launch configurations' dialog, select launch configuration and press required buttons. The resulting script will look like this:
get-menu "Run/Run Configurations..." | click
with [get-window "Run Configurations"] {
  get-tree | select "OSGi Framework/org.eclipse.ui osgi launch"
  get-button "Add Required Bundles" | click
  get-button "Validate Bundles" | click
  get-window Validation | get-button OK | click
}
We can replay it and obviously the test case will pass, as it does not contain any assertions yet.
Asserting results
To assert that validation completed successfully, change the last line to this:
get-window Validation | get-label "No problems were detected."
Once a test case is replayed again, it correctly fails with a message 'The Label "No problems were detected." could not be found'. To make sure that the test is correct, run the same test without any modifications on Kepler to see that it passes:
Eclipse bugzilla #394900: Import existing projects broken by malformed .project file
Again, this issue is easy to reproduce manually, but how hard is it to make an automated test for this?
Preparing a state
To prepare a state for this test case, we can use Folder
context. At first, create two resource projects in AUT workspace
–
corruptedProject
and
goodProject
, then create a folder in home directory,
projectsToImport
, and copy projects from AUT workspace into this folder. Then
modify
.project
file in
corruptedProject
to produce an invalid XML.
Next, go back to RCPTT and create a new Folder context. To specify
a folder context root, browse for a
projectsToImport
folder and click 'Capture': (on a screenshot below I also opened
the captured file to demonstrate that the XML is really corrupted)
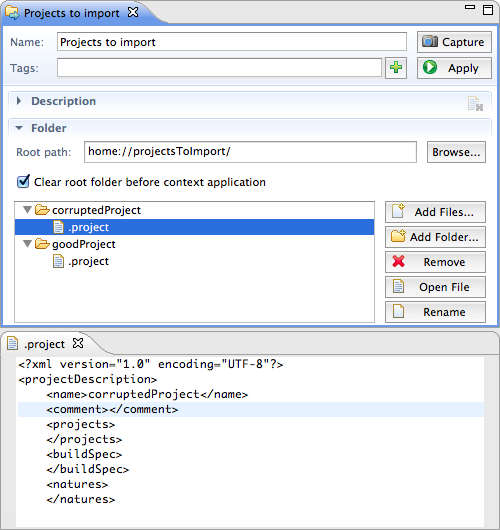
Similar to workspace context, which stores a state of a workspace,
a Folder context can be used to control a state of a file system
outside of workspace, which is especially useful for testing of
import functionality. Note that Folder context editor was smart
enough to record a path to a folder in machine-independent way (
home://projectsToImport/
), so that this context can be used on other machines.
For this test case we also need a workspace context, which ensures that workspace is empty. You can just create a new workspace context, name it 'empty workspace' and there's nothing else to do – by default workspace contexts have no projecs inside and have an option 'Clear workspace' turned on.
Recording actions
Create a new test case, add two contexts into it, and record the following actions:
- Go to File/Import… menu.
- Select General → Existing projects.
- In import dialog, browse for
projectsToImportfolder. - Click Refresh button.
- Switch to assertion mode and assert that a Projects section is
empty – click on a tree and add an assertion for
itemCountproperty.
The recorded script is below:
get-menu "File/Import..." | click
with [get-window Import] {
    get-tree | select "General/Existing Projects into Workspace"
    get-button "Next >" | click
}

set-dialog-result Folder "/Users/ivaninozemtsev/projectsToImport"
with [get-window Import] {
    get-button "Browse..." | click
    get-button Refresh | click
}
get-window Import | get-tree | get-property itemCount | equals 0 | verify-true
You may notice that there's an interesting command recorded
–
set-dialog-result
. That's how RCPTT handles native dialogs: during recording, it
remembers a value, selected by user in a native dialog, and stores
it as a
set-dialog-result
command. During test case execution RCPTT runtime automatically
returns stored value to application code instead of opening a
native dialog.
However, in order to make a test case fully portable across
machines and operating systes, we need to slightly modify this
script in order to replace an absolute path with a value, relative
to a home folder. This can be achieved by using two ECL commands
–
get-java-propery
and
format
:
set-dialog-result Folder [format "%s/projectsToImport" [get-java-property "user.home"]]
Asserting results
Next, we also need to modify the last part of a script, which
asserts the results – instead of asserting that there are
no children, actually we want to assert the correct behavior, i.e.
there is one child,
goodProject
. This can be done like this:
with [get-window Import | get-tree] {
    select "goodProject.*"
    get-property itemCount | equals 1 | verify-true
}
Pay attention to this line –
select "goodProject.*"
. Here we use a regular expression instead of full text of a tree
item (full text also includes an absolute path on a file system).
It is possible to use
format
command again to construct a full text here, but in this case it
is faster to simply strip an end text by
.*
.
Conclusion
Finally, you can run all three tests together and see that all of them are failing with expected messages:

You can use RCPTT in order to produce independent test cases efficiently and quickly. RCPTT allows to execute them without modifications on different operating systems and different versions of Eclipse platform. Give it a try, and share your opinion!
Here are some useful links to get started:
About the Authors