Program Your Arduino Like a Pro with the Eclipse C/C++ IDE
I’ve been a tools developer for a long time. It all started just over 20 years ago when I was working at Nortel and brought in a fancy modeling tool called ObjecTime Developer to help us build the OA&M system for a new component of their famous telephone exchange switch. I had such a good time with that I joined ObjecTime shortly after and never looked back.
In the 20 years since, I've built tools for embedded developers, starting with Developer which eventually morphed into Rational Rose RealTime. Eventually, I became a bit disillusioned with modeling tools and moved over to the IDE space working on the Eclipse CDT. I’ve been really lucky to end up on these projects and am pretty proud of where we got with them.
But one thing was in the back of my mind all along. I haven’t really done embedded development since my Nortel days. I’ve been building tools for embedded developers and didn’t really know what it was like to be them. It was around then that the Arduino craze started taking off and I found my avenue to jump in with my first Arduino Uno. It’s been a lot of fun working with sensors and LEDs and networking building simple little IoT projects. It was such a great learning experience.
Becoming an Arduino developer I couldn’t help but be underwhelmed with the Arduino IDE. I remember wondering what the content assist key combination was just to find out, it doesn’t have content assist. What? That was one of the first features we added to CDT once we had the C++ parser in place. That got me thinking. How hard would it be to extend the CDT to do Arduino programming? It took a while, but last October, I finally reached the point where I was ready to make it available to the community. This article describes the Arduino C++ IDE and how it leverages the power of the Eclipse C/C++ IDE.
Why C++?
The first thing to note is that the Arduino C++ IDE is exactly that, C++. It doesn’t support “INO” sketches that the official Arduino IDE supports. These sketches use “Wiring” which is a “programming language” that is based on earlier work called “Processing”. Wiring is essentially a C++ library and a slight subset of the C++ language. The only difference is that you don’t need to include the system header files, i.e. Arduino.h, and you don’t need to forward declare your functions.
I actually think that’s a shame. It is so close to teaching new developers and hobbyists how to program in C++. All they need to learn is those two concepts and they’re C++ developers. It’s a missed opportunity that the Arduino C++ IDE attempts to correct.
Getting Started
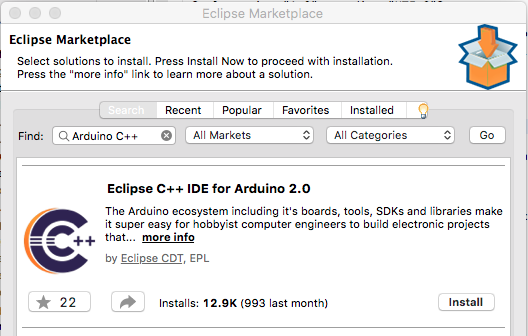
The Arduino C++ IDE is available from the Eclipse Marketplace. To get started, users need to download the Eclipse C++ IDE from the Eclipse downloads page. The C++ IDE can be installed with the new Eclipse installer, or the C++ package can be downloaded directly. Once that’s set up, the Marketplace client can be used to search for and install the Arduino C++ IDE. There are other Arduino IDEs on the marketplace so look for the CDT logo to find the one I am writing about here.
Once the plug-ins are installed, you then need to install a “Platform”. An Arduino Platform is essentially a Software Development Kit (SDK) that includes the core libraries and the toolchain used to build applications for a set of boards. The Arduino IDE builders have done a very cool thing and have public metadata that describes the SDKs and provides enough information to download everything you needs. The Eclipse Arduino C++ IDE leverages that and presents that information in the Arduino Download Manager.
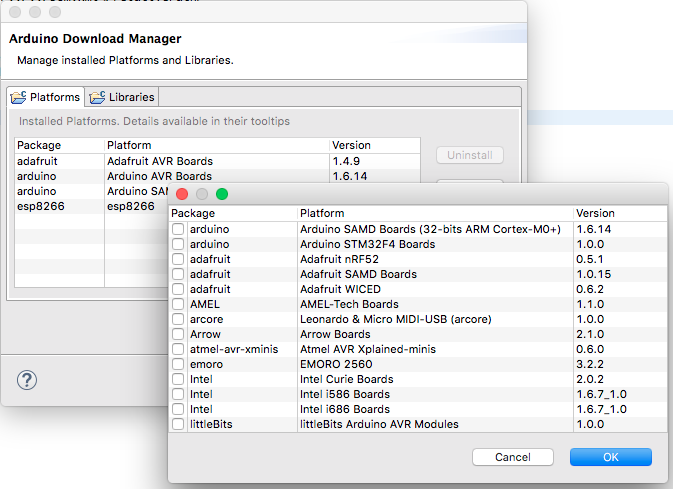
A list of URLs to the package.json files containing this information is maintained in the Arduino preference pages. These metadata files are provided by board vendors and an unofficial list can be found on the Arduino wiki.
There is an equivalent for Libraries though in this case, the Arduino IDE providers maintain the complete list and the Arduino C++ IDE references it directly. This includes libraries for various peripherals like NeoPixels or Wifi chips as well as libraries for reusable functionality like the MQTT protocol.
Once you’ve installed the set of platforms and any libraries you need, you’re ready to start building Arduino applications.
The Eclipse Launch Bar
The first step is to tell Eclipse about the board you want to work with. This will drive the build and launch processes to get your projects up and running. To simplify this process, we’ll use the new Eclipse Launch Bar.
The Launch Bar was built by my team here at QNX and contributed to Eclipse for other projects in the community to use. The main objective is to simplify the launch process by minimizing the need for users to open the launch configuration dialog boxes. If plug-ins set things up correctly, and the Arduino C++ IDE plugin does, you should be able to select the project you want to run, and the target where you want to run it and click the Launch button.

It also allows setting the launch mode, but since Arduino doesn’t support debugging (yet) we only have Run available.
New Targets can be created from the “New Launch Target…” item from the Launch Target selector (the third dropdown) or from the New Connection action in the Connections View. Select Arduino as the connection type then select the serial port that your board is connected to and board type for your board. For complex boards that require special programmers, you can select that as well.

Once the board is created, you can then proceed to create an Arduino project. You can access the wizard to create on from the top level File menu, New Arduino project, or New C/C++ Project and select Arduino C++ Sketch as the template. This will produce the minimal Arduino project that has a setup function and a loop function. Add in the Blinky code and press the Launch (middle) button on the launch bar to run your sketch.
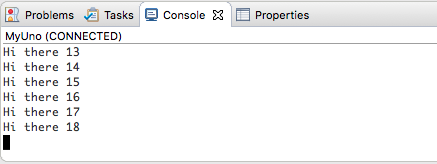
Serial Monitor
As with regular Arduino programming, you can program the Serial port to print out messages back to the IDE. It’s unfortunately still the main way to debug Arduino programs. To view the messages, we have hooked up the Serial Port to the Eclipse Console View. To open it, find your board in the Connections View (you may need to open that view first). The “Open Command Shell” menu item on the connection will create a new console to show the output from that board.
Getting More Help
I have created a screencast up on YouTube that walks through this whole process including additional steps to use Libraries in your Project. You can see the video here:
https://www.youtube.com/watch?v=TtPvkPpAx0EThe CDT forum is the best place to ask questions, though I’ve received questions from all over the place including on the YouTube page and the MarketPlace entry.
https://www.eclipse.org/forums/index.php?t=thread&frm_id=80There will be bugs as I don’t have many boards so I am relying on the community to report issues so I can fix them. You can help by raising bugs here:
https://bugs.eclipse.org/bugs/enter_bug.cgi?product=CDTFuture Directions
The Arduino C++ IDE is a fairly complete IDE. I’ve been using it to build demos for Eclipse conferences and am loving that I can use the power of the Eclipse C/C++ IDE for these hobby projects. But there are a couple of things more that need to be done.
First, I’m not sure I really like the Serial Monitor being in the Console View. That was sort of an experiment. For Oxygen, the next Eclipse release, I’ll hook up the Serial Monitor to the Eclipse Terminal View which will give a more standard workflow.
The most requested feature I’ve had is to support development of Arduino Libraries. There is a huge collection out there and more are always being created. It would be great to have an IDE that supports working with those.
The Arduino C++ IDE for Eclipse has been a great passion of mine as I dove into the world of hobbyist electronics bringing my Eclipse IDE with me. My hope is that others find it as useful as I have and that the Arduino community can benefit from the best in class tools just like the Pros do.
About the Authors