Reactive Microservices with Eclipse Vert.x
Building reactive systems is a new way to build distributed applications taking advantages of modern CPU architectures and using resources more efficiently. Combined with microservices, it provides an amazing flexibility where each “component” is individually developed, released, deployed, scaled, updated and retired. It also infuses the required resilience into the system to avoid failure cascading and keep the system responsive even when facing failures. Last but not least, the asynchronous communication, promoted by reactive systems, copes with the interaction challenges of modern systems such as rich and engaging user interactions, but also the concurrency required to face load variations.
However, building reactive systems is not straightforward. Building a microservice-based architecture is also not easy. Many aspect needs to be managed such as deployment facilities, service discovery, interactions between the services, resilience patterns, scalability, and so on.
Eclipse Vert.x is a toolkit to build reactive microservices. It gives you a great freedom to shape your system as you want, ensuring its responsiveness, resilience and elasticity. The communication between your components is asynchronous leveraging the non-blocking and asynchronous nature of Vert.x.
In this article, we explore how reactive microservices can be built easily with Vert.x. After an introduction to the Vert.x and reactive systems concepts, we go through an example of reactive microservice application and focus on the different key part of such a system. This article does not cover microservices in depth. There are many resources available on this subject such as http://www.martinfowler.com/articles/microservices.html.
In addition, this article does not cover all Vert.x features – it gives an overview.
What is Vert.x
Vert.x is a toolkit to build distributed reactive systems on the top of the Java Virtual Machine using an asynchronous and non-blocking development model. As a toolkit, Vert.x can be used in many contexts: in a standalone application or embedded in a Spring application. Vert.x and its ecosystem are just jar files used as any other library: just place them in your classpath and you are done. However, as Vert.x is a toolkit, it does not provide an all-in-one solution, but provides the building blocks to build your own solution. An excerpt of the Vert.x ecosystem is depicted below. You can pick any of these components in addition to Vert.x core to build your distributed systems. For instance, if you want to build a web application, Vert.x Web is the component you need. You will probably also use one of the data access component too. If you are doing an integration with some legacy systems, the bridge with Apache Camel is the one you need. The richness of the ecosystem makes Vert.x incredibly flexible - whether it's simple network utilities, sophisticated modern web applications, HTTP/REST microservices, high volume event processing or a full blown back-end message-bus application, Vert.x fits.
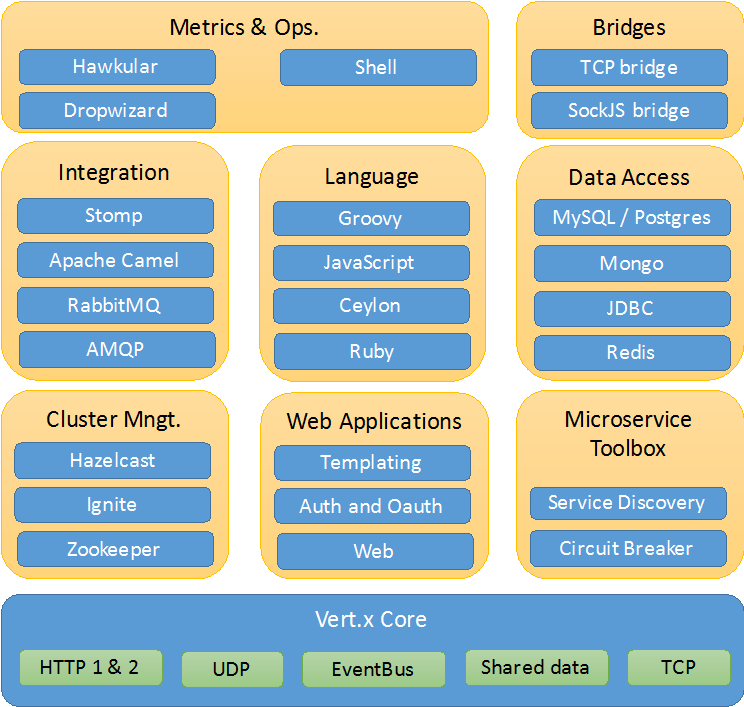
Figure 1. Excerpt of the Vert.x ecosystem
You may have spotted the language box in the picture. Vert.x application runs on top of the Java Virtual Machine. However, it does not mean it has to be developed using the Java programming language. Vert.x applications can be developed with Java, of course, but also with Groovy, JavaScript (using Nashorn), Ceylon or Ruby (using JRuby). Vert.x provides idiomatic APIs for every supported language. Vert.x doesn't preach about what language is best, you can choose the languages you want based on the application you are building and the skill-set of your team. You can also combine them.
Reactive Systems
Applications built with Vert.x are reactive. The Reactive Manifesto defines a reactive application as having four key properties:
- Use asynchronous message-passing
- Elastic
- Resilient
- Responsive
Components, forming your Vert.x application, interact using asynchronous message-passing regardless of whether these components are co-located or distributed. Each component reacts to the received message by using an asynchronous non-blocking development model (more on this below). This allows the application to more effectively share resources by doing work only in response to outside messages.
Vert.x applications are also elastic, meaning they react to increasing load well, because the architecture highly concurrent and distributed. Vert.x also takes advantages of multi-core CPUs.
Vert.x applications are also resilient, treating failure as a first-class citizen --- it can face failures, isolate them, and implement recovery strategies easily.
The final property, responsive, means the application is real-time and engaging. It continues to provide its service in a timely-fashion even when the system is facing failures or peak of demand.
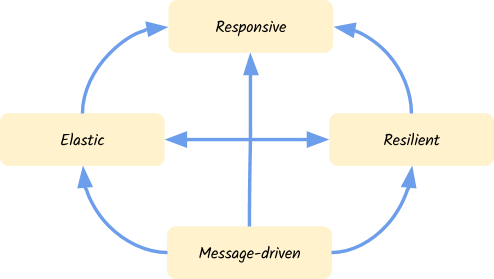
Figure 2. Reactive Manifesto characteristics
As soon as you follow the Vert.x development model, your application inherits from these properties making it ready to face reality: failures happen, load varies, the network is definitely not reliable and so on.
Asynchronous and Non-Blocking Development Model
Vert.x applications are event-driven. Your application is notified when something interesting happens. It receives the events and so can react to this event. Let’s take a simple example. Vert.x provides an easy way to create a HTTP server. This HTTP server is going to be notified every time a HTTP request is received:
vertx.createHttpServer()
    .requestHandler(request -> {
      // This handler will be called every time an HTTP request is
      // received at the server
      request.response().end("hello world");
    })
    .listen(8080);
Code 1. Http server with Vert.x
In this example, we set a requestHandler receiving the request and sending “Hello world” back.
With very few exceptions, none of the APIs in Vert.x block the calling thread. If a result can be provided immediately, it will be returned; otherwise, you will usually provide a Handler to receive events some time later. A Handler is a function notified when an event is ready to be processed or when the result of an asynchronous operation has been computed.
Thanks to this non-blocking model, you can handle a highly concurrent work load using a small number of threads. In most cases, Vert.x calls your handlers using a thread called event loop. Vert.x APIs are non-blocking and won’t block the event loop, but that’s not much help if you block the event loop yourself in a handler, hence the golden rule:
Don’t block the event loop
Because nothing blocks, an event loop can deliver a huge quantity of events in a short amount of time. This is called the Reactor pattern. It’s very important to enforce the golden rules. For instance, in the previous code snippet, the request handler is always called from the same event loop. So, if the handler would block, the other requests would not be handled in a timely-fashion and would be queued, waiting for the thread to be released. So you would lose the scalability and efficiency purpose of Vert.x.
In a standard reactor implementation there is a single event loop thread which runs around in a loop delivering all events to all handlers as they arrive. The issue with a single thread is simple: it can only run on a single core at any one time. Vert.x works differently here. Instead of a single event loop, each Vert.x instance maintains several event loops. This pattern is called Multi-Reactor Pattern.
If you need to interact with blocking APIs, Vert.x provides constructs to do so. We don’t cover them in this article. We invite you to check the Vert.x documentation for further details.
Finally, if you are afraid of the callback-based development model, notice that Vert.x provides alternatives such as Future or Reactive eXtension (RX).
Verticles
Vert.x comes with a simple, scalable, actor-like deployment and concurrency model out of the box. Verticles are chunks of code that get deployed and run by Vert.x. An application would typically be composed of many verticle instances running in the same Vert.x instance at the same time. Verticle instances communicate with each other by sending messages on the event bus and so enforce the asynchronous interactions mentioned above.
Default verticles are executed on the Vert.x event loop and must never block. Vert.x ensures that each verticle is always executed by the same thread (never concurrently, hence avoiding synchronization constructs).
Verticles can be implemented in any of the supported language. In this article, we only cover Java. In Java, a verticle is a class extending AbstractVerticle. The class can override the start and stop method called respectively when the verticle is deployed and undeployed:
import io.vertx.core.AbstractVerticle;

public class MyVerticle extends AbstractVerticle {

  @Override
  public void start() throws Exception {
    // Executed when the verticle is deployed
  }

  @Override
  public void stop() throws Exception {
    // Executed when the verticle is undeployed
  }
}
Code 2. Example of verticle
A verticle can deploy other verticle. While deploying the verticle, it can configure the verticle by passing a configuration. In addition, it can configure the number of instances to create. Each instance is associated to a different event loop, and Vert.x balances the load among these instances. Thanks to this mechanism a Vert.x application can efficiently use all the cores of your CPU:
public class MyDeployingVerticle extends AbstractVerticle {

  @Override
  public void start() throws Exception {
    // Pass a configuration
    JsonObject config = new JsonObject().put("key", "value");
    vertx.deployVerticle(io.vertx.starter.MyVerticle.class.getName(),
        new DeploymentOptions().setConfig(config));

    // Set the number of instances
    vertx.deployVerticle(io.vertx.starter.MyVerticle.class.getName(),
        new DeploymentOptions().setInstances(2));
  }

}
Code 3. Example of verticle deployments
There are many other aspects that you can configure using DeploymentOptions such as high-availability, the worker nature….
Create your first Vert.x project
Let’s now create a Vert.x project so see how all the concepts are articulated. In this article we are going to create a project using Apache Maven. However, you can choose the build tool you want, or even use the vertx cli directly. Also notice that you don’t need a specific IDE or plugin to develop, run or debug a Vert.x application. Because it’s a toolkit, any Java tooling can be used efficiently.
To create a Maven project for you Vert.x application, just run:
git clone https://github.com/vert-x3/vertx-maven-starter.git PROJECT_NAMEAlternatively, if you are using Linux or MacOS, you can use the following shell command:
curl http://vertx.io/assets/starter-scripts/create-vertx-project-maven.sh -o vertx-create-maven-project.sh; bash vertx-create-maven-project.sh
Then, navigate to the generated directory and run `./redeploy.sh` (`redeploy.bat` on Windows). Open your browser to http://localhost:8080, and you should see running your first Vert.x application! You can import the project into your favorite IDE as any other Maven project.
The application runs in redeploy mode. So, if you open and change the content of src/main/java/io/vertx/starter/MainVerticle.java, to something like:
@Override
public void start() {
  vertx.createHttpServer()
      .requestHandler(req -> req.response().end("‹h1›Welcome‹/h1›"))
      .listen(8080);
}
You will see that Maven is recompiling your application and then, the application is restarted. So, you are ready to implement a reactive microservice efficiently.
Packaging the project is simple as mvn clean package. It produces a fat-jar in the target directory ready to be executed with: java –jar target/PROJECT_NAME-fat.jar
Implement a REST API
The generated project contains a single verticle, starting a HTTP server. Let’s now see how to implement a very simple REST API using Vert.x Web. Adding a component from the Vert.x stack is easy as adding a dependency in the pom.xml:
‹dependency›
  ‹groupId›io.vertx‹/groupId›
  ‹artifactId›vertx-web‹/artifactId›
‹/dependency›
Note: You need to restart the redeploy script in order to take use the new dependencies.
Vert.x Web is a component to build modern web applications on top of Vert.x. It lets you implement REST APIs easily, but also provides server-side templating, static file support, error pages; in other words, everything you need to create a reactive web application.
Vert.x Web provides the concept of Router. A router is an object on which you register routes. Every time that the HTTP server receives a request, it looks into the set of routes to invoke the matching one. Each route has an associated Handler called to process the request and build the response.
Let’s imagine a very simple REST API just handling a set of names and allow retrieving this list as well as adding new names. This REST API could be implemented as follows:
package io.vertx.starter;

import io.vertx.core.AbstractVerticle;
import io.vertx.core.json.Json;
import io.vertx.ext.web.Router;
import io.vertx.ext.web.handler.BodyHandler;

import java.util.ArrayList;
import java.util.List;

public class MyRestAPIVerticle extends AbstractVerticle {

  // Maintain a simple list of names
  private List<String> names = new ArrayList<>();

  @Override
  public void start() {
    // Create a Vert.x web router
    Router router = Router.router(vertx);

    // Register a simple first route on /
    router.get("/").handler(rc -> {
      rc.response().end("Welcome");
    });

    // Register a second router retrieving all stored names as JSON
    router.get("/names").handler(
        // Just encode the list as JSON and return.
        rc -> rc.response()
            .putHeader("content-type", "application/json")
            .end(Json.encode(names)));

    // Register a body handler indicating that other routes need
    // to read the request body
    router.route().handler(BodyHandler.create());

    // Register a third route to add names
    router.post("/names").handler(
        rc -> {
          // Read the body
          String name = rc.getBody().toString();
          if (name.isEmpty()) {
            // Invalid body -> Bad request
            rc.response().setStatusCode(400).end();
          } else if (names.contains(name)) {
            // Already included name -> Conflict
            rc.response().setStatusCode(409).end();
          } else {
            // Add the name to the list -> Created
            names.add(name);
            rc.response().setStatusCode(201).end(name);
          }
        });

    vertx.createHttpServer()
        // Pass the router's accept method as request handler
        .requestHandler(router::accept)
        .listen(8080);
  }

}
Code 4. Implementing a REST API with Vert.x Web
As the code is quite straightforward, we won’t analyze it in details. Once all the routes are declared, a Vert.x HTTP server is created. We pass the accept method from the Router object as requestHandler – so it does the request matching for us.
Notice that, thanks to the Vert.x execution model, you don’t need to deal with synchronization. The list is never accessed concurrently: the same thread is used to execute all handlers.
Consume a REST API
When building microservice application, you often need to consume provided services. For instance, you need to consume REST APIs. Vert.x provides an asynchronous HTTP client, so it does not block the thread when the HTTP request is sent to the server (waiting for the answer). You pass a Handler called when the response has been received. If you are interested by the content of the response, you register a second Handler to read the body – the response containing only the HTTP status and headers. For example, if we want to create a client for the REST API presented above, the code would be:
package io.vertx.starter;

import io.vertx.core.AsyncResult;
import io.vertx.core.Future;
import io.vertx.core.Handler;
import io.vertx.core.Vertx;
import io.vertx.core.http.HttpClient;
import io.vertx.core.http.HttpClientOptions;
import io.vertx.core.json.JsonArray;

public class MyRestAPIClient {

  private HttpClient client;

  public MyRestAPIClient(Vertx vertx) {
    // Create the HTTP client and configure the host and post.
    client = vertx.createHttpClient(new HttpClientOptions()
        .setDefaultHost("localhost")
        .setDefaultPort(8080)
    );
  }

  public void close() {
    // Don't forget to close the client when you are done.
    client.close();
  }

  public void getNames(Handler<AsyncResult<JsonArray>> handler) {
    // Emit a HTTP GET
    client.get("/names",
        response ->
            // Handler called when the response is received
            // We register a second handler to retrieve the body
            response.bodyHandler(body -> {
              // When the body is read, invoke the result handler
              handler.handle(Future.succeededFuture(body.toJsonArray()));
            }))
        .exceptionHandler(t -> {
          // If something bad happen, report the failure to the passed handler
          handler.handle(Future.failedFuture(t));
        })
        // Call end to send the request
        .end();
  }

  public void addName(String name, Handler<AsyncResult<Void>> handler) {
    // Emit a HTTP POST
    client.post("/names",
        response -> {
          // Check the status code and act accordingly
          if (response.statusCode() == 200) {
            handler.handle(Future.succeededFuture());
          } else {
            handler.handle(Future.failedFuture(response.statusMessage()));
          }
        })
        .exceptionHandler(t -> handler.handle(Future.failedFuture(t)))
        // Pass the name we want to add
        .end(name);
  }
}
Code 5. Example of REST client using Vert.x
In this class, we initialize a HTTP client with a host and port. In the getNames and addName method we use this client to, respectively, retrieve the list of names and add a name to the list. These methods received a Handler‹AsyncResult‹X››, in other words a function taking an AsyncResult as parameter. AsyncResult is a structure encapsulating the result of an asynchronous operation. Indeed, these operations may fail, and so it’s important to be able to detect such failures and react. The next code shows how these methods are used:
Vertx vertx = Vertx.vertx();
MyRestAPIClient client = new MyRestAPIClient(vertx);
client.getNames(ar -> {
  if (ar.succeeded()) {
    System.out.println("Names: " + ar.result().encode());
  } else {
    System.out.println("Unable to retrieve the list of names: "
     + ar.cause().getMessage());
  }
});
Code 6. Handling AsyncResults
The consuming code must check whether or not the operation has failed. In the case of a failure, we can retrieve the cause. Otherwise, we can get the result of the operation.
Service Discovery
The previous section illustrates how you can easily consume a REST service using the Vert.x HTTP client. However, this client needs to know the host and port of the REST service. Unfortunately, this information is not necessary known beforehand and may even change during the lifetime of the application. To avoid this issue, Vert.x provides a service discovery mechanism. As depicted on the picture below, service discovery lets service providers to publish their service and so let consumer to look for the right service provider, react in case of unavailability and can also track changes. The Vert.x service discovery also support importers and exporters to bridge other service discovery mechanisms such as Consul, Apache Zookeeper or Kubernetes.
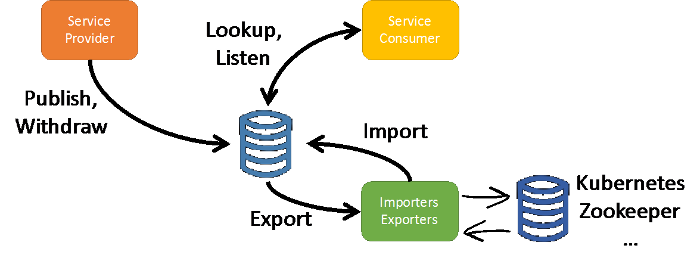
Figure 3. Vert.x Service Discovery
To use the service discovery mechanism, you would need add a dependency in our project:
‹dependency»
  ‹groupId»io.vertx‹/groupId»
  ‹artifactId»vertx-service-discovery‹/artifactId»
‹/dependency»
Then, a component knowing the current location of the service publishes a record into the Vert.x service discovery:
ServiceDiscovery discovery = ServiceDiscovery.create(vertx);
discovery.publish(HttpEndpoint.createRecord(
    "my-rest-api",
    "localhost", 8080,
    "/names"),
    ar -> {
      if (ar.succeeded()) {
        System.out.println("REST API published");
      } else {
        System.out.println("Unable to publish the REST API: " +
             ar.cause().getMessage());
      }
    });
Code 7. Service Publication
The previous code snippet creates an instance of the Vert.x service discovery, and then publishes a record for the REST API we have seen previously in this article. The Vert.x service discovery handles different type of services. Here, the REST API is published as a HTTP endpoint. The code creates a record for the service containing a name, the location and some metadata. When the registration operation has completed (successfully or not), the passed handler is called.
By default, Vert.x stores the records in a distributed map shared by all the members of the Vert.x cluster. However, this is configurable to use any type of backend such as Redis, Apache Zookeeper or even in a plain local map.
On the consumer side, the code does need to know the exact location of the service, but only the set of metadata required to find the service. Generally, the name is enough:
public MyRestAPIClient(ServiceDiscovery discovery,
                       Handler<AsyncResult<Void>> completionHandler) {
  HttpEndpoint.getClient(discovery,
         new JsonObject().put("name", "my-rest-api"),
          ar -> {
            if (ar.failed()) {
             // No service
            completionHandler.handle(Future.failedFuture(
              "No matching services"));
           } else {
              client = ar.result();
              completionHandler.handle(Future.succeededFuture());
           }
  });
}
Code 8. Retrieving a HTTP client from the Vert.x Service Discovery
As we know that our service is published as a HTTP endpoint, the HTTP client is retrieved from the service discovery. The JSON object is used to represent a filter. Only service record matching all the passed properties are accepted.
Thanks to the Vert.x service discovery, you obtain location transparency easily and is able to deploy your microservice regardless the environment. If the location of the service change, or if the service become unavailable, your application can react and smoothly manage these cases.
Resilience Patterns
When building a microservice architecture, resilience is a stringent requirement. Every service can fail, every interaction between these services can also fail. So your application needs to be prepared to face these failures and still responds in a timely-fashion to the requests.
Vert.x comes with a set of resilience pattern making your application ready to face these failures. First, as you have seen in the different code snippet of this article, failure is a first class citizen and your code has to deal with them. So, failures are not propagated, making each service a bulkhead. In addition, you can set a timeout to all distributed interactions managed by Vert.x. If you do not receive a response before the specified time, the operation is considered as failed. For example, you can set a timeout on the HTTP request:
client.get("/names",
    response ->
        // Handler called when the response is received
        // We register a second handler to retrieve the body
        response.bodyHandler(body -> {
          // When the body is read, invoke the result handler
          handler.handle(Future.succeededFuture(body.toJsonArray()));
        }))
    // Set the timeout (time given in ms)
    .setTimeout(5000)
    .exceptionHandler(t -> {
      // If something bad happen, report the failure to the passed handler
      // Also called when the timeout is reached
      handler.handle(Future.failedFuture(t));
    })
    // Call end to send the request
    .end();
Code 9. HTTP client with timeout
Don’t forget that a timeout does not mean that the actual operation has not been completed, just that it did not complete on time, or something else went wrong.
There is another resilience pattern very famous in microservice applications: the circuit breaker. This pattern has the advantage to include a “recovery” function. Basically, a circuit breaker is a 3 states automata as depicted below:

Figure 4. The circuit-breaker pattern
A circuit breaker monitors an operation and keep track of the number of failures encountered when executing this operation. When a threshold is reached, the circuit breaker switches to the open state. In this state the operation is not called anymore, but a fallback is executed immediately. Periodically, it will let a single request passes and calls the actual operation. Depending on the result of this execution, the circuit breaker switches back to the close state upon success, or to the open state if the operation failed again. An important aspect of the circuit breaker pattern is to give to the service you are calling time to recover instead of queuing more and more work.
Vert.x provides its own implementation of the circuit breaker pattern. It’s was specially designed for asynchronous operations, and enforce the Vert.x execution model. An example if given below. Obviously you can use other circuit breaker implementations such as Netflix Hystrix.
// Step 1 - create a circuit breaker
// Create an instance of circuit breaker.
circuitBreaker = CircuitBreaker.create("my-circuit-breaker", vertx,
    // Configure it
    new CircuitBreakerOptions()
        .setTimeout(5000) // Operation timeout
        .setFallbackOnFailure(true) // Call the fallback on failure
        .setResetTimeout(10000)); // Switch to the half-open state every 10s
//…
public void getNames(Handler<AsyncResult<JsonArray>> handler) {
  // Step 2 - Protect operation with it
  circuitBreaker.executeWithFallback(
      operation -> {
        client.get("/names",
            response ->
                response.bodyHandler(body -> {
                  operation.complete(body.toJsonArray());
                }))
            .exceptionHandler(operation::fail)
            .end();
      },
      failure ->
          // Return an empty json array on failures
          new JsonArray()

  ).setHandler(handler); // Just call the handler.

}
Code 10. Usage of the Vert.x circuit breaker
Conclusion
In this article we have seen how Eclipse Vert.x and its ecosystem make easy the implementation of reactive microservices. It does not only provide everything you need to implement microservices, it lets you build reactive systems. Thanks to the asynchronous communication between the services, the provided resilience patterns and also Vert.x scalability feature, your whole system become more responsive and easier to keep on track. Your application is now ready to face the reality and its sets of constraints.
For further details about Vert.x and how you can build your next application with it, check http://vertx.io.
Happy coding!
About the Authors