MQTT 101 – How to Get Started with the lightweight IoT Protocol
Introduction
Everybody talks about the Internet of Things nowadays. Increasingly affordable micro controllers like Arduino and Raspberry Pi are enabling cheap devices that measure sensor data and send it over the internet. The goal of this post is to introduce the lightweight protocol MQTT and its capabilities to send data between devices and other systems and to demonstrate them by implementing two clients with Eclipse Paho.
The term Internet of Things was first used by Kevin Ashton in 2009 for interconnecting
physical devices over the internet. The basic idea is very simple:
Physical devices can exchange data between each other or
being controlled by others. Examples of such devices
would be a refrigerator, a car, a building or basically any other
electronic device. One of the most common use cases is the
collection, transmission, consolidation and displaying of sensor
data. The results could be a web dashboard with the aggregated
values or an alarm, when a threshold is exceeded.
The
application scenarios are almost unlimited. Imagine your alarm
clock would know that your train to work is 15 minutes late and
adjust itself accordingly. Also your coffee maker is switched on
automatically 15 minutes later to make you a hot cup of coffee
before you leave for work. Sounds like the future ? All
that is already possible today. Ericsson predicts that in 2020 50 billion
devices are connected over the internet. The communication between
the huge amount of devices is enabled by IPv6 and lightweight
communication protocols like MQTT.
MQTT
MQTT was developed by Andy Stanford-Clark (IBM) and Arlen Nipper
(Eurotech; now Cirrus Link) in 1999 for the monitoring of an oil
pipeline through the desert. The goals were to have a protocol,
which is bandwidth-efficient and uses little battery power,
because the devices were connected via satellite link and this was
extremely expensive at that time.
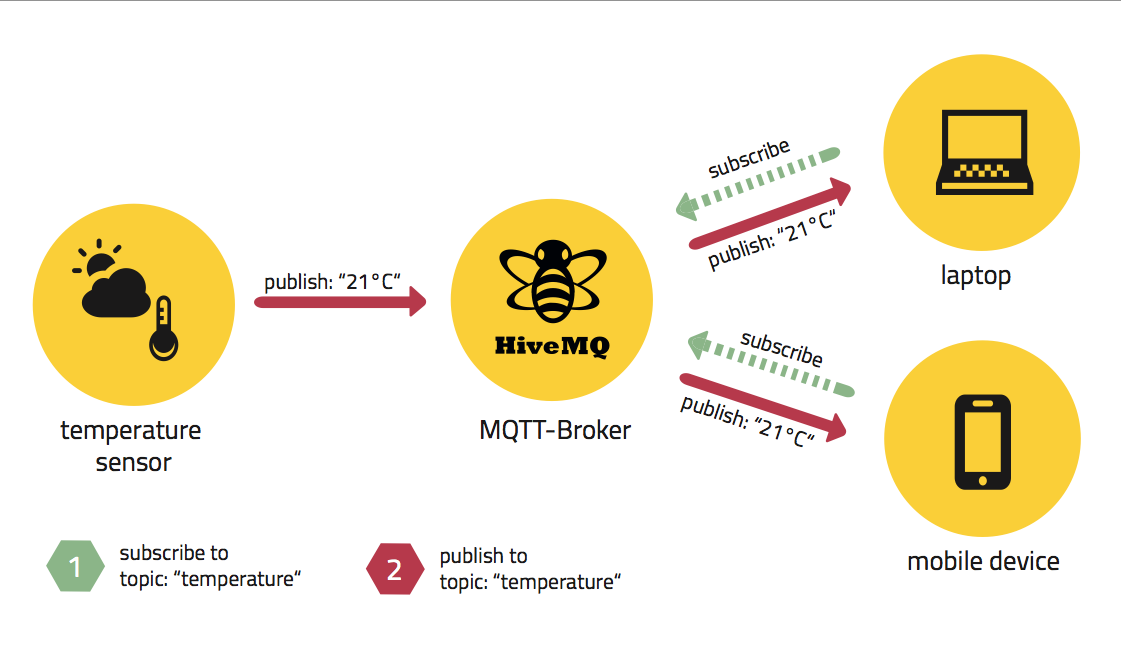
The protocol uses
a publish/subscribe architecture in contrast to HTTP with its
request/response paradigm. Publish/Subscribe is
event-driven and enables messages to be pushed to clients. The
central communication point is the MQTT broker, it is in charge of
dispatching all messages between the senders and the rightful
receivers. Each client that publishes a message to the broker,
includes a topic into the message. The topic is the
routing information for the broker. Each client that
wants to receive messages subscribes to a certain topic and the
broker delivers all messages with the matching topic to the
client. Therefore the clients don’t have to know each other, they
only communicate over the topic. This architecture enables highly
scalable solutions without dependencies between the data producers
and the data consumers.
MQTT Publish/Subscribe Architecture
The difference to HTTP is that a client doesn’t have to pull the
information it needs, but the broker pushes the information to the
client, in the case there is something new. Therefore each MQTT
client has a permanently open TCP connection to the broker. If
this connection is interrupted by any circumstances, the MQTT
broker can buffer all messages and send them to the client when it
is back online.
As mentioned before the central concept in
MQTT to dispatch messages are topics. A topic is a simple
string that can have more hierarchy levels, which are separated
by a slash. A sample topic for sending temperature data
of the living room could be house/living-room/temperature.
On one hand the client can subscribe to the exact topic or on the
other hand use a wildcard. The subscription to house/+/temperature
would result in all message send to the previously mention topic house/living-room/temperature
as well as any topic with an arbitrary value in the place of
living room, for example house/kitchen/temperature. The
plus sign is a single level wild card and only
allows arbitrary values for one hierarchy. If you need to
subscribe to more than one level, for example to the entire
subtree, there is also a multilevel wildcard (#).
It allows to subscribe to all underlying hierarchy levels. For
example house/# is subscribing to all topics beginning
with house.
Eclipse Paho
Now with the concept of topics explained, it is time to jump right into the first implementation and to show how the publishing and subscribing can be done using source code. But first a quick introduction of Eclipse Paho, the MQTT implementation used in this example. It has been founded under the umbrella of the Eclipse Foundation at the beginning of 2012 with the goal to provide open IoT protocol implementations. The implementation of MQTT is the de-facto reference implementation and available in Java, C, C++, JavaScript, Lua, Python and soon also C#. The origin of most of the implementations is the codebase of IBM and Eurotech, who have used them in many internal projects in production.
Use Case
In order to make the subsequent code more understandable, we will use the transferring of sensor data from a temperature and brightness sensor to a control center over the internet as an example. The sensors will be connected to a Raspberry Pi, which acts as gateway to the MQTT broker, which resides in the cloud. On the other side is a second device, the control center, that also has an MQTT client and receives the data. Additionally we will implement a notification, which alerts the control center if the sensor is disconnected.

Communication between the sensor client and the control center over MQTT
Implementation
First we will implement the sensor client, which is simulating a thermometer and a brightness sensor. It should send a current value every second to the MQTT broker. In this case we are using the HiveMQ public broker on the MQTT Dashboard. The first step is to create an instance of the MqttClient class.
public class Publisher
{
     public static final String BROKER_URL = "tcp://broker.mqttdashboard.com:1883";
     private MqttClient client;

     public Publisher()
     {

          String clientId = Utils.getMacAddress() + "-pub";
          try
          {
               client = new MqttClient(BROKER_URL, clientId);
          }
          catch (MqttException e)
         {
              e.printStackTrace();
              System.exit(1);
          }
     }
}
As parameters for the constructor it is necessary to specify the URL of the broker (tcp://broker.mqttdashboard.com:1883) and also the client id. The latter is an unique identifier overall the broker. A good choice for the client id is the MAC address of the computer, because that is automatically unique. In the example -pub is added to the mac address, because otherwise it wouldn’t work starting both clients on the same machine for testing. After creating the instance, it is possible to try to connect to the broker with calling client.connect(). Apart from a simple connect, it is also possible to hand over more parameters. One example is the clean session flag. When it is set to true, the broker will wipe the session every time the client disconnects, otherwise it will keep the subscription and buffer the messages sent with Quality of Service 1 and 2 (more on this later). The session is assigned to the client id, therefore it is truly important to have it unique. Another option is Last Will and Testament (LWT), which helps detecting failures of other clients. As stated above every client has an open connection, so when the client disconnects ungracefully the broker can detect that. If the client has set a LWT topic and message on connect, the broker will send that to the specified topic, which allows the client to notify others about its failure.
//...

MqttConnectOptions options = new MqttConnectOptions();
options.setCleanSession(false);
options.setWill(client.getTopic("home/LWT"),
"I'm gone".getBytes(), 2, true);

client.connect(options);

//...
Now we have to implement the business logic to retrieve the values and send them every second, therefore we use an infinite loop and the methods publishTemperature and publishBrightness. Each method creates a MqttTopic object and a random value, which will then be published. The complete examples of both clients can be found on GitHub.
     public static final String TOPIC_TEMPERATURE = "home/temperature";

     //...
     while (true)
     {
          publishBrightness();
          Thread.sleep(500);
          publishTemperature();
          Thread.sleep(500);
     }
     //...

     private void publishTemperature() throws MqttException {
         final MqttTopic temperatureTopic = client.getTopic(TOPIC_TEMPERATURE);

         final int temperatureNumber = Utils.createRandomNumberBetween(20, 30);
         final String temperature = temperatureNumber + "°C";

         temperatureTopic.publish(new MqttMessage(temperature.getBytes()));
     }

     //publishBrightness() wird analog zu publishTemperature() implementiert
Each message can be published with one of three quality of service levels (QoS). These levels are associated with different guarantees. A message send with level 0 doesn’t have a guarantee at all, it implies fire and forget. Level 1 guarantees that the message will at least arrive once, but can arrive more than once. Level 2 is the most sophisticated choice, which guarantees that the message arrives at the destination exactly once. The choice of QoS is a trade-off, between protocol overhead and the guarantee that the message arrives, because ensuring QoS 2 is using more bandwidth than QoS 0.
The next step is implementing the subscribing client, which is reading the values on the topics home/temperature and “home/brightness”, plus observes the home/LWT topic for the last will message to detect a failure of the sensor client. The initialization of the MqttClient instance is almost the same, except we use -sub as a suffix for the client id. For receiving the messages sent by the sensor simulator, it is necessary to implement the MqttCallback interface. The MqttCallback interface defines three methods that need to implemented: connectionLost, messageArrived and deliveryComplete. connectionLost is called when the connection is unexpectedly closed form the MQTT broker. This method is the best place for a reconnect logic. The method messageArrived is called when the broker sends a new message to this particular client. Finally, there is the deliveryComplete method that is called after a message with QoS 1 or 2 reaches the broker. For our use case implementing the messageArrived method is enough. All arriving messages should be print out with topic and payload and if it is sent on the home/LWT topic, we additionally print out Sensor gone!.
public class SubscribeCallback implements MqttCallback
{

     @Override
     public void connectionLost(Throwable cause) {}

     @Override
     public void messageArrived(MqttTopic topic, MqttMessage message)
     {
          System.out.println("Message arrived. Topic: " + topic.getName() + " Message: " + message.toString());

          if ("home/LWT".equals(topic.getName()))
          {
               System.err.println("Sensor gone!");
          }
     }

     @Override
     public void deliveryComplete(MqttDeliveryToken token) {}

}
After implementing the callback, we have to make it known to the MqttClient before connecting. Also after the successful connection is established, it is necessary to subscribe to all topics, which should be sent to the client. In this case it should be everything that starts with home, so the usage of a multi-level wildcard saves us from subscribing to 3 different topics: home/#.
mqttClient.setCallback(new SubscribeCallback());
mqttClient.connect();
mqttClient.subscribe("home/#");
Run both clients
Now that the sensor client and the Control Center are implemented,
it is time to run both applications. We start the Control Center
first and then the sensor client. Once the sensor client starts,
messages arrive at the Control Center. If you will now exit the
sensor client ungracefully, this is recognized by the Control
Center immediately through the Last Will and Testament message.
Congratulations, you have now build your first Internet of
Things application with MQTT!
Summary
This simple application is just an example and can be easily adapted and reused for more advanced purposes. You could simply extend the existing code so that multiple clients in different rooms measure the temperature and brightness, and the Control Center also indicates that. Another possibility would be to replace the Control Center through a web dashboard where the values are displayed in several charts using the Paho JavaScript library.
As we have seen, it is possible with very little effort to create application that communicates over MQTT. The Eclipse Paho library implements all the functionality that is described in the MQTT specification and MQTT should be a tool in the repertoire of every developer, who deals with the Internet of Things or the requirement of connecting mobile devices.
About the Authors