Getting started with the EMF Client Platform
EMF enables the automatic generation of the entity model for an application. Additionally, EMF provides frameworks for a variety of tasks, e.g., to store and collaboratively work on these entities. The EMF Edit framework supports the creation of UIs for EMF model instances. However, creating a user interface for browsing and modifying entities based on an EMF model still requires a lot of manual work. The same is true for the integration of different storage technologies. The generated editor provided by EMF allows you to create a quick prototype of a UI, but it is not meant to be a basis for an industrial application.
Any manually created UI immediately requires maintenance efforts if the underlying model is extended or changed. This is especially true at the beginning of a project when the model is constantly evolving. In an agile process, the resulting application ideally should be able to be demonstrated to the customer after any adaptation of the underlying model.
This tutorial describes how to use the EMF Client Platform to set up the first version of your own application in less than one minute, just by providing your entity model in EMF.
In contrast to the generated editor, the EMF Client Platform provides a generic but adaptable UI to create, modify and share EMF model instances. For this, no manual coding or code generation is required. As a prerequisite, you only need to provide an EMF model describing the entity objects of your application as well as the corresponding edit plugin. The EMF Client Platform is able to render its UI reflectively, based only on the information contained in the model.
Since the EMF Client Platform provides a reflective UI, the resulting application is robust against a change in a model. That means you can evolve the underlying model without any manual adaptations of the UI.
The EMF Client Platform is an Eclipse open source project: http://eclipse.org/emfclient/
This tutorial describes how to get started with the EMF Client Platform. For this tutorial you can either use your own EMF model or the model of our example application “Make It Happen”. This example model describes a simple ToDo application including Users, Tasks and UserGroups. It can be retrieved from this repository:
http://github.com/eclipsesource/makeithappen
If you want to try all of the described features yourself, we describe how to set-up a running application with your custom model in the section “Getting started with your custom model”. If you do not have an EMF model yet, you can use the model of our example application “Make It Happen”. All screenshots and descriptions in this tutorial are based on this example model. If you want to create your own custom model, please refer to this tutorial.
Components of the EMF Client Platform
The EMF Client Platform is designed in a highly modular way. It is possible to use all components or only parts of it depending on the requirements. All components provide a default look for the initialization use case but can be customized later. From a user point of view, the EMF Client Platform consists of three main views, also shown in the following figure. These components are described in more detail in the following sections of this tutorial.
Explorer (marked in yellow): Showing the hierarchy of model instances, grouped in projects, which allows users to create new elements and change the hierarchy using drag and drop.
Editor (marked in blue): Showing one model element instance, selected in the Model Explorer. Allows users to modify attributes and references of one model element.
Repository Explorer (marked in red): Showing data sources from which entities can be retrieved, e.g., local files, EMFStore, CDO or a data base.
.jpg)
The screenshot shows the three main UI components of EMFCP
The three main components make use of a couple of reusable smaller components such as a dialog to search for model elements or a dialog to create new elements. These components can also be used as stand-alones.
In addition to the UI components, the EMF Client Platform provides an abstraction layer to use different data sources, called data providers. Data providers handle access to entities and are responsible for storing, sharing or versioning them. The simplest data provider stores entities in local files. Alternatively, entities could be retrieved from a repository such as CDO or EMFStore or even from a database. Because of the provided abstraction layer, an EMF Client Platform application is not directly dependant on a certain storage technology. This allows the underlying storage technology to be changed at any point in time, e.g., to evolve from local storage in files to the use of a model repository. You could think of the data provider as an equivalent to the team API used to abstract common features of SCMs such as SVN or Git within the Eclipse IDE.

EMFCP provides a transparent provider layer, allowing the use of different storage technologies.
Explorer
The model explorer provides an overview of all model entities available in an application. It therefore defines the concept of a project. Projects are self-contained entities that contain model elements.
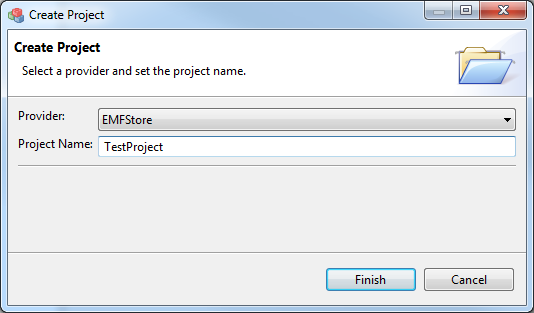
You can create new projects (right-click). During the creation of a project, you need to select where the project should be stored. To do this, you select a data provider, e.g., file, EMFStore or CDO. This selection is only necessary if you use different data providers at the same time in your application. If you only deploy one data provider, it will be used as a default. In the example shown in the following figure, an EMFStore project is created.
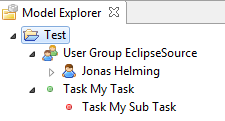
After creating a project, the model explorer allows you to create new entities within the new project. On lower levels, you can create children of existing model elements by right clicking on them. The model explorer lets you create all possible children of a model element. In the “Make It Happen” application, the model defines that Tasks can contain subtasks, and right clicking on a task allows you to create a subtask as a child. Additionally, you can move existing entities using drag and drop. In the example, you can move subtasks within their parent task. Finally, you can double click elements to open them in the Editor.
All information required for the model explorer is derived from the containment hierarchy of the EMF model. The Genmodel allows you to specify whether certain containment references are visible as children in the tree or not.
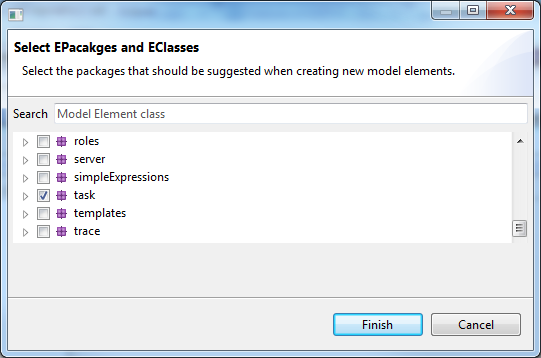
At the root level of a project, every available EMF model element of any model known to the running application can be created. This includes all model plugins that are part of the running application. This would also include models that are not part of your data model, e.g., Ecore itself. It is therefore possible to filter the model elements that are available in this dialog (right click on a project => Filter Model Elements). These settings are by default project-specific. However, it is possible to programmatically influence the filters. For convenience, the EMF Client Platform provides a filter plugin that black lists all models that are part of the Eclipse Modeling Edition. Therefore, when you start the default application, only elements of your custom model and the example model should be visible. If there are packages unknown to EMFCP, you might see other model packages in the list. Right click on the project and select only the models you want to create in your application.
Note that the right-click menu of the model explorer may contain more entries depending on the underlying data provider. For example, an EMFStore project can be shared, committed and updated.
The model explorer provides several extension points. However, most required adaptations can be done within the model by changing the containment hierarchy or by adapting the available children elements.
If you double click an element in the model explorer, it will open the editor described in the next section. However it is possible to exchange the action, which is executable on a double click.
Editor
The editor shows a single model element and allows you to modify of all of its attributes and references. The editor is rendered reflectively, meaning you can open any EObject with it by default. If the editor is opened with a certain EObject, it will look at the model description of the element and render every visible attribute and reference of the EObject with specific control. The editor depends on the type of attribute or reference to decide which control to choose. For example, the editor chooses a text field for a string attribute and a drop down box for an enumeration.
Additionally, the editor shows the result of the EMF validation. In the following figure, the attribute “Emails” is marked because the model specifies that there needs to be at least one email address for a player.
Attributes and references can be hidden in the editor by setting their property type to “none” in the genmodel. The layout of the editor can be influenced if necessary by setting annotation within the model. Additionally, the EMF Client Platform allows users to register their own controls for certain attributes or references to adapt the look of the editor. However, the editor provides a good default solution for editing model elements, which is very useful for getting started with a custom application.
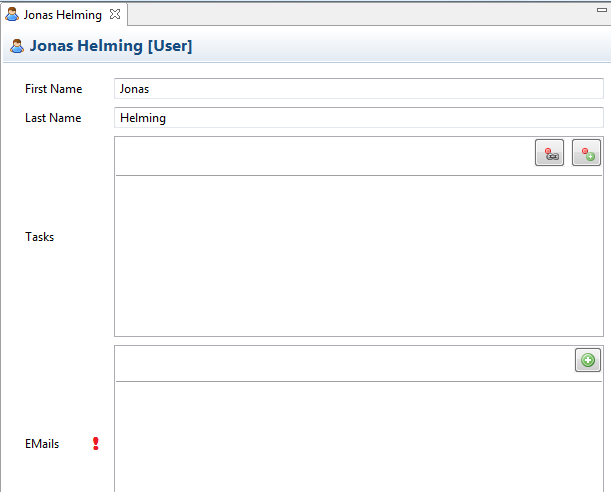
The editor renders all available attributes and references of an arbitrary EObject as well as the result of the built-in validation.
Since the editor works reflectively, it is very robust against changes in the model. If you add or remove any attributes or references, you just need to regenerate your model and edit plugin, and the editor will be able to render the new instances.
Repository Explorer
The repository explorer manages different data sources from which projects are retrieved. Data providers can allow the creation of repositories, typically if they are server based, e.g., CDO or EMFStore. Some data providers, e.g., the file-based provider and the EMFStore provider, allow the creation of local projects within the model explorer without the use of the repository explorer.
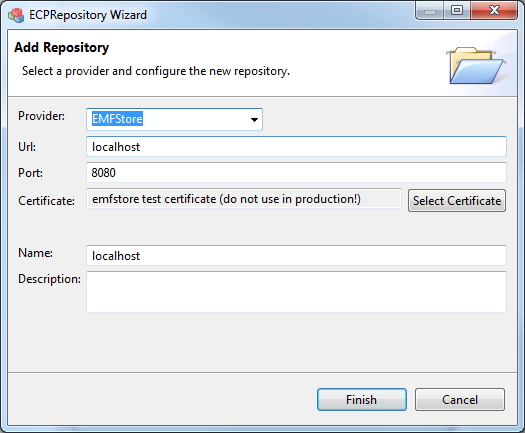
Use the “plus” button to create new repositories and chose the data provider you want to use.
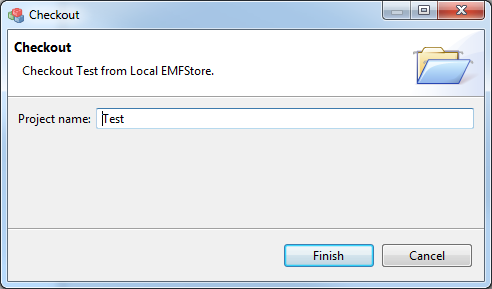
Once you have created a repository, you can browse the available projects or model elements on the server. Right click on a sub-element of a repository to check out content from a repository to your local workspace. This action will create a new project in your local workspace for which you need to assign a name.
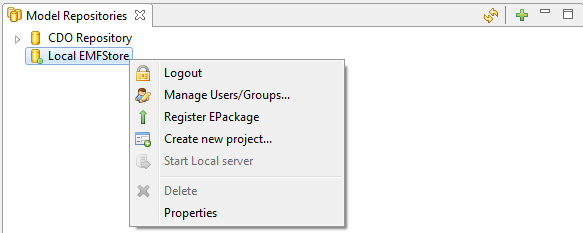
Additionally, the right click menu of repositories contains actions specific to the underlying data provider. For example, right clicking on an EMF Repository allows the user to login, start a local server and create a new project on the server.
Since the repository explorer supports different data sources, a custom application does not directly depend on the applied back-end technology. This offers flexibility in the selection of technologies. For example, a project can start to work with files and switch to a server-based solution later on. Therefore, it is possible to reuse an existing data provider or to implement a custom one.
Extensions
The EMF Client Platform creates a running application just by providing an EMF model to it. This application serves as a good starting point for development. However, most scenarios require adaptation of this default application in some places. Many adaptations just require adaptation of the underlying model itself. For example, custom validation rules can be added to the model. They will be processed by the EMF Client Platform without any further implementation. For another example, the layout of the editor can be influenced by setting annotations within the model. However, some adaptations require custom implementations. Therefore the EMF Client Platform offers various extension points. This allows you to implement small pieces and iteratively plug them into the running application. The following tutorials describe the most important possibilities for customizing the EMF Client Platform components:
- Customize the look of model elements
- Define Model Validation Constraints
- Replace the editor
- Add a custom control to be used by the editor
- Configure the backend
Please refer to http://eclipse.org/emfclient/ for more documentation
Getting started with your custom model
In this section, we describe how to start the default application with your custom model.
For evaluation, you can simply install the EMF Client Platform bundles in your IDE (modeling edition) using the latest update site referenced on this site:
http://eclipse.org/emfclient/download.html
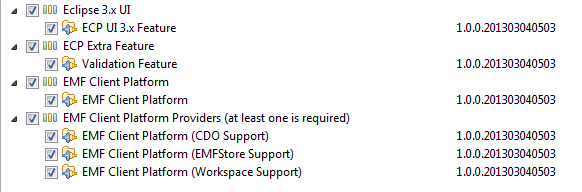
Please install the following features, which will install all available data providers too. If you only want to test one data provider, you can ignore the others and not install them.
After installation, you need the model plugin and the edit plugin for your application to be present in your workspace. To get a model, you can chose one of the following possibilities:
- You can use the “Make It Happen” example model, which can be retrieved from this repository: http://github.com/eclipsesource/makeithappen
- You can create the “Make It Happen” example model from scratch
- You can create a custom model for your own application; a general description on how to do that can be found here: http://eclipsesource.com/blogs/tutorials/emf-tutorial/
No matter which option you chose, there should be at least two plugins in your Eclipse workspace: the model and the edit plugin. For example:

Now you can start your model with the EMFCP demo application by creating a run configuration, which starts the EMFCP demo product. This run configuration will automatically also contain your custom model from your developer workspace. To create a run configuration, select the Eclipse menu Run => Run Configurations. Create a new run configuration and run the application “org.eclipse.emf.ecp.application.e3.application”, as shown in the following screenshot.
.jpg)
Now you can start your application; it should present you with an empty EMFCP workbench containing your custom model.
Additional Notes:
- If you build a product based on the EMF Client Platform, you should define a target platform later on that contains EMFCP instead of installing it into every developer’s IDE.
- You can define your own application and product based on the components of EMFCP to replace the existing view, add additional views, add branding or change the layout of the workbench.
- To use the CDO provider, you need to set up a CDO server, please refer to http://eclipse.org/cdo/.
- The demo application contains a local EMFStore repository. To set up a remote repository, please refer to http://eclipse.org/emfstore.
You find more documentation and information about EMF Client Platform here: http://eclipse.org/emfclient
About the Authors
