Xtending Android Development
Android is an amazing operating system that combines technical innovation with high popularity among the end-consumers. In spite of fragmentation, there is a large amount of developers across the world who enjoy developing applications for Android. Today, most Android applications are written in Java. Unfortunately, Java is known to be deficient in some modern language concepts and idioms like conciseness, declarativity, modularity mechanisms, the map/reduce pattern or immutable data. Wouldn't it be great if there was a more advanced programming language for Android development? Luckily, there is one and it integrates seamlessly with Java. This language is Xtend.
Xtend is a statically-typed programming language that compiles to Java. Xtend has a clear and concise syntax. Although lambda expressions will be finally introduced in Java 8, Xtend's syntax for them is significantly more readable. Another feature that makes Xtend a functional language is the absence of statements. Code written in Xtend is executed by evaluating expressions. Operator overloading in form of an operator-to-method mapping allows to fully customize operator semantics. Extension methods enhance existing types with new functionality. Other powerful features like the type-based switch expression, shorthand property access and local type inference make programming in Xtend real fun. Even more important than the language features is the seamless, bidirectional interoperability with Java, a low learning curve for Java developers, comprehensible and efficient generated Java source code and the great IDE support. All this makes Xtend ready for immediate use in every environment where Java and Eclipse are used for development. If you are new to Xtend, check out its documentation.
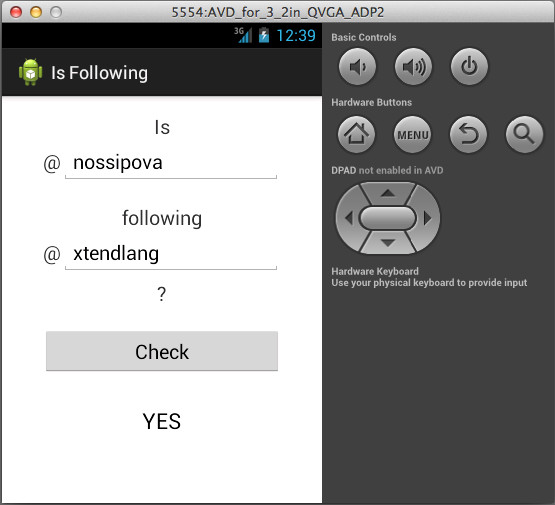
In this tutorial, we will write an Android application in Xtend, build an APK and run it on the Android emulator. We will implement a simple application called Is Following? which lets us check if a Twitter user follows another Twitter user.
To be able to follow the tutorial, you need to be acquainted with Android development and the Eclipse IDE.
Setting Up The IDE
First, we'll install and configure the IDE and create a project. You can skip the first three steps, if you already have an Eclipse installation that you use for Android development.
- Download and install Eclipse IDE with built-in Android Developer Tools from http://developer.android.com/sdk/index.html.
- Follow the instructions at http://developer.android.com/sdk/installing/bundle.html to set up your Android SDK for the first time.
- Alternatively, you can use an existing Eclipse installation and set it up as described at http://developer.android.com/sdk/installing/index.html.
- After you have Eclipse, the Android SDK and the ADT plugin ready, install version 2.4 of Xtend. To do so, go to Help -> Install New Software… and paste the Xtend update site http://download.eclipse.org/modeling/tmf/xtext/updates/composite/releases into the field labeled Work with.
- Choose Xtend 2.4.
- Disable the checkbox Contact all update sites during install to find required software, to avoid unwanted updates of other Eclipse plug-ins.
- Click Finish and follow the instructions of the installation wizard.
Creating A Project
Now, we'll create a project and start writing the application. You can download the complete source code from https://github.com/nossipova/isfollowing.
Create a new Android Application Project with a blank activity MainActivity.
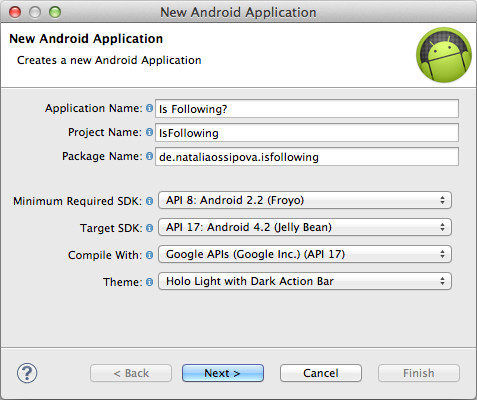
- The compiler compliance level of the project needs to be set to 1.6.
Creating A Layout
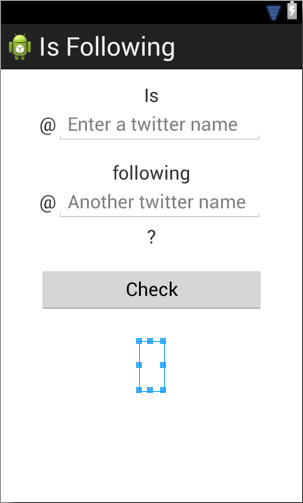
Create a simple layout that consists of:
- an editable field for each of both Twitter names,
- a button to start the request and
a text view that will show a result.
Writing The Application
Our application will have an activity to interact with the user and a communicator which will send requests to Twitter and process its responses. The communication with Twitter will be performed asynchronously. Let's implement these components.
- Delete the class
MainActivity.javathat was automatically generated through the project creation. - To create a new Xtend class, select New -> Xtend Class from the project context menu in the Package Explorer.
- On the first page of the creation wizard, type
MainActivityin the Name field and selectandroid.app.Activityas a superclass. - Click Finish.
The class we've just created will show an error:
Mandatory library bundle 'org.eclipse.xtext.xbase.lib' 2.3.0 or higher not found on the classpath.
Use the available quick fix to add Xtend libraries to the classpath.MainActivitywill have two methods:onCreate(Bundle)andshowResult(Object). The first methodonCreate(Bundle)prepares the content view and registers the click listener callback of the Check button. In the callback, we initialize the communicator, use its methodisNetworkAvailable(Context)to test the connectivity and execute the communicator asynchronously. The second methodshowResult(Object)updates the UI with the response received from the communicator by setting the text value in the result text view.package de.nataliaossipova.isfollowing import android.app.Activity import android.os.Bundle import android.view.View import android.widget.Button import android.widget.EditText import android.widget.TextView import static de.nataliaossipova.isfollowing.R$id.* import static de.nataliaossipova.isfollowing.R$layout.* import static de.nataliaossipova.isfollowing.R$string.* class MainActivity extends Activity implements AsyncDelegate { override onCreate(Bundle it) { super.onCreate(it) contentView = activity_main val Button button = getView(Button01) button.onClickListener = [ var communicator = new TwitterCommunicator communicator.delegate = this if (communicator.isNetworkAvailable(this)) { val EditText editText1 = getView(EditText01) val EditText editText2 = getView(EditText02) communicator.execute(editText1.text.toString, editText2.text.toString) } ] } override showResult(Object it) { var TextView resultView = getView(ResultView) resultView.text = if ('true' == it) { getString(yes).toUpperCase } else { getString(no).toUpperCase } } def <T extends View> T getView(int id) { findViewById(id) as T } }Create a new Xtend class
TwitterCommunicatoras a subclass ofandroid.os.AsyncTask. The subclass implements two methods:doInBackground(Params...)andonPostExecute(Result). IndoInBackground(Params…)method, we create a new Twitter URL from both Twitter names passed in as parameters. After that, we open an HTTP connection and read the input stream from it. The second method passes the data read from the input stream to the main activity.package de.nataliaossipova.isfollowing import android.content.Context import android.net.ConnectivityManager import android.os.AsyncTask import com.google.common.io.CharStreams import java.io.InputStream import java.io.InputStreamReader import java.net.URL class TwitterCommunicator extends AsyncTask<String, Void, String> { AsyncDelegate delegate override protected doInBackground(String... params) { new URL('https://api.twitter.com/1/friendships/exists.json?screen_name_a=' + params.get(0) + '&screen_name_b=' + params.get(1)) .openConnection.inputStream.readStream } override onPostExecute(String result) { if (delegate != null) { delegate.showResult(result) } } def setDelegate(AsyncDelegate delegate) { this.delegate = delegate } def isNetworkAvailable(Context it) { val networkInfo = (getSystemService(Context::CONNECTIVITY_SERVICE) as ConnectivityManager).activeNetworkInfo return networkInfo != null && networkInfo.connected } def private readStream(InputStream in) { return CharStreams::toString(new InputStreamReader(in)) } }To avoid tight coupling between the activity and the communicator, we will make use of the delegate pattern. Create a new Xtend interface
AsyncDelegate. The interface declares only one methodshowResult(Object). We will call this method from the post execute callback ofTwitterCommunicator.package de.nataliaossipova.isfollowing interface AsyncDelegate { def void showResult(Object it) }
The MainActivity already implements the AsyncDelegate
interface.
Build And Run
Now, when we are done with writing source code, add
permissions
android.permission.INTERNET
and
android.permission.ACCESS_NETWORK_STATE
to the Android manifest and let's build an APK and run it on
an AVD.
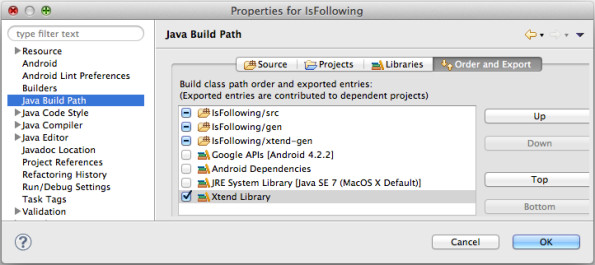
We need to tell ADT how to export the Xtend libraries. Choose Properties -> Java Build Path from the project context menu and go to the Order and Export tab. Select the checkbox beside Xtend library.
After closing the Properties window, you can launch the application on an existing AVD or a device.
Where To Go From Here
Now that you know how to use Xtend for Android development, go and create awesome Android apps in this sophisticated programming language!
Don't hesitate to let me know if anything of the above is confusing to you or if you'd like me to go into more detail.
About the Authors
