Eclipse Scout adds Mobile Support
Eclipse Scout is a framework to build business applications based on the Eclipse platform. So far, Scout client applications included support for Swing or SWT to build desktop applications, and Eclipse RAP for web applications.
New with the Kepler release, Scout has added support for creating mobile applications that run on tablets and smart phones. Thanks to the clean separation of the Scout application model from a specific UI technology Scout applications may now be deployed on mobile phones, as web applications or to the desktop with a single code base. This feature greatly reduces maintenance costs for larger applications that need to be available on multiple frontends.
Below, a mid-sized Scout business application (20'000 Java classes) is shown. This application takes advantage of Scout's mobile support and can be deployed to desktop and mobile frontends simultaneously.

The rendering of the UI is adapted to the different target devices at runtime. For this, a device transformer component takes care of adapting UI elements to a specific frontend. Examples being context menus that are replaced with touch buttons for mobile devices and tables that are mapped to lists with finger scrolling support.
For the application shown above, less than 20 Java classes are specifically built for the mobile client. These classes are mainly responsible for the application's home screen and the telephony integration on mobile phones. In addition, 200 minor frontend specific adaptations are included in the code base of the product. This results in over 98% of the Java code beeing reused across the different frontends.
Being independent of specific UI technologies is clearly one of Scout's major assets. As an additionaly benefits, it reduces the long term risks of "marrying" critical business applications to the "wrong" UI technology to almost zero. In fact, the default setup of Scout applications enforces the separation of business code from UI technology codes.
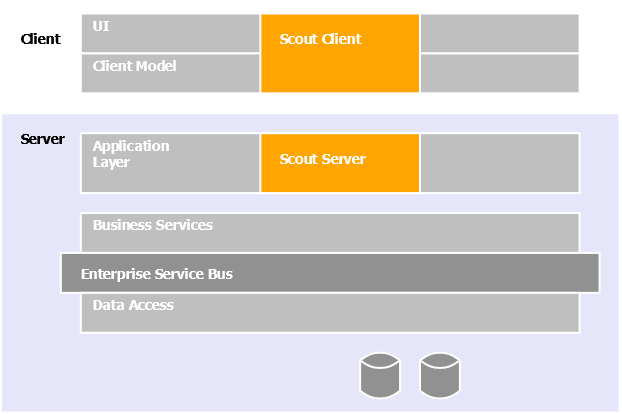
The scope of the Scout framework is best shown using a layered setup typical for enterprise IT landscapes. Many well established open source frameworks exist to deal with data access, persistence and the implementation of backend systems up to the business service layer.
The Hello World
A "Hello World" program is a traditional way to begin any new framwork or programming language. The special aspect of the Scout "Hello World" is it's client server architecture including clients that runs on the desktop, in a web browser, and on mobile devices.
In the text below we will first introduce the "Hello World" from the user perspective before we go through the installation process and dive into the actual implementation.
What the User sees
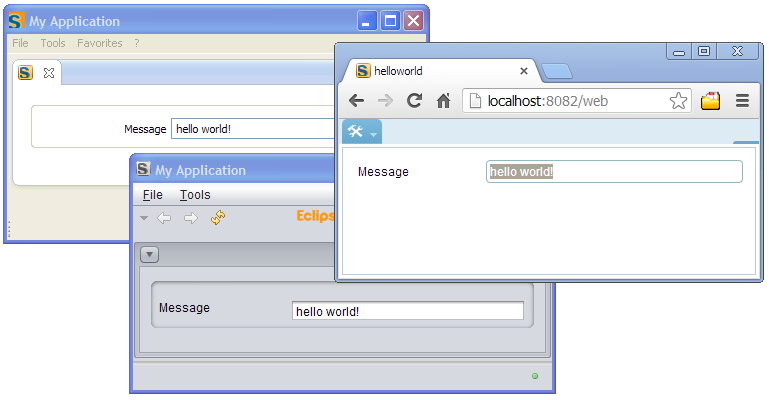
When the user starts a client desktop application he/she gets either a Swing or SWT based application showing a "hello world!" message in the main frame of the application. To run the Hello World as a web application in a browser, the user can also type the URL to the application into the address bar of a web browser. As shown below, the user has the choice between three different client applications.
To demonstrate the new mobile Support shipped with the Kepler relase of Scout, the user can also type the application's URL into a mobile browser. Depending on the frontend device used, the user is redirected to specific links for mobile phones or tablets.
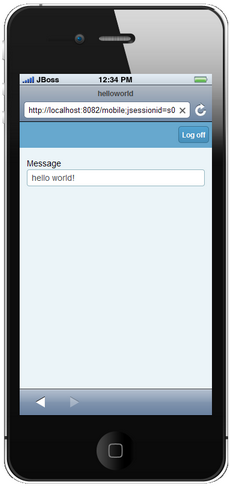
When we compare the Hello World web application with the mobile version shown above the slight differences between the two frontends become apparent. On the mobile device the label of the message field is rendered on top of the text and instead of a Tools button that provides access to the applications menu tree we just have a logout button on the mobiles home form.
Installing Scout
Installing the Eclipse for Scout Developers package is no different from installing any other Eclipse package. The Scout package is available on eclipse.org/downloads and the only prerequisite for the installation is a working JDK version 6 or 7.
In case you prefer to go through detailed installation instructions, have a look at these pages.
The Implementation
Begin the implementation of the Hello World application with starting your Eclipse IDE executable and providing an empty workspace directory.
Once Eclipse has started, click away the welcome screen to switch to the workbench of the Scout SDK and you see the Scout perspective with its Scout Explorer shown in the upper left of the Eclipse IDE.
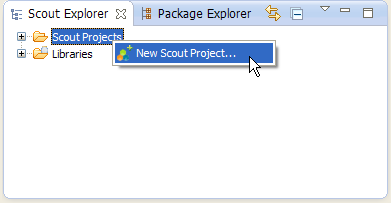
As shown above, use context menu New Scout Project... to launch the new project wizard.
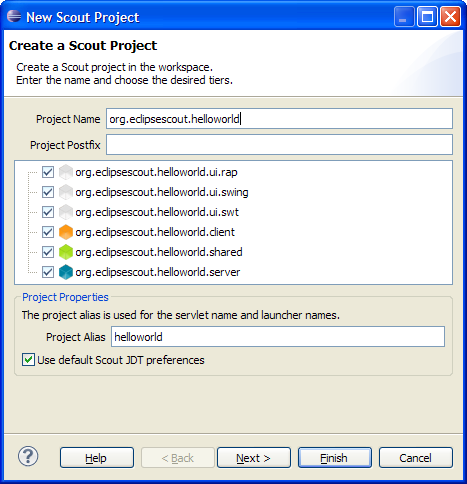
In the new project wizard enter org.eclipsescout.helloworld into the field Application Name and click on the wizard's Finish button.
After the Scout SDK has created the initial Scout application in the background the application model is presented as a tree in the Scout Explorer view.
And, under the main project node org.eclipsescout.helloworld:
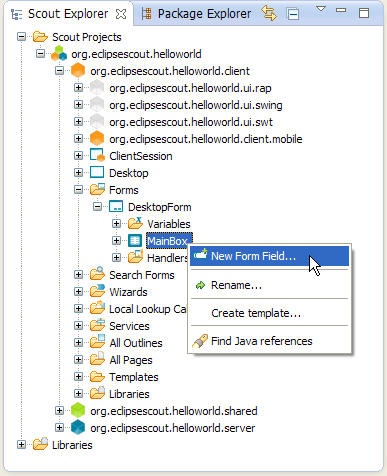
- Navigate to the orange client node org.eclipsescout.helloworld.client
- Expand its sub folder Forms
- Expand the DesktopForm node
- Click on the MainBox node
What you have done now is selecting the container of all form fields of the desktop form which in turn is the dialog shown in the main application window of the Hello World application.
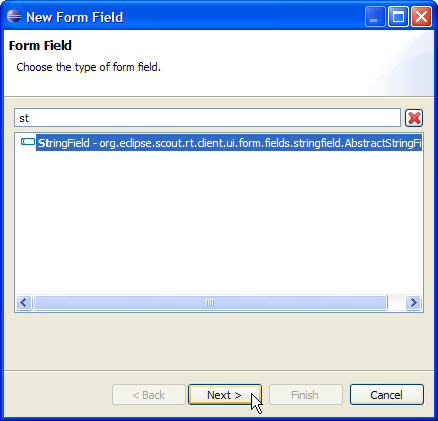
We now add the first form field by selecting the context menu New Form Field... on the MainBox node. This will open the new form field wizard shown below.

In the first wizard step we select a GroupBox component and click on the Next button.
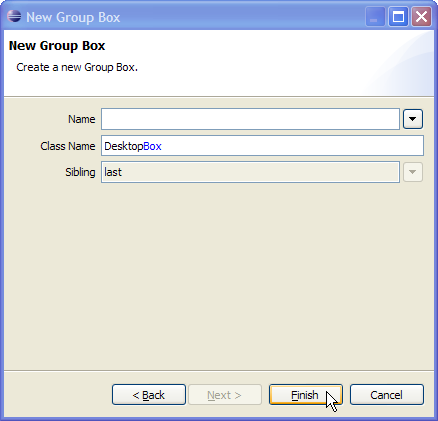
Then we set the Class Name field to DesktopBox and click the Finish button. This will add a group box field that later holds the message field. Please note the only reason for adding the group box field here is a better layout for the Hello World application. We could also have added the message field directly into the MainBox.
On the newly created desktop box field we now want to add the message field. As shown below, we now use the context menu New Form Field... on the DesktopBox node.
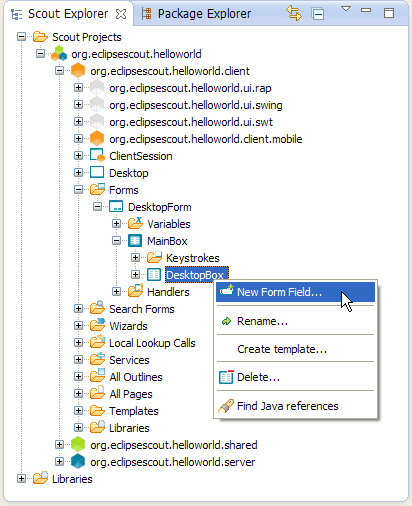
In the first wizard step we select a StringField component and click on the Next button.
To provide the lable for this string field we add Message into the Name field as shown below.
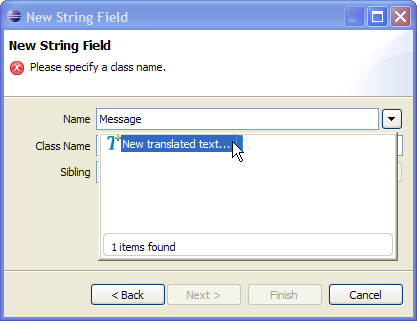
From the drop-down list presented by the wizard select the entry New translated text... with a double click. This starts the new text entry wizard shown below.
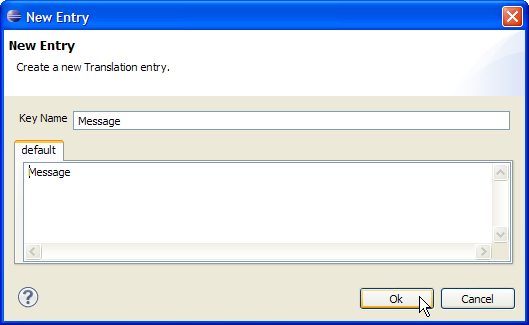
In this step, the Scout SDK helps the developer to work with translated texts, rather than typing in string literals directly into the source code of the Scout application. The texts entered into the langauge tabs will be copied by the Scout SDK into Java properties files and the application code then only contains the text keys.
As we only have a default language tab to fill in, the suggested values for the fields Key Name and default are fine and we can close the dialog with the Ok button.
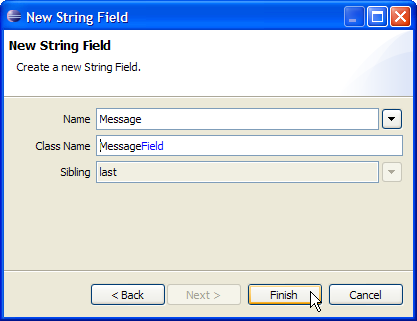
Having filled in the label text the class name field is automatically filled in and we can close the wizard with the Finish button. With this step we have completed the implementation of the Scout client part of the Hello World application.
As a next step, we will now implement the business logic on the Scout server that will provide the content to the message field that is displayed in the Scout client to the user.
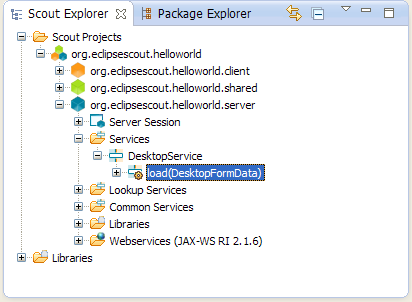
To implement the server logic of the Hello World application, we first navigate to the load method of the DesktopService under the blue server node as shown above.
This follows the Scout standard pattern where each client form has an associated server service that is responsible for loading form content and storing user changes using the application's persistence mechanism.
In the Hello World application the desktop service is only used to load an initial content into the message field of the desktop form. With a double click on the load method shown in the Scout Explorer the associated source code is loaded into the Java editor. In the Java code we only need to provide the Scout code to fill in the content to the message field.
formData.getMessage().setValue("hello world!");
Using the formData input parameter, we can access the desktop forms message field with method getMessage and use setValue to fill in the desired content. This leads to the final implementation of the load method as shown below:
@Override
 public DesktopFormData load(DesktopFormData formData) throws ProcessingException {
   formData.getMessage().setValue("hello world!");
   return formData;
 }
That's it. Both the transportation of the form data object between the Scout server and client application, and the necessary mapping of its content to the form fields in the client application are performed by the framework. This does not require any work by the Scout developer.
Running the Application
To launch the Hello World application from within the Scout SDK first select the main project node org.eclipsescout.helloworld in the Scout Explorer as shown below.
The Scout Object Property view of the main project node contains a Product Launchers section. This section contains a launcher box for each development product of the Hello World application.

As shown in the screenshot above, we first start the Hello World server application with a click on the green Start Product icon in the Server box.
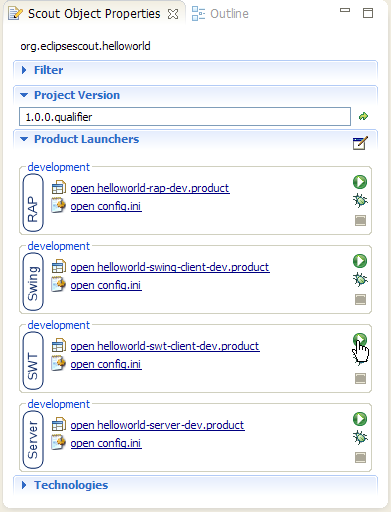
Then we can start the client products in turn. In the screenshot above the SWT client is started using the start icon in the SWT box.
To access the necessary target URLs for web and mobile clients of the Hello World application click on the link open config.ini provided in the RAP launcher box. This will open the config.ini file that contains the URL in the form of comments.
- http://localhost:8082/mobile
- http://localhost:8082/tablet
- http://localhost:8082/web
- http://localhost:8082/ (for automatic dispatching)
Next Steps
In case you have been intrigued by what you have seen from Scout so far you might consider the following steps:
Do more tutorials. In addition to the Hello World tutorial presented above, a significant amount of additional tutorials and how-tos is available on the Scout wiki. Depending on your time and interest, this will keep you occupied an addtional hour - or several days. In case you run into difficulties or have general questions regarding Scout we are happy to answer your questions in the Scout forum. Please bear in mind that July and August is summer vacation time and we are less responsive during these months.
Browse the Book. A more comprehensive introduction is available in the Scout book, also new with the Kepler release. So far, the book provides a good introduction and a general overview of the possibilities of Scout applications. For the next releases we plan to add more material to the book that cover various aspects of Scout and the development of Scout applications in greater detail. The Scout book is free and available in HTML format for online browsing. For offline usage the book is availabe in PDF, EPUB and ZIP (zipped HTML) formats.
Follow Scout. For more recent updates, check out the Scout blog or the @EclipseScout Twitter account. If you happen to live near Zurich also have a look at the local Eclipse Community page on Google+. This is the place where we usually announce public Eclipse events that frequently include Scout presentations.
About the Authors
