12. Compilation
| This chapter may be outdated. |
12.1. Introduction
Compilation is the process of transforming some source code written by means of a human readable text into a machine readable target file, i.e. bytecode or assembler. However, in the context of N4JS, the target output is not machine code but another high-level programming language. This kind of compiler transforming from one programming language to another is called transpiler, as a combination of transformation and compiler. The design of the transpiler takes this special setup into account.
12.1.1. General design rationals
12.1.1.1. Logging and error reporting
The generator always expects to get a valid model as an input. So all syntactic and semantic errors (not warnings) in the N4JS code as well as regarding the project configuration, e.g. in the package.json file, should be already discovered in the validation step. So any error marker on the resource will prevent the compiler to run.
In case of other errors arising in the generator, the error handling is done as follows:
-
either throw an
GeneratorExceptionor better callExceptionHandler.handleError(message)(that then will throw this exception) -
beside the message also the file and the current line can be passed to
GeneratorException -
GeneratorException(as extending RuntimeException) will be handled by the generator caller-
in UI:
BuildInstructionwill create an error log entry -
headless: lets the
GeneratorExceptionfail
-
12.1.1.2. Progress monitor
The compiler works on a single file and we do not expect that to take much time. Processors working on many files, such as linkers (in the JavaScript context, that is minification and concatenation), are different components.
12.1.2. Xtext Integration
12.1.2.1. Xtext default behaviour
The Xtext builder participant calculates the delta for every change in the project and triggers dirty state handling as well as code generation. By default the builder participant expects exactly one implementation bound to the IGenerator interface and thus only one output configuration provider belonging to this generator.
12.1.2.2. N4JS requirements
In constrast to the default Xtext behaviour in the N4JS IDE allows
-
the registration / discovery of multiple generators (including compilers and transpilers) but even no compiler at all, so that it is possible to ship the IDE also without any generators
-
to configure these generators separately (output paths and so on) workspace globally but also project specific (currently it is only required to enable / disable a compiler)
-
to enable / disable generators, but it is allowed to enable more than one compiler at one
-
to start compilers headless, i.e. e.g in automated build / JUnit tests but with the possibility to configure them there as well
12.1.2.3. Compiler discovery in UI
-
There is a singleton
ICompositeGenerator. TheICompositeGeneratorinstance itself doesn’t contain generator logic but knows subgenerators (that implementISubGenerator) to which it delegates the input file (so instead of registering a new builder participant (that then would have to recalculate the delta) only the generator call is extracted) -
In the UI case, the actual execution of the registered generator is done in
BuildInstructionwhere every N4JS resource contained in the delta calculated by the builder participant is anICompositeGeneratorimplementation. -
Builder (UI) and Generator (Core) summarizes the implementation of this compiler infrastructure in the UI case.

12.1.2.4. Compiler discovery in headless
-
N4JSHeadlessStandaloneSetupis used to combineN4JSRuntimeModuleandN4JSHeadlessGeneratorModuleso there isPropertiesFileBasedValuesProvideris bind as implementation forIPreferenceValuesProvider -
via
N4JSHeadlessStandaloneSetupthe injector is created which is used to create an instance ofICompositeGenerator -
in the headless mode the subgenerators of are manually registered via an extension point in the class
HeadlessExtensionRegistrationHelper.
12.1.2.5. General generator implementation
The following snippet shows a minimal generator example.
public class Generator implements IGenerator {
    @Override public void doGenerate(Resource resource, IFileSystemAccess fsa) {
        final String filename = computeTargetFileName(resource.getURI());

        Script script = IterableExtensions.<Script> head(
            Iterables.<Script> filter(resource.getContents(), Script.class));

        fsa.generateFile(filename, doCompileToString(script));
    }
}
Generation is triggered for each Xtext resource. IFileSystemAccess is an abstraction of where to write the generated artefacts. This enables using the generator in the IDE (with a workspace) and headless (directly operating on files). In tests you can use InMemoryFileAccess, in standalone mode you should use JavaFileSystemAccess and in Eclipse mode EclipseFileSystemAccess2
12.1.2.6. General generator activation
| Programmatically |
Invoke the |
| Xtext Builder |
This is available by default when using the bound |
| Context Menu | |
| MWE2 Workflow |
via |
12.1.3. Overview of the Input Models
The input is a simple instance of Script, which is the root model element for all N4JS files. Actually, it is the root of the AST. For the AST elements, other elements stemming from other models are accessible as well. The following models may be important for the compiler:
| N4JS AST |
The abstract syntax tree is an EMF model, it is defined in a single Xcore file |
| Parser or Node Model |
The parser tree, also called node model, is defined by Xtext. It contains offset information, holding whitespaces, line breaks, comments as well as other hidden tokens. It can be accessed via |
| Type Model |
The type model is an abstract view on the N4JS AST. It is defined in a single Xcore file |
| N4 Project |
via |
| Grammar Model |
Grammar Model created from |
12.2. Generators
Generators are an abstraction above that of transpilers. N4JS transpilers are implemented as specific generators, but there might be other generators that are not transpilers (e.g. generator that produces HTML documentation from the jsdoc in the N4JS source files).
12.2.1. Generator Components
Compiler Components gives an overview over the compiler related components. Some of these components are described in detail in the following sections. As of Dec 2017, the generator architecture has been refactored and simplified.
-
There is only a single
ICompositeGeneratorinstance. Since the single instance should simply delegate to subgenerators, composite generators can no longer be registered via extension point. -
Most of generator related code is moved into
org.eclipse.n4jsbundle. This is needed because we need to bindICompositeGeneratorto a concrete implementation in theorg.eclipse.n4jsbundle and the extension point forICompositeGeneratorhas been removed. -
An extension point
org.eclipse.n4js.generator.subgeneratoris introduced in theorg.eclipse.n4jsbundle. This makes it possible to register a new subgenerator via extension point.

Discovering generators and provide them with Guice bindings. shows how composite generator and subgenerators interact with other components both in the UI and in the headless case.

As we can see in the diagram above. In the UI case, N4JSBuilderParticipant creates BuildInstruction which in turn delegates the generation logics to an instance of ICompositeGenerator. The ICompositeGenerator simply delegates the generation logics to subgenerators .
In the headless mode, n4jscBase.doMain creates an instance of N4JSStandaloneSetup and obtains the injector from there. This injector is then used to create an instance of ICompositeGenerator in N4HeadlessCompiler.
12.2.2. Generator architecture
The compiler has to create different compilation targets, e.g., for web applications running in a browser (Chrome), or for applications running on iOS using the JavaScriptCore framework [13]. Other scenarios may include code created for debugging purposes vs. optimized code, although this may be implementable via configuration switches as well.
Generator and sub-generators shows the main generator classes, including two sub generators for EcmaScript code and EcmaScript on iOS.

12.2.3. Unified Compiler Configuration
Since the compiler is to be used in both UI and headless (or CLI) mode, the configuration has to abstract from Eclipse IPreferenceStore concept or CLI utility classes. This is done with the combination of CompilerDescriptor and CompilerProperties, used by all ISubGenerator implementations (see Fig. Sub Generators).
Each compiler provides
-
a unique name (that have to match with the name of the output configuration)
-
a default compiler descriptor that contains the preference values to be applied when nothing else been configured in the provided preference values
A CompilerDescriptor has
-
an identifier (this is the unique name of the compiler as mentioned before)
-
a name (a readable name to used in Eclipse preference page)
-
a description (not used yet, but maybe later also shown in the preference page)
-
a flag, that indicates, if this generator should run by default
-
the file extension to be used for the compiled file
-
the
OutputConfigurationobject from Xtext that contains output related preferences like the output folder
The CompilerProperties is an enumeration that makes it easier to iterate over the preferences and getting / setting the preference values in a generic way. So this enumeration contains all configurable properties as literals.
The keys for preferences have to follow a fixed pattern as it also used internally by the builder participant when applying the configurations from the OutputConfiguration. So the key consists of
-
’outlet’
-
unique name of the compiler = unique name of the output configuration
-
the name of the property
Example: outlet.es5.compiledFileExtension
N4JSPreferenceAccess encapsulates the access to the injected IPreferenceValuesProvider. This values provider is bound in UI to EclipsePreferencesProvider that creates an overlay over the default configuration and makes it so possible to have workspace global as well as project specific preferences and always as fall back the default values.
In headless mode the PropertiesFileBasedValuesProvider is bound as implementation of IPreferenceValuesProvider. With this implementation it is possible to load the preferences from a provided properties file.
N4JSPreferenceAccess is used in AbstractSubGenerator which provided the most common used preferences as extra methods.
12.3. Transpilers
Transpilers are a special case of generators, used for transforming N4JS source code into some target code in some other, high-level programming language. In this section we describe the general transpiler infrastructure without considering any particular transpiler. Currently, there is only a single such concrete transpiler for ECMAScript target code, explained later in N4JS-to-EcmaScript Transpiler.
All code of the general transpiler infrastructure is found in bundle org.eclipse.n4js.transpiler.
12.3.1. Overview
Overview of the compilation pipeline shows an overview of the steps during transpilation of a single resource:
-
an initial conversion from the original AST to an intermediate model (IM), called preparation step.
-
one or more transformation phases, each taking as input the IM and performing a number of in-place modification on it.
-
a final pretty printing step that transform the final version of the IM into the textual output, i.e. the target code.

The IM is the most important data structure in the transpiler. It starts out as a 1-to-1 copy of the original AST and is then gradually transformed by the AST transformation steps into, ultimately, a representation of the output code. Only the IM undergoes updates, while the original AST remains unchanged. Nodes in the IM that are identical on N4JS source code and target code side can simply be left unchanged. Traceability links allow navigating back to an original AST node from a given IM node, but due to the gradual modification of the IM this might not be possible for all IM nodes (the tracer will return null in those cases.
Ideally, each transformation executed during the transformation step should be self-contained and coupling should be reduced to a minimum. Of course, this is not possible in all cases, in practice. Therefore, a simple mechanism is provided for statically specifying dependencies between transformations by way of Java annotations (see Java class TransformationDependency for more details). The ECMAScript transpiler, for example, has 18 individual transformations (at time of writing).
12.3.2. Relation between AST and IM
The relation between the original AST and the IM is maintained by the tracer, see class Tracer, which is available via the transpiler state. The tracer allows to obtain a IM elements for a given original AST node and, conversely, original AST nodes for a given IM element (i.e. a 1:N association between original AST node and IM element).
The main purpose of this tracing information is to compute source maps for the target code.
At the beginning of the transformation step, there is a 1-to-1 correspondence between AST and IM, but over the course of the transformations this correspondence will become more and more blurred. Therefore, whenever using the tracer to get to the original AST from a given IM element , we have to consider the case that there is not original AST node defined for (because was created programmatically by an earlier transformation) OR that the original AST node is of a different kind than (because, maybe, an original N4JS class declaration was replaced by a function declaration by an earlier transformation).
Whenever a transformation changes the IM, it is responsible to update the tracer, accordingly.
12.3.3. Implementation Overview
Transpiler Class Diagram shows a class diagram of the main constituents of the transpiler infrastructure.

The AbstractTranspiler controls the overall workflow shown earlier in . Concrete subclasses of Transformation perform the actual transformations (the preparation and pretty-printing steps are not shown in the above class diagram). Concrete transformations are created via injection within concrete sub classes of AbstractTranspiler (see class EcmaScriptTranspiler for an example). All information required during transpilation is kept in a simple data class called TranspilerState; a single instance of this class is created during the preparation step and is passed along until transpilation of the resource to transpile is completed.
Class Transformation has a super class TranspilerComponent that has two important responsibilities:
-
it contains many utility methods that are easily accessible from within concrete transformations through inheritance.
-
it obtains the transpiler state via injection (using the scoping feature of Google Guice, for more details see
org.eclipse.n4js.utils.di.scopes.ScopeManagerandTransformationScoped). This injection is done in super classTranspilerComponent, so when implementing a new transformation, the programmer does not have to deal with these details and can simply obtain the transpiler state via the inherited methodTranspilerComponent#getState().
Code shared across concrete transformations should be placed in sub classes of TransformationAssistant. Those assistants are similar to the helpers used elsewhere, but by sharing the TranspilerComponent super class they get all the utility methods provided by that class and they automatically get the transpiler state.
For more implementation details see the code and javadoc; a good starting point for investigating the overall workflow are classes AbstractTranspiler and Transformation.
12.3.4. Guidelines for Implementing Transformations
Some hints:
-
if you need to create an entirely new transformation:
-
create new sub class of
Transformation(use Xtend). -
in the main class of the transpiler you are working with (probably
EcmaScriptTranspiler), change method#computeTransformationsToBeExecuted()to return an instance of your new transformation. The instance should be created using a Guice provider (seeEcmaScriptTranspilerfor an example). Note that this method also defines the order of transformations! -
implement the
#transform()method of your newly created transformation. -
consider adding pre and post conditions via methods
#assertPreConditions()and#assertPostConditions()(throw an AssertionError if failed). -
consider declaring dependencies to other transformations using the annotations defined in class
TransformationDependency.
-
-
code shared across transformations should be placed in a new or existing sub class of
TransformationAssistantand then this assistant should be injected into the transformations that require this code’s functionality. -
inside a transformation or transformation assistant:
-
to modify the IM, use the utility methods inherited from
TranspilerComponent(e.g.#replace(),#insertBefore()); try to avoid direct manipulation of the IM as far as possible (but sometimes it’s necessary). -
to create new IM elements, use the convenience methods in
TranspilerBuilderBlocks; use static import. -
to create a new symbol table entry or to obtain an existing symbol table entry for a given original target or element in the IM, use the inherited utility methods
TranspilerComponent#getSymbolTableEntry*().
Never search or modify the symbol table directly! -
to access the transpiler state [14], use inherited method
TranspilerComponent#getState()(by convention, in Xtend you should just writestateas if it were a field).
-
-
for local testing, activate additional consistency checks between transformations and assertion of pre/post conditions via these boolean flags:
AbstractTranspiler#DEBUG_PERFORM_VALIDATIONS,
AbstractTranspiler#DEBUG_PERFORM_ASSERTIONS. -
never add one of the following replaced EMF entities to the IM:
Script,
IdentifierRef,
ParameterizedTypeRef,
ParameterizedTypeRefStructural,
ParameterizedPropertyAccessExpression.
Instead, use the replacement entities fromIM.xcorethat have the_IMsuffix (e.g.IdentifierRef_IM). If you always useTranspilerBuilderBlocksas described above, you won’t run into this issue.
12.3.5. Symbol Table in the IM
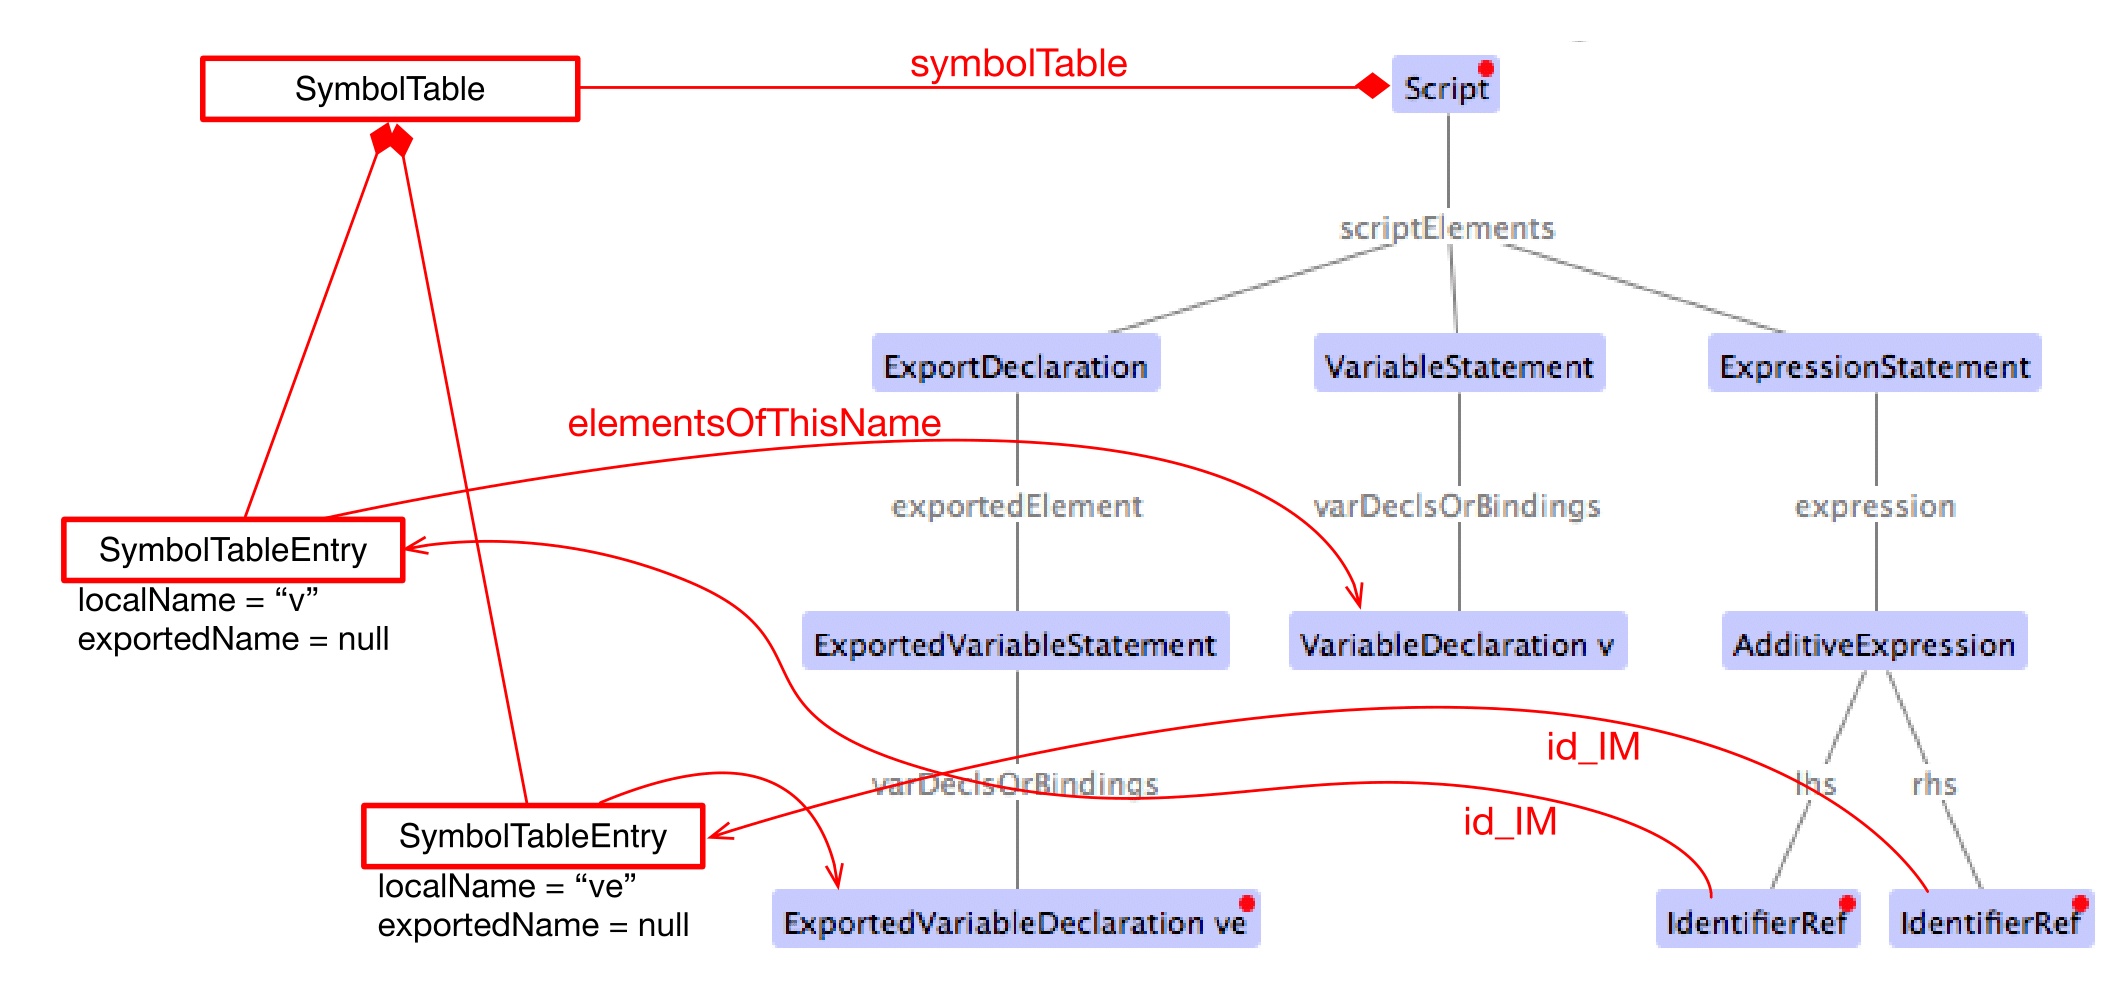
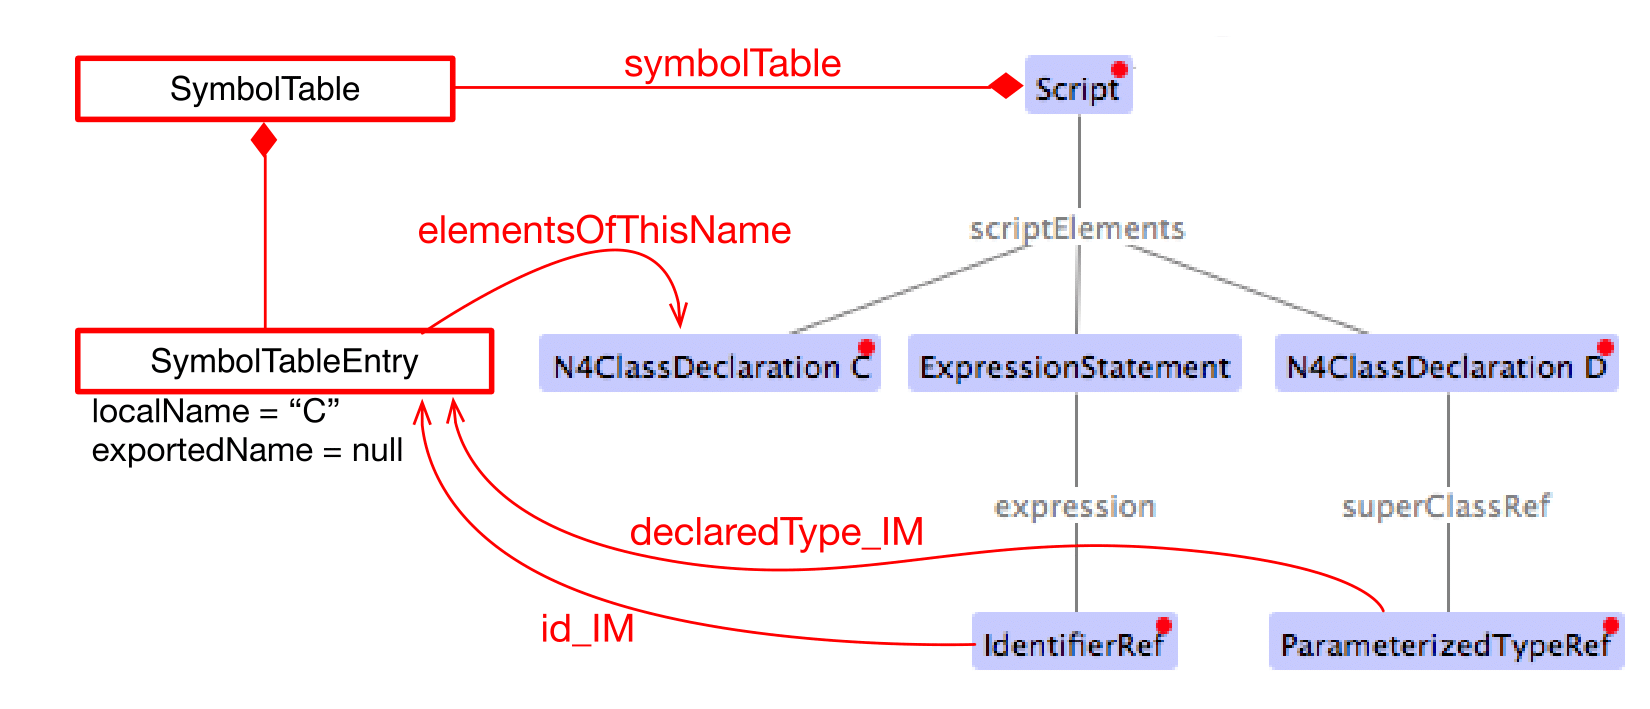
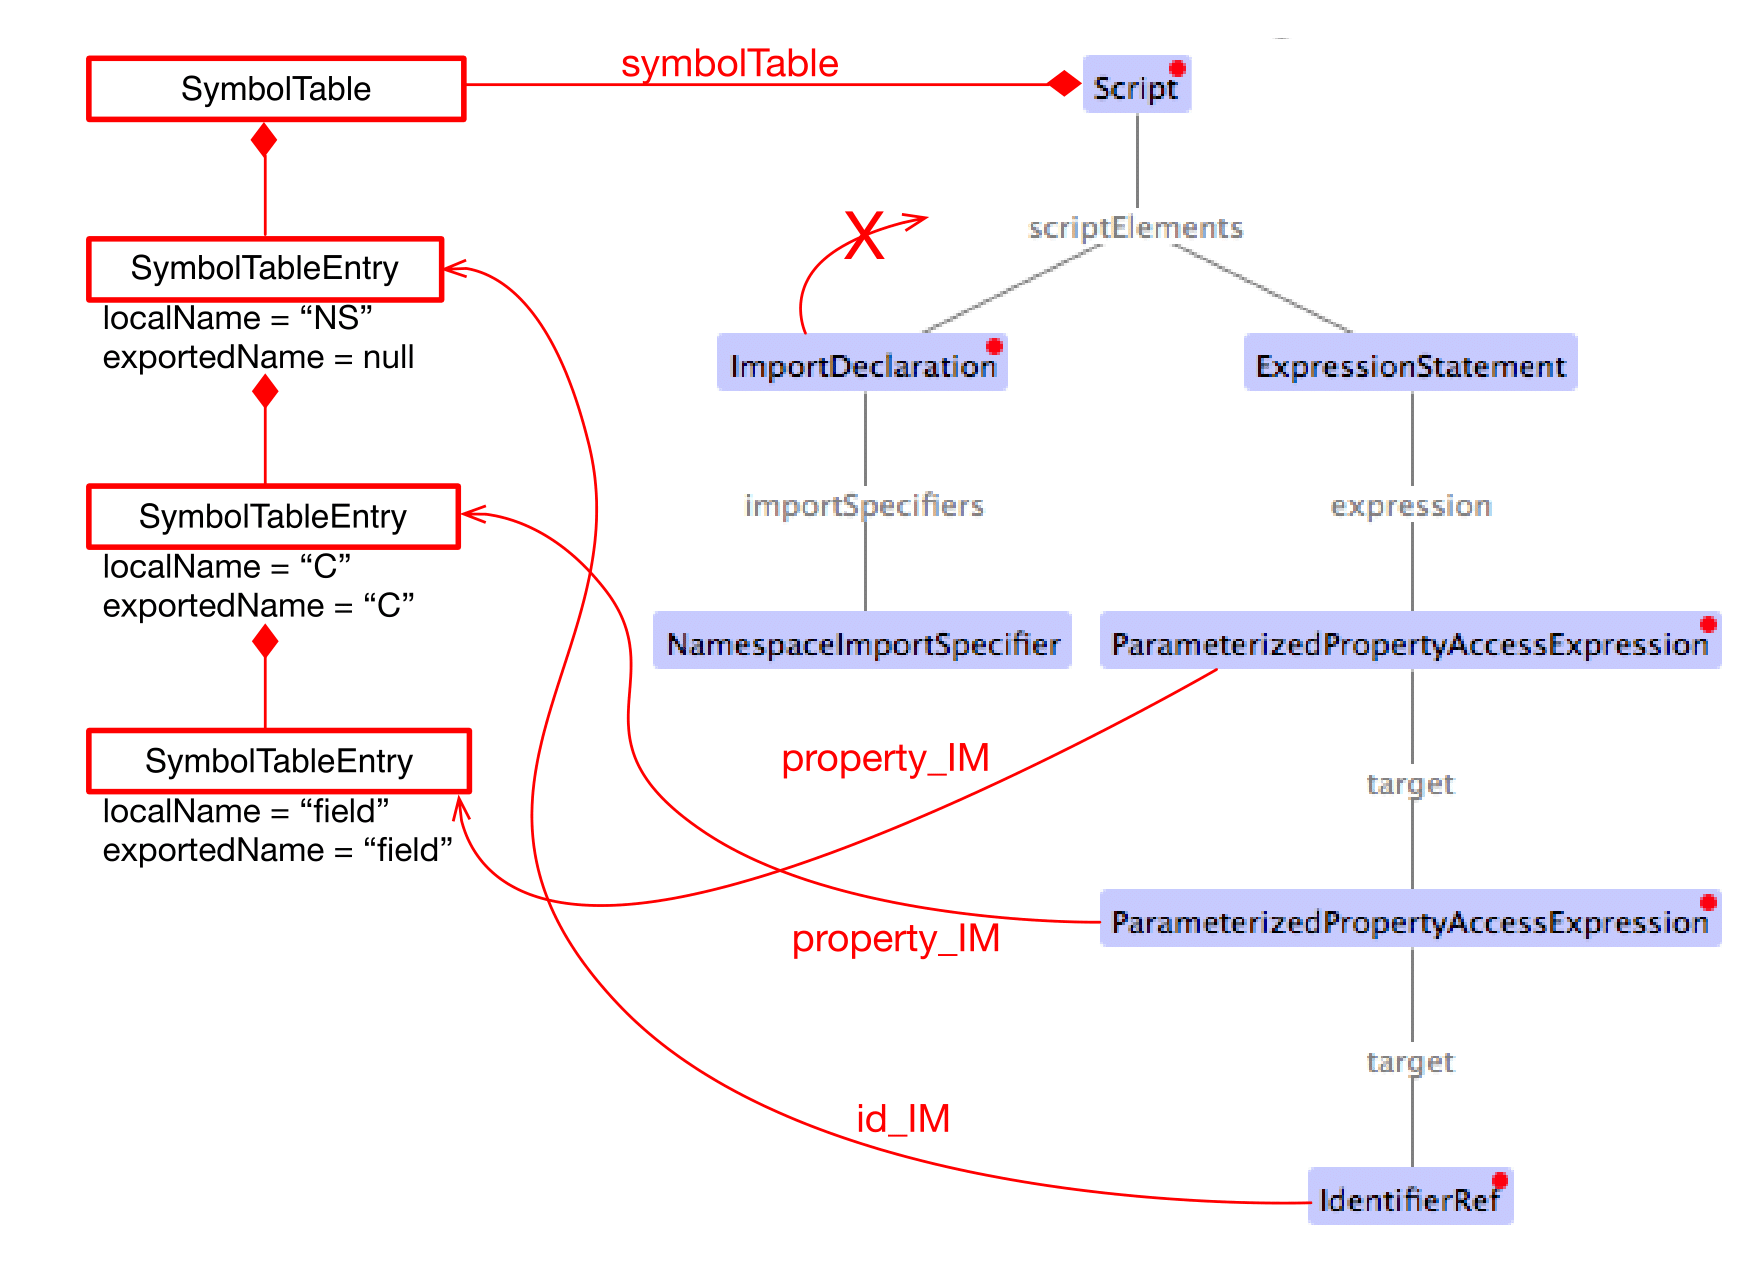
During the preparation step, the IM is created as an exact copy of the original AST in most cases. However, to make sure the IM is self-contained and does not have any cross-references to the original AST or the original TModule and to simplify certain computations within the transformations, some AST entities are modified. For this purpose, there is a small EMF model called IM.xcore. It extends the AST model n4js.xcore and adds some elements.
Most importantly, a symbol table is created and all references of the original AST pointing to an IdentifiableElement (either in the original AST or in the TModule) are rewired to a reference to an entry in the symbol table. Those entries are of type SymbolTableEntry and occur in three special forms (there is a dedicated sub class for each case). Detailed information is provided in the javadoc of SymbolTableEntry and its sub classes and is not repeated here to avoid duplication.
The following entity replacements are done while creating the IM from the original AST and the entities without _IM must never appear in the IM:
-
ScriptScript_IM -
IdentifierRefIdentifierRef_IM -
ParameterizedTypeRefParameterizedTypeRef_IM -
ParameterizedTypeRefStructuralParameterizedTypeRefStructural_IM -
ParameterizedPropertyAccessExpressionParameterizedPropertyAccessExpression_IM
For example, when having in the original AST an IdentifierRef pointing to identifiable element , then the IM will contain an IdentifierRef_IM pointing to a SymbolTableEntryOriginal with a property originalTarget pointing to .
Figures Rewire Var, Rewire Class, and Rewire Import show a comparison between an original AST with its original TModule and the self-contained intermediate model for a number of concrete examples.
Original AST + TModule

Intermediate model (IM)
original AST + TModule

Intermediate model (IM)
Original AST + TModule

Intermediate model (IM)
12.4. N4JS-to-EcmaScript Transpiler
12.4.1. Overview of Transformations
The following overview will soon be outdated. Therefore:
-
to find out which transformations are actually being executed and in what precise order, it is best to directly look into method:
EcmaScriptTranspiler#computeTransformationsToBeExecuted(). -
to learn about dependencies between transformations, check the annotations of the transformation class to see if one of the dependency annotations defined in
TransformationDependencyare given there (though probably not all dependencies will be specified in that form).
The following table lists all transformation by class name in the order they are executed by the EcmaScriptTranspiler.
StaticPolyfillTransformation |
|
MemberPatchingTransformation |
|
ApiImplStubGenerationTransformation |
|
DestructuringTransformation |
turn destructuring patterns into ES5 code |
SuperLiteralTransformation |
super call + super access |
ExpressionTransformation |
casts, |
DependencyInjectionTransformation |
|
ClassDeclarationTransformation |
|
InterfaceDeclarationTransformation |
|
EnumDeclarationTransformation |
|
FunctionDeclarationTransformation |
turn declared function into variable declaration + function expression |
ArrowFunction_Part1_Transformation |
|
BlockTransformation |
local arguments variable, |
FormalParameterTransformation |
variadic arguments |
ArrowFunction_Part2_Transformation |
|
TrimTransformation |
remove TypeRefs and TypeVariables |
SanitizeImportsTransformation |
remove unused imports + add missing imports |
ModuleWrappingTransformation |
The main complexity lies in the three transformations for N4JS type declarations (classes, interfaces, enums) and the related three transformations for member handling at the beginning (static polyfills, member patching, API/Impl stub generation) and the module wrapping. Up to the double horizontal line, the IM is still rather close to N4JS (e.g. still contains N4ClassDeclarations with N4MemberDeclarations), but after that it rapidly departs from the structure of the original AST (e.g. class declarations are broken up into a function declaration and a $makeClass call, field accessors and methods become function expressions in the properties of an object literal, fields are handled differently).
12.4.2. Transpiling members
When processing the members of a container type, in the standard case, the transpiler simply has to generate target code for each owned member. For inherited members no output code has to be generated, because the ordinary semantics of the Javascript prototype chain is used in the generated code.
There are, however, special cases when output code has to be generated for a non-owned or non-existant member of a container type:
-
partial shadowing caused by lone field accessors, [sec:Transpiling_members__Partial_shadowing_of_getter_setter_pairs]
( delegation) -
consumption of members of an interface within an implementing class, [sec:Transpiling_members__Consuming_or_inheriting_members_of_an_interface]
( delegation, for data fields: copying) -
inheritance of members of an interface within an extending interface, [sec:Transpiling_members__Consuming_or_inheriting_members_of_an_interface]
( delegation, for data fields: copying) -
mixing in members into a container type via static polyfill, [sec:Transpiling_members__Static_polyfill]
( copying) -
adding an API / implementation stub, [sec:Transpiling_members__API_implementation_stubs]
( creation)
The above overview also states what technique is used in each special case of member handling: delegation, copying or creation. Delegation is the most tricky one and means that not a new function is generated in the output code for the special member, but the existing member function of an existing member is obtained from somewhere in the prototype chain and used directly as the member function of the special member. Copying means that an existing member is copied to another location where the special handling is required as if it were defined in that place. Lastly, creation means that an entirely new member is created for which no existing member serves as a template and this member gets a body with some default behavior. These three techniques of special member handling are explained in more detail in Techniques for special member handling.
12.4.2.1. Techniques for special member handling
If output code has to be generated for a non-owned member of a classifier we distinguish the following two cases:
-
either some other member owned by classifier serves as a template for ,
-
or no such template exists.
In the first case, we can either copy in the sense that we will generate output code for within the output code for as if had been defined in . Or we can use delegation, i.e. generate output code for that reuses the existing member function of in . In case no template exists, we always have to create from scratch, i.e. generate output code as if had been defined with some behavior pre-defined by the N4JS language (this applies only to API / implementation stubs where this pre-defined behaviour is to throw an unimplemented member error).
Creation and copying is straightforward; for more details on member delegation see class DelegationAssistant and entity DelegatingMember in IM.xcore. The basic approach is to allow one transformation to create a DelegatingMember and insert it into the IM and let the transformations for class and interface declarations turn this member into low-level Javascript constructs that perform the actual delegation.
12.4.2.2. Partial shadowing
In Javascript, if an object has a setter of name , then a read access obj.prop will return undefined, even if the prototype of has a getter or field of name . Conversely, if has a getter , then a write access obj.prop = 42 will produce a runtime error, even if the prototype of has a setter or field .
var proto = {
  get prop1() { return "this won't show up" },
  set prop2(value) { console.log("this won't be reached") }
}
var obj = {
  set prop1(value) {},
  get prop2() {}
}
obj.__proto__ = proto;

console.log(typeof obj.prop1);  // will print "undefined"
obj.prop2 = 42;  // error: "setting a property that has only a getter"
Note, in plain N4JS a validation enforces a redefinition of accessors or overriding of a field always by getter/setter pairs. However, in special situations of incomplete API implementations stubs for missing accessors are created in order to provide meaningful test-reporting. This leads to situations where on the implementation side a single getter or or a single setter is defined in a subclass - unaware of possibly injected stubs in superclasses. The aforementioned validation can not enforce the user to author an accessor pair. To keep a meaningful test-response the transpiler treats this situation as follows:
12.4.2.3. Consuming or inheriting members of an interface
When an N4JS class consumes the member of an interface implemented by , then this cannot be handled by the native prototype chain mechanism of Javascript. Instead, the transpiler has to generate a member of corresponding type that delegates to the consumed member. In case of data fields, such a delegation is not possible and thus the transpiler generates output code for the consumed data field as if the field had been defined in .
Of particular importance in this context is the diamond problem when consuming members from an interface. For example, if interface defined method with a default implementation, interface extends and overrides with a different implementation, class implements and class extending implements , then will not consume because it has already inherited from its super class (which in turn has consumed it from ). So, in the default implementation of given in will be active, not that given in .
12.4.2.4. Static polyfill
See class StaticPolyfillTransformation for details.
12.4.3. Support for incomplete API implementation testing
As part of the introduction of API projects with executable test cases the need to verify the state of implementations came into focus. No formal dependency is allowed between an API project and its dedicated implementation projects, hence an inconsistency can not directly be detected. However at runtime (c.f. Execution) the API is always replaced by an appropriate implementation.
In cases where such an implementation is incomplete this would result in failures due to missing concepts, e.g. calls to methods that are not in place or usage of fields which are not defined. In order to support the author of an implementation the IDE provides a mean to compare the current state of implementation to the developer in a tabular way (c.f. [N4JSSpec]).
The key idea for automated test-support is to incorporate those comparison-results into the transpiled output in way, that a test-framework can easily distinguish wrong implementations from incomplete implementations. Of course this is not always possible, but the majority of cases can be handled.
As there is only one transpilation mode the resulting modifications are always part of the generated code.
In order to distinguish the different project-types we distinguish between different project types:
-
an API-project (API)
-
an API-implementation project (Impl)
-
a client project (Client)
-
a test project (Test)
The API-project defines the requirements to it’s implementors in form of definition-files (n4jsd). The API is defined together with an test-project which validates the implementation. Client code is written with a formal dependency to the API and uses the elements declared therein. In that sense an API-testing project is just a normal client project with a test-nature.
Additional code to support API implementation testing is only inserted into the Impl-projects. API, Client and Test are not affected.
One major goal in transpiling Impl projects is to provide the ability to load all modules used in Client/Test projects in non-disruptive way. Even if the implementation is missing elements the runtime should still be able to successfully load the module. Errors should only be signalled when the client code actually uses the missing concepts.
12.4.3.1. Modifications in Impl projects
The generator is module driven. In case of missing modules nothing will be done but the runtime will detect this and act accordingly.
In general only missing elements will be inserted:
-
Missing class - a stub will be generated
-
Missing function - a stub will be generated
-
Missing enumeration - a stub will be generated
-
Missing interface - a stub will be generated
Missing members of classes are inserted as stubs. Missing fields will be replaced by getter/setter-pairs throwing an error upon read and write access.
A more sophisticated approach needs to be taken for interfaces with default implementations (marked with @ProvidesDefaultImplementation or @ProvidesInitializer).
Currently missing field initialisers in interfaces are not detected for two reasons: Field-initialising is carried out on loading. Throwing an error in the initialiser will prevent the module from being loaded. Installing a getter/setter pair on the Impl-interface is not an option since the inheritance chain used in client project has no knowledge about this and therefore these accessors cannot be reached from client code.
Missing default implementations will be inserted as stubs. For normal class compilation the inheritance chain needs to be scanned. In case of an missing default implementation in an implemented interface a forwarding call to the stub needs to be inserted on the class.
12.4.3.2. Implementation of stub-generation
The implementation is mainly organised in ApiImplStubGenerationTransformation, which makes use of MissingApiMembersForTranspiler and ScriptApiTracker.
When a Module is transpiled the type of the project is checked. Only if the project is an implementation project the comparison between the current module and it’s API module is computed and attached as an Adapter to the Script during the life-cycle of the ScriptTranspilerPolicy. The ProjectComparisonAdapter serves as a shared information pool among the different transpiler-policies and caches different compare-results. After transpilation of the script the adapter will be removed.
In order to reuse all existing code as far as possible, missing elements are modelled as subclasses of the requested element but with no AST-information. These subclasses are member-classes of the ScriptApiTracker class. All class-names are prefixed with VirtualApi and hold a reference to the type-information computed by the module-comparison.
It is important to not access the AST-elements of type-information obtained from the project-comparison, since this would trigger the AST-loading and invalidate (proxifying) existing EObjects.
12.5. n4jsc Headless Compiler Interface
The headless compiler interface consists of a runnable class capable of reading command line options packaged together with all required dependencies into one executable .jar archive.
The sources of the command line interface are located in in the tools/ subfolder of the main git repository. They comprise of the package org.eclipse.n4js.hlc and corresponding test package org.eclipse.n4js.hlc.tests. (c.f. Tools).
A description of how to use the headless compiler can be found in the N4IDE document.
12.5.1. building the headless compiler
The maven-modules related to the headless compiler build are organised in the tools folder in the project-root. In order to build the headless compiler as part of the common build-chain, the maven-profile buildTools needs to be activated (off by default), e.g. mvn -PbuildTools .
To build the headless compiler separately, the project-pom can be set to tools/pom.xml, however then the tycho-generated artefacts must be accessible by this build. This can be achieved in three different ways:
-
the build takes place on a workspace formerly building the n4js-project without cleaning it (interesting for local experiments),
-
a former n4js-build installed the artefacts into the currently configured local-.m2-repository of maven or
-
a former n4js-build deployed the artefacts to the configured nexus-server.
Note however, on our build-server option a) is not feasible, option b) requires you to setup a build-chain and ensuring the same build-node to be building on and c) is difficult up to nearly impossible without a proper versioning-scheme.
Parameters for the headless-compiler-build are defined in the parent-pom located at releng/org.eclipse.n4js.parent/pom.xml with properties prefixed by hlc..