Copyright
© 2001 Object Technology International, Inc.

Help Part 1
Contributing a little help
Summary
The Eclipse platforms help system defines two extension points ("contributions"
and"contexts")
that allow individual plug-ins to contribute online help and context-sensitive
help for their components. In this article we will investigate the contributions
extension point and how you can use it to contribute documentation for
your plug-in.
By Greg Adams, OTI and Dorian Birsan, IBM
Updated May 28, 2001
Editor's note: This article describes the help system for Eclipse
release 1.0. There is an updated
version of this article for Eclipse release 2.0.
Introduction
The Eclipse platforms help system allows you to contribute your plug-ins online
help using the org.eclipse.help.contributions extension point. You can either
contribute the online help as part of your code plug-in or provide it separately
in its own documentation plug-in. This separation is beneficial in those situations
where the code and documentation teams are different groups or where you want
to reduce the coupling/dependency between the documentation and code. The platforms
help facilities provide you with the raw building blocks to structure and contribute
your help. It does not dictate structure or granularity of documentation. The
platform does however provide and control the integrated help viewers thus ensuring
seamless integration of your documentation.
The org.eclipse.help.contributions extension point provides four elements
through which you can contribute your help, they are:
-
topics
-
infoset (also known as a book)
-
infoview
-
actions (also known as wiring)
The topics, infoset and actions contributions all specify an associated
xml file that contains the details of the contribution. In the remainder
of this article we will create a documentation plug-in that uses all four
of these elements. By the time were done, youll have your first online
help plug-in.
Making the plug-in and content
A content author supplies one or more HTML files containing the actual
documentation. There are no restrictions imposed by the platform on the
granularity of the HTML files. That is, the documentation authors can opt
to use one massive HTML file, or numerous smaller granularity HTML files.
We will start by assuming that you already have some html files that you
want to integrate into the Eclipse platform. Lets assume your content
is arranged into the following directory tree.
doc/
concepts/
concept1.html
concept1_1.html
concept1_2.html
tasks/
task1.html
task2.html
task3_1.html
task3_2.html
ref/
ref1.html
ref2.html
Create a plug-in directory called org.eclipse.helparticle and place the above
doc\ sub-tree into it. Now create an initial plugin.xml file with
the following content:
<?xml version="1.0"?>
<plugin
name = "Online Help Sample"
id = "org.eclipse.helparticle"
version = "0.9"
provider-name = "Object Technology International,
Inc.">
</plugin>
To help you get started here is a zip file containing the above initial
plug-in structure. This plug-in manifest file doesn't actually integrate anything
yet but soon we will add our contributions to it.
Topics & HTML Content
Now that we have our sample content files we are ready to create our topics
file.
A topics file defines the key entry points into the HTML content files
by mapping a topic id and label to a reference in one of the HTML files.
A topics file acts like a table of contents for a set of html content.
Teams migrating onto the Eclipse platform can quickly reuse existing documentation
by defining entry points into their existing documentation via the topics
file. A plug-in can have one or more topics files. Topics files are sometimes
referred to as navigation files since they describe how to navigate the
html content. We have three main content areas, concepts, tasks and reference.
Our obvious choices are one big topics file, or a topics file for each
main content area. Keep in mind this decision is ours to make, and is not
a decision the platform dictates to us. If we were really writing our
documentation we would have a larger number of files so, with that in mind
we will try and keep things manageable by creating a topics file for each
of the three content areas as follows:
topics_Tasks.xml
<topics id="tasksAll">
<topic id="plainTasks" label="Plain Stuff">
<topic label="Task1"
href="doc/tasks/task1.html"/>
<topic label="Task2"
href="doc/tasks/task2.html"/>
</topic>
<topic id="funTasks" label="Fun Stuff" >
<topic label="Task3_1"
href="doc/tasks/task3_1.html"/>
<topic label="Task3_2"
href="doc/tasks/task3_2.html"/>
</topic>
</topics>
topics_Concepts.xml
<topics id="conceptsAll">
<topic label="Concept1" href="doc/concepts/concept1.html">
<topic label="Concept1_1"
href="doc/concepts/concept1_1.html"/>
<topic label="Concept1_2"
href="doc/concepts/concept1_2.html"/>
</topic> </topics>
topics_Ref.xml
<topics id="refAll">
<topic label="Ref1" href="doc/ref/ref1.html"/>
<topic label="Ref2" href="doc/ref/ref2.html"/>
</topics>
Topics are contributed as part of the topics container element. A topic
can be a simple link to content (e.g. Task1) or a hierarchical grouping of sub-topics
(e.g. Fun Stuff), or both (e.g. Concept1). When we start wiring these topics into
the overall documentation web we will refer to them by their id. When used as
a link, the argument to href is assumed to be relative to the current plug-in.
Only topics with an id can be manipulated. We can also refer to the id associated
with the topics element if we want to refer to all of its enclosed topic entries.
Later we will modify the plugin.xml to add the actual contributions pointing to
these files.
Creating a book
Now that we have our raw content and topic files its time to create our
infoset. An information set (infoset) is a documentation web or book. The
Eclipse platform can display any number of infosets. An infoset contains
one or more infoviews. An infoview provides a high-level semantic grouping
within the infoset. Infoviews could be used to create multiple views onto
the document web. For example we could use them to create an integrated
view of documentation supplied by many components, or a component based
view. We could also use them to create separate views for getting started,
tasks and concepts, or as we will shortly do, create one infoview to show
them all. The term infoview is used to avoid collision/confusion with the
term view in the platforms user interface. Each infoview contains a collection
of topics. Sometimes a higher-level component or product team is responsible
for weaving together the documentation and topics supplied by a number
of its component teams. For our purposes well assume that our plug-in
should supply both the topics and the book that integrates the topics.
Towards the end of the article we will look at how to make your documentation
plug-in live happily in both a component world and a product world.
The following infoset has id infoset_SampleGuide and declares one
infoview whose id is view_Contents. The id of the infoview will become
important as we start wiring in the high level structure for the infoview,
and ultimately wiring in the topics we defined earlier.
infoset_SampleGuide.xml
<infoset id="infoset_SampleGuide" label="Online Help
Sample" href="doc/splash.html">
<infoview label="Content" id="view_Contents"
/>
</infoset>
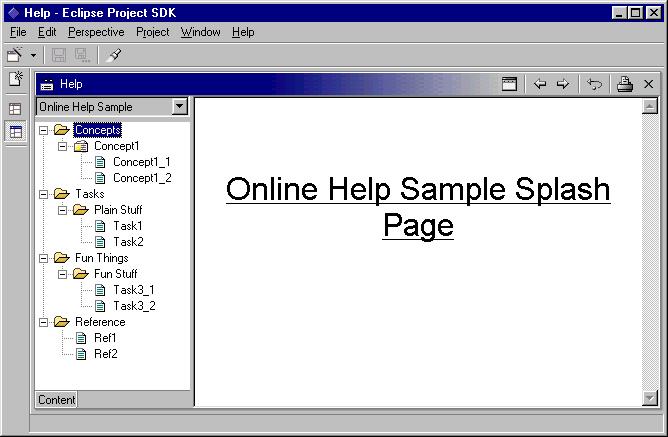
Selecting the book called "Online Help Sample" shows one possible infoview
called "Content". The following figure shows the eventual look of our help.
If multiple infoviews had been declared by our xml file they would show
up as additional "infoview tabs" alongside the "Content" tab. Notice that
our splash page (contained in splash.html and declared above) is
also displayed.
Wiring in the top level structure
Next on our agenda is to define the top-level structure that a user will
see within our Contents infoview. We start by creating the following
topics file for the top-level topics:
topics_view_Contents.xml
<topics id="topics_view_Contents">
<topic id="conceptsRoot" label="Concepts"
/>
<topic id="tasksRoot" label="Tasks" />
<topic id="funRoot" label="Fun Things" />
<topic id="refRoot" label="Reference" />
</topics>
Now comes the fun part, time to wire in these topics into our Contents
infoview. Once weve done that we can then proceed to wire in all of our
other topics underneath the above top-level topics. We start by wiring
in the top-level topics using the following actions
file.
actions_view_Contents.xml
<actions infoview="org.eclipse.helparticle.view_Contents">
<insert
from="org.eclipse.helparticle.topics_view_Contents"
to="org.eclipse.helparticle.view_Contents"
as="child"/>
</actions>
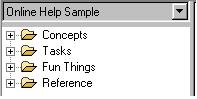
The following snapshot shows what our infoset (Outline Help Sample) will
look like as a result of wiring in these top-level topics. The title (label)
of the infoset is only displayed in the combo box if there is more than
one infoset.
Taking a closer look at actions
Before we continue lets take a closer look at the action file
and the action elements it contains. The actions file contains scripting actions
to be performed on topics and infoviews. Currently there is only one kind of
action, the insert action, which is used to wire topics and views together into
one integrated information web. The actions are structural actions (insert)
and, thus, apply to a certain infoview. So, all the insert actions in an actions
file wire their topics into one infoview. If you want to wire into different
infoviews, you will need an actions file for each. The insertion points can
be topics or infoviews. A topic indicates its willingness to be an insertion
point by providing an id. Infoviews are required to have id's. Only fully
qualified ids are used as references. For example, the fully qualified topic
id of the topic <topic id="conceptsRoot " label="Concepts"> in our
org.eclipse.helparticle plug-in is org.eclipse.helparticle.conceptsRoot. In
the above actions file we took the topics element with fully qualified id "org.eclipse.helparticle.topics_viewContents"
and wired it into the infoview with id "org.eclipse.helparticle.view_Contents".
Since the insertion points are sometimes located in other plug-ins,
and these plug-ins may not be installed, one can specify an alternate insertion
point. By default, if none of the choices succeed, the topic stays under
its component hierarchy. The "to" attribute specifies the target insertion
point. The topic specified by the "from" attribute is the topic being inserted.
Followings are some possible ways to insert a topic and they are specified
using the "as" attribute:
-
As a child of the insertion point, which is the most common. Attribute:
as = "child".
-
As the first child of the insertion point. Attribute as = "first-child".
-
As the last child of the insertion point. Attribute as = "last-child".
-
As the previous sibling of the insertion point (i.e., just before the insertion
point at the same level in the navigation tree). Attribute as = "prev-sib".
-
As the next sibling of the insertion point (i.e., just after the insertion
point at the same level in the navigation tree). Attribute as = "next-sib".
Alternative insertion options can be provided. The nested insert sub-elements
of the insert element provide these alternatives. This can be thought of as a
"fall-back" mechanism where if an insert action fails, the nested insert action
will be executed. Once the first choice insertion point has been satisfied, the
other alternative insertion points are ignored.
Integrating our topics
The time has come to finally integrate our topics into the top-level topics of
the Contents infoview. To do this we need another actions file that we will
call actions_All.xml (since it integrates all of our topics).
actions_All.xml
<actions infoview="org.eclipse.helparticle.view_Contents">
<insert
from="org.eclipse.helparticle.conceptsAll"
to="org.eclipse.helparticle.conceptsRoot"
as="child"/>
<insert
from="org.eclipse.helparticle.refAll"
to="org.eclipse.helparticle.refRoot"
as="child"/>
<insert
from="org.eclipse.helparticle.plainTasks"
to="org.eclipse.helparticle.tasksRoot"
as="child"/>
<insert
from="org.eclipse.helparticle.funTasks"
to="org.eclipse.helparticle.funRoot"
as="child"/> </actions>
Recall that we had a number of task related html files, and the structure/navigation
of these files was defined by topics_tasks.xml as follows:
topics_Tasks.xml
<topics id="tasksAll">
<topic id="plainTasks" label="Plain Stuff">
<topic label="Task1"
href="doc/tasks/task1.html"/>
<topic label="Task2"
href="doc/tasks/task2.html"/>
</topic>
<topic id="funTasks" label="Fun Stuff" >
<topic label="Task3_1"
href="doc/tasks/task3_1.html"/>
<topic label="Task3_2"
href="doc/tasks/task3_2.html"/>
</topic>
</topics>
In the above actions file we use the insert as child action to take the topic
with id org.eclipse.helparticle.plainTasks and insert it and its sub-topics under
the topic with id org.eclipse.helparticle.tasksRoot
<insert
from="org.eclipse.helparticle.plainTasks"
to="org.eclipse.helparticle.tasksRoot"
as="child"/>
The actions file also takes some of our more entertaining tasks and inserts
them into the Fun Things area of the web using the following action.
<insert
from="org.eclipse.helparticle.funTasks"
to="org.eclipse.helparticle.funRoot"
as="child"/>
Finishing our plugin
Before we continue a brief recap is in order:
-
We started by creating our plug-in and document files.
-
Next we created topic files to describe the structure/navigation of our
content.
-
We then moved up one level above content, to the wiring and integration
of our book. To do this we created our infoset with its single Contents
infoview.
-
Next we created another topics file (topics_view_Contents.xml) to define
the top-level topics.
-
Finally we wired it all together using the action files actions_view_Contents.xml
(to wire in the top level topics) and actions_All.xml (to wire in the bulk
of our topics).
The one remaining piece of work is to update our plugin.xml to actually
contribute the action, topics, and infoset files that we created. Start
with updating the plugin.xml to contribute our infoset:
<extension point="org.eclipse.help.contributions">
<infoset name="infoset_SampleGuide.xml"/></extension>
Next we contribute the top-level topics, and the actions file that wires
them into our infoset:
<extension point="org.eclipse.help.contributions">
<topics name="topics_view_Contents.xml"/>
<actions name="actions_view_Contents.xml"
/>
</extension>
Lastly we contribute the bulk of our topics and wire them in:
<extension point="org.eclipse.help.contributions">
<topics name="topics_Concepts.xml" />
<topics name="topics_Tasks.xml" />
<topics name="topics_Ref.xml" />
<actions name="actions_All.xml" />
</extension>
Thats it, youre done. Now take your plugin (click here for a zip
file of the final plugin) and drop it into the platforms plugins directory,
start eclipse and choose Help -> Help Contents. Once you expand the topics in
the Contents infoview you will see the following.
Non-integrated components
What if we expect our plug-in will sometimes be installed by itself, and in other
cases it will be installed as part of a larger component or product. When deploying
a free floating plug-in we want to ensure that our infoset is visible. When topics
from a plug-in are integrated into a larger web it probably doesnt make sense
for their standalone book to show up anymore. To support this nonintegrated or
loosely integrated documentation, a plug-in can define an infoset and associated
actions and set their standalone attribute to true. This has the effect
of executing the inserts only when those topics have never been contributed anywhere
else and only display the infoset if it is not empty. In other words, this behaves
as: "if this is an independent plug-in, and there are no topics contributed to
some well-known infoset, then insert the documentation into a standalone info
set". Empty standalone infosets are not shown. This really says that if the topics
contributed by the plug-in are inserted into well-known infosets, then the standalone
actions did not insert anything in the standalone infoset, so just ignore this
empty infoset. Setting standalone attributes on actions and infosets is useful
when providing a "Catch all" scenario, when documentation cannot be contributed
to a well-known infoset but the plug-in documentation should still appear somewhere.
To support standalone mode we need to make the following additions to our infoset
and action xml files. The addition is marked in bold.
infoset_Guide.xml
<infoset id="infoset_Guide"label="Online
Help Sample" href="doc/splash.html"
standalone="true">
actions_All.xml
<actions infoview="org.eclipse.platform.doc.user.view_Contents"
standalone="true">
actions_view_Contents.xml
<actions infoview="org.eclipse.platform.doc.user.view_Contents"
standalone="true">
Now if someone includes our topics our actions will not be used, and
consequently our infoset will be empty and not show up.
Externalizing Strings in your XML files
Plugin.xml files externalize their strings by replacing the string with
a key (e.g. %pluginName) and creating an entry in the plugin.properties
file of the form:
pluginName = Online Help Sample Plugin
The contribution XML files are externalized using a similar approach.
To externalize <topic id="plainTasks" label="Plain Stuff"> we replace
its label with a key %plainStuff . Our topic now looks like:
<topic id="plainTasks" label="%plainStuff">
Create an entry in the document.properties file containing the entry:
plainStuff = Plain Stuff
The help system will use document.properties when looking up strings
externalized by our online help contributions.
Server and zip files
The platform utilizes its own documentation server to provide the actual web pages
from within the document web. A custom server allows the platform to handle
the wide variety of web browsers in a browser independent way while also providing
plugin aware support. The platform's help server allows the documentation to also
be deliver in a zip file thus avoiding problems that may result when a large number
of files are present. In our example plugin we created a sub-directory called
"doc". Alternatively we could have placed our html files into a zip file called
"doc.zip".
Conclusions
We have seen how we can use the infoset, infoview to declare books the
user can see. We then used the actions contribution and the topics contribution
to declare and integrate our topics. The platforms mechanisms can be used
to integrate new documentation, or to quickly wire in existing html based
documentation without rewriting it. The mechanisms allow you to create
multiple different views onto your documentation web. In our plug-in we
only created a single infoview but additional infoviews could easily be
created. Component documentation can either be written to be a standalone
book, or optionally marked such that if it is integrated into a larger
document web, the individual component book will automatically be hidden.
Lastly, we observed that the platform provides the building blocks for
doc integration but does not set out any style or structuring guidelines.