Embracing JUnit 5 with Eclipse
JUnit 5 is out the door as the next generation test framework. It is a fundamentally redesigned version of the most widely used testing library in Java. JUnit 4.0 was first released over a decade ago after the introduction of annotations in Java 5. The world of Java and testing has evolved a lot since then. JUnit 4 was a big ball of mud with a single junit.jar to be used by test developers, testing framework developers, IDE developers, and build tool developers. Over the time, these developers have been accessing internals and duplicating code from JUnit 4 to get things done. This had made it very difficult to maintain and enhance the JUnit framework. So, to take advantage of the new features like lambda expressions from Java 8 and to support the advanced testing needs, JUnit 5 is now available as a modular and extensible test framework for the modern era.
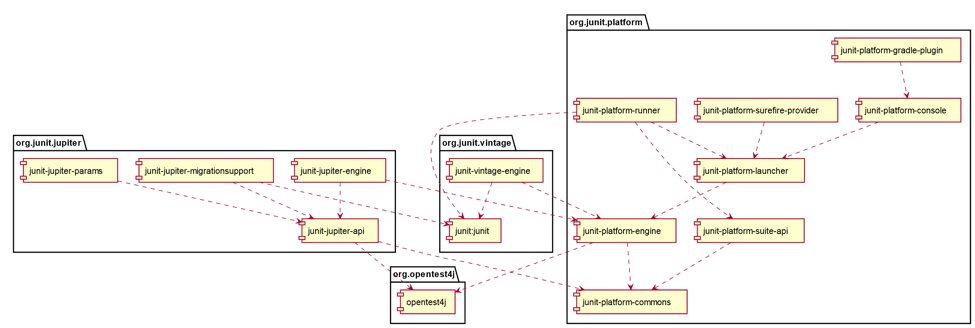
Source: (JUnit 5 User Guide) http://junit.org/junit5/docs/current/user-guide/#dependency-diagram
How is JUnit 5 different?
JUnit 5 is composed of several different modules from three different sub-projects.
JUnit 5 = JUnit Platform + JUnit Jupiter + JUnit Vintage
- JUnit Platform defines Launcher APIs which are used by IDEs and build tools to launch the framework. It also defines TestEngine APIs which are used to develop testing frameworks that run on the platform.
- JUnit Jupiter is the combination of the new programming model and extension model for writing tests and extensions in JUnit 5. It also provides a TestEngine for running Jupiter based tests on the platform.
- JUnit Vintage provides a TestEngine for running JUnit 3 and JUnit 4 based tests on the platform.
Give JUnit 5 a spin
To give JUnit 5 a spin, you have the tooling support in the Eclipse IDE ready at your disposal. Download Eclipse Oxygen.1a (4.7.1a) now and try it out yourself!
Here is a sneak peek into the major interesting features of JUnit Jupiter with Eclipse support for JUnit 5.
What can I do with JUnit 5?
Create a new JUnit Jupiter test
Create a new JUnit Jupiter test via New JUnit Test Case wizard:
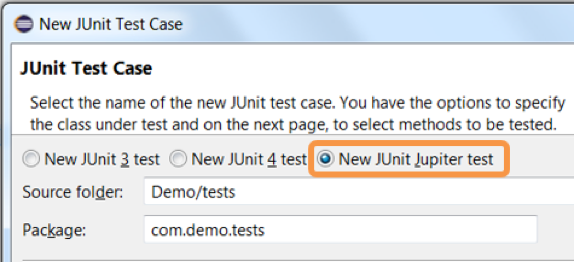
On this page, you can specify the lifecycle method stubs to be generated for this test case. It also lets you select a class under test and on the next page, you can select the methods from this class to generate test stubs.
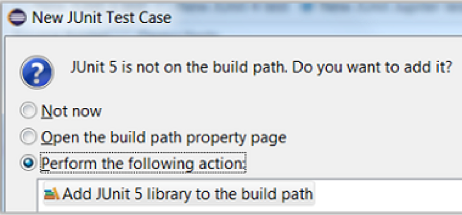
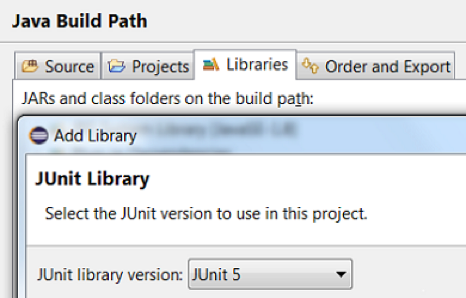
Add JUnit 5 library to the build path
- The new JUnit Test Case wizard offers to add it while creating a new JUnit Jupiter test:
- Quick Fix (Ctrl+1) proposal on
@Test,@TestFactory,@ParameterizedTest, and@RepeatedTestannotations

- Add JUnit library in Java Build Path dialog:
JUnit Jupiter test case
Here's a simple JUnit Jupiter test case.
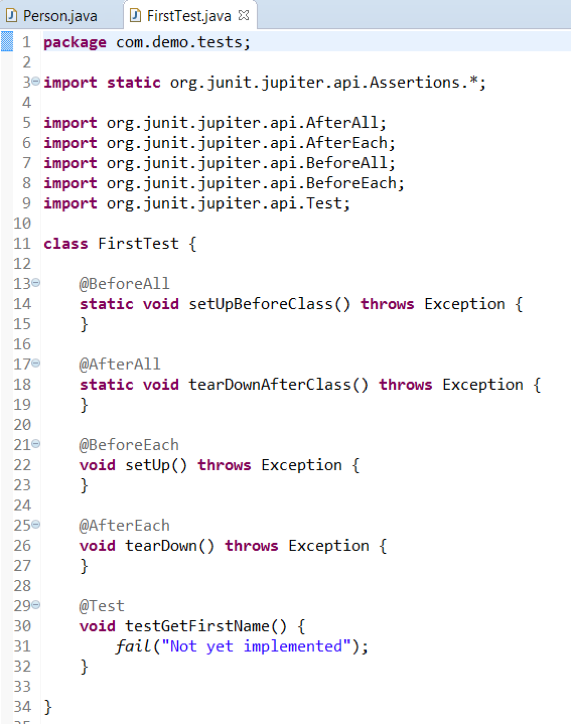
In JUnit Jupiter, test classes and methods can have any access modifier (other than private).
Here is a comparison of the annotations in JUnit 4 and JUnit Jupiter:
JUnit 4 |
JUnit Jupiter |
|---|---|
@org.junit.Test |
@org.junit.jupiter.api.Test |
@BeforeClass |
@BeforeAll |
@AfterClass |
@AfterAll |
@Before |
@BeforeEach |
@After |
@AfterEach |
@Ignore |
@Disabled |
JUnit Jupiter test method
Create a JUnit Jupiter test method in the Eclipse IDE with the new test_jupiter template:

Assertions and Assumptions
JUnit Jupiter provides assertions and assumptions as static methods in
org.junit.jupiter.api.Assertions class and org.junit.jupiter.api.Assumptions class respectively.
- You can view all the failures from grouped assertions in the Result Comparison dialog which can be opened from the Failure Trace section of JUnit view:

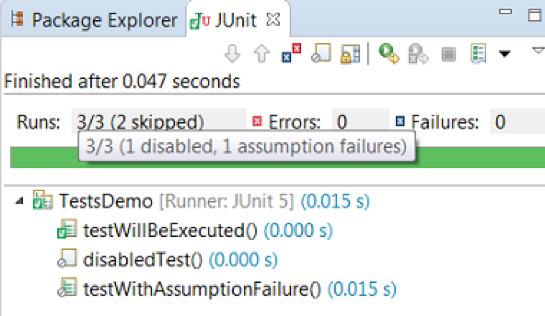
- You can view the number of tests with assumption failures on hover in JUnit view:
- JUnit Jupiter’s
Assertions,Assumptions,DynamicContainerandDynamicTestclasses are now added to Eclipse Favorites by default:

This allows you to quickly import static methods in your code from these favorite classes via Content Assist (Ctrl + Space) and Quick Fix (Ctrl + 1).
You can also configure the number of static member imports needed in your code before type.* is used in the Organize Imports Preferences:

Custom display names
JUnit Jupiter’s @DisplayName annotation allows you to provide custom display names for test classes and test methods which can have spaces, special characters, and even emojis. In Eclipse, you can see the custom test names in JUnit view. You can use the Go to File action or you can just double-click on the custom test name to navigate to the corresponding test from JUnit view:

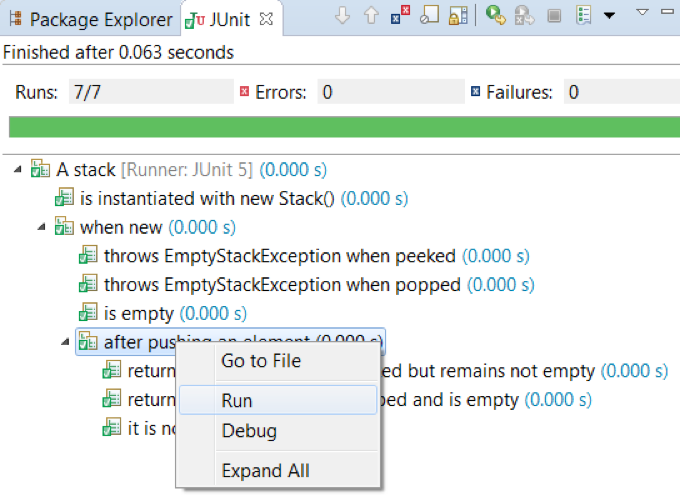
Nested test classes
In JUnit Jupiter, non-static nested classes (i.e. inner classes) can serve as @Nested test classes for logical grouping of test cases. In Eclipse, you can (re-)run a single nested test class by using the Run action in JUnit view or Outline view. You can even right-click on a nested test class name in the editor and use the Run As → JUnit Test action:
Test interfaces and default methods
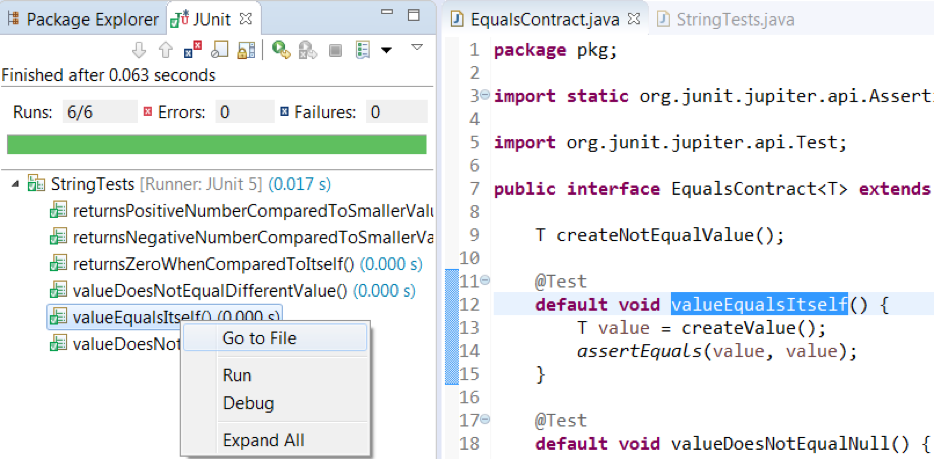
JUnit Jupiter introduces the concept of a test interface which allows you to pre-implement some test code as default methods in interfaces. These default test methods can be inherited by implementing test classes, thereby enabling multiple inheritance in tests. In Eclipse, you can use the Go to File action or double-click on a test method in JUnit view to navigate to the corresponding default method inherited by the test class:
Tagging and filtering
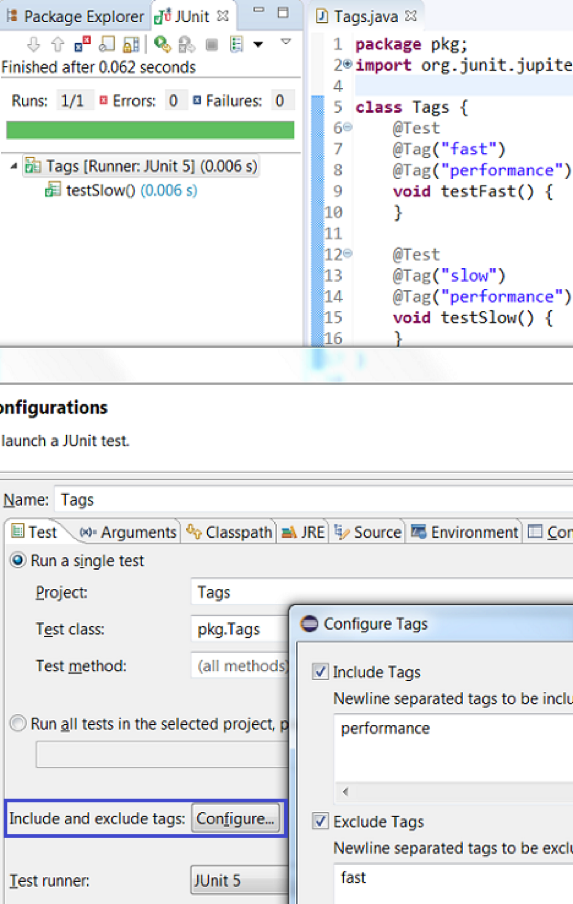
You can tag test classes and test methods with your own identifiers using the @Tag annotation in JUnit Jupiter. These tags can later be used to filter test execution. In Eclipse, you can provide tags to be included in or excluded from a test run via the Configure Tags dialog in its JUnit launch configuration:
Meta-annotations and composed annotations
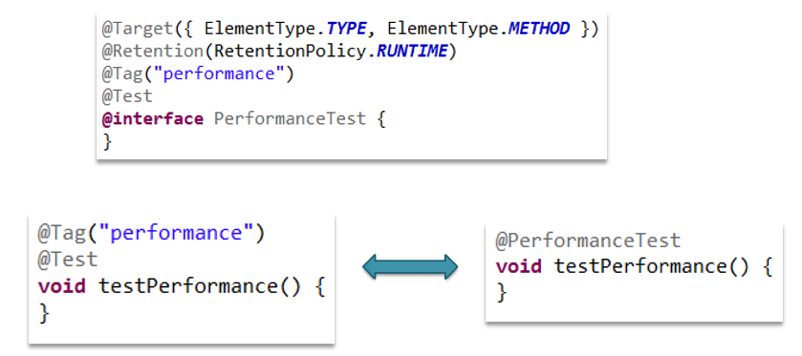
Annotations in JUnit Jupiter can be used as meta-annotations. This allows you to create a custom composed annotation that will automatically inherit the semantics of its meta-annotations. For example, you can use @Test and @Tag(“performance”) annotations as meta-annotations and create a composed annotation named @PerformaceTest which can be used as a replacement of the other two annotations on tests:
Dynamic tests
JUnit Jupiter introduces a concept of dynamic tests which are generated at runtime by a factory method annotated with @TestFactory annotation. The test factory method returns DynamicNode instances (DynamicContainer and DynamicTest). A dynamic container is composed of a display name and a list of dynamic nodes. A dynamic test is composed of a display name and an Executable. Note that there are no lifecycle callbacks for individual dynamic tests. Dynamic containers can be used for dynamic nesting of nodes:

In your Eclipse workspace, you can create a test factory method with the new test_factory template:

Repeated tests
You can repeat a test in JUnit Jupiter by annotating the test method with @RepeatedTest annotation and specifying the number of repetitions. You can optionally specify a custom display name for each repetition and use RepetitionInfo as the test method parameter to get information about the current repetition:


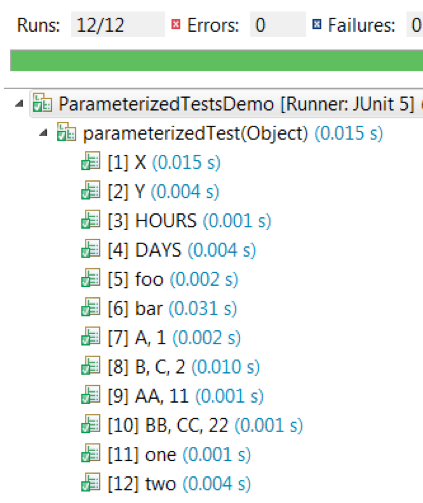
Parameterized tests
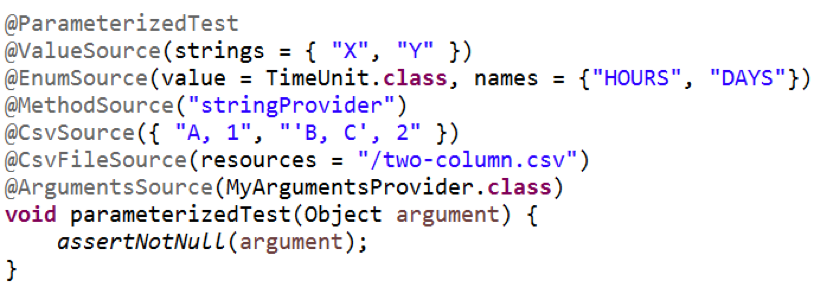
You can run a test multiple times with different arguments by annotating the test method with @ParameterizedTest annotation and declaring at least one source to provide the arguments. You can optionally specify a custom display name for each run. JUnit Jupiter provides various source annotations which can be seen in this example:
Dependency injection
Dependency injection in JUnit Jupiter allows test constructors and methods to have parameters. These parameters must be dynamically resolved at runtime by a registered parameter resolver. ParameterResolver is the extension API to provide parameter resolvers which can be registered via @ExtendWith annotation. This is where Jupiter’s programming model meets its extension model. JUnit Jupiter provides some built-in resolvers which are registered automatically:
- TestInfo (resolved by
TestInfoParameterResolver) to access information about the currently executing test:

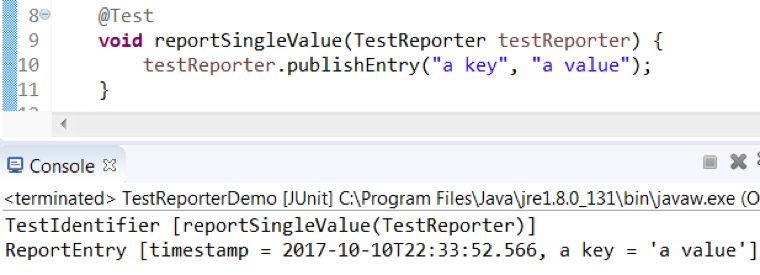
- TestReporter (resolved by
TestReporterParameterResolver) to publish additional data about the current test run which can be seen in the Console view in the Eclipse IDE:
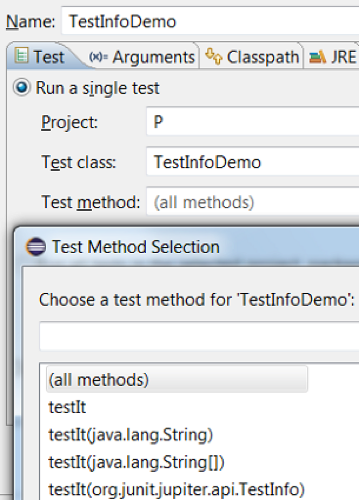
In the Eclipse IDE, the Test Method Selection dialog in JUnit launch configuration now shows the method parameter types also:
JUnit Jupiter extension model
JUnit Jupiter’s extension model provides various extension APIs as small interfaces in org.junit.jupiter.api.extension package which can be implemented by extension providers. You can register one or more of these extensions declaratively on a test class, test method, or composed annotation via @ExtendWith annotation. JUnit Jupiter also supports global extension registration via Java’s ServiceLoader mechanism:

Note
- If you are using an Eclipse workspace where you were running your JUnit 5 tests via
@RunWith(JUnitPlatform.class)in the Eclipse IDE without JUnit 5 support then you will have JUnit 4 as the test runner in their launch configurations. Before executing these tests in the Eclipse IDE with JUnit 5 support, you should either change their test runner to JUnit 5 or delete them so that new launch configurations are created with JUnit 5 test runner while running the tests: - We do not support running tests in a setup where an old Eclipse build (not having JUnit 5 support) is using a new Eclipse build (having JUnit 5 support) as target. Also, developers who have the JDT JUnit runtime bundles (
org.eclipse.jdt.junit.runtime,org.eclipse.jdt.junit4.runtime) checked out and pull the latest changes will run into the above issue. You are expected to use a new Eclipse build for the development.

Resources & References
Eclipse Support for JUnit 5
- Download Eclipse Oxygen.1a (4.7.1a)
- Software site repository to update your Eclipse installation
- Report bugs/enhancements in Eclipse support for JUnit 5
Learn more about the JUnit 5 Project
About the Author