Getting Started with VIATRA
VIATRA is an open source model transformation framework, focusing on efficient evaluation of model queries and supports various transformation workflows. This document contains a tutorial for getting started with the query and transformation development.
The tutorial relies on the CPS Demonstrator application. The CPS Demonstrator is specified to cover a usual workflow in Model-driven Engineering, where a system is (1) first described in a source model, then (2) automated model-to-model transformations are used to derive a target model. Finally, (3) model-to-text transformation is performed to generate code from the target domain. In addition, a model generator that can automatically create source domain models can support the correctness testing and performance evaluation of the components. This tutorial uses only a subset of the transformation problem, as its main goal is to illustrate the basics of the VIATRA environment. Consult the original demonstrator for a more complex transformation example.
We expect readers to be familiar with the basics of Eclipse plug-in development, more specifically creating plug-in projects and defining basic UI extensions such as commands. Additionally, we expect a basic understanding of EMF-based modeling. If required, look at the Plug-in development tutorial at http://www.vogella.com/tutorials/EclipsePlugin/article.html or the EMF tutorial at http://www.vogella.com/tutorials/EclipseEMF/article.html for a short presentation on these subjects.
This tutorial includes a quick setup guide, then describes both model query development and their usage in the query runtime. Then, both batch and event-driven transformations are covered.
1. Setting up the tutorial
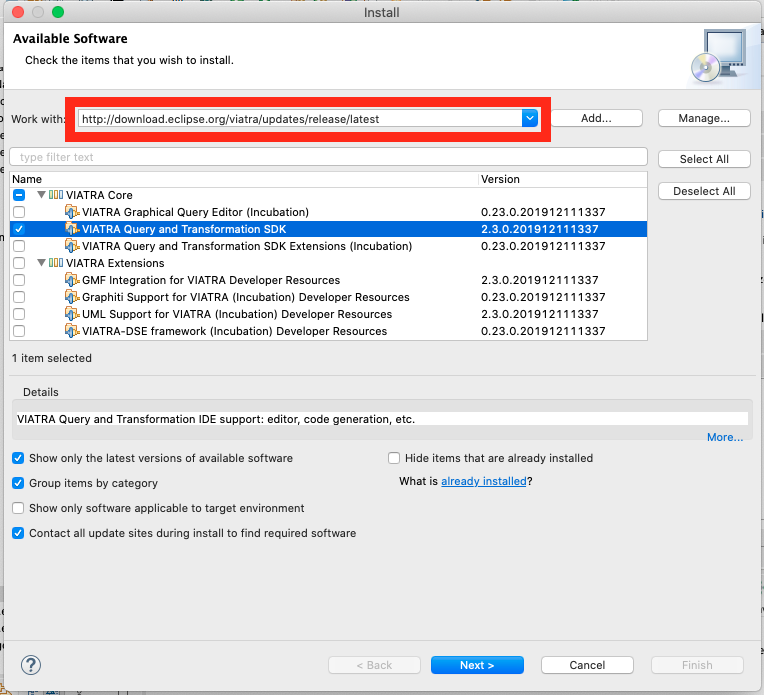
This tutorial was last updated using VIATRA 2.3.0 (released on 18th December 2019), available from the Simultaneous Release Train p2 repository (http://download.eclipse.org/releases/2019-12). The latest version can be downloaded from http://download.eclipse.org/viatra/updates/release/latest that should be compatible with everything described here. To install VIATRA, select the VIATRA Query and Transformation SDK from the selected repository to install.
Figure 1. Install window
This document assumes that the CPS metamodels are installed into the Eclipse instance. They are available from the p2 repository http://download.eclipse.org/viatra/examples/cps
VIATRA defines a custom perspective called Transformation Development that includes a few views and shortcuts that make it easier to develop queries and transformations. The remainder of the tutorial expects that this perspective is selected; in case a different perspective is used, the corresponding views and wizards are still available in their standard respective locations.
2. Domains
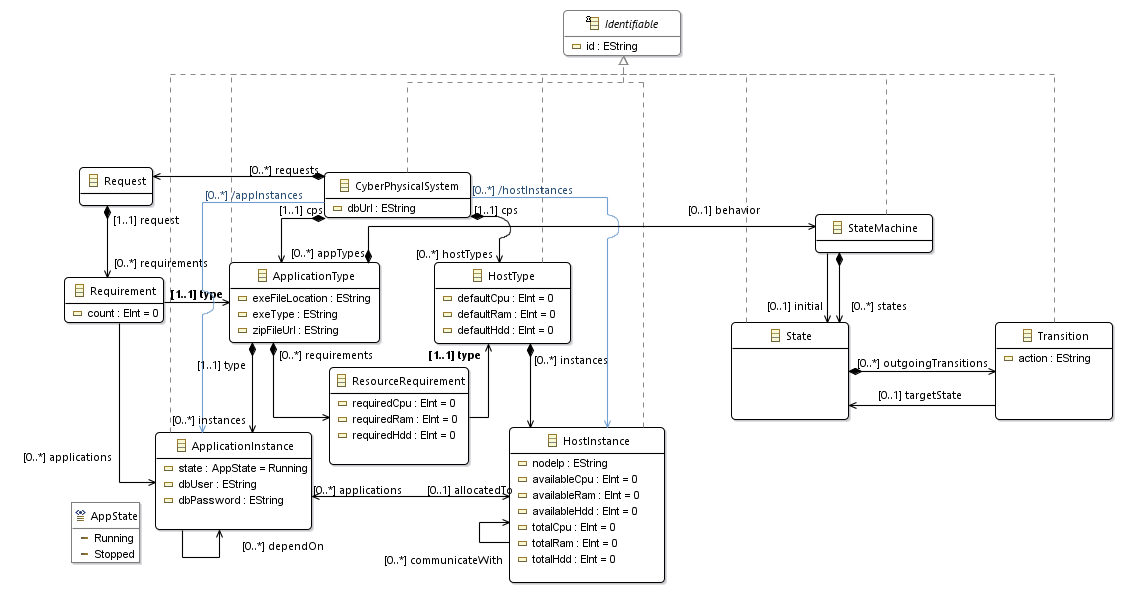
2.1. Cyber Physical System
The CPS domain specifies application and host types and their instances, requests and requirements on applications and resource requirements of applications towards hosts. Application types have a state machine that describes their behavior through states and transitions. Finally, application instances can be allocated to host instances that can communicate with each other.
-
Host instances have a unique node IP address.
-
Application instances have a unique identifier.
-
State machines can define an initial state.
-
Transitions may specify an action for sending or waiting for a signal. A signal can be sent by providing an application type (with its ID) and a signal identifier, while waiting for a signal is done by specifying its identifier.
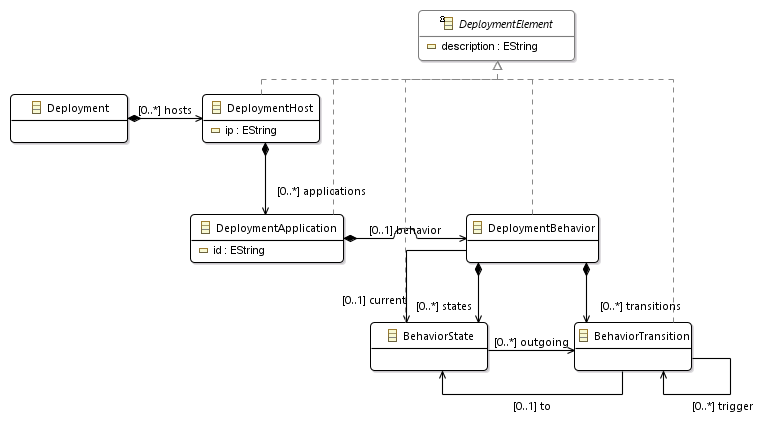
2.2. Deployment
In the deployment model, host instances contain the applications that are running on them, while each application has a behavior with states and transitions. The behavior has a current state and transitions may trigger other transitions when the triggered transition is waiting for the signal they are sending and the application type is correct.
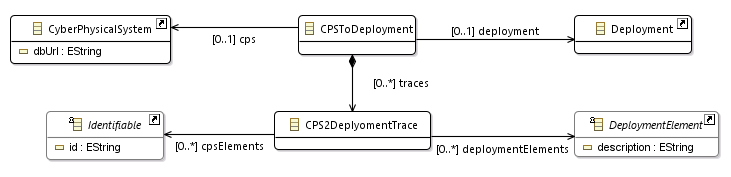
2.3. Traceability
The traceability model describes the correspondence between a CPS and a deployment model. The traceability is stored in a set of traces that refer to zero, one or multiple CPS and deployment elements.
3. Query Development
3.1. Using the Query Development Environment
Constraints and conditions in the VIATRA framework are expressed using a graph pattern-based language. This declarative formalism allows very compact definitions of complex conditions, while it is still possible to provide live query evaluation based on the Rete algorithm.
In the following we get an overview of the query development environment, starting with the definition of queries, followed by query evaluation support. Then we gain an understanding of the various language elements by creating more and more complex queries.
A graph pattern encodes a named query with some parameters defined as a disjunction of pattern bodies, while each body consists of a set of constraints. The result of a graph pattern, called match set, is a set of (model element) tuples where the elements fulfill all constraints defined in at least one of the pattern bodies.
| The pattern language always works on sets: neither the constraints nor the match set is ordered; and match set never includes multiple tuples with exactly the same model elements. |
3.1.1. Define your First Query
To define queries, first a VIATRA Query Project has to be created with the standard New Project Wizard of Eclipse. Such projects are specialized Eclipse plug-in projects with preconfigured VIATRA dependencies and the query generator initialized. Query specifications have to be added to the Java classpath of the projects, more specifically into Java packages. Based on these observations the creation of the first query consists of the following steps:
-
Create a new VIATRA Query project in the host Eclipse with any name. The tutorial will assume the following name:
org.eclipse.viatra.examples.cps.queries. -
Add
org.eclipse.viatra.examples.cps.modelto the Plug-in dependencies to make the CPS metamodel available for the project. -
Create a Java package to store the queries. The tutorial will assume one named
org.eclipse.viatra.examples.cps.queries. -
Create a new query definition in a package named using the
New Query Definitionwizard from the VIATRA category. The tutorial assumes the query file is namedCPSQueries.vql. -
Fill the first query:
queries.vql// Java package declaration, must match the container of the file package org.eclipse.viatra.examples.cps.queries // EPackage import import "http://org.eclipse.viatra/model/cps" // Pattern declaration pattern hostIpAddress(host: HostInstance, ip : java String) { // Type constraint stating that variables 'host' and 'ip' are connected via a 'nodeIp' attribute HostInstance.nodeIp(host,ip); }
Looking at the pattern header, we see that this pattern has two parameters, meaning its results will be a pair of values, the first selecting a HostInstance from the model, while the second one a String literal. The connection between these elements is described by a single constraint ensuring that ip variable stores the nodeIp attribute of a corresponding HostInstance.
3.1.2. Evaluate Queries in the Query Results View
VIATRA includes a view to evaluate the results of queries over various editors, and reacts on changes in the editor.
The Query Results view is the primary tool for debugging graph patterns. Open the view by selecting Window/Show View/Query Results or you can simply press the CTRL+3 shortcut and start to type the name of the view. The view allows loading models and queries, and display (and update) the results of queries automatically. Together with the installed metamodels there is also an example instance model included that will be used in this tutorial as an example.
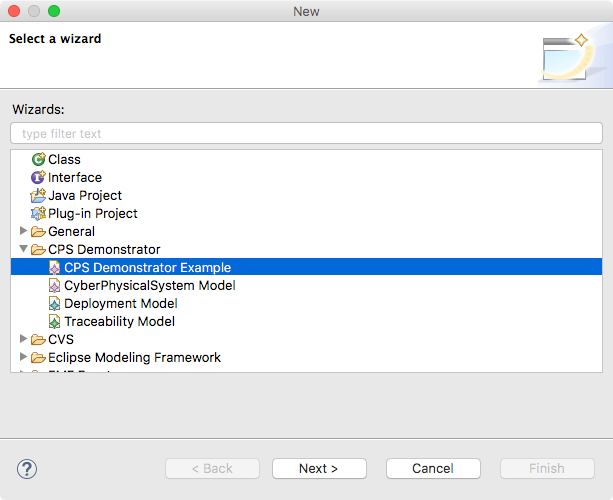
Figure 2. Initialize the example CPS demonstrator project
-
Open our example instance model (/org.eclipse.viatra.examples.cps.instances/example.cyberphysicalsystem)
-
Make sure "ReteEngine" is selected in the toolbar of the Query Results view
-
then press the 'Load model from active editor' (first button on the toolbar)
-
Open the query specification (vql file)
-
then press the 'Load queries from the active editor' button
At this point the Query Results view should contain the matches of the freshly created pattern. Using the example model, you can see that there are 6 matches for the pattern, each consisting of a HostInstance-IP address pair. Note that the Query Results view provides live results: by updating the model in the model editor file, e.g. adding a new host instance or changing its IP address, the results update automatically.
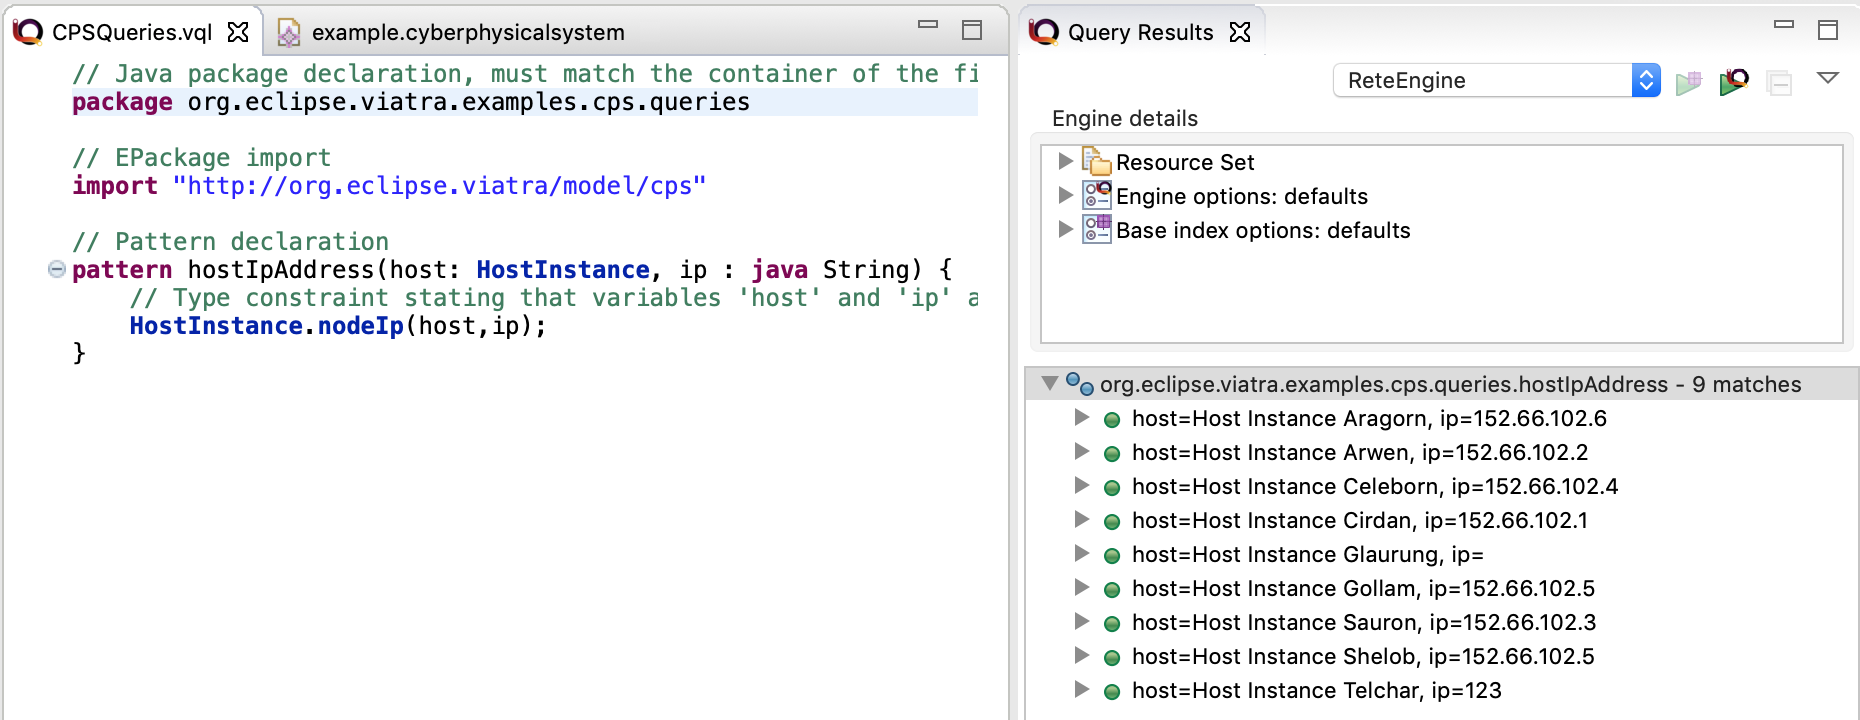
Figure 3. Query Results View
| If the 'Load model from active editor' button is not enabled, it either means, the current editor does not contain a model, or VIATRA does not understand the editor type. By default, EMF tree editors are supported; other editor types, such as graphical editors are supported by additional integration plug-ins, such as the GMF or Graphiti integration available from the VIATRA repository. |
3.1.3. Define Additional Queries
In the following, we define a set of patterns that illustrate additional capabilities of the query language. Each pattern will come with a short definition, followed by the code itself and some remarks about how the pattern works.
-
List all
HostInstanceelements whose IP address is an empty string-
This pattern, similar to the first pattern, still consists of a single constraint. The pattern constraints can refer to Java literals, like empty strings or numbers directly.
-
Notice that if you create a new
HostInstanceelement, it will not appear in the match results. This happens because in EMF unset and empty attributes are different (similar to the difference between empty Strings and null in Java). You can write a pattern that finds missing attribute values using theneg findconstruct (see later).pattern emptyIpAddress(host: HostInstance) { HostInstance.nodeIp(host, ""); }
-
-
List all application instances that are running
-
Similar to integer, numeric and boolean literals, you can refer to EMF enumerations as constants. This pattern uses the EEnum literal
AppState::Runninginstead of a variable.pattern runningApplication(application : ApplicationInstance) { ApplicationInstance.state(application, AppState::Running); }
-
-
List all
HostInstance-HostInstancepairs that share a common IP address-
This pattern is more complex, as it has three parameters and three constraints. The first two describe similar type constraints we have seen. The pattern also compares the values of variables
host1andhost2with each other using the!=(not equal) operator (The==operator is also available).pattern sameIpAddress(host1 : HostInstance, host2 : HostInstance, commonIp : java String) { HostInstance.nodeIp(host1, commonIp); HostInstance.nodeIp(host2, commonIp); host1!=host2; }
-
-
List all
HostInstanceelements that have non well-formed IPv4 addresses (e.g. not four numbers separated with dots)-
The well-formedness validation of the IP address strings requires specific validation blocks called
checkexpressions where you can write a wide range of Xbase expressions, behaving similarly to Java and accessing Java classes from the classpath of the project. In this case, the well-formedness of the address values is represented via a utility method provided by Google Guava, but similar results could be expressed using Java regular expressions as well. -
Note that this method also matches fields where IP addresses are set to empty string.
-
It is important to note that check expressions have to be deterministic, side-effect free and can only be called on attribute variables. Given VIATRA cannot decide whether a given Java method is side-effect free, a warning is provided for each unknown method referenced by the expression. If necessary, the environment supports extending the list of known methods, see the detailed language documentation for more details.
pattern ipFormatInvalid(host : HostInstance, ip : java String) {
    HostInstance.nodeIp(host,ip);
    check (
        !com.google.common.net.InetAddresses.isInetAddress(ip)
    );
}
-
-
List
Stateelements connected throughTransitionelements-
A pattern body might use variables other than the pattern parameters, such as the variable
transitionin this example. These variables are called local variables. -
It is important to note that if there are multiple transitions between two states, the match set will still include only a single pair of the states, because local variables are not included in the match tuples. If all edges are required, the corresponding transition variable should also be declared as a parameter.
pattern connectedTo(state: State, other: State){
    // There exists a transition from `state` to `other`
    State.outgoingTransitions(state, transition);
    Transition.targetState(transition, other);
}
-
-
List bad host instances that fail either of the previous conditions.
-
Disjunctions can be expressed by using the
orkeyword between pattern bodies. A model element tuple is included in the match set of a pattern, if at least one of the bodies have a match. Note that if multiple bodies would match the same tuple, the match set of the pattern will still only include the tuple once (set semantics). -
Patterns can be reused using
findconstraints meaning all conditions expressed by the called pattern must be matched from the source. -
This pattern also includes single-use (or don’t care) variables, starting with the character '_'. Such a declaration describes a variable where we are only interested in its existence but not its value.
pattern badHost(host : HostInstance, ip : java String) {
    find sameIpAddress(host, _other, ip);
} or {
    find ipFormatInvalid(host, ip);
}
-
-
List all good host instances (that meet neither of the incorrect conditions)
-
The negative pattern composition, expressed by the
neg findkeyword is used to define negative conditions. This works similar to thefindconstraints, with the notable exception that if there are any matches to the badHost with the selected parameters, the host pattern fails to match. -
Those actual parameters of the negative pattern call that are not used elsewhere in the calling body are universally quantified, meaning that the calling pattern only matches if variables of the calling pattern cannot be bound to matching elements.
pattern goodHost(host : HostInstance, ip : java String) {
    HostInstance.nodeIp(host, ip);
    neg find badHost(host, _);
}
-
-
List the number of applications for each HostInstance
-
Patterns can be marked as private, making the pattern itself only visible inside the source file it is defined. The generated code for these patterns is reduced (e.g. does not include generated Match and Matcher classes for easier access).
-
It is possible to calculate the matches of a pattern using the
count findexpressions. The value of such an expression is the number of matches found with the selected number of matches.private pattern allocatedApplications(host : HostInstance, app : ApplicationInstance) { HostInstance.applications(host, app); } pattern countApplications(host : HostInstance, m : java Integer) { m == count find allocatedApplications(host, _); }
-
-
List all states of a state machine that are reachable from its initial state (either directly or indirectly)
-
The reachable states are calculated using the transitive closure of the previously introduced connectedTo pattern.
pattern reachableState(sm :StateMachine, state: State){
    // The initial state of the statemachine is reachable
    StateMachine.initial(sm, state);
} or {
    StateMachine.initial(sm, initial);
    // Ensure the state is indeed included in the state machine; unnecessary in a well-formed model
    StateMachine.states(sm, state);
    // The + symbol after the pattern name represents transitive closure
    find connectedTo+(initial, state);
}
-
3.1.4. Validation
VIATRA provides facilities to create validation rules based on the pattern language of the framework. These rules can be evaluated on various EMF instance models and upon violations of constraints, markers are automatically created in the Eclipse Problems View.
The @Constraint annotation can be used to derive a validation rule from a graph pattern as a validation rule. The pattern of the rule identifies the erroneous model elements, while the annotation parameters provides information about how to present the results in the user interface. The annotation uses the following parameters:
-
key: The list of paremeters which determine which objects the constraint violation needs to be attached to.
-
message: The message to display when the constraint violation is found. The message may refer the parameter variables between $ symbols, or their EMF features, such as in $Param1.name$.
-
severity: "warning" or "error"
-
targetEditorId: An Eclipse editor ID where the validation framework should register itself to the context menu. Use ` * ` as a wildcard if the constraint should be used always when validation is started.
| To find a specific editor id, we can use the Plug-in Selection Spy tool with a Shift+Alt+F1 shortcut. For a few generic editors, such as the Sample Reflective Ecore Editor, the framework by default provides such a registration option, no manual registration is necessary. |
For example:
@Constraint(targetEditorId = "org.eclipse.viatra.examples.cps.cyberPhysicalSystem.presentation.CyberPhysicalSystemEditorID",
            severity = "error",
            message = "The ip address is not unique",
            key = {host1})
pattern sameIpAddress(host1: HostInstance, host2: HostInstance, commonIp : java String) {
    HostInstance.nodeIp(host1, commonIp);
    HostInstance.nodeIp(host2, commonIp);
    host1!=host2;
}
When adding such a constraint annotation to a graph pattern, the code generator initializes a validation project that includes and registers the rules derived from the patterns for the framework. These rules can be tried out by opening a new runtime Eclipse instance:
-
Launch a new
Eclipse applicationcontaining all projects in the workspace. -
In the newly launched Eclipse instance, open an erroneous instance model in the model editor (make sure the editor is the same one that is added to the
targetEditorIdparameter). -
Start the validation from the popup menu items under VIATRA Validation.
For more information about look at the Eclipse IDE Plug-in Development tutorial at vogella.com.
3.1.5. More Complex Queries
This section introduces a set of more complex queries, useful for both introducing the remaining language features such as aggregators while illustrating the way the query language allows breaking down more complex conditions.
3.1.5.1. Calculate the Maximum Number of Instances
It is possible to find the Application Type that has the most instances defined in the model by combining a counting of the values of the related feature and a max function. The sumNumberOfInstances helper pattern uses a count call of the ApplicationType.instances feature (note the omission of the find keyword there). This feature is available starting with VIATRA 2.0, and allows reducing the number of trivial helper patterns, like the pattern hostIpAddress introduced earlier in this tutorial.
After the counts are available in the match set of a pattern, it is possible to calculate the maximum value using the max find construct. The # symbol represents an otherwise unbound parameter of the called pattern that needs is be aggregated, e.g. in case of a max aggregator the largest value is selected. It is important to note that calculating the maximum does not connect the ApplicationType instances to their maximum, that needs to be done with an additional constraint.
pattern maximumNumberOfInstances(at : ApplicationType, max : java Integer) {
	max == max find sumNumberOfInstances(at, #);
	find sumNumberOfInstances(at, max);
}

pattern sumNumberOfInstances(at : ApplicationType, n : java Integer) {
	n == count ApplicationType.instances(at, _);
}
3.1.5.2. Check Memory Requirements of a Host
The CPS metamodel explicitly stores requirements of applications, and both free and total resource values in case of host instances. However, checking that application requirements and free and total values are consistent requires checking.
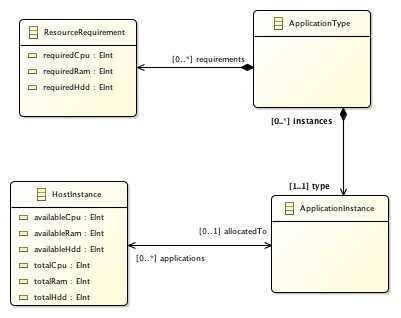
Figure 4. Requirement handling in the metamodel
In the following example we focus on the memory requirements, but similar queries can be provided for CPU or HDD requirements. The well-formedness constraint we are trying to enforce is as follows: FREE MEMORY + SUM(MEMORY OF DEPLOYED APPLICATIONS) = TOTAL MEMORY.
The pattern requires two helper patterns: one of them (applicationTypeRequirementRAM) is responsible for collecting the RAM requirement for a selected Application Type, the other (totalMemoryRequirements) summarizes all memory requirements a selected application instance.
Using these helper patterns, the invalidMemoryRequirement pattern executes two additional steps: (1) it summarizes the results of the pattern totalMemoryRequirements with regards to the application instances allocated to a host instance, and (2) checks whether the three requirements are consistent.
A Host Instance is allocated to at most a single application, so it is not required to summarize the requirements of all applications here as done in the invalidMemoryRequirement pattern. However, adding this element to the query illustrates how to use sum correctly if multiple levels of summarization is necessary.
|
pattern invalidMemoryRequirement(h : HostInstance, available : java Integer, allocated : java Integer, total : java Integer) {
	HostInstance.availableRam(h, available);
	HostInstance.totalRam(h, total);
	allocated == sum find totalMemoryRequirements(h, _, #);
	check(total != allocated + available);
}

private pattern totalMemoryRequirements(h : HostInstance, ai : ApplicationInstance, ram : java Integer) {
	HostInstance.applications(h, ai);
	ApplicationInstance.type(ai, at);
	ram == sum find applicationTypeRequirementRAM(at, #);
}

private pattern applicationTypeRequirementRAM(at : ApplicationType, ram : java Integer) {
	ApplicationType.requirements(at, req);
	ram == sum ResourceRequirement.requiredRam(req, #);
}3.2. Using Queries Programmatically
VIATRA Query provides an API to execute queries on various models, including support for listening to match set changes. However, as the incremental evaluation relies on indexes, the API also covers lifecycle management for the runtime. The central element of the API is the Query Engine that is responsible for loading query specifications, setting up indexes and providing match results. This approach is supported by code generators that create a runtime representation for graph patterns and provide a type-safe API to access VIATRA code.
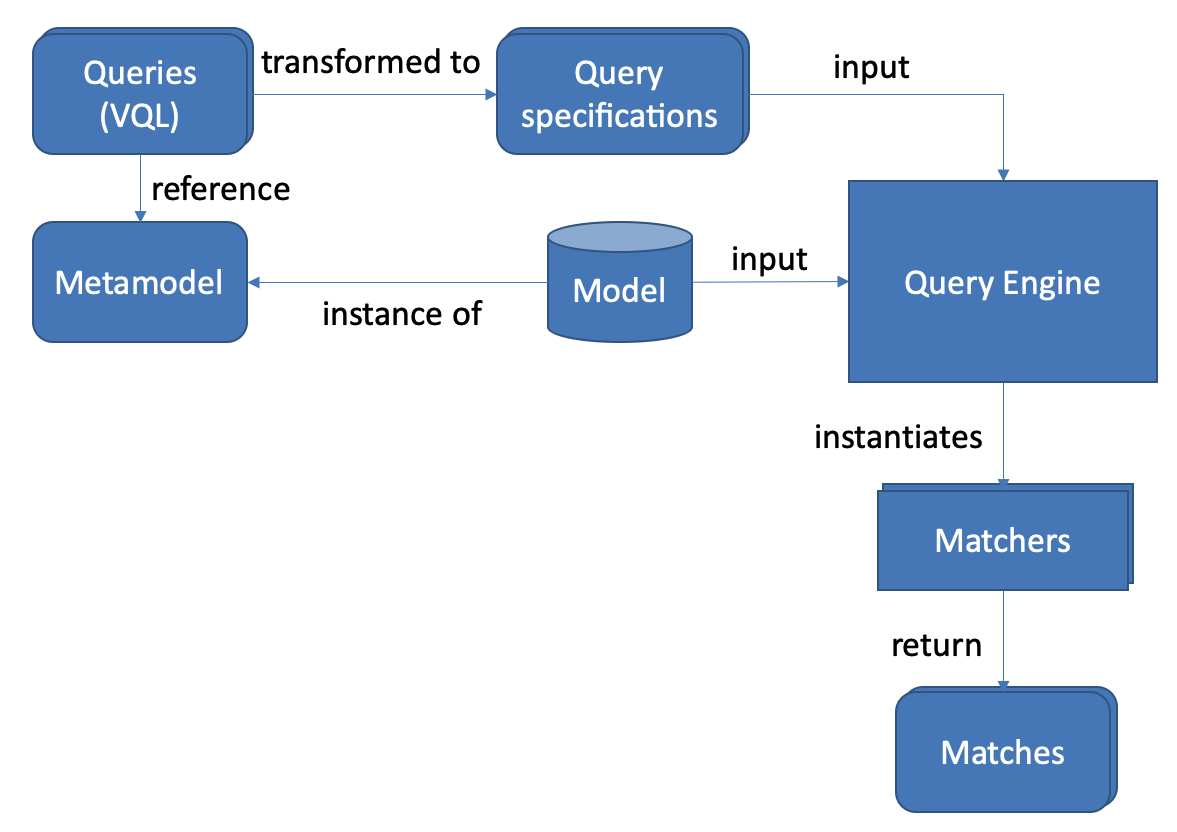
Figure 5. Overview of the runtime components of VIATRA Query
To start working with the VIATRA Query API, we have to provide (1) a Scope representing the model and a (2) set of query specifications. The easiest way to initialize a scope, is to simply wrap an EMF ResourceSet inside a new EMFScope instace. For query specifications, the generated matcher classes can be used as an example, see as follows.
In general, the generated code in a VIATRA Query project is based on a (1) query specification classes representing the original VQL specifications for the runtime API, sharing a qualified class name with the original pattern specification. Each query specification includes (2) a Match and Matcher nested subclass for each pattern definition (recommended for general usage). Finally, (3) a group class for each file that can be used to initialize all queries together, using the same Java classname as the original vql file.
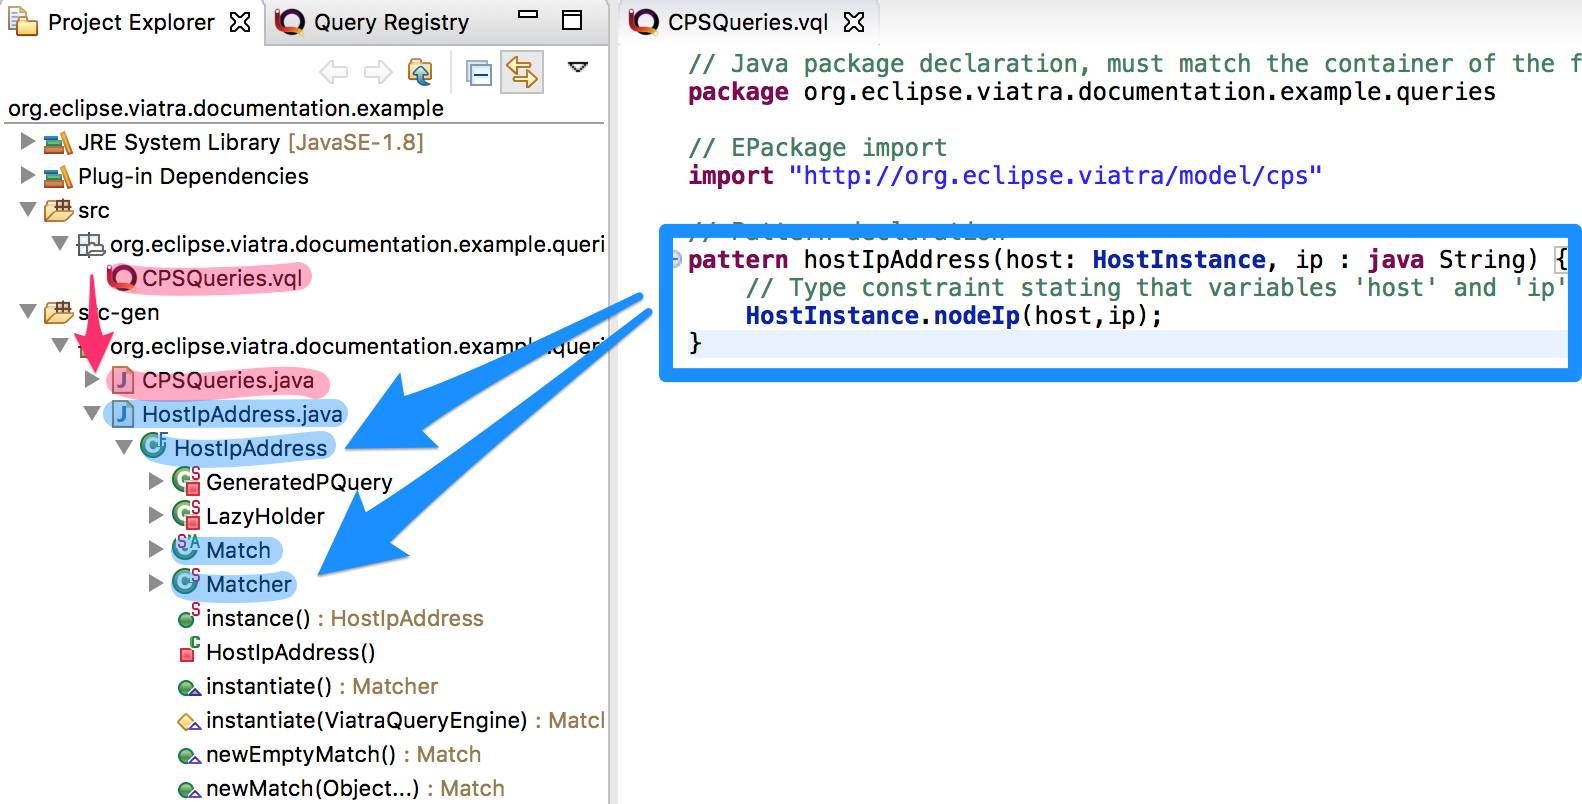
Figure 6. Structure of the query generated code
| The default generated API structure was changed in VIATRA 2.0. Before VIATRA 2.0 query specifications, matches and matchers were generated into separate classes. The remainder of the tutorial relies on the new generation schema; using the old schema requires a few updates in the code, specifically for match and matcher class references are to be updated accordingly. |
3.2.1. Initialize a headless Application
To illustrate the usage of the VIATRA Query API, we will create a headless Eclipse application, and execute it over one of the queries written in the previous part. Such an application is a Java class registered using the extension point org.eclipse.core.runtime.applicationsorg.eclipse.core.runtime
<extension id="queryrunner" point="org.eclipse.core.runtime.applications">
  <application cardinality="singleton-global" thread="main" visible="true">
    <run class="org.eclipse.viatra.examples.cps.queries.runner.QueryRunner"/>
  </application>
</extension>
The IApplicationstartstop
public class QueryRunner implements IApplication {

	@Override
	public Object start(IApplicationContext context) throws Exception {
        // Return value 0 is considered as a successful execution on Unix systems
		return 0;
	}

	@Override
	public void stop() {
        // Headless applications do not require specific stop steps
	}

}
The created application can be started as an Eclipse application by specifically selecting the previously created extension.

Figure 7. Running the Query Runner application
3.2.2. Initializing a Query Engine
To initialize a query engine, as first step an EMF scope has to be loaded. This can be done using the following code segment (expecting the model file was copied into the root of the queries project):
private EMFScope initializeModelScope() {
	ResourceSet rs = new ResourceSetImpl();
	rs.getResource(URI.createPlatformPluginURI("org.eclipse.viatra.examples.cps.queries/example.cyberphysicalsystem", true), true);

	return new EMFScope(rs);
}
If we have a model scope, it can be used to initialize a managed query engine. The internal implementation of the ViatraQueryEngine.on
Additionally, it is recommended to prepare the engine with all queries that will be used. For this, the generated query groups (one per query file) include a prepare
private ViatraQueryEngine prepareQueryEngine(EMFScope scope) {
	// Access managed query engine
    ViatraQueryEngine engine = ViatraQueryEngine.on(scope);

    // Initialize all queries on engine
	CPSQueries.instance().prepare(engine);

	return engine;
}
If multiple query groups are to be loaded, either create a generic pattern group that holds all the patterns, or create a coalesce traversal block where you can execute multiple prepare statements together using the |
3.2.3. The pattern matcher API
The easiest way to use all the query engine is to ask for all matches of a query. The getAllMatches
private void printAllMatches(ViatraQueryEngine engine) {
	// Access pattern matcher
	HostIpAddress.Matcher matcher = HostIpAddress.Matcher.on(engine);
	// Get and iterate over all matches
	for (HostIpAddress.Match match : matcher.getAllMatches()) {
		// Print all the matches to the standard output
		System.out.println(match.getHost());
	}
}
It is safe to ask for the same matcher multiple times using the |
It is also possible to use a more functional style processing of matches with a Consumer.
private void printAllMatches2(ViatraQueryEngine engine) {
    HostIpAddress.Matcher matcher = HostIpAddress.Matcher.on(engine);
    matcher.forEachMatch(new Consumer<HostIpAddress.Match>() {
        @Override
        public void accept(HostIpAddress.Match match) {
            System.out.println(match.getHost());
        }
    });
}| Before VIATRA 2.0, a separate MatchProcessor class was generated for each class that works similar to the Consumer-based implementation, but also extract all parameters. In version 2.0, this MatchProcessor is not generated by default, but can be enabled in the compiler settings. |
This can be simplified with a lambda expression as follows:
private void printAllMatches3(ViatraQueryEngine engine) {
	HostIpAddress.Matcher matcher = HostIpAddress.Matcher.on(engine);
	matcher.forEachMatch(match -> System.out.println(match.getHost()));
}
Often it is beneficial to check for and process only a single match. For this reason it is possible to ask for a single match using the getOneArbitraryMatch
private void printOneMatch(ViatraQueryEngine engine) {
	HostIpAddress.Matcher matcher = HostIpAddress.Matcher.on(engine);
	// getOneArbitraryMatch returns an optional
	matcher.getOneArbitraryMatch()
		//Print out the match only if available
		.ifPresent(match -> System.out.println(match.getHost()));
}
The match returned by the |
Before version 2.0, |
The generated matchers also include a few methods to access values of the parameters. For example, in case of the hostIpAddressgetAllValuesOfipip
private void printAllAddresses(ViatraQueryEngine engine) {
    HostIpAddress.Matcher matcher = HostIpAddress.Matcher.on(engine);
    for (String ip : matcher.getAllValuesOfip()) {
        System.out.println(ip);
    }
}
If there are multiple hosts that have the same IP address, the |
All matcher functionality supports filtering the matches with constants. By setting some filter parameters with a non-null value we state that we are interested in only matches where the selected parameters equal to the given value.
private void printFilteredMatches(ViatraQueryEngine engine) {
	HostIpAddress.Matcher matcher = HostIpAddress.Matcher.on(engine);
	for (HostIpAddress.Match match : matcher.getAllMatches(null, "152.66.102.1")) {
		System.out.println(match);
	}
}
Regardless of input values receiving null values, the |
If a filter condition has to be reused, it is possible to create mutable matches where the filtered values are set accordingly. This approach is also useful to use named setters (e.g. if multiple String parameters are to be set) or one does not want to write null
private void printFilteredMatches2(ViatraQueryEngine engine) {
	HostIpAddress.Matcher matcher = HostIpAddress.Matcher.on(engine);
	HostIpAddress.Match filter = matcher.newMatch(null, "152.66.102.1");
	for (HostIpAddress.Match match : matcher.getAllMatches(filter)) {
		System.out.println(match);
	}
}
Finally, if we are only interested in whether there exist any match fulfilling the query, or we want to know how many matches there are, the matcher has methods that calculate these. Both of these methods can be combined with filter matches.
private void printCounts(ViatraQueryEngine engine) {
	HostIpAddress.Matcher matcher = HostIpAddress.Matcher.on(engine);
	System.out.println(matcher.countMatches());
	System.out.println(matcher.hasMatch(null, null));
	System.out.printf("Count matches with ip 152.66.102.3: %d %n", matcher.countMatches(null, "152.66.102.3"));
    System.out.printf("Has matches with ip 152.66.102.13: %b %n", matcher.hasMatch(null, "152.66.102.13"));
}
If asking for the has/count calls is immediately followed by the processing of the said matches, it is usually better to call |
3.2.4. Advanced query engine features
There are cases where the standard engine lifecycle is inappropriate, e.g. the models will not be unloaded but we want to spare memory by freeing up indexes. Furthermore, there are some functionality, like hint handling or match update listener support that was not added to the base implementation to keep its API clean.
private AdvancedViatraQueryEngine prepareAdvancedQueryEngine(EMFScope scope) {
    AdvancedViatraQueryEngine engine = AdvancedViatraQueryEngine.createUnmanagedEngine(scope);

    // Initialize all queries on engine
    CPSQueries.instance().prepare(engine);

    return engine;
}
Do not forget to dispose unmanaged engine manually using the |
3.2.4.1. React to match updates
One feature of the advanced query engine is to allow listening to changes, e.g. registering a match update listener for a pattern matcher. Such a listener is triggered when the match set for a pattern matcher changes, together with the direction of the changes.
IMatchUpdateListener<HostIpAddress.Match> listener = new IMatchUpdateListener<HostIpAddress.Match>() {

    @Override
    public void notifyAppearance(HostIpAddress.Match match) {
        System.out.printf("[ADD] %s %n", match.prettyPrint());
    }

    @Override
    public void notifyDisappearance(HostIpAddress.Match match) {
        System.out.printf("[REM] %s %n", match.prettyPrint());

    }
};

private void addChangeListener(AdvancedViatraQueryEngine engine) {
    HostIpAddress.Matcher matcher = HostIpAddress.Matcher.on(engine);

    try {
        // fireNow = true parameter means all current matches are sent to the listener
        engine.addMatchUpdateListener(matcher, listener, true);
        // execute model manipulations
        matcher.getOneArbitraryMatch()
        	.ifPresent(match -> match.getHost().setNodeIp("123.123.123.123"));
    } finally {
        // Don't forget to remove listeners if not required anymore
        engine.removeMatchUpdateListener(matcher, listener);
    }
}
By registering the match update listener with a |
When looking at the output, the setNodeIp call will result in two changes: the first one represents the removal of the old match (host - old IP pair), while the second one represents an addition of a new one (host - new IP pair). In general, a model update can often often result in multiple match changes (even on a single pattern).
| Be very careful when using match update listeners, as sometimes they are called while the model indexes are in an inconsistent state. For this reason, do not update the underlying model and do not execute further model queries. If such cases are required, delay the execution for a later phase. Better still, you can rely on the transformation API of VIATRA that ensure that rules are only executed when the indexes are in a consistent state. |
3.2.4.2. Query backends and hints
The advanced query engine also allows to initialize patterns with non-default settings called hints. The most important feature of these hints allow setting the pattern matcher backend, and other backend-specific settings could be changed.
In addition to Rete-based incremental query evaluation VIATRA also includes a local search-based approach. By default, Rete is used, but by adding the org.eclipse.viatra.query.runtime.localsearchLocalSearchHintsReteHintOptions
private void queryWithLocalSearch(AdvancedViatraQueryEngine engine) {
	// Prepares a hint for local search
    QueryEvaluationHint hint = LocalSearchHints.getDefault().build();
    // Ensures that local search is used for matching
    HostIpAddress.Matcher matcher = engine.getMatcher(HostIpAddress.instance(), hint);

    // The local search backend features the same API as the Rete backend
    for (HostIpAddress.Match match : matcher.getAllMatches()) {
        System.out.println(match.prettyPrint());
    }
}
As you can see, after the initialization the local search based backend can be queried with the same backend as the Rete-based one, however, it calculates the results when queried instead of relying on previously cached results. This means, usually it is cheaper (in memory and prepare time) to initialize a local search based matcher, but gathering the results is more expensive.
| As the name suggests, hints might be ignored by the query engine, e.g. if an incorrect configuration was set, or the engine knows of a functionally equivalent way that has a better performance. For details about the hints, consult the LocalSearchHints and ReteHintOptions classes. |
There are a few aspects where the current (version 2.0) local search backend behaves differently to the original, Rete-based algorithm:
-
Recursive queries are not supported. Trying to initialize a query with recursion results in a runtime error.
-
The algorithm cannot provide change notifications, so registering a MatchUpdateListener over local search-based queries is prohibited.
| The local search backend of VIATRA is almost functionally compatible with the Rete-based backend, but has very different performance characterics. If performance is critical, make sure to understand both algorithms to choose the appropriate one for the problem at hand. |
4. Model Transformation Development
For model transformation development a Java API is available, allowing seamless integration of the transformations into any Java applications. However, to enhance readability, we recommend using a higher-level JVM language, as it allows defining the transformation as an internal DSL of this host language.
In this tutorial we rely on the Xtend language to host the VIATRA transformation DSL, and we rely on its extension method and type inference support to reduce unnecessary elements. However, other JVM-based languages can also be used with similar efficiency (for an example in Kotlin see https://gist.github.com/doczir/bfe95c470599c5b8e60b400b80f92ea2).
4.1. Batch Transformations
This exercise helps the audience to create a simple batch transformation using the VIATRA Transformation API. The transformation will transform the hosts and applications in a CPS model to a deployment model. The exercise also covers registering a menu command which initializes the transformation.
4.1.1. Create transformation
For the transformation, we have to create a VIATRA Query Project (the one from the query development tutorial could also be reused), and create a new query file called CpsXformM2M.vql to store the patterns we want to use in the transformation with the following contents:
import "http://org.eclipse.viatra/model/cps"
import "http://org.eclipse.viatra/model/deployment"
import "http://org.eclipse.viatra/model/cps-traceability"

pattern hostInstance(hostInstance : HostInstance) {
    HostInstance(hostInstance);
}

pattern applicationInstance(
    appType : ApplicationType,
    appInstance : ApplicationInstance
) {
    HostInstance.applications(_, appInstance);
    ApplicationType.instances(appType, appInstance);
}

/**
 * Traceability link access
 */
pattern cps2depTrace(
    cps2dep : CPSToDeployment,
    trace : CPS2DeploymentTrace,
    cpsElement : Identifiable,
    depElement : DeploymentElement
) {
    CPSToDeployment.traces(cps2dep, trace);
    CPS2DeploymentTrace.cpsElements(trace, cpsElement);
    CPS2DeploymentTrace.deploymentElements(trace, depElement);
}-
Create transformation class in Xtend
-
Create new Model Transformation with the wizard
 Figure 8. Model Transformation Wizard - Create new transformation
 -
Setup the name of the transformation and click Next
 Figure 9. Model Transformation Wizard - Name of the new batch transformation
 -
Setup the type of the transformation to BatchTransformation and click Finish
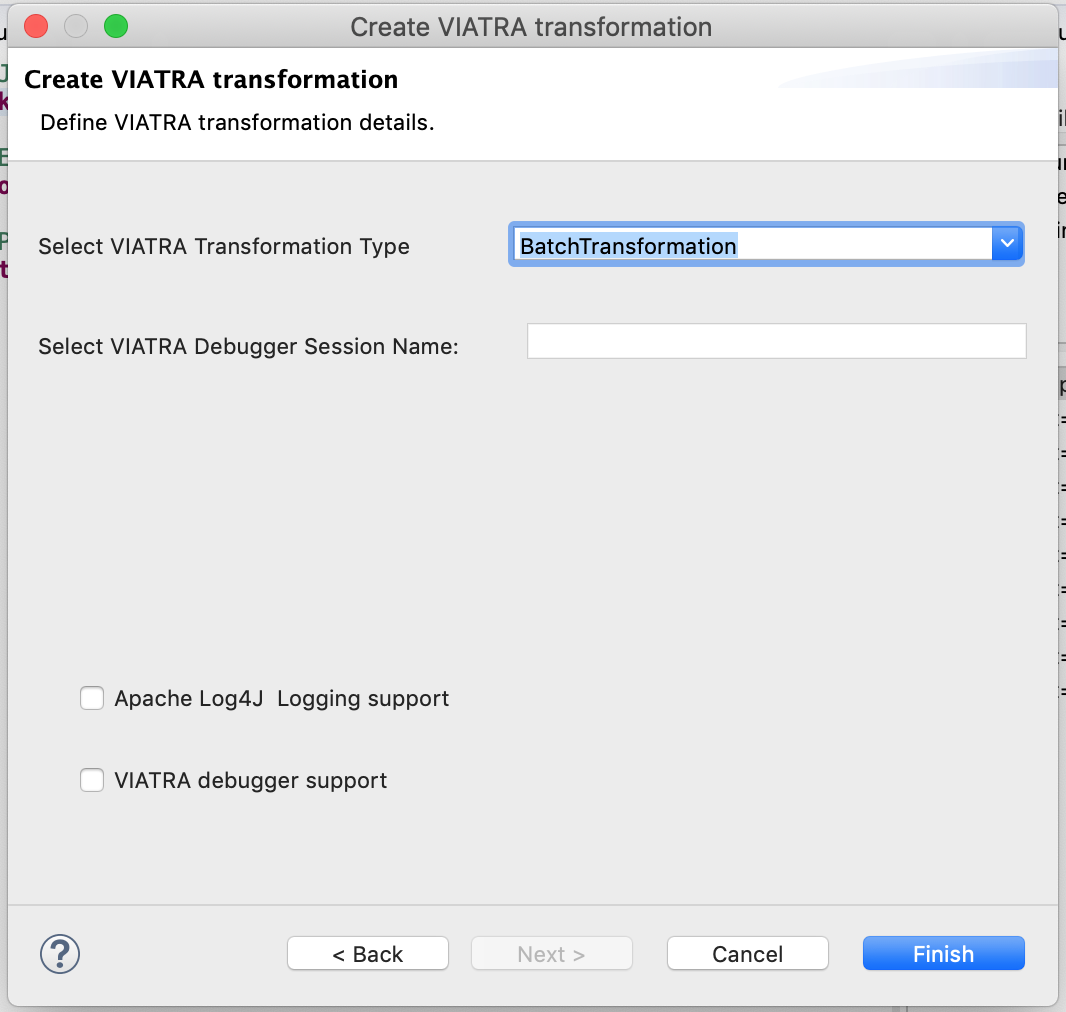 Figure 10. Model Transformation Wizard - Type of the new transformation
-
In the created file we have to register a few extension methods, more specifically for our used queries (CpsXformM2m
/** VIATRA Query Pattern group **/
val extension CpsXformM2M cpsXformM2M = CpsXformM2M.instance

/** EMF metamodels **/
val extension DeploymentPackage depPackage = DeploymentPackage.eINSTANCE
val extension TraceabilityPackage trPackage = TraceabilityPackage.eINSTANCE-
Constructor will also initialize transformation (replace the generated one)
-
It assumes that the resource and trace models are already created
-
The IModelManipulations implementation is used to make model access replaceable, this way the same transformation may be used for cases where the resource set is transactional. The initialization of this is generated automatically into the
createTransformationmethod.val CPSToDeployment cps2dep new(CPSToDeployment cps2dep, ViatraQueryEngine engine) { this.cps2dep = cps2dep resource = cps2dep.deployment.eResource this.engine = engine prepare(engine) createTransformation }
-
-
Transformation will remain active until disposed is called (there is a generated
disposemethod in the class) -
Create a rule to generate DeploymentHosts for each HostInstances
-
The
BatchTransformationRuleFactoryextension provides a builder API for rule definition -
A VIATRA query is used as precondition to the rule, which means the rule will be activated each time the given pattern when changes allowing to update the output accordingly.
val hostRule = createRule.precondition(HostInstance.instance).action[/*Action part*/].build
-
-
Specify which action to run when the rule fires. It will create the transformed
DeploymentHostelement in the output model as well as a trace element associating the sourceHostInstanceand the targetDeploymentHost:val hostRule = createRule(HostInstance.instance).action[ val cpsHostInstance = it.hostInstance val nodeIp = cpsHostInstance.nodeIp println('''Mapping host with IP: «nodeIp»''') /** Create & initialize DeploymentHost in output model **/ val depHost = cps2dep.deployment.createChild(deployment_Hosts, deploymentHost) => [ set(deploymentHost_Ip, nodeIp) ] /** Create trace element in trace model **/ cps2dep.createChild(CPSToDeployment_Traces, CPS2DeploymentTrace) => [ addTo(CPS2DeploymentTrace_CpsElements, cpsHostInstance) addTo(CPS2DeploymentTrace_DeploymentElements, depHost) ] println('''Mapped with IP: «nodeIp»''') ].build
Before version 2.1 the createRule method was parameterless and the query specification had to be provided in the precondition method. This was changed as the old API required some unexpected type casts when writing transformations in plain Java (instead of Xtend or Kotlin). This approach is still available in VIATRA 2.1, but it is marked as deprecated.
|
-
The rule which creates
DeploymentApplicationelements forApplicationInstanceobjects, looks similar. It has to find theDeploymentHostcreated from theHostInstanceto which the sourceApplicationInstanceis allocated, so it assumes thehostRulehas already fired:val applicationRule = createRule(ApplicationInstance.instance).action[ val cpsApplicationInstance = it.appInstance val appId = cpsApplicationInstance.identifier println('''Mapping application with ID: «appId»''') /* Find the DeploymentHost created from the HostInstance to which the source ApplicationInstance is allocated */ val cpsHostInstance = cpsApplicationInstance.allocatedTo val depHost = engine.cps2depTrace.getAllValuesOfdepElement(null, null, cpsHostInstance).filter(DeploymentHost).head /* Create & initialize DeploymentApplication in this DeploymentHost */ val deploymentApplication = depHost.createChild(deploymentHost_Applications, deploymentApplication) => [ set(deploymentApplication_Id, appId) ] /* Create trace element in trace model */ cps2dep.createChild(CPSToDeployment_Traces, CPS2DeploymentTrace) => [ addTo(CPS2DeploymentTrace_CpsElements, cpsApplicationInstance) addTo(CPS2DeploymentTrace_DeploymentElements, deploymentApplication) ] println('''Mapped application with ID: «appId»''') ].build -
Implement the method which performs the transformation using the rules defined above:
-
Since we are using the non-incremental (the whole model is always retransformed on model changes), the output and trace models are to be cleared before the any rule can fire
-
Pay attention to fire the rules in the proper order
def execute() {
    println('''Executing transformation on: Cyber-physical system: «cps2dep.cps.identifier»''')
    /* Clear output & trace model for batch transformation**/
    cps2dep.deployment.hosts.clear
    cps2dep.traces.clear
    /* Fire transformation rules**/
    hostRule.fireAllCurrent
    applicationRule.fireAllCurrent
}
-
4.1.2. Create a menu command to execute the transformation
-
Create a UI plugin with the following additional dependencies:
org.eclipse.ui, com.incquerylabs.course.cps.viatra.batch;bundle-version="0.1.0", org.eclipse.viatra.examples.cps.traceability;bundle-version="0.1.0", org.eclipse.viatra.query.runtime;bundle-version="1.2.0" -
Create handler implementation:
TransformHandler.javapublic class TransformHandler extends AbstractHandler implements IHandler { ViatraQueryEngine engine; CPS2DeploymentTransformationViatra transformation; @Override public Object execute(ExecutionEvent event) throws ExecutionException { IStructuredSelection selection = (IStructuredSelection) HandlerUtil.getCurrentSelection(event); CPSToDeployment tracemodel = (CPSToDeployment) selection.getFirstElement(); if (engine == null){ try { engine = ViatraQueryEngine.on( new EMFScope( tracemodel.eResource().getResourceSet())); transformation = new CPS2DeploymentTransformationViatra(tracemodel, engine); } catch (ViatraQueryException e) { throw new ExecutionException(e.getMessage(), e); } } transformation.execute(); return null; } } -
Register handler in the context menu of
CPSToDeploymentelements inplugin.xml:<extension point="org.eclipse.ui.commands"> <command defaultHandler="com.incquerylabs.course.cps.viatra.batch.ui.TransformHandler" id="com.incquerylabs.course.cps.viatra.batch.ui.command" name="Transform"> </command> </extension> <extension point="org.eclipse.ui.menus"> <menuContribution allPopups="false" locationURI="popup:org.eclipse.ui.popup.any?after=additions"> <command commandId="com.incquerylabs.course.cps.viatra.batch.ui.command" style="push"> <visibleWhen checkEnabled="false"> <with variable="selection"> <count value="1"> </count> <iterate> <adapt type="org.eclipse.viatra.examples.cps.traceability.CPSToDeployment"> </adapt> </iterate> </with> </visibleWhen> </command> </menuContribution> </extension>
4.1.3. Execute the transformation
-
Launch Eclipse Application
-
Create a generic resource project
-
Copy a
.cyberphysicalsystemresource in it if you already have one, or create a new CyberPhysicalSystem Model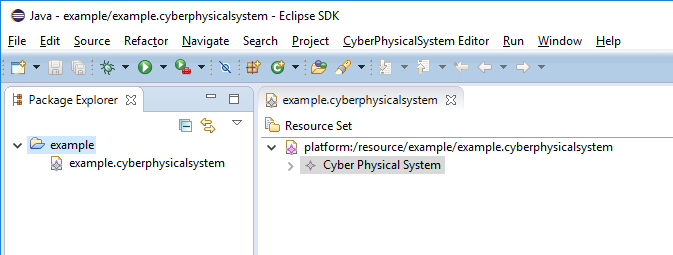 Figure 11. Project with a .cyberphysicalsystem resource
 -
Create a Deployment model
-
Root element shall be Deployment
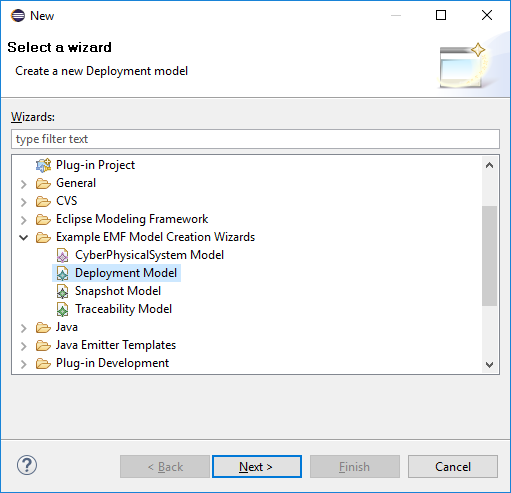 Figure 12. New Deployment Model
-
-
Create a Traceability model
-
Root element shall be CPS To Deployment
 Figure 13. New Traceability Model
-
-
In the Traceability editor, load both CPS and Deployment models with Load Resources... in the context menu
 Figure 14. Load necessary resources into the Tracebility Model
 -
Set CPS and Deployment references of traceability model in the properties view
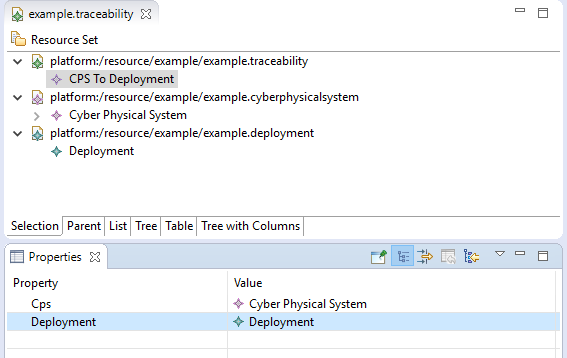 Figure 15. Set the references of the Traceability Model
 -
Create a new HostType, HostInstance, ApplicationType and ApplicationInstance in the Deployment model
-
Execute transformation using the created command (on the context menu of the Traceability model root)
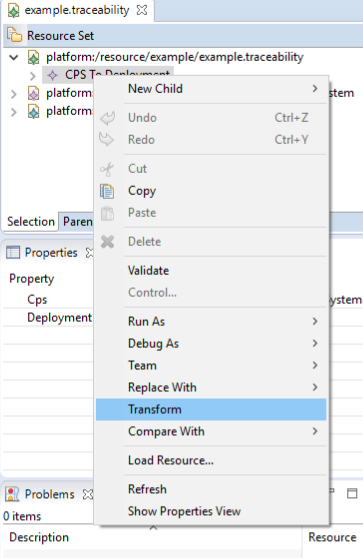 Figure 16. Transformation command in the context menu
4.1.4. References
-
VIATRA Transformation API: transformations.html
-
Further transformation examples: https://wiki.eclipse.org/VIATRA/Transformation/Examples
4.2. Event-driven Transformations
This exercise heps the audience to create a simple event-driven transformation using the VIATRA Transformation API. The transformation will create (and then incrementally update while active) a deployment model based on a CPS model. The exercise also covers registering a menu command which initializes the transformation.
Given the batch and event-driven transformations are really similar, this section focuses mainly on the differences; if required, consult the batch transformation tutorial.
4.2.1. Create transformation
Specific patterns have to be defined for event-driven rules; note that there are small differences to the batch definitions, e.g. there is an additional pattern called allocatedDeploymentApplication.
import "http://org.eclipse.viatra/model/cps"
import "http://org.eclipse.viatra/model/deployment"
import "http://org.eclipse.viatra/model/cps-traceability"

pattern hostInstance(hostInstance) {
    HostInstance(hostInstance);
}

pattern applicationInstance(appType, appInstance){
    HostInstance.applications(_, appInstance);
    ApplicationType.instances(appType, appInstance);
}

pattern allocatedDeploymentApplication(depHost, depApp) {
    DeploymentHost.applications(depHost, depApp);
}

pattern cps2depTrace(cps2dep, trace, cpsElement, depElement) {
    CPSToDeployment.traces(cps2dep, trace);
    CPS2DeploymentTrace.cpsElements(trace, cpsElement);
    CPS2DeploymentTrace.deploymentElements(trace, depElement);
}-
Create transformation class (preferably Xtend)
-
Create new Model Transformation with the wizard
Figure 17. Model Transformation Wizard - Create new transformation-
Setup the name of the transformation and click Next
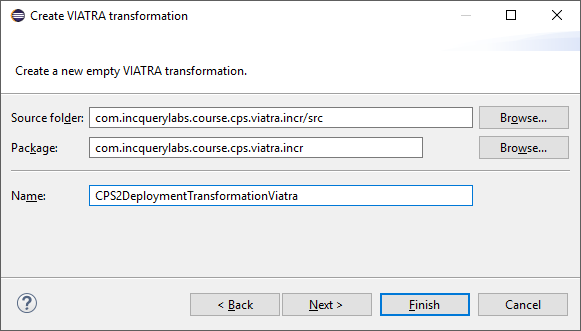 Figure 18. Model Transformation Wizard - Name of the new event-driven transformation
 -
Setup the type of the transformation to EventDrivenTransformation and click Finish
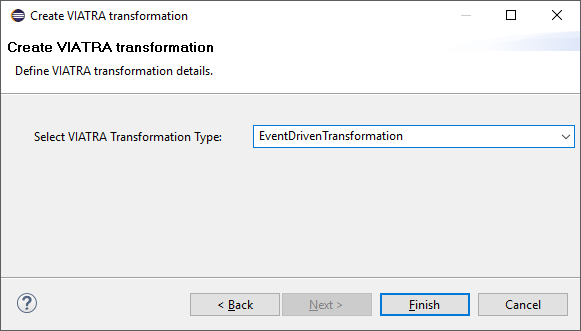 Figure 19. Model Transformation Wizard - Type of the new transformation
-
-
-
Register used, domain-specific APIs as extensions, common APIs are already generated
/* * VIATRA Query group */ val extension CpsXformM2M cpsXformM2M = CpsXformM2M.instance /* * EMF metamodels */ val extension DeploymentPackage depPackage = DeploymentPackage::eINSTANCE val extension TraceabilityPackage trPackage = TraceabilityPackage::eINSTANCE -
Constructor will also initialize transformation (replace the generated one)
-
It assumes that the output and trace models are already created
-
The IModelManipulations implementation is used to make model access replaceable, this way the same transformation may be used for cases where the resource set is transactional
val CPSToDeployment cps2dep

new(CPSToDeployment cps2dep, ViatraQueryEngine engine) {
    this.cps2dep = cps2dep
    this.resource = cps2dep.deployment.eResource
    this.engine = engine
    prepare(engine)
    createTransformation
}
-
-
Transformation will remain active until dispose is called (a
disposemethod is already generated) -
Create a rule to create DeploymentHosts for each HostInstances
-
The EventDrivenTransformationRuleFactory extension provides a builder API for rule definition
-
A VIATRA query pattern is used as precondition to the rule, which means the rule will be activated each time the given pattern changes allowing to update the output accordingly.
val hostRule = createRule(HostInstanceMatcher.querySpecification)
-
Before version 2.1 the createRule method was parameterless and the query specification had to be provided in the precondition method. This was changed as the old API required some unexpected type casts when writing transformations in plain Java (instead of Xtend or Kotlin). This approach is still available in VIATRA 2.1, but it is marked as deprecated.
|
-
Add action for each kind of changes in the pattern to update trace and output models:
-
upon creation of a HostInstance
.action(CRUDActivationStateEnum.CREATED) [ val hostinstance = hostInstance val nodeIp = hostInstance.nodeIp println('''Mapping host with IP: «nodeIp»''') /* Create new DeploymentHost element in output model */ val host = cps2dep.deployment.createChild(deployment_Hosts, deploymentHost) => [ set(deploymentHost_Ip, nodeIp) ] /* Create trace entry */ cps2dep.createChild(CPSToDeployment_Traces, CPS2DeploymentTrace) => [ addTo(CPS2DeploymentTrace_CpsElements, hostinstance) addTo(CPS2DeploymentTrace_DeploymentElements, host) ] ] -
upon the change of a HostInstance
.action(CRUDActivationStateEnum.UPDATED) [ /* find associated DeploymentHost element */ val depHost = engine.cps2depTrace .getOneArbitraryMatch(cps2dep, null, hostInstance, null) .depElement as DeploymentHost val hostIp = depHost.ip println('''Updating mapped host with IP: «hostIp»''') /* update IP attribute */ val nodeIp = hostInstance.nodeIp depHost.set(deploymentHost_Ip, nodeIp) println('''Updated mapped host with IP: «nodeIp»''') ] -
upon the removal of a HostInstance
.action(CRUDActivationStateEnum.DELETED) [ /* Find trace element */ val traceMatch = engine.cps2depTrace .getOneArbitraryMatch(cps2dep, null, hostInstance, null) val hostIp = hostInstance.nodeIp println('''Removing host with IP: «hostIp»''') /* Remove DeploymentHost element */ cps2dep.deployment.remove(deployment_Hosts, traceMatch.depElement) /* Remove trace */ cps2dep.remove(CPSToDeployment_Traces, traceMatch.trace) println('''Removed host with IP: «hostIp»''') ] -
Add default activation lifecycle then build the rule:
-
The lifecycle defines the state machine used to determine the possible states on which transition actions can defined.
.addLifeCycle(Lifecycles.getDefault(true, true)).build
-
-
-
The rule which create DeploymentApplication elements for ApplicationInstances, looks similar
val applicationRule = createRule(ApplicationInstanceMatcher.querySpecification) .action(CRUDActivationStateEnum.CREATED) [ /* Find associated DeploymentHost for the HostInstance this application is allocated to */ val depHost = engine.cps2depTrace.getAllValuesOfdepElement(null, null, appInstance.allocatedTo).filter( DeploymentHost).head val appinstance = appInstance val appId = appInstance.identifier println('''Mapping application with ID: «appId»''') /* Create DeploymentApplication application in host */ val app = depHost.createChild(deploymentHost_Applications, deploymentApplication) => [ set(deploymentApplication_Id, appId) ] /* create trace entry */ cps2dep.createChild(CPSToDeployment_Traces, CPS2DeploymentTrace) => [ addTo(CPS2DeploymentTrace_CpsElements, appinstance) addTo(CPS2DeploymentTrace_DeploymentElements, app) ] println('''Mapped application with ID: «appId»''') ].action(CRUDActivationStateEnum.UPDATED) [ /* find associated DeploymentApplication */ val depApp = engine.cps2depTrace.getOneArbitraryMatch(cps2dep, null, appInstance, null). depElement as DeploymentApplication /* Update ID */ if (depApp.id != appInstance.identifier) depApp.set(deploymentApplication_Id, appInstance.identifier) ].action(CRUDActivationStateEnum.DELETED) [ /* find associated DeploymentApplication */ val trace = engine.cps2depTrace.getAllValuesOftrace(null, appInstance, null).head as CPS2DeploymentTrace val depApp = trace.deploymentElements.head as DeploymentApplication /* Remove application from host */ engine.allocatedDeploymentApplication.getAllValuesOfdepHost(depApp).head.remove(deploymentHost_Applications, depApp) /* Remove traces */ cps2dep.remove(CPSToDeployment_Traces, trace) ].addLifeCycle(Lifecycles.getDefault(true, true)).build -
Replace the generated
createTransformationusing the rules defined above-
For cases when it is possible to have more than one rules activated (e.g. a new HostInstance is added to the model with already set allocated applications) a conflict resolver is used to provide a fixed ordering of rules to be executed.
-
We use a priority-based resolver (lower priority rules will be executed first), which considers priority of disappearing rules to be inverted (a disappearing application’s priority will be -2)
private def createTransformation() {
    //Initialize model manipulation API
    this.manipulation = new SimpleModelManipulations(engine)

    //Initialize event-driven transformation
    val fixedPriorityResolver = new InvertedDisappearancePriorityConflictResolver
    fixedPriorityResolver.setPriority(hostRule.ruleSpecification, 1)
    fixedPriorityResolver.setPriority(applicationRule.ruleSpecification, 2)

    transformation = EventDrivenTransformation.forEngine(engine)
        .setConflictResolver(fixedPriorityResolver)
        .addRule(hostRule)
        .addRule(applicationRule)
        .build
}
-
4.2.2. Creating a menu command to execute the transformation
-
Create UI plugin
-
Add dependencies:
MANIFEST.MForg.eclipse.ui, com.incquerylabs.course.cps.viatra.incr;bundle-version="0.1.0", org.eclipse.viatra.examples.cps.traceability;bundle-version="0.1.0", org.eclipse.viatra.query.runtime;bundle-version="1.2.0" -
Create handler implementations:
ToggleTransformationHandler.javapublic class ToggleTransformationHandler extends AbstractHandler implements IHandler { ViatraQueryEngine engine; CPS2DeploymentTransformationViatra transformation; /* (non-Javadoc) * @see org.eclipse.core.commands.IHandler#execute(org.eclipse.core.commands.ExecutionEvent) */ @Override public Object execute(ExecutionEvent event) throws ExecutionException { IStructuredSelection selection = (IStructuredSelection) HandlerUtil.getCurrentSelection(event); CPSToDeployment tracemodel = (CPSToDeployment) selection.getFirstElement(); if(transformation == null) { if(engine == null) { try { engine = ViatraQueryEngine.on( new EMFScope( tracemodel.eResource() .getResourceSet())); transformation = new CPS2DeploymentTransformationViatra(tracemodel, engine); } catch (ViatraQueryException e) { throw new ExecutionException(e.getMessage(), e); } } } else { transformation.dispose(); } return null; } } -
Register handler in the context menu of "CPSToDeployment" elements
plugin.xml<extension point="org.eclipse.ui.commands"> <command defaultHandler="com.incquerylabs.course.cps.viatra.incr.ui.ToggleTransformationHandler" id="com.incquerylabs.course.cps.viatra.incr.ui.command" name="Toggle Transformation"> </command> </extension> <extension point="org.eclipse.ui.menus"> <menuContribution allPopups="false" locationURI="popup:org.eclipse.ui.popup.any?after=additions"> <command commandId="com.incquerylabs.course.cps.viatra.incr.ui.command" label="Toggle Incremental Transformation" style="push"> <visibleWhen checkEnabled="false"> <with variable="selection"> <count value="1"> </count> <iterate> <adapt type="org.eclipse.viatra.examples.cps.traceability.CPSToDeployment"> </adapt> </iterate> </with> </visibleWhen> </command> </menuContribution> </extension>
4.2.3. Executing the transformation
-
Launch runtime eclipse
-
Create a generic resource project
-
Copy a
.cyberphysicalsystemresource in it
Figure 20. Project with a .cyberphysicalsystem resource -
Create an empty Deployment model
-
Root element shall be Deployment
Figure 21. New Deployment Model
-
-
Create a Traceability model
-
Root element shall be "CPS To Deployment"
Figure 22. New Traceability Model
-
-
In the Traceability editor, load both CPS and Deployment models with "Load Resources.." in the context menu
Figure 23. Load necessary resources into the Traceability Model -
Set CPS and Deployment references of traceability model in the properties view
Figure 24. Set the references of the Traceability Model -
Toggle transformation using the created command (on the context menu of the Traceability model root)
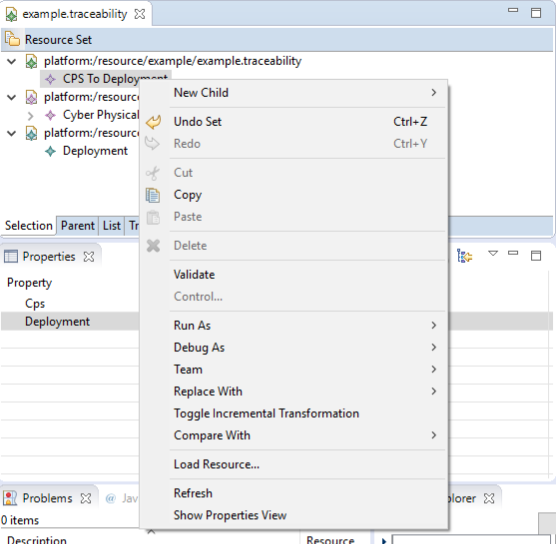 Figure 25. Toggle transformation in the context menu
 -
Initial activation done on first modification of the input model, e.g. create a new HostType
4.2.4. References
-
VIATRA Transformation API: transformations.html
-
Further transformation examples: https://wiki.eclipse.org/VIATRA/Transformation/Examples
4.3. Debugging model transformations
The development and debugging of model transformations is not a trivial exercise, the basic concepts of software debugging however can be mapped to this field as well. Debuggers can be used for detecting bugs, as well as better understanding the structure and behavior of programs. Direct control over a program allows the programmer to follow the flow of execution or stop the program at any desired point. Then it is possible to inspect its current state and verify the correctness of the software. These properties are very desirable in the field of model transformations too. The VIATRA framework incorporates a debugger framework that supports the following features:
-
Display the state of remote VIATRA transformations.
-
Allow the user to control the execution of VIATRA transformations, via standard debugger commands ("Step over", "Continue") or by selecting the next activation to be executed.
-
Display the model instances associated with the transformation under debugging.
-
Allow the user to define various transformation breakpoints.
The model transformation debugger described in this section requires the VIATRA Query and Transformation SDK Extensions (Incubation) component to be installed from the VIATRA repository. The debugger in its current form is considered experimental, and both the feature set and API setup is subject to change in future releases of VIATRA.
|
4.3.1. Setting Up the Transformation Under Debugging
In order to support debugging, the model transformation definition needs minor modifications. These can be done in two different ways:
-
If the transformation is being newly developed, it is highly advised to use the VIATRA model transformation creation wizard. As shown on the figure below, the user can select the "VIATRA debugger support" checkbox, this way the generated code will incorporate the appropriate setup.
-
In case of an already-existing transformation, the model transformation definition needs to be modified manually. This involves adding the VIATRA debug configuration to the VIATRA transformation builder (requiring an additional dependency to the plugin
org.eclipse.viatra.transformation.runtime.debug). The following example snippet shows how this is achieved for the example.
// New import declaration
import org.eclipse.viatra.transformation.debug.configuration.TransformationDebuggerConfiguration

public class CPS2DeploymentTransformationViatra {
...
    private def createTransformation() {
        ...
        // Initializes a debugger configuration with the name `TestTransformation`
        val debugger = new TransformationDebuggerConfiguration("TestTransformation")
        transformation = BatchTransformation
            .forEngine(engine)
            // Adds the debugger configuration to the transformation
            .addAdapterConfiguration(debugger)
            .build
        ...
    }

...
}| Here we replace the previously created transformation to always start with debugging enabled. If necessary, the addition of the adapters could be made configurable by the transformation developer and separate menu items can be added as necessary. |
The transformation debugger configuration registers a runtime agent that blocks transformation execution until a debugger client connects via JMX. For the agent to work, a few command line parameters to be specified:
-Dcom.sun.management.jmxremote.port="port to be used, typically 1099"
-Dcom.sun.management.jmxremote.authenticate=false
-Dcom.sun.management.jmxremote.ssl=false
4.3.2. Using the Debugger UI
The following section describes how to use the VIATRA transformation debugger UI elements once the debugging infrastructure is set up. This section of the guide assumes that a target Eclipse instance is running.
4.3.2.1. Connecting to the transformation under debugging
-
If the VIATRA debugger feature is installed, the Debugger UI Elements are contained by the Eclipse Debug perspective, once this perspective is selected, the related VIATRA debug views are displayed.
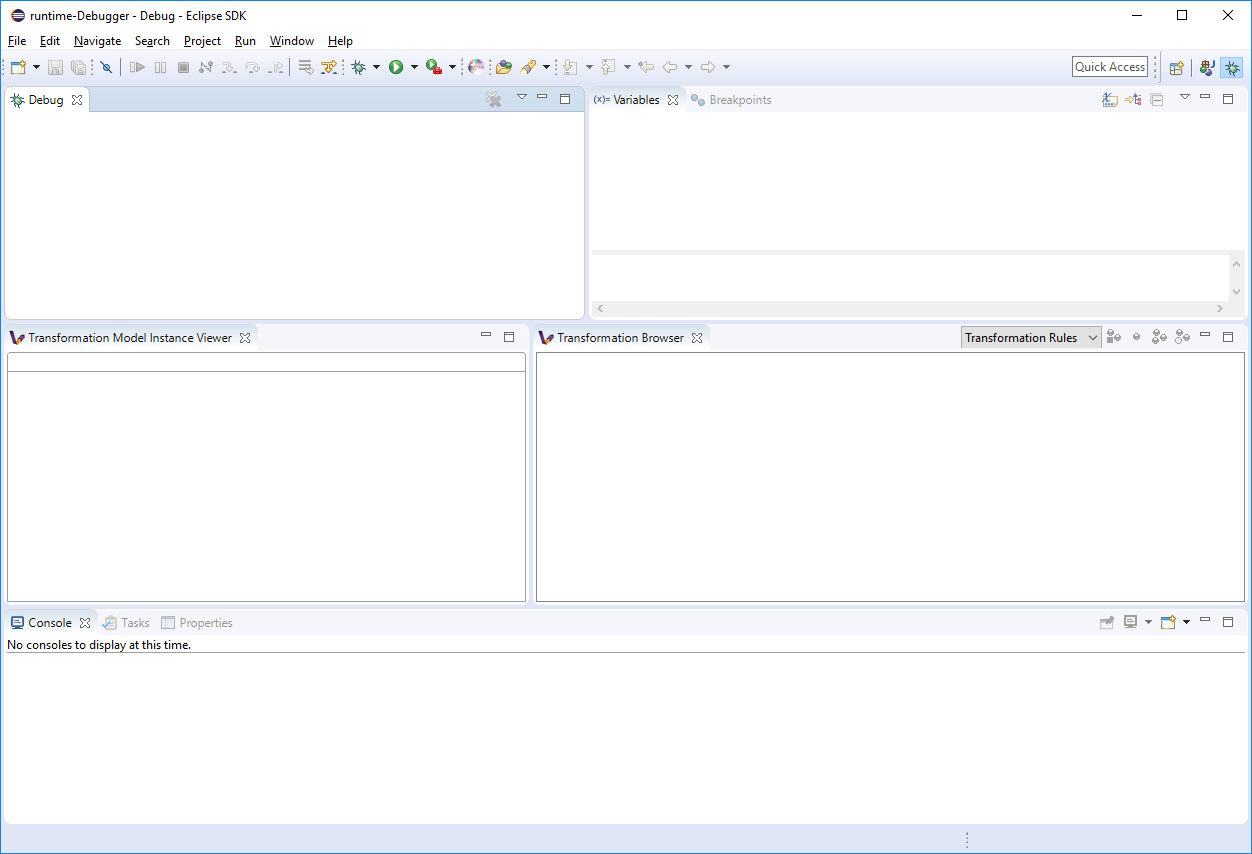
Figure 26. Debug perspective with debugger views
-
The debugger can be initialized via launching a VIATRA Transformation Remote Debugging debug configuration. The debug configuration can be specified similarly to any other Eclipse launch configuration. As the figure below shows, firstly, the target port needs to be specified. This value needs to be equal to the port value specified in the target Eclipse launch configuration (typically its 1099).
-
Next the port needs to be queried, via using the button located next to the port text field.
-
After the querying is completed, the user can select from a set of transformation instances that are present on that port.
-
Finally, a class file present in the workspace needs to be selected, as the breakpoints associated with the transformation will be bound to the resource of this file.
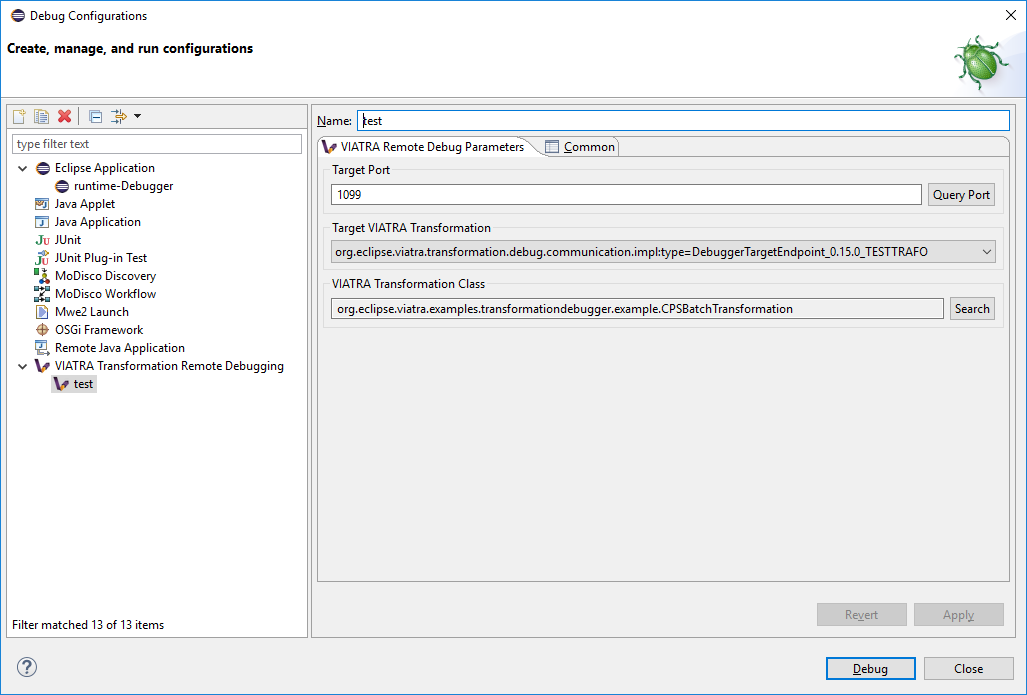
Figure 27. Editing launch configuration
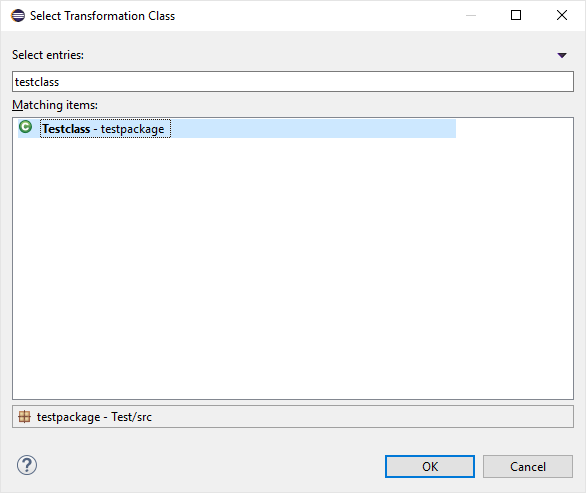
Figure 28. Selecting a class
-
These launch configurations are saved, once the user defines a configuration for a target transformation, it can be reused without any required modifications (Assuming that the user did not modify the ID of the transformation session).
-
After launching the debug configuration, the debug session is initialized allowing the user to observe and control the execution of the selected transformation. Here the transformation debugging session is displayed in the Eclipse debug view. There are however additional contemporary views that display the details of the selected debug session.
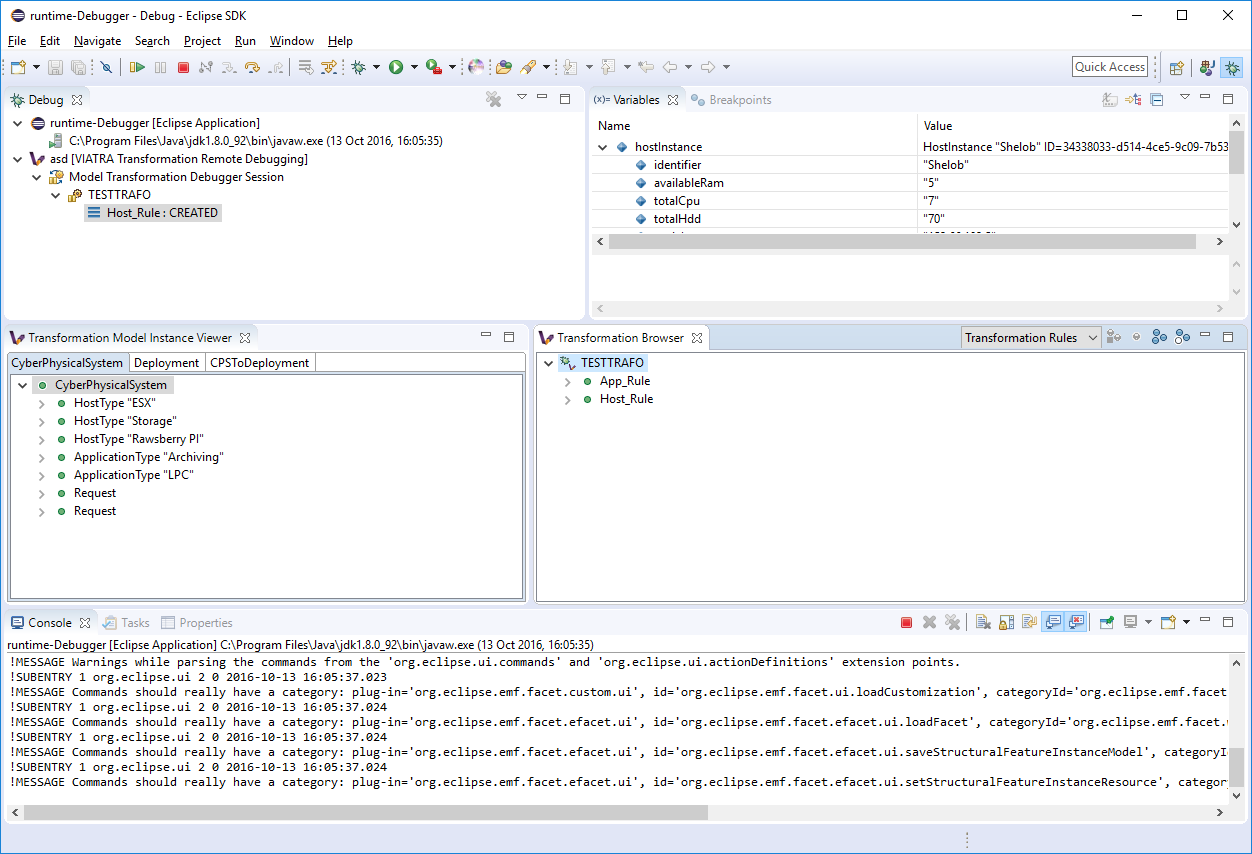
Figure 29. Debugger in its initialized state
4.3.2.2. Browsing the transformation state
One of the main use-cases of the VIATRA transformation debugger, is to enable the transformation developer to observe the state of a VIATRA transformation at certain point in its execution sequence. The debugger allows the transformation developer to observe the following transformation elements:
-
Active transformation rule activations
-
Input and output model instances
-
The input parameters of the next Activation
| In order to use the debugger UI elements, select the Debug Stack trace representing the transformation: |
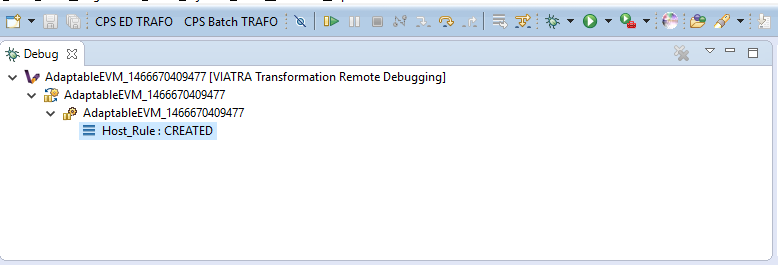
Figure 30. Selecting the transformation stack frame
The Transformation Browser view is responsible for observing the internal state of the transformation. It allows the user to observe the current transformation rule activations, and it supports the definition of various transformation breakpoints.
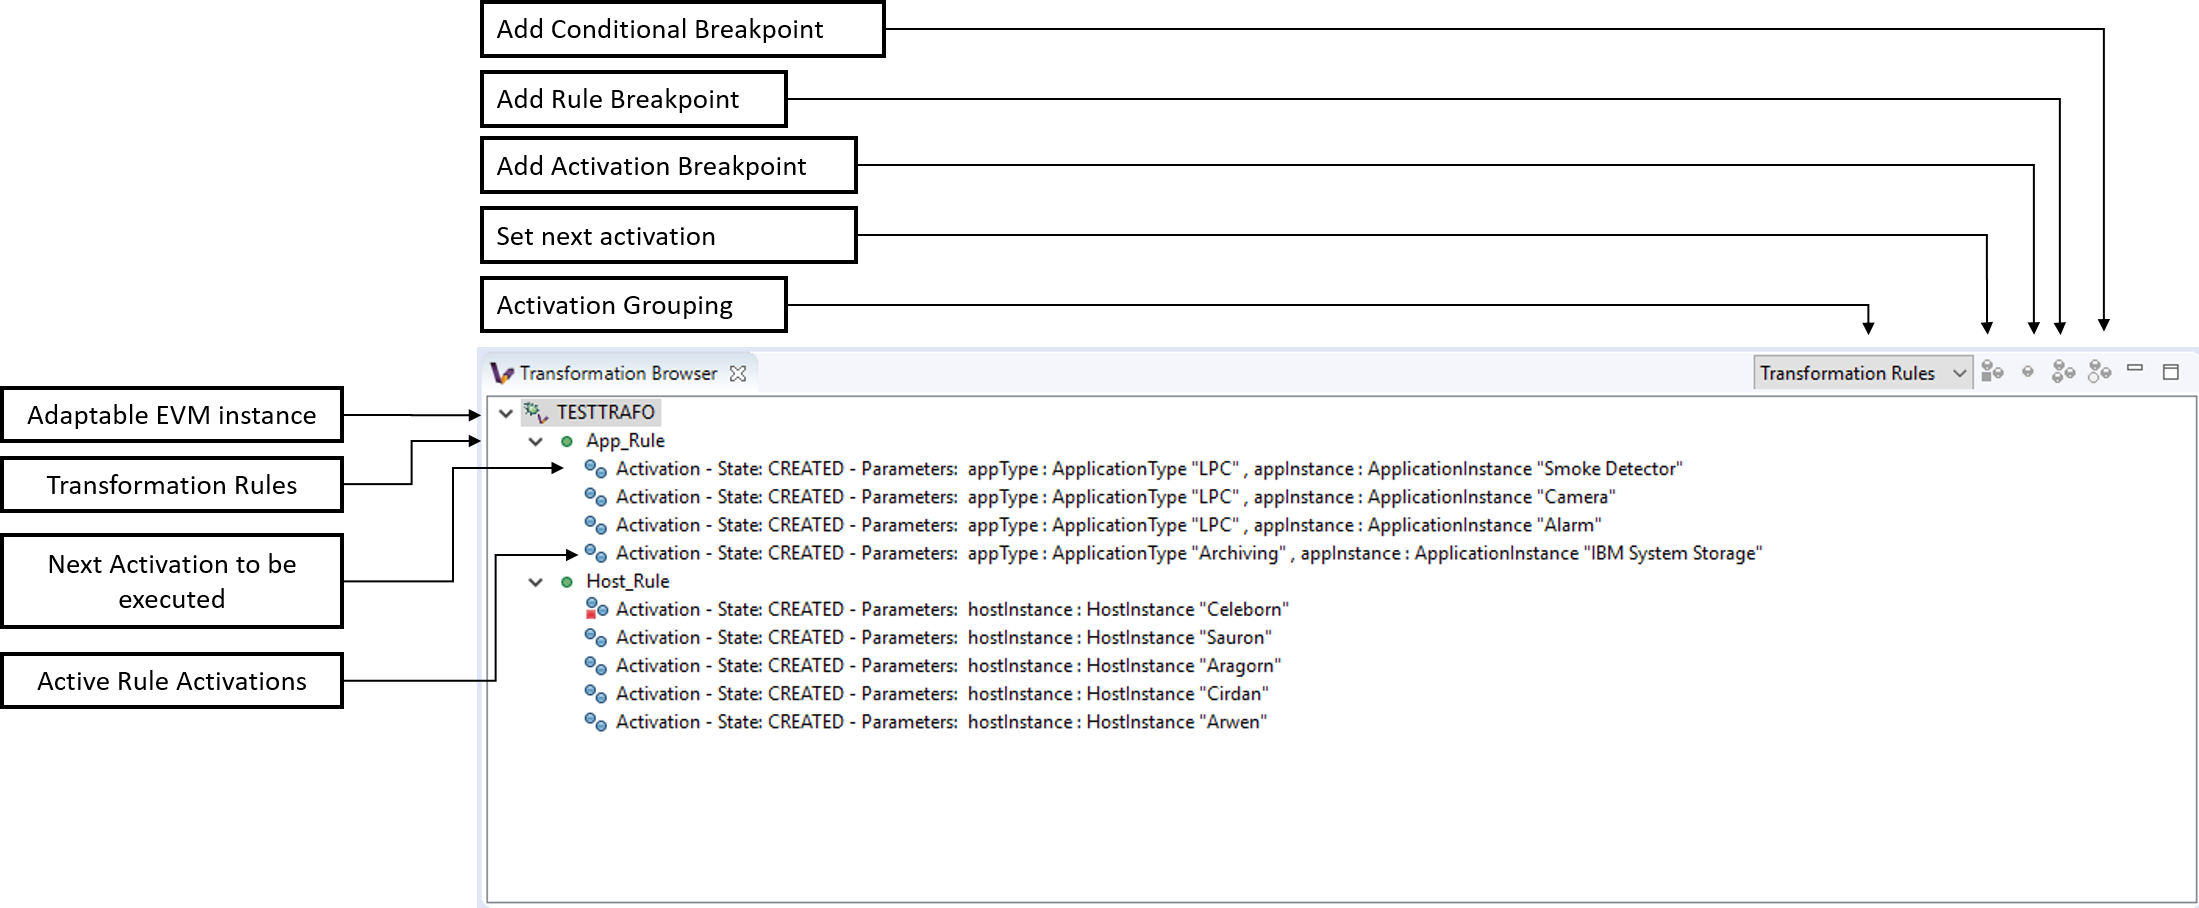
Figure 31. Transformation Browser ordered by transformation rules
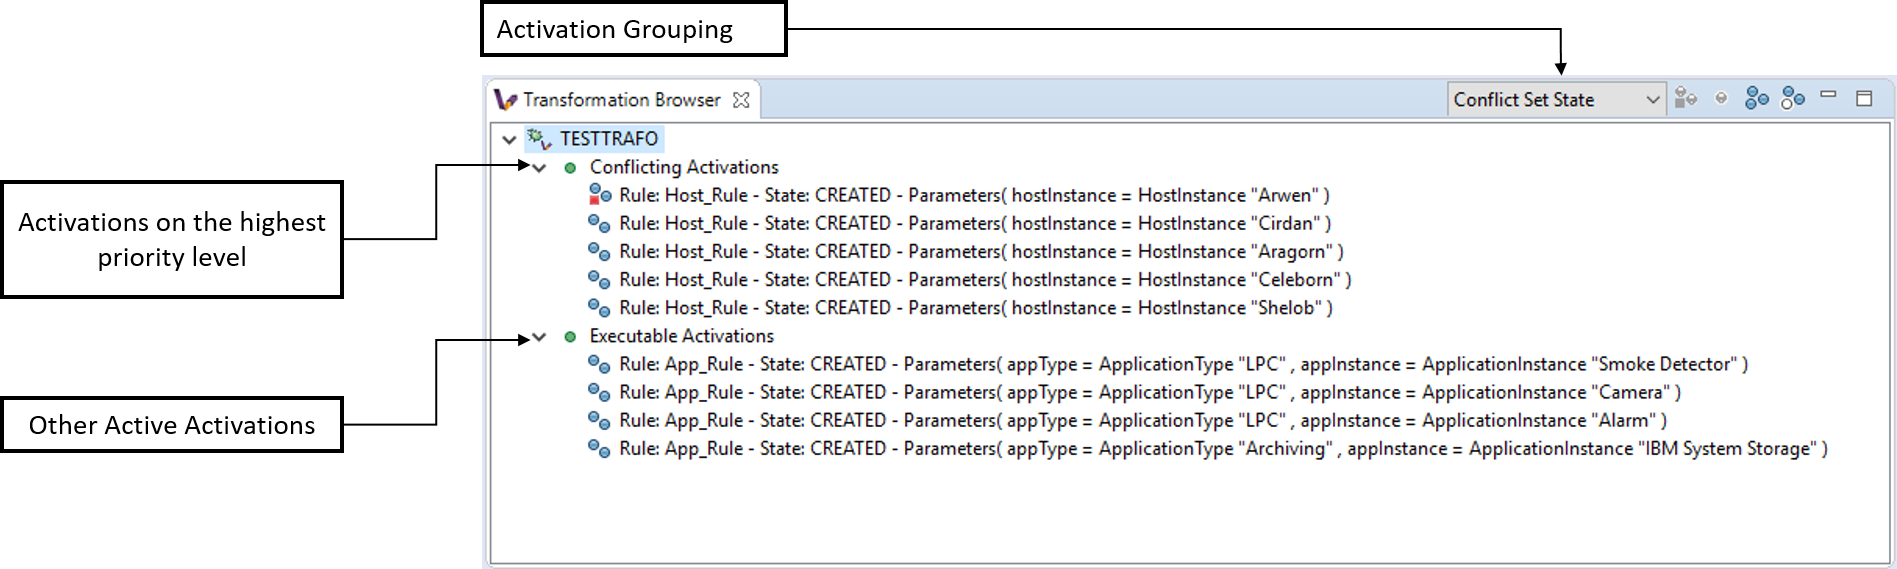
Figure 32. Transformation Browser ordered by EVM Conflict Set state
The Transformation Model Instance Viewer enables the transformation developer to observe the state of the source and target model instances related to the model transformation selected in the Adaptable Transformation Browser view. This view displays the model instances in a multi-tabbed tree view with properties view support.
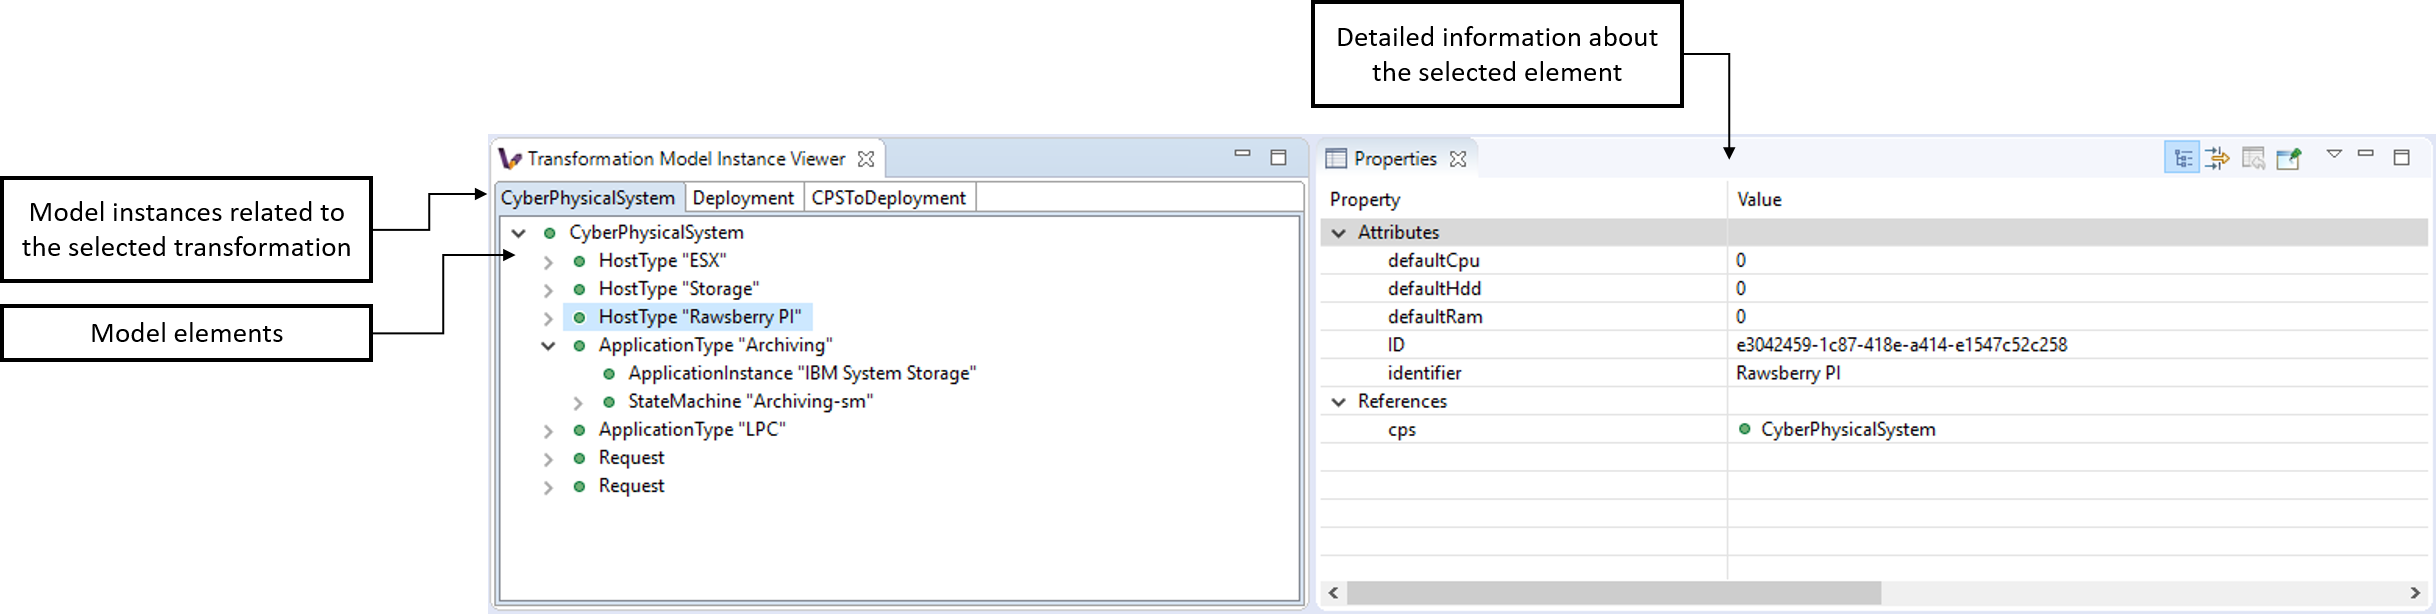
Figure 33. VIATRA model instance browser view
The parameters of the next activation to be executed can be observed via the Variables Eclipse Debug View. After selecting the given debug stack frame (representing a transformation rule activation), the parameters of the transformation rule precondition are displayed as variables.
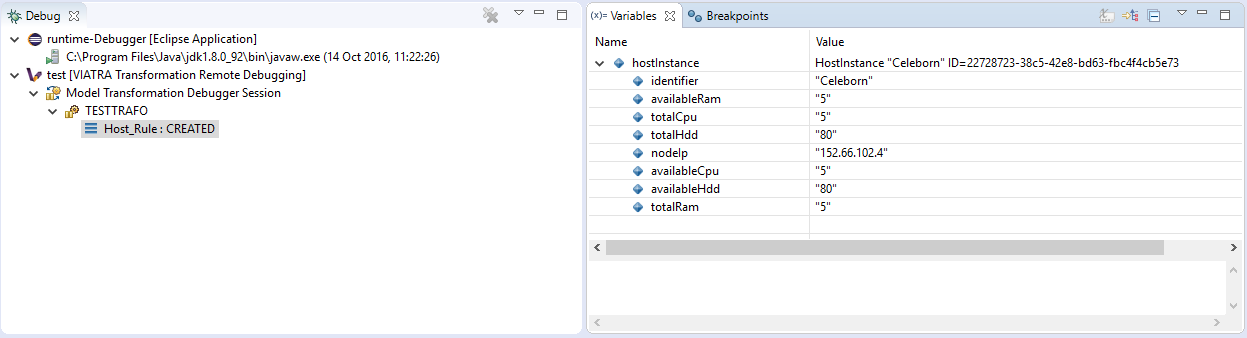
Figure 34. VIATRA transformation preconditions as Variables
4.3.2.3. Controlling the transformation execution sequence
The VIATRA transformation debugger enables the transformation developer to control the execution sequence of the transformation under debugging. This can be done in the following ways.
Using Breakpoints and standard debug commands
The Transformation debugger supports the following breakpoints:
-
Activation breakpoint: Activation breakpoints can be toggled via selecting a rule activation and using the appropriate command on the Transformation Browser view.
-
Rule Breakpoint: Rule breakpoints can be created via selecting a model transformation instance and using the appropriate UI element. Once this is done, the following dialog opens, on which the transformation developer can specify the name of the transformation rule. Once an activation is about to be executed, the debugger checks if the activation derives from the rule associated with the specified name. If this condition is true, the execution is halted.
-
Conditional breakpoint: These breakpoints allow the user to define VIATRA Query based conditions to halt the execution of the transformation. In order to create a conditional breakpoint, select a model transformation instance in the Transformation Browser view, and use the appropriate command on the view’s command bar. Afterwards, a dialog window opens which allows the user to define VIATRA query patterns. The execution of the transformation is halted once the match set of the pattern changes.
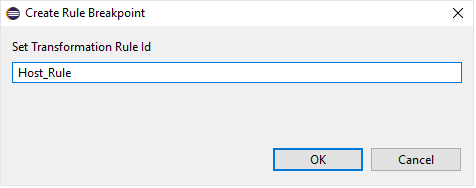
Figure 35. Rule breakpoint definition dialog

Figure 36. Conditional breakpoint definition dialog
| This editor reuses the standard Xtext based VIATRA query editor, however in this case, package definitions should be omitted (as there is no enclosed Eclipse resource to the file). Furthermore, the definition can contain only one public pattern at this point, this restriction, however, does not apply to private patterns. |
| The Debugger runtime component reuses the VIATRA Query language parser infrastructure to parse the patterns contained in conditional breakpoints. The debugger runtime component explicitly does not require classes of the parser infrastructure to be loaded (in order to minimize the dependencies of said runtime component). Make sure however, if conditional breakpoints are used, the target platform on which the transformation under debugging is running should contain the VIATRA Query Tooling UI elements, and they should be initialized as well. If these required steps are omitted, the debugger produces the following error message: |
| The rule and conditional breakpoints are persisted between individual transformation debugging sessions. The breakpoints are contained in a common breakpoint pool managed by the Eclipse Breakpoint Manager. |
| The breakpoints added are displayed in the Breakpoints Eclipse Debug view. Which can be used to disable and remove these breakpoints. |

Figure 37. Conditional breakpoint error dialog
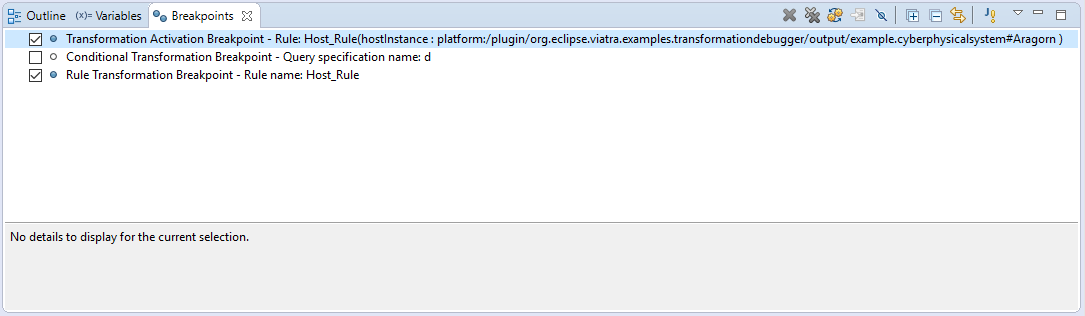
Figure 38. Transformation breakpoints in the Eclipse Breakpoints view
The debugger supports the following Eclipse debug commands:
- Step Over (F6)
-
If the transformation execution is halted, use this command the execute the next activation, and stop the execution again.
- Resume (F8)
-
If the transformation execution is halted, use this command to continue the execution of the transformation until a breakpoint is hit.
- Terminate (Ctrl+F2)
-
The transformation is resumed and the debugger agent is disconnected from the target transformation. The transformation debugging session is terminated.
A few debug commands are not supported for now, including Step Return, Step Into, Suspend and Disconnect.
Directly selecting the next transformation activation to be fired
The transformation debugger allows the user to define which activation should be executed next. In order to do this, select an activation and use the appropriate command to set it as the next activation to be executed.
| The changes made this ways could produce unpredictable behavior in the model transformation (Overriding the defined priority could result in inconsistent model states). Use this feature cautiously. |
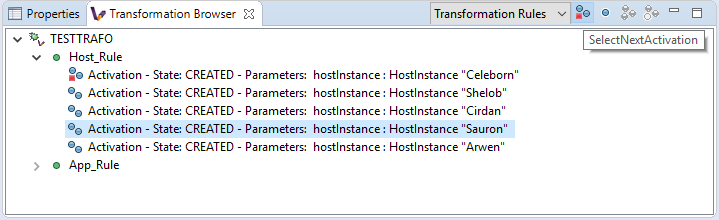
Figure 39. Selecting the next activation
Once the next activation is selected, notice that the red rectangle representing, the next activation to be fired, is moved to the desired activation. At this point, if the transformation is resumed, it will continue its execution from the selected activation.
4.3.3. Common issues
4.3.3.1. Trying to connect to an unreachable VIATRA transformation instance
If the VIATRA transformation instance specified in the debugger launch configuration does not exist, the debugger tooling will inform the user, that the debugging session could not be initialized and terminate the newly created session as well.

Figure 40. Debugger Connection Error
4.3.3.2. Transformation under debugging terminated abruptly.
If the eclipse instance in which the target transformation is running is terminated, or the connection is severed between the host and target components, the debugger tooling will terminate the respective VIATRA debugger launch automatically.
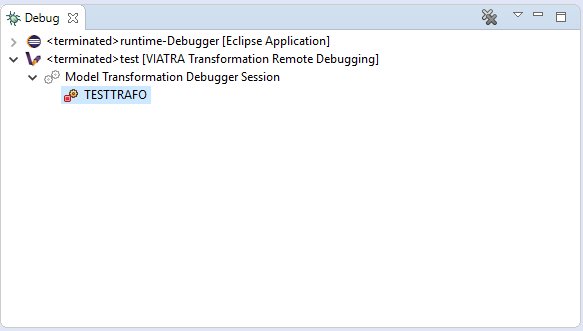
Figure 41. Automatic termination
4.3.3.3. Trying to add a conditional breakpoint, but the Xtext parser infrastructure is not initialized.
In order to ensure that the conditional breakpoint patterns are parsed properly in the runtime Eclipse instance, the Xtext parser infrastructure needs to be initialized. If the debugger tooling produces the following exception, open a VIATRA query view (e.g.: VIATRA Query Explorer) to manually initialize the parser tooling. These manual steps are needed, as Xtext-based parser tooling components are loaded lazily.
Figure 42. Conditional breakpoint error dialog