Navigate to your project overview by clicking the menu item Projects. Here you can find the list of projects with description and other related details. On the left side of project list you can find a advanced filters to filter out specific project.
The Project List lists all the relevant projects with the following information:
Project name: All the projects are listed with their names.
Description: The description for the project is displayed here.
Project responsible: The email address of the person responsible for the project is displayed.
State: Displays the state of the project and clearing requests. The status for PS and CS is indicated by colors.
Color
Project State (PS)
Project Clearing State (CS)
Green
Active
Closed
Yellow
Not Applicable
In-progress
Red
Open
Open
Grey
Phase out/ Unknown
Not Applicable
License Clearing displays the clearing states for releases for the project including sub projects.
Actions: you can perform the following actions for a project:
Action
Description
To edit a Project
To create clearing request the OSS clearing team
To duplicate current version of existing project. This action will also duplicate all the linked projects, releases along with the general information and is used to create different versions of the project.
To delete the project from SW360.
NOTE: CLICK ONTO SORT LICENSE INFORMATION ALPHABETICALLY.
1.03 Project Search
Advanced search dialogue box allows you to search for a particular project. To search for a project follow the procedure:
Enter the Project name and Version of the project that you want to search.
Select the Project Type from the drop-down list. For more information regarding the project type, refer to paragraph 4. of General Information.
Search the project by Project Responsible email.
Search projects by their Group, select the group from the drop-down list.NOTE: BY DEFAULT, THE SEARCH RETURNS ONLY THE RESULTS OF YOUR GROUP. HOWEVER, YOU CAN ALSO SELECT THE GROUPS FROM THE DROP-DOWN LIST.
Search projects by their project State, select the options available from the drop-down list. For more information regarding project state, refer to 1.02 Project List.
You can search the projects by their Clearing State, select the options available from the drop-down list. For more information regarding project state, refer to 1.02 Project List.
You can search projects by their Tags. If there are multiple tags that you want to search, use a comma to separate.
You can search projects by Additional Data.
1.04 Add Project
To add a new project, click on the Add Project on the project page, this redirects you to another page that allows you to add project information add project information for the project you want to create. Following are the three sections where you must enter information:
Summary
Administration
Linked Releases and Projects
1.Summary
A.General Information
NOTE: FIELDS MARKED "*" ARE MANDATORY
Enter the Name of the project you want to create.
The field Created by is set automatically to the creator/owner of the project.
Version of a project indicates there are new changes compared to the previous version of the project. Enter the version for your project as required.
Select the Project Type from the drop-down list.
Customer: Delivered to the customer
Internal: Internally used but can also be used in other projects as a sub-project
Product: Developed as a product and delivered to the customer
Services: Developed as a service and delivered to the customer
Inner Source: OSS within a particular organization
Project Visibility describes if the project is visible to all or only selected personnel. The default is set to “everyone”, you can select the project visibility from the drop-down list.
Private: Only visible to creator or admin
Me and Moderators: Visible to creator, moderators and admins
Group and Moderators: Visible to all users of the same group and the moderators
Everyone: All logged in users
Tags are words assigned to a project that assist in quick searching. You can create a tag by assigning a word to your project.
Check or uncheck the following fields as required:
Enable Security Vulnerability Monitoring (activated only if security responsible are added), refer to C. Roles.
Do not create monitoring list, but use from the external id, refer to E. External IDs.
Enable Displaying Vulnerabilities if you want the vulnerabilities to be visible.
Modified on date will be set automatically on creating the project.
Description: You can enter details of your project.
Modified by will be set automatically.
Select the Domain for your project from the drop-down list.
Application software
Documentation
Embedded Software
Hardware
Test and diagnostics
Click on the field to select the Vendor for your project.
This opens a dialogue box, use the type field to search for the vendors.
Select the vendors
Click on Add Vendor.
B. External URLs
Click on Click to add row to external URLs to add URLs of your project.
Select External URL Key from the drop-down list.
Homepage: Link for homepage
Wiki page: Link for wiki page
Clearing:
Enter External URL Value. It is the web address for the above mentioned external URL key. To add multiple external URLs, repeat the same procedure.
To delete an external URL, click on.
C. Roles
Group is the department you/project owner belongs to. Click on the group field to select a Group for your project.
This opens a dialogue box, use the type field to search for the group.
Select the group.
Click on Select
Enter the Owners Accounting Unit.
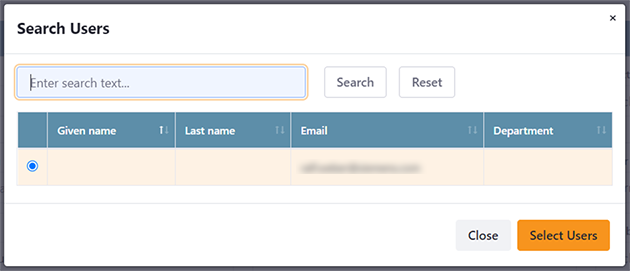
Project manager is the user who manages the project. Click on the field to select Project Manager.
This opens a dialogue box, use the type field to search for the Project Manager.
Select the Users.
Click on Select Users.
Enter the Owners Billing Group.
Project Owner holds the project. Click on the field to select Project Owner.
This opens a dialogue box, use the type field to search for the Project Owner.
Select the Users.
Click on Select Users.
Select the Owner Country from the drop-down list.
Security responsible is the list of users responsible for the security of the project. Click on the field to select Security responsible.
This opens a dialogue box, use the type field to search for the Security responsible.
Select the Users
Click on Select Users.
Click on the field to select Lead Architect.
This opens a dialogue box, use the type field to search for the Lead Architect.
Select the Users.
Click on Select Users.
Moderator is the user responsible for the project. Click on the field to select moderators.
This opens a dialogue box, use the type field to search for the Moderators.
Select the Users.
Click on Select Users.
Click on the field to select Contributors.
This opens a dialogue box, use the type field to search for the Contributors.
Select the Users.
Click on Select Users.
D. Additional Roles
To assign more roles to your project, use Click to Add Additional Roles.
Select the type of Role from the drop-down list.
Stakeholder
Analyst
Contributor
Accountant
End user
Quality manager
Test Manager
Technical writer
Key user
Enter Email address of the responsible personnel. To add multiple additional roles, repeat the same procedure.
To delete an additional role, click on.
E. External Ids
Click on Click to add row to External Ids to add external Ids to your project.
Click on field to enter External Id Key and select from the drop-down list.
Enter External Id Value. To add multiple external Ids, repeat the same procedure.
To delete an External Id, click on.
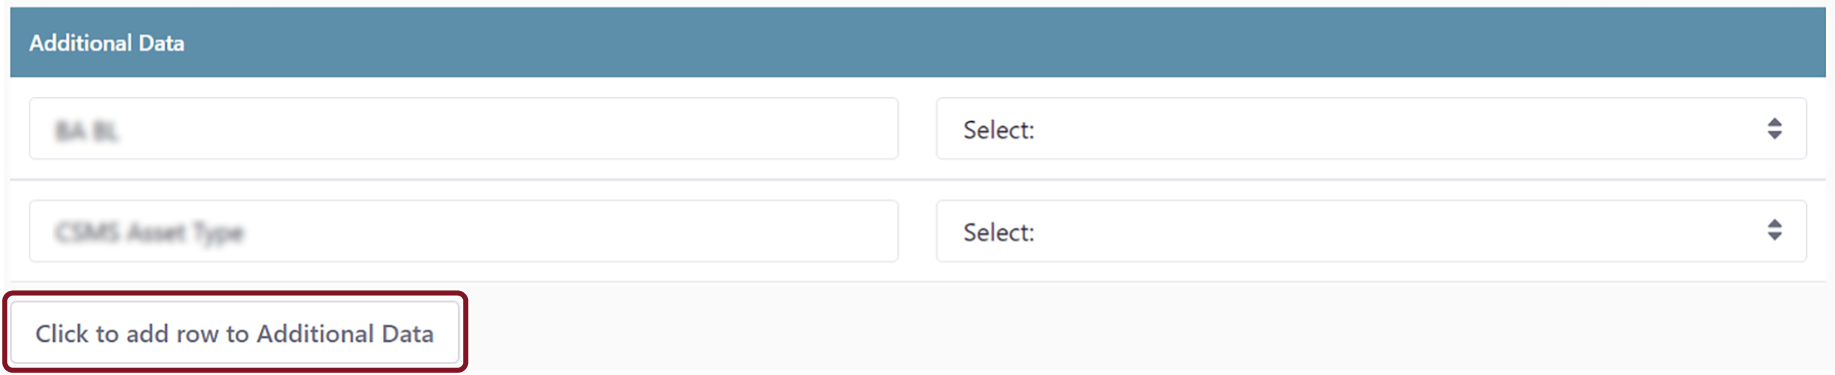
F. Additional Data
You can add data keys and corresponding data values for your project.
To add more additional data keys, click on Click to add rows to additional data.
Enter additional data key.
Enter additional data value. To add multiple additional data, repeat the same procedure.
.
To delete an additional data, click on.
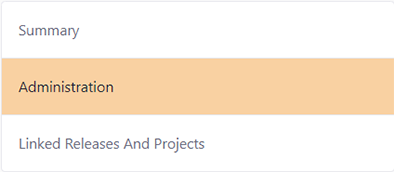
2.Administration
Administration section contains license clearing and lifecycle information of the project. To edit these fields, click on “Administration”, use navigation section.
A.Clearing information
To add clearing information for your project:
Select the values for Project Clearing State from the drop-down list.
Open Project
In progress
Closed
Clearing team is responsible for project clearing. To assign a clearing team, select the values for Clearing team from the drop-down list.
Pre-evaluation is important for the project development to understand the status of the license and estimate the effort for clearing activities. Set Deadline for pre-evaluation date.
Following information should be entered manually:
Clearing summary: Overview of the clearing for the project management.
Special risk open source software: Risks which occur out from usage of specific OSS components.
General risk 3rd party software: General risk which occur always from using OSS and commercial SW like for e.g., patent infringements.
Special risk 3rd party software: Specific risks which occur by using specific projects, including commercial projects.
Sales and delivery channels: To know when the software will be delivered via resellers as a reseller license has to be procured and to decide how to fulfill the obligations of the licenses.
Remarks and additional requirements: Any additional relevant requirement.
NOTE: THE ABOVE INFORMATION IS NECESSARY FOR PROJECT MANAGEMENT TO UNDERSTAND THE STATUS OF THE LICENSE AND ESTIMATE THE EFFORT FOR CLEARING ACTIVITIES.
B.Lifecycle information
To add lifecycle information for your project:
Select the values for Project state from the drop-down list.
Active
Phase-out
Unknown
Set System test begin and System test end dates. System test begin date can be used in licensing and risk perspective. System test end date is the latest date for component releases.
Set Delivery start and Phase out dates. After the phase out date, maintenance is not required for the project.
NOTE: LICENSE CLEARING FOR THE PROJECT MUST BE FINISHED BEFORE THE PROJECT DELIVERY DATE.
C.License Info Header
The license info header can be set as a default header. However, you can edit this field as required.
3.Linked Releases and Projects
You can link other projects and releases to the project that you are adding. Click on Linked Releases and Projects, use navigation section.
A.Linking Projects
To add existing projects as a sub-project:
Click on Add Projects, this action opens a dialogue box.
Search and select the projects which you would like to link.
Click on Link Projects.
After the project is linked, you can select the Project Relation for your sub-project from the drop-down list.
Sub-project
Duplicate
Unknown
Related
Check or uncheck Enable SVM as required.
To link multiple projects, repeat the same procedure.
To delete a linked project, click on.
B.Linking releases
To add releases to your project:
Click on Add Releases, this action opens a dialogue box.
Search for the releases which you want to link or click on Releases of linked projects to view all the releases which are linked to the project.
Select all the releases which you want to link and click on Link releases.
After the release is linked, you can select the value for the Release relation from the drop-down list.
Unknown
Contained
Related
Dynamically linked
Statically linked
Side by side
Standalone
Internal Use
Optional
To be replaced
Code snippet
Select the value for the Release Mainline State from the drop-down list.
Open
Mainline
Specific
Phaseout
Denied
Add Comments, if required.
To link multiple releases/components, repeat the same procedure.
To delete a linked release, click on.
After all the information for the new project is filled out. Click on “Create Project” at the top.
If you do not want to create a project on any point of time, click on “Cancel” at the top.
1.05 Import SBOM
SPDX is a common format for communicating compliance information or list of components across all suppliers. Importing an SBOM will create a project/component. To import a SBOM:
Click on Import SBOM on the project page. This will open a dialogue box for you to upload the Bill Of Materials (BOM).
Drag and drop the file from your local system to the dialogue box or click on Browse File and select the file you want to import.
NOTE: ONLY SPDX RDF/XML FILES WITH UNIQUE DESCRIBED TOP LEVEL NODE ARE SUPPORTED.
After uploading is done SW360 checks for duplicates, if there are no duplicates found, a Component from the uploaded SBOM is created.
1.06 Edit Project
You can edit an existing project in SW360, provided you have required rights. To edit a project follow the procedure:
Search for the projects you want to edit or navigate from the project list.
Click onfrom the actions column. You can also edit a project by clicking on the project and click on Edit Project.
Change the data for the project as required. For more information, refer to 1.04 Add Project.
In this view, you can also add attachments for the project in this view, click on Attachments, use navigation section.
Click on Add Attachment, this action opens a dialogue box.
Browse and select the files which you want to upload or drag and drop them into the area.
Click on Upload.
Select the type of file from the drop-down list.
Select the status from the drop-down list.
If required, add comments
To delete an attachment, click on.
After you modify the required fields, click on “Update Project”.
To delete the project, click on “Delete Project”.
To cancel any changes that you made click on “Cancel”.
1.07 Duplicate a Project
Duplicating a project is commonly used to create different versions of the project. This helps in reducing efforts as fewer modifications are required to create a new version. To duplicate a project:
Search for the projects you want to duplicate or navigate from the project list.
Click onfrom the actions column to duplicate the project.
Modify the data for the duplicate project as required. For more information, refer to 1.04 Add Project.
Click on “Create Project” after all changes are made.
To cancel any changes that you made click on “Cancel”.
1.08 Deleting a Project
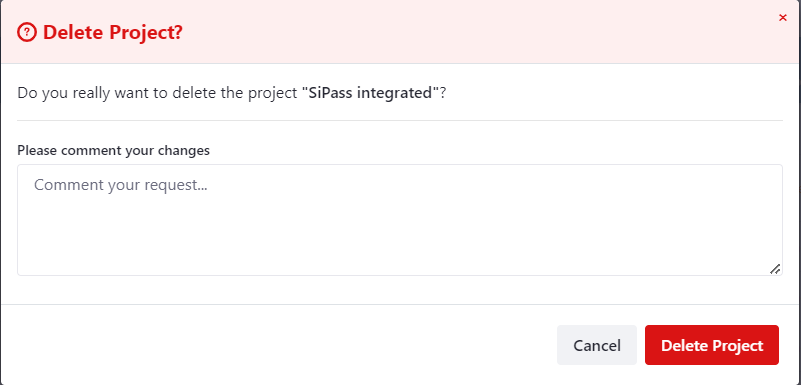
You can delete an existing project in SW360, provided you have required rights. To delete a project follow the procedure:
WARNING: DELETING A PROJECT CAN ONLY BE DONE IF THERE ARE NO LINKED PROJECTS OR COMPONENTS. IF NOT, THERE WILL BE MISSING LINKS FOR THE PROJECTS.
Search for the projects you want to delete or navigate from the project list.
Click onfrom the actions column to delete the project.
The software will prompt for a confirmation of deleting the project. You can also add comments for the action in the prompt box before deleting.
Click on Delete Project.
To cancel any changes that you made click on Cancel.
1.09 Linking A Project
There are multiple ways that you can link a project to another.
A. Linking to a parent project
Search for the projects you want to link or navigate from the project list. Click on the required project.
This will display the view mode of the selected project. Click on “Link Projects” on the top. This will open a dialogue box to search for the projects.
Search for the projects which you want to link.
Select the projects and click on Link Projects.
Once the project is successfully linked, you will see the prompt in green. If you want to edit the project further, click on the click here to edit the project relation on the green prompt.
Again, the project opens up in edit mode.
Modify the project details as required for the linked project. Refer to Link Projects.
You can also link a component to a project while editing a project.
Search for the projects you want to delete or navigate from the project list. Click on the required project.
This will display the view mode of the selected project, click on license clearing, use navigation section.
Select the component/release from the list displayed. After which, which redirects you to its component page.
Click on “Link to Projects” to link this release/component to a project. This will open a dialogue box to search for the projects.
If you want to view the projects which are already linked to the components/release, check the box for show already linked projects.
Select the project which you want to link the component / release to and then click on link to project.
1.11 Security Vulnerability tracking for Projects
You can view all the security vulnerabilities for your project. To view vulnerability tracking status:
Search for the projects or navigate from the project list. Click on the required project.
This will display the view mode of the selected project, click on Vulnerability Tracking Status.
Here you can view Security Vulnerability Monitoring is enabled or not. The Security Vulnerabilities are only visible in the edit project mode when the “security responsible” is assigned. Refer to paragraphs C. Roles.
You can track the vulnerabilities by name, project origin, SVM tracking status, short status and type.
To view all the listed vulnerabilities for sub-projects of the parent project click on Vulnerabilities.
If you want to view the complete data for a vulnerability, refer to 5. Vulnerability.
1.12 Clearing Requests
Each project needs license clearing and it is a project level activity.
A. Create Clearing Requests
To create a clearing request:
Search for the projects or navigate from the project list. Click onor,
Search for the projects or navigate from the project list. Click on the required project, this will display the view mode of the of the selected project. Click on License Clearing, use navigation section.
Click on Create Clearing Request, a dialogue box will appear.
Enter the clearing team email id by clicking on the field and searching for the email of the clearing team. Select the contact from the list and click on Select Users.
Select the Preferred Clearing Date.
If required, add Comments.
Click on “Create Request”.
To cancel any changes that you made click on Cancel.
B. View Clearing Requests
You can view the existing clearing requests which are already created for a project. To view the clearing requests, follow the procedure:
Search for the projects or navigate from the project list. Click onor,
Click on the required project.
Select License Clearing, use navigation section.
Click on View Clearing Request.
A new dialogue box with the clearing request information will be displayed.
C. Edit Clearing Requests
For more information on how to edit the existing clearing requests, refer to 6. Requests.
1.13 Export Spreadsheet
You can generate the excel sheet for an advanced search. For e.g., List of all projects created for group “SHS”.
Go to project home page.
If required, you can filter the projects using the advanced search options. Refer to 1.02 Project Search.
After the search gives a result, click on Export Spreadsheet and select the option from the drop-down list.
Projects only
Projects with linked releases
A file will now be downloaded to your local system with the required information.
NOTE: YOU CAN ALSO USE THE EXPORT SPREADSHEET OPTION ON MULTIPLE PAGES, LIKE LICENSE CLEARING PAGE OF A PROJECT/COMPONENT, EDIT VIEW OF A COMPONENT, ECC PAGE OF PROJECT ETC.
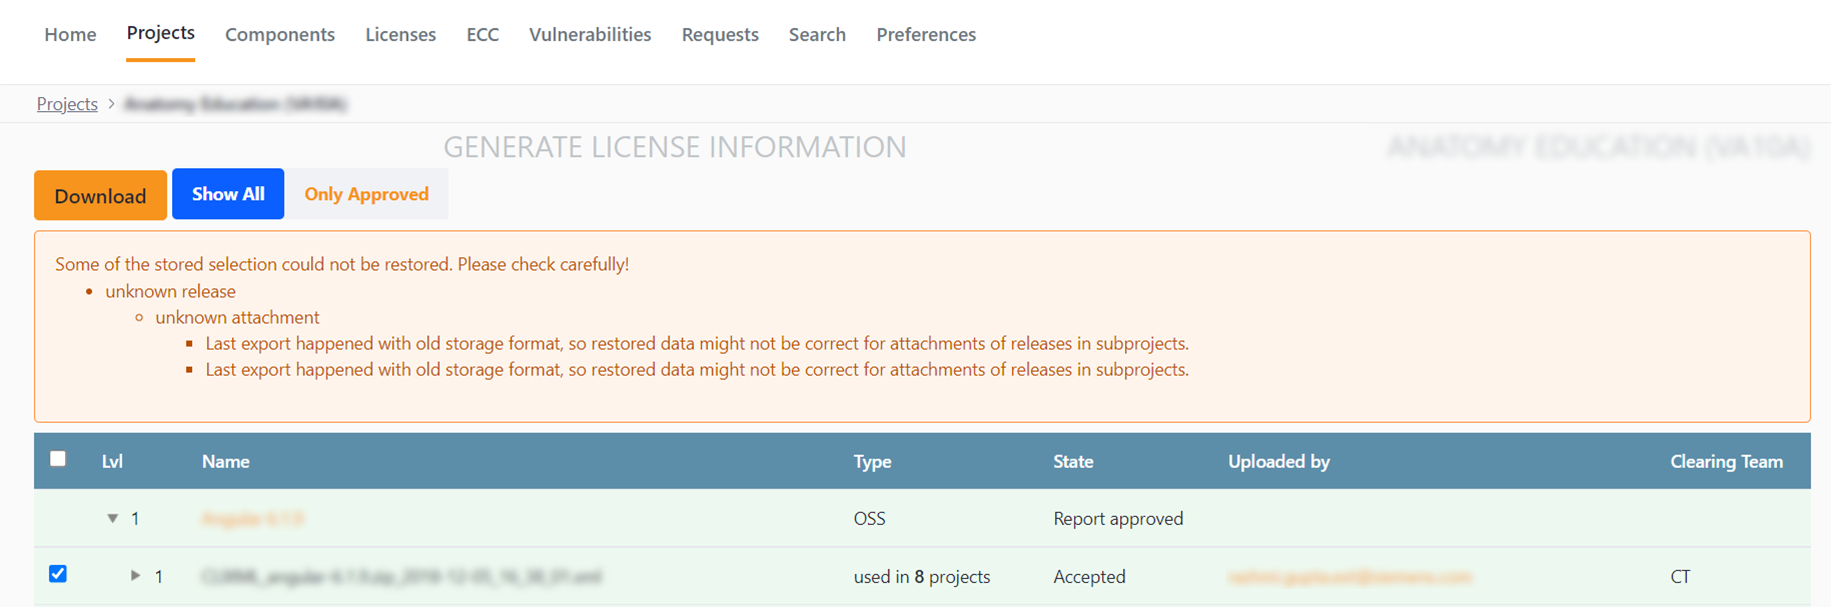
1.14 Generate License Info
You can generate a read me OSS file of all the license information for a project. To generate license information:
Search for the projects or navigate from the project list. Click on the required project.
Select License Clearing, use navigation section.
The page displays the list of all the releases listed and their respective release clearing state in the state column. Each of the releases has license information in the form of CLI files. You can view this information in the main licenses or other licenses column.
Generating a license info will create a read me OSS document combining all the licenses.
Click on Generate license info and select the options from the drop-down list.
Project only
Project with sub project
After your selection, you are redirected to another page where you can further modify the output of the license information.
Select Show all to view all the license information or Only Approved to view approved licenses.
Select which CLI you want to publish the information from the list displayed below.
Click on Download. A new Dialogue box will appear asking for your preferences.
Check the required boxes and select an output format.
Click on Download to get a Readme.OSS file.
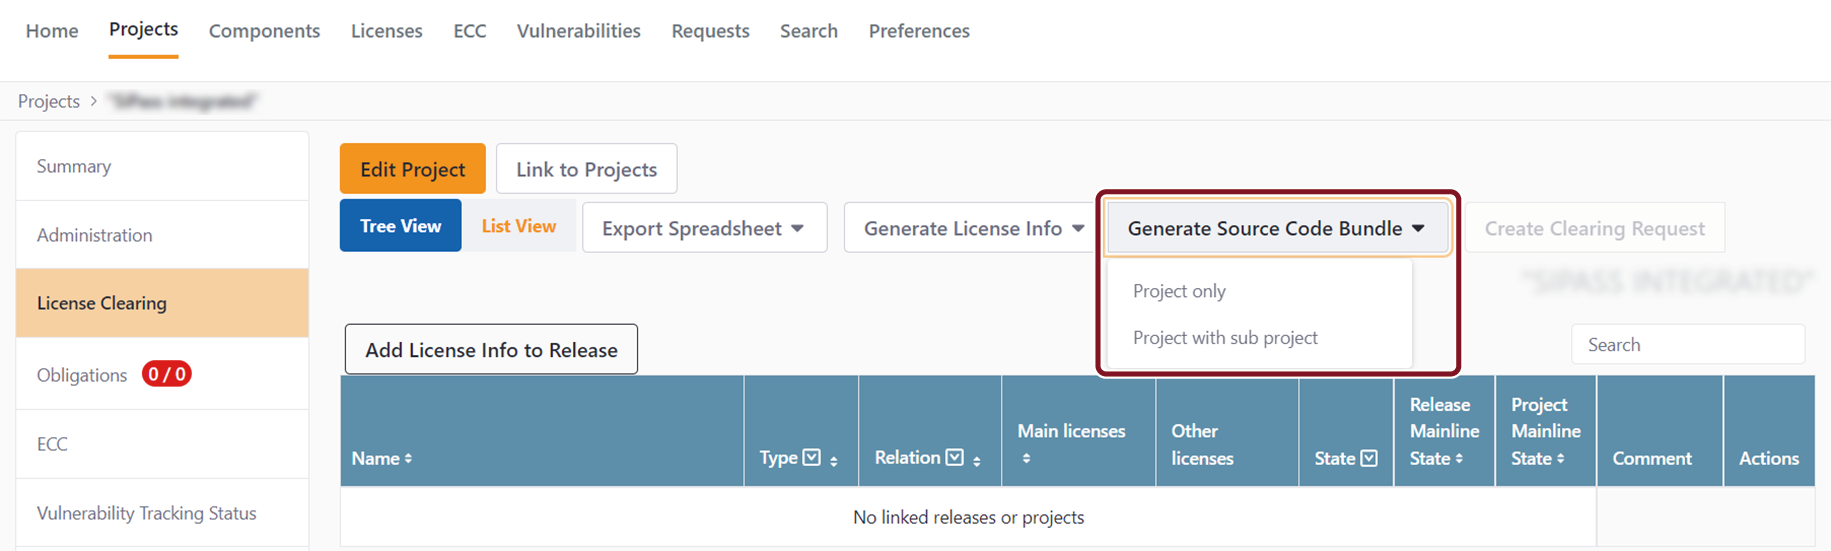
1.15 Generate Source Code Bundle
Few components have obligations, for example, sharing source code. The organization must share the source code to the user in a disc format. To generate Source Code Bundle:
To select the project, use the search option or navigate from the project list and click on it.
Select License Clearing, use navigation section.
The window shows a list of all the releases listed. Click on Generate Source Code Bundle and select the option from the drop-down list.
Project only
Project with sub project
After you select, you are redirected to another page which lists all the source code information.
Select the required source code and click Download.
A combined zip file comprising of all the select source code will be downloaded.