This is the multi-page printable view of this section. Click here to print.
- 1: Getting started
- 2: Concepts
- 2.1: AWS Connector
- 2.2: Suite connector
- 2.3: Container management
- 2.4: Software update
- 2.5: File upload
- 3: How-to guides
- 3.1: Update software
- 3.2: Upload files
- 3.3: Back up and restore files
- 3.4: Monitor system metrics
- 3.5: Bootstrap device
- 3.6: Offline explore edge device
- 4: References
- 4.1: Remote connectivity configuration
- 4.1.1: AWS Connector configuration
- 4.1.2: Suite connector configuration
- 4.1.3: Suite bootstrapping configuration
- 4.2: Local digital twins configuration
- 4.3: Container management configuration
- 4.3.1: Container configuration
- 4.3.2: Manager configuration
- 4.4: Software update configuration
- 4.5: File upload configuration
- 4.6: File backup configuration
- 4.7: System metrics configuration
1 - Getting started
1.1 - Install Eclipse Kanto
Before you begin
The containerd Debian package is required. You can install it manually or run:
curl -fsSL https://github.com/eclipse-kanto/kanto/raw/main/quickstart/install_ctrd.sh | sh
Install Eclipse Kanto
Choose the Eclipse Kanto Debian package for your target device architecture from the ones available at the project’s GitHub Releases page. Download and install it via executing the following (adjusted to your package name):
wget https://github.com/eclipse-kanto/kanto/releases/download/v0.1.0-M3/kanto_0.1.0-M3_linux_x86_64.deb && \
sudo apt install ./kanto_0.1.0-M3_linux_x86_64.deb
Verify
It’s important to check if all the services provided by the Eclipse Kanto package are up and running successfully. You can quickly do that via executing:
systemctl status \
suite-connector.service \
container-management.service \
software-update.service \
file-upload.service \
file-backup.service \
system-metrics.service
All listed services must be in an active running state.
What’s next
1.2 - Explore via Eclipse Hono
By following the steps below you will connect your first device to a publicly available Eclipse Hono sandbox using Eclipse Kanto. A couple of simple Eclipse Hono northbound business applications written in Python are provided to explore the capabilities for remotely managing and monitoring your edge device.
Before you begin
The location where the Python applications and utility shell scripts will run does not have to be your edge device as they communicate remotely with Eclipse Hono only. To run them, you need:
The quickstart applications and provisioning scripts
You can execute the script below to download them automatically:
mkdir quickstart && cd quickstart && \
wget https://github.com/eclipse-kanto/kanto/raw/main/quickstart/hono_commands.py && \
wget https://github.com/eclipse-kanto/kanto/raw/main/quickstart/hono_events.py && \
wget https://github.com/eclipse-kanto/kanto/raw/main/quickstart/requirements.txt && \
wget https://github.com/eclipse-kanto/kanto/raw/main/quickstart/hono_provisioning.sh
OpenSSL and the following SSL and SASL related libraries:
pkg-config,swig,libsasl2-dev,libsasl2-2libsasl2-modules-gssapi-mitandlibssl-dev, e.g.:sudo apt install openssl pkg-config swig libsasl2-dev libsasl2-2 libsasl2-modules-gssapi-mit libssl-devRequired Python dependencies to run the scripts
You can install them by using the downloaded
requirements.txtfile via executing:pip3 install -r requirements.txt
Provision the Eclipse Hono tenant and device
In order to be able to connect your device to Eclipse Hono, you need to have a dedicated tenant and a device instance
provisioned for it. Fill in the required empty environmental variables definitions in the hono_provisioning.sh, e.g.:
# The Hono tenant to be created
export TENANT=demo
# The identifier of the device on the tenant
# Note! It's important for the ID to follow the convention namespace:name (e.g. demo:device)
export DEVICE_ID=demo:device
# The authentication identifier of the device
export AUTH_ID=demo_device
# A password for the device to authenticate with
export PWD=secret
Run the provisioning script and you will have your Eclipse Hono tenant and device ready to be connected:
./hono_provisioning.sh
Configure Eclipse Kanto
Eclipse Kanto uses the /etc/suite-connector/config.json to acquire all the remote communication, identification and
authentication data to establish the remote connection. Update it with the following:
{
  "provisioningFile": "/etc/suite-connector/provisioning.json",
  "logFile": "/var/log/suite-connector/suite-connector.log",
  "address":"mqtts://hono.eclipseprojects.io:8883",
  "tenantId":"demo",
  "deviceId":"demo:device",
  "authId":"demo_device",
  "password":"secret"
}
Restart the Suite Connector service for the changes to take effect:
sudo systemctl restart suite-connector.service
Verify
To explore remote containerized applications management, we will use the two Python scripts to run, monitor and remove a simple InfluxDB container using its public container image available at Docker Hub.
First, start the monitoring application that requires the configured Eclipse Hono tenant (-t) and will print all
received events triggered by the device:
python3 hono_events.py -t demo
In another terminal, we are ready to spin up an InfluxDB container instance at the edge via executing the second application
that requires the command to execute (run), the Eclipse Hono tenant (-t), device identifier (-d) and
the full container image reference to use (--img):
python3 hono_commands.py run -t demo -d demo:device --img docker.io/library/influxdb:1.8.4
After the script exits with success, you can check out the new container running on your edge device via executing:
sudo kanto-cm list
Looking at the terminal where the monitoring application is running, you will be able to see all the events triggered by the operation.
To remove the newly created container, execute the same application script
only this time with the rm command and the identifier of the container to remove (--id), e.g.:
python3 hono_commands.py rm -t demo -d demo:device --id e6f7fbea-0e95-433c-acc7-16ef21b9c033
2 - Concepts
2.1 - AWS Connector
AWS Connector enables the remote connectivity to an AWS IoT cloud ecosystem. It provides the following use cases:
- Enriched remote connection
- Optimized - to pass the messages via a single underlying connection
- Secured - to protect the edge identity and data via TLS with basic and certificate-based authentication
- Maintained - with a reconnect exponential backoff algorithm
- Synchronized - on a connectivity recovering via a message buffering
- Application protection - AWS Connector is the only one component with a remote connectivity i.e. all local applications are protected from exposure to the public network
- Offline mode - local applications don’t need to care about the status of the remote connection, they can stay fully operable in offline mode
- Device Shadow - messages sent to the Twin Channel are converted to messages more suitable for AWS Device Shadow service and sent to it.

How it works
The AWS Connector plays a key role in two communication aspects - local and remote.
Cloud connectivity
To initiate its connection, the edge has to be manually or automatically provisioned. The result of this operation is different parameters and identifiers. Currently, AWS Connector supports MQTT transport as a connection-oriented and requiring less resources in comparison to AMQP. Once established, the connection is used as a channel to pass the edge telemetry and event messages. The IoT cloud can control the edge via commands and responses.
In case of a connection interruption, the AWS Connector will switch to offline mode. The message buffer mechanism will be activated to ensure that there is no data loss. Reconnect exponential backoff algorithm will be started to guarantee that no excessive load will be generated to the IoT cloud. All local applications are not affected and can continue to operate as normal. Once the remote connection is restored, all buffered messages will be sent and the edge will be fully restored to online mode.
Local communication
Ensuring that local applications are loosely coupled, Eclipse Hono™ MQTT definitions are in use. The event-driven local messages exchange is done via a MQTT message broker - Eclipse Mosquitto™. The AWS Connector takes the responsibility to forward these messages to the IoT cloud and vice versa.
Monitoring of the remote connection status is also enabled locally as well, along with details like the last known state of the connection, timestamp and a predefined connect/disconnect reason.
2.2 - Suite connector
Suite connector enables the remote connectivity to an IoT cloud ecosystem of choice, powered by Eclipse Hono™ (e.g. Eclipse Cloud2Edge and Bosch IoT Suite). It provides the following use cases:
- Enriched remote connection
- Optimized - to pass the messages via a single underlying connection
- Secured - to protect the edge identity and data via TLS with basic and certificate-based authentication
- Maintained - with a reconnect exponential backoff algorithm
- Synchronized - on a connectivity recovering via a message buffering
- Application protection - suite connector is the only one component with a remote connectivity i.e. all local applications are protected from exposure to the public network
- Offline mode - local applications don’t need to care about the status of the remote connection, they can stay fully operable in offline mode

How it works
The suite connector plays a key role in two communication aspects - local and remote.
Cloud connectivity
To initiate its connection, the edge has to be manually or automatically provisioned. The result of this operation is different parameters and identifiers. Currently, suite connector supports MQTT transport as a connection-oriented and requiring less resources in comparison to AMQP. Once established, the connection is used as a channel to pass the edge telemetry and event messages. The IoT cloud can control the edge via commands and responses.
In case of a connection interruption, the suite connector will switch to offline mode. The message buffer mechanism will be activated to ensure that there is no data loss. Reconnect exponential backoff algorithm will be started to guarantee that no excessive load will be generated to the IoT cloud. All local applications are not affected and can continue to operate as normal. Once the remote connection is restored, all buffered messages will be sent and the edge will be fully restored to online mode.
Local communication
Ensuring that local applications are loosely coupled, Eclipse Hono™ MQTT definitions are in use. The event-driven local messages exchange is done via a MQTT message broker - Eclipse Mosquitto™. The suite connector takes the responsibility to forward these messages to the IoT cloud and vice versa.
The provisioning information used to establish the remote communication is available locally both on request via a predefined message and on update populated via an announcement. Applications that would like to extend the edge functionality can further use it in Eclipse Hono™ and Eclipse Ditto™ definitions.
Monitoring of the remote connection status is also enabled locally as well, along with details like the last known state of the connection, timestamp and a predefined connect/disconnect reason.
2.3 - Container management
Container management enables a lightweight standard runtime which is capable to run containerized applications with all advantages of the technology: isolation, portability and efficiency. The deployment and management are available both locally and remotely via an IoT cloud ecosystem of choice. The following use cases are provided:
- Standardized approach - with OCI (Open Container Initiative) compliant container images and runtime
- Lightweight runtime - with a default integration of
containerdand a possibility for another container technology of choice like podman, LXC and more - Isolation - with a default isolation from other containerized applications and the host system
- Portability - with an option to run one and the same containerized application on different platforms
- Pluggable architecture - with extension points on different levels

How it works
A container image packs the application executable along with all its needed dependencies into a single artifact that can be built by a tooling of choice. The built image is made available for usage by being pushed to a container image registry where the runtime can refer it to.
To create a new container instance, the container management uses such an image reference and a configuration for it to produce a fully functional container.
The container lifecycle (start, update, stop, remove) and environment (memory constraints, restart policy, etc.) are also handled by the runtime.
The container management continuously ensures the applications availability via state awareness and restart policies, provides monitoring via flexible logging and fine-grained resources management.
All of that is achieved on top of an underlying runtime of choice (containerd by default) that takes care of the low-level isolation mechanisms.
2.4 - Software update
Software update enables the deployment and management of various software artifacts, both locally and remotely via an IoT cloud ecosystem of choice. It provides the following use cases:
- Robust download - with a retry and resume mechanism when the network connection is interrupted
- Artifact validation - with an integrity validation of every downloaded artifact
- Universal installation - with customizable install scripts to handle any kind of software
- Operation monitoring - with a status reporting of the download and install operations

How it works
When the install operation is received at the edge, the download process is initiated. Retrieving the artifacts will continue until they are stored at the edge or their size threshold is reached. If successful, the artifacts are validated for integrity and further processed by the configured script. It is responsible to apply the new software and finish the operation. A status report is announced on each step of the process enabling its transparent monitoring.
On start up, if there have been any ongoing operations, they will be automatically resumed as the operation state is persistently stored.
What’s next
2.5 - File upload
File upload enables sending of files to a backend storage of choice. It can be used both locally and remotely via a desired IoT cloud ecosystem. The following use cases are provided:
- Storage diversity - with ready to use integrations with Azure Blob Storage, Amazon S3 and standard HTTP upload
- Automatic uploads - with periodically triggered uploads at a specified interval in a given time frame
- Data integrity - with an option to calculate and send the integrity check required information
- Operation monitoring - with a status reporting of the upload operation
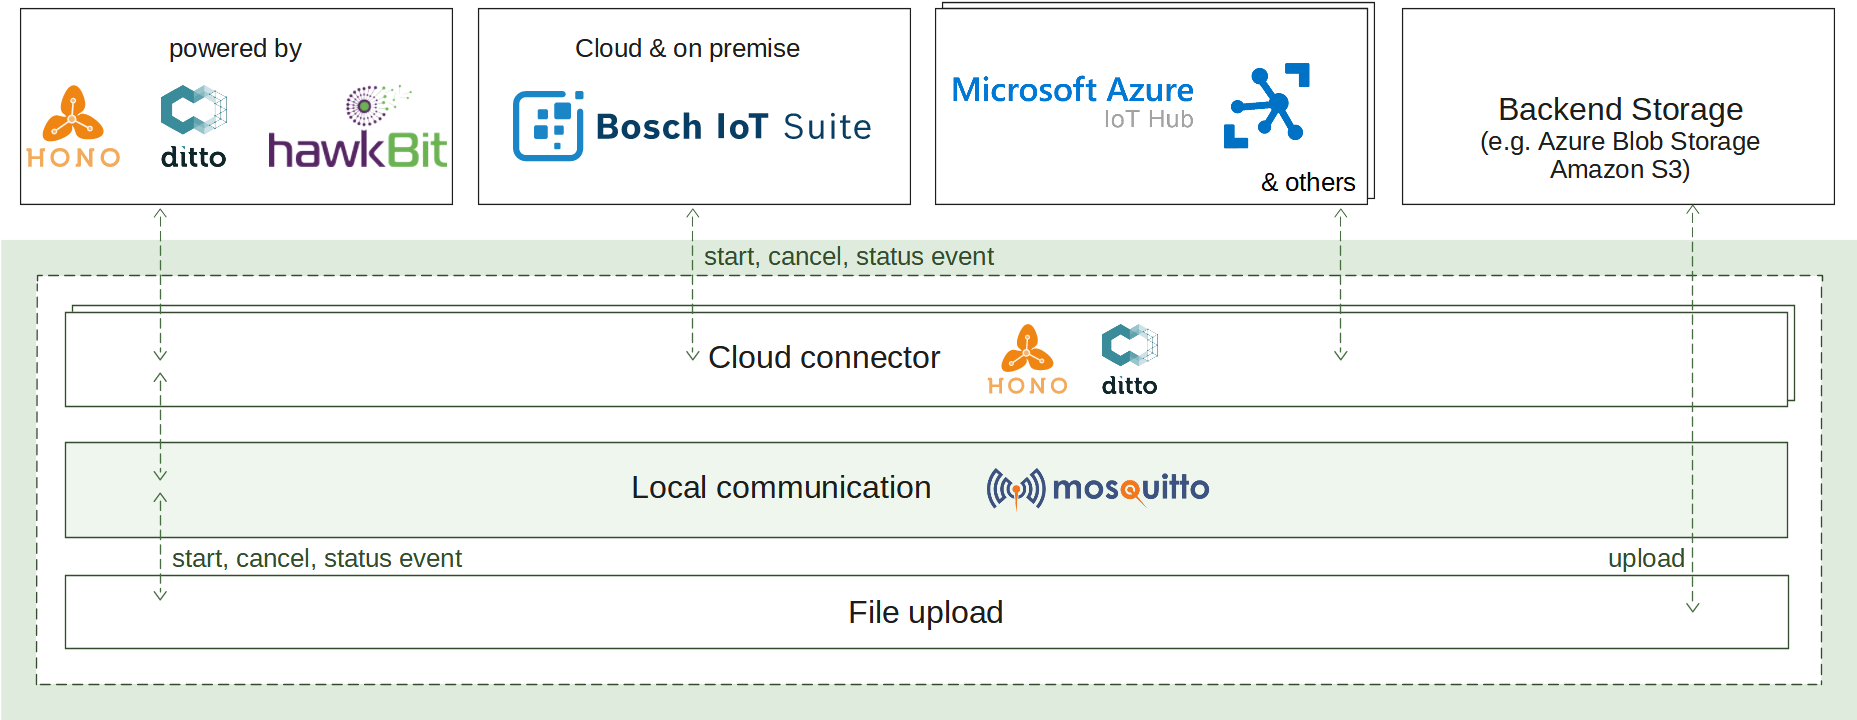
How it works
It’s not always possible to inline all the data into exchanged messages. For example, large log files or large diagnostic files cannot be sent as a telemetry message. In such scenarios, file upload can assist enabling massive amount of data to be stored to the backend storage.
There are different triggers which can initiate the upload operation: periodic or explicit. Once initiated, the request will be sent to the IoT cloud for confirmation or cancellation transferred back to the edge. If starting is confirmed, the files to upload will be selected according to the specified configuration, their integrity check information can be calculated and the transfer of the binary content will begin. A status report is announced on each step of the upload process enabling its transparent monitoring.
What’s next
3 - How-to guides
3.1 - Update software
By following the steps below you will install ahello
Debian package via a publicly available Eclipse Hono sandbox using Eclipse Kanto.
A couple of simple Eclipse Hono northbound business applications written in Python are provided to explore
the capabilities for remotely installing and monitoring.
On the edge side, a basic
install_hello.sh
script will be downloaded and executed.
Before you begin
To ensure that your edge device is capable to execute the steps in this guide, you need:
Debian-based linux distribution and the
aptcommand line toolIf you don’t have an installed and running Eclipse Kanto, follow Install Eclipse Kanto
If you don’t have a connected Eclipse Kanto to Eclipse Hono sandbox, follow Explore via Eclipse Hono
The software update application
Navigate to the
quickstartfolder where the resources from the Explore via Eclipse Hono guide are located and execute the following script:wget https://github.com/eclipse-kanto/kanto/raw/main/quickstart/hono_commands_su.pyExecuting
helloin the terminal will return that the command is not found
Install Debian package
To explore the software management, we will use two Python scripts to install and monitor the hello Debian package.
The location where the Python applications will run does not have to be your edge device as they communicate remotely
with Eclipse Hono only.
First, start the monitoring application that requires the configured Eclipse Hono tenant (-t) and will print all
received events triggered by the device:
python3 hono_events.py -t demo
In another terminal, we are ready to spin up a hello Debian package at the edge via executing the second application
that requires the Eclipse Hono tenant (-t) and the device identifier (-d):
python3 hono_commands_su.py -t demo -d demo:device
Verify
You can check out that the new package is installed on your edge device via executing:
hello
The command now displays: Hello, world!
Clean up
The installed hello Debian package can be removed via executing:
sudo apt remove hello
3.2 - Upload files
By following the steps below you will upload an example log file to your HTTP file server via a publicly available Eclipse Hono sandbox using Eclipse Kanto. A simple Eclipse Hono northbound business application written in Python is provided to explore the capabilities for remotely uploading and monitoring.
Before you begin
To ensure that all steps in this guide can be executed, you need:
servefileinstalledThis is a small Python HTTP server used in the example to serve the uploads. It does not have to be running on your edge device but it has to be accessible from there. You can install it by executing:
pip3 install servefileIf you don’t have an installed and running Eclipse Kanto on your edge device, follow Install Eclipse Kanto
If you don’t have a connected Eclipse Kanto to Eclipse Hono sandbox, follow Explore via Eclipse Hono
Navigate to the
quickstartfolder where the resources from the Explore via Eclipse Hono guide are located and execute the following script:wget https://github.com/eclipse-kanto/kanto/raw/main/quickstart/hono_commands_fu.py
Upload log file
By default, all files in /var/tmp/file-upload/ directory can be uploaded.
For example, grab the suite connector log file and place it in the directory via executing:
mkdir -p /var/tmp/file-upload/ && sudo cp /var/log/suite-connector/suite-connector.log /var/tmp/file-upload/
Choose a directory where the log file will be uploaded, open a new terminal there and run servefile:
servefile -u .
To explore the file upload, we will use a Python script to request and monitor the operation. The location where the Python application will run does not have to be your edge device as it communicates remotely with Eclipse Hono only.
Now we are ready to request the log file upload from the edge via executing the application
that requires the Eclipse Hono tenant (-t) and the device identifier (-d):
python3 hono_commands_fu.py -t demo -d demo:device
Verify
You can check out that the log file is on your HTTP file server by listing the content of servefile working directory.
Clean up
Stop servefile and clean up its working directory.
3.3 - Back up and restore files
By following the steps below you will back up a simple text file to an HTTP file server and then restore it back via a publicly available Eclipse Hono sandbox using Eclipse Kanto. A simple Eclipse Hono northbound business application written in Python is provided to explore the capabilities for remotely backing up and restoring files.
Before you begin
To ensure that all steps in this guide can be executed, you need:
servefileinstalledThis is a small Python HTTP server used in the example to serve the uploads and downloads. It does not have to be running on your edge device, but it has to be accessible from there. You can install it by executing:
pip3 install servefileIf you don’t have an installed and running Eclipse Kanto on your edge device, follow Install Eclipse Kanto
If you don’t have a connected Eclipse Kanto to Eclipse Hono sandbox, follow Explore via Eclipse Hono
The file backup and restore application
Navigate to the
quickstartfolder where the resources from the Explore via Eclipse Hono guide are located and execute the following script:wget https://github.com/eclipse-kanto/kanto/raw/main/quickstart/hono_commands_fb.py
Back up
By default, all directories in /var/tmp/file-backup/ or the directory itself can be backed up.
For this example, create a file data.txt which will be later backed up:
sudo mkdir -p /var/tmp/file-backup && sudo echo "This is the first line in the file!" >> /var/tmp/file-backup/data.txt
You can verify that the file was successfully created by executing the following command:
cat /var/tmp/file-backup/data.txt
This should produce This is the first line in the file! as an output.
Choose a directory where the text file will be uploaded, open a new terminal there and run servefile
with the flag -u to enable a file upload:
servefile -u .
To explore the file backup, we will use a Python script to request and monitor the operation. The location where the Python application will run does not have to be your edge device as it communicates remotely with Eclipse Hono only.
Now we are ready to request the text file backup from the edge via executing the application that requires the command
to execute (backup), Eclipse Hono tenant (-t), the device identifier (-d) and the host where the backup will
be uploaded to:
python3 hono_commands_fb.py backup -t demo -d demo:device -h localhost
You can check out that the backup file data.zip is on your HTTP file server by
listing the content of the servefile working directory.
Restore
To explore the restore capabilities you will first modify the data.txt file, and then you will restore it to
the version before the changes by using the backup, that was created earlier.
You can modify the data.txt file with the following command:
sudo echo "This is the second line in the file!" >> /var/tmp/file-backup/data.txt
You can verify that the file was successfully updated by executing the following command:
cat /var/tmp/file-backup/data.txt
This output should be:
This is the first line in the file!
This is the second line in the file!
Navigate to the terminal where servefile was started and terminate it.
Start it again with the flag -l to enable a file download:
servefile -l .
To explore the file restore, we will use a Python script to request and monitor the operation. The location where the Python application will run does not have to be your edge device as it communicates remotely with Eclipse Hono only.
Now we are ready to request the text file restore from the edge via executing the application that requires the command
to execute (restore), Eclipse Hono tenant (-t), the device identifier (-d) and the host where the backup file
will be downloaded from:
python3 hono_commands_fb.py restore -t demo -d demo:device -h localhost
Verify
You can check out that the original file is restored by executing the following command:
cat /var/tmp/file-backup/data.txt
This should produce This is the first line in the file! as an output.
Clean up
Stop servefile and clean up its working directory.
Remove the data.txt file from the /var/tmp/file-backup directory.
3.4 - Monitor system metrics
By following the steps below you will be able to monitor the system metrics from your edge device via a publicly available Eclipse Hono sandbox using Eclipse Kanto. A simple Eclipse Hono northbound business application written in Python is provided to explore the capabilities for remotely monitoring the CPU and memory utilization.
Before you begin
To ensure that all steps in this guide can be executed, you need:
Plotlyis an open-source plotting library andDashis a framework for building data application in Python. They are used in this example to run a simple HTTP server and visualize the incoming system metrics data in real time, and they do not have to be running on your edge device. You can install them by executing:pip3 install plotly dashIf you don’t have an installed and running Eclipse Kanto on your edge device, follow Install Eclipse Kanto
If you don’t have a connected Eclipse Kanto to Eclipse Hono sandbox, follow Explore via Eclipse Hono
The system metrics application
Navigate to the
quickstartfolder where the resources from the Explore via Eclipse Hono guide are located and execute the following script:wget https://github.com/eclipse-kanto/kanto/raw/main/quickstart/hono_commands_sm.py
Monitor system metrics
To explore the system metrics, we will use a Python script to request and monitor the CPU and memory utilization. The location where the Python application will run does not have to be your edge device as it communicates remotely with Eclipse Hono only.
Now we are ready to request the system metrics from the edge via executing the application
that requires the Eclipse Hono tenant (-t) and the device identifier (-d):
python3 hono_commands_sm.py -t demo -d demo:device
Verify
You can check out that the CPU and memory utilization metrics are properly received and displayed by checking out the application dashboard (by default - http://127.0.0.1:8050).
3.5 - Bootstrap device
By following the steps below you will automatically provision a new device via a publicly available Eclipse Hono sandbox using Eclipse Kanto. A simple Eclipse Hono northbound business application written in Python is provided to explore the capabilities for device bootstrapping and automatically provision a new device.
First a bootstrapping request is sent from the edge.
The custom Python application handles the request by automatically
provisioning a new device. Upon successful automatically provisioning it sends back
all mandatory remote communication, identification and authentication data.
On the edge side, the response is handled by updating the connection configuration with the received data
and by executing a basic
post_bootstrap.sh
script to restart the Suite Connector service for the changes to take effect.
Before you begin
To ensure that your edge device is capable to execute the steps in this guide, you need:
If you don’t have an installed and running Eclipse Kanto, follow Install Eclipse Kanto
If you don’t have a connected Eclipse Kanto to Eclipse Hono sandbox, follow Explore via Eclipse Hono
The suite bootstrapping application and post bootstrap script
Navigate to the
quickstartfolder where the resources from the Explore via Eclipse Hono guide are located and execute the following script:wget https://github.com/eclipse-kanto/kanto/raw/main/quickstart/hono_commands_sb.py && \ wget https://github.com/eclipse-kanto/kanto/raw/main/quickstart/post_bootstrap.shGrab the post script file and place it in the /var/tmp/suite-bootstrapping directory via executing:
sudo mkdir -p /var/tmp/suite-bootstrapping/ && sudo cp ./post_bootstrap.sh /var/tmp/suite-bootstrapping/Back up
/etc/suite-connector/config.jsonas this file will be modified from this guideStop suite-connector.service. Suite bootstrapping automatically provision device and try to start the suite connector service with new device
sudo systemctl stop suite-connector.service
Configure Suite Bootstrapping
Open file /etc/suite-connector/config.json, copy address, tenantId, deviceId, authId and password.
{
    ...
    "address": "mqtts://hono.eclipseprojects.io:8883",
    "tenantId": "demo",
    "deviceId": "demo:device",
    "authId": "demo_device",
    "password": "secret"
    ...
}
Bootstrapping uses the /etc/suite-bootstrapping/config.json to acquire all the remote communication, identification and
authentication data to establish the remote connection for bootstrapping.
It is also where you need to specify the path to the post bootstrapping script and where to store received response data.
Update the configuration as shown below and replace tenantId, deviceId, authId and password
with the settings that you copied in the previous step.
{
  "logFile": "/var/log/suite-bootstrapping/suite-bootstrapping.log",
  "postBootstrapFile": "/etc/suite-connector/config.json",
  "postBootstrapScript": ["/var/tmp/suite-bootstrapping/post_bootstrap.sh"],
  "caCert": "/etc/suite-bootstrapping/iothub.crt",
  "address": "mqtts://hono.eclipseprojects.io:8883",
  "tenantId": "demo",
  "deviceId": "demo:device",
  "authId": "demo_device",
  "password": "secret"
}
Restart the suite bootstrapping service for the changes to take effect:
sudo systemctl restart suite-bootstrapping.service
When configured correctly the Suite Bootstrapping service automatically sends the bootstrapping request.
Automatically provision via bootstrapping
To explore the suite bootstrapping, we will use a Python script to automatically provision and monitor the new device. The location where the Python application will run does not have to be your edge device as it communicates remotely with Eclipse Hono only.
Now we are ready to handle the bootstrapping request via executing the application
that requires the Eclipse Hono tenant (-t), the device identifier (-d) and the password (-p) you wish to use for the new device:
python3 hono_commands_sb.py -t demo -d demo:device -p secret
Verify
The last event received for the application is with the new tenant id that is automatically provisioning for the Suite Connector. You can check out that the Suite Connector is now connected to the new device via its status.
sudo systemctl status suite-connector.service
Clean up
Revert previous back up /etc/suite-connector/config.json file.
Remove temporary directory for post bootstrap file /var/tmp/suite-bootstrapping via executing:
sudo rm -r -f /var/tmp/suite-bootstrapping/
Stop suite bootstrapping service and restart suite connector service by executing:
sudo systemctl stop suite-bootstrapping.service && \
sudo systemctl restart suite-connector.service
3.6 - Offline explore edge device
By following the steps below, you will get the structure of the edge digital twins with all its features and properties using Eclipse Kanto. A simple Eclipse Hono northbound business application written in Python is provided to display the things’ and their features’ structure.
Before you begin
To ensure that your edge device is capable to execute the steps in this guide, you need:
If you don’t have an installed and running Eclipse Kanto on your edge device, follow Install Eclipse Kanto
If you don’t have a connected Eclipse Kanto to Eclipse Hono sandbox, follow Explore via Eclipse Hono
Stop
suite-connector.service. The local digital twins service is a replacement for the suite connector service, that is why either one of the services must be running.sudo systemctl stop suite-connector.serviceThe offline explore application
Navigate to the
quickstartfolder where the resources from the Explore via Eclipse Hono guide are located and execute the following script:wget https://github.com/eclipse-kanto/kanto/raw/main/quickstart/hono_commands_ldt.py
Configure Local digital twins
Open file /etc/suite-connector/config.json, copy tenantId, deviceId, authId and password.
{
    ...
    "tenantId": "demo",
    "deviceId": "demo:device",
    "authId": "demo_device",
    "password": "secret"
    ...
}
The local digital twins service uses the /etc/local-digital-twins/config.json to acquire all the remote communication, identification and
authentication data to establish the remote connection. Update the configuration as shown below and
replace tenantId, deviceId, authId and password with the settings that you copied in the previous step.
  {
    "logFile": "/var/log/local-digital-twins/local-digital-twins.log",
    "caCert": "/etc/local-digital-twins/iothub.crt",
    "thingsDb": "/var/lib/local-digital-twins/thing.db",
    "tenantId": "demo",
    "deviceId": "demo:device",
    "authId": "demo_device",
    "password": "secret"
  }
Save the configuration and start the local digital twins service using the following command:
sudo systemctl start local-digital-twins.service
Receive the structure of the edge device
Now we are ready to request the structure of the edge digital twins via executing the offline explore application that requires the local digital twins tenant (-t) and the device identifier (-d):
python3 hono_commands_ldt.py -t demo -d demo:device
Verify
On the shell there will be output of the structure of the edge digital twins with all its features and properties. Things with the following identifiers will be presented:
- demo:device
- demo:device:edge:containers
Clean up
Stop the local digital twins service and start suite connector service by executing:
sudo systemctl stop local-digital-twins.service && \
sudo systemctl restart suite-connector.service
4 - References
4.1 - Remote connectivity configuration
4.1.1 - AWS Connector configuration
Properties
To control all aspects of the suite connector behavior.
| Property | Type | Default | Description |
|---|---|---|---|
| topicFilter | string | Regex filter used to block incoming messages by their topic | |
| payloadFilters | string | Regex filters used to exclude parts of the incoming messages payload | |
| Remote connectivity | |||
| address | string | Address of the MQTT endpoint that the connector will connect for the remote communication, the format is: scheme://host:port | |
| tenantId | string | default-tenant-id | Tenant unique identifier that the device belongs to |
| clientId | string | MQTT client unique identifier | |
| Remote connectivity - TLS | |||
| alpn | string[] | TLS application layer protocol negotiation options space separated for cloud access | |
| caCert | string | aws.crt | PEM encoded CA certificates file |
| cert | string | PEM encoded certificate file to authenticate to the MQTT endpoint | |
| key | string | PEM encoded unencrypted private key file to authenticate to the MQTT endpoint | |
| Remote connectivity - TLS over TPM | |||
| tpmDevice | string | Path to the device file or the unix socket to access the TPM 2.0 | |
| tpmHandle | int | TPM 2.0 storage root key handle, the type is unsigned 64-bit integer | |
| tpmKeyPub | string | File path to the public part of the TPM 2.0 key | |
| tpmKey | string | File path to the private part of the TPM 2.0 key | |
| Local connectivity | |||
| localAddress | string | tcp://localhost:1883 | Address of the MQTT server/broker that the suite connector will connect for the local communication, the format is: scheme://host:port |
| localUsername | string | Username that is a part of the credentials | |
| localPassword | string | Password that is a part of the credentials | |
| Local connectivity - TLS | |||
| localCACert | string | PEM encoded CA certificates file | |
| localCert | string | PEM encoded certificate file to authenticate to the MQTT server/broker | |
| localKey | string | PEM encoded unencrypted private key file to authenticate to the MQTT server/broker | |
| Logging | |||
| logFile | string | log/suite-connector.log | Path to the file where log messages are written |
| logLevel | string | INFO | All log messages at this or a higher level will be logged, the log levels in descending order are: ERROR, WARN, INFO, DEBUG and TRACE |
| logFileCount | int | 5 | Log file maximum rotations count |
| logFileMaxAge | int | 28 | Log file rotations maximum age in days, use 0 to not remove old log files |
| logFileSize | int | 2 | Log file size in MB before it gets rotated |
Example
The minimal required configuration to connect.
{
    "address": "tls://<AWS-endpoint-address>:8883",
    "caCert": "AmazonRootCA1.pem",
    "cert": "example-device.crt",
    "key": "example-device.key",
    "clientId": "org.eclipse.kanto:exampleDevice",
    "logFile": "/var/log/aws-connector/aws-connector.log"
}
Template
The configuration can be further adjusted according to the use case. The following template illustrates all possible properties with their default values.
{
    "topicFilter": "",
    "payloadFilters": [],
    "address": "",
    "alpn" : [],
    "tenantId": "default-tenant-id",
    "clientId": "",
    "caCert": "aws.crt",
    "cert": "",
    "key": "",
    "tpmDevice": "",
    "tpmHandle": 0,
    "tpmKeyPub": "",
    "tpmKey": "",
    "localAddress": "tcp://localhost:1883",
    "localUsername": "",
    "localPassword": "",
    "localCACert": "",
    "localCert": "",
    "localKey": "",
    "logFile": "logs/aws-connector.log",
    "logLevel": "INFO",
    "logFileCount": 5,
    "logFileMaxAge": 28,
    "logFileSize": 2
}
4.1.2 - Suite connector configuration
Properties
To control all aspects of the suite connector behavior.
| Property | Type | Default | Description |
|---|---|---|---|
| Remote connectivity | |||
| address | string | mqtts://mqtt.bosch-iot-hub.com:8883 | Address of the MQTT endpoint that the suite connector will connect for the remote communication, the format is: scheme://host:port |
| alpn | string[] | TLS application layer protocol negotiation options space separated for cloud access | |
| deviceId | string | Device unique identifier | |
| authId | string | Authentication unique identifier that is a part of the credentials | |
| tenantId | string | Tenant unique identifier that the device belongs to | |
| username | string | MQTT username that is a part of the credentials. This parameter takes precedence over authId and tenantId | |
| password | string | Password that is a part of the credentials | |
| clientId | string | MQTT client unique identifier | |
| policyId | string | Policy unique identifier of the digital twin | |
| Remote connectivity - TLS | |||
| caCert | string | iothub.crt | PEM encoded CA certificates file |
| cert | string | PEM encoded certificate file to authenticate to the MQTT endpoint | |
| key | string | PEM encoded unencrypted private key file to authenticate to the MQTT endpoint | |
| deviceIdPattern | string | Pattern to generate the device identifier, {{subject-dn}} and {{subject-cn}} placeholders can be part of it | |
| Remote connectivity - TLS over TPM | |||
| tpmDevice | string | Path to the device file or the unix socket to access the TPM 2.0 | |
| tpmHandle | int | TPM 2.0 storage root key handle, the type is unsigned 64-bit integer | |
| tpmKeyPub | string | File path to the public part of the TPM 2.0 key | |
| tpmKey | string | File path to the private part of the TPM 2.0 key | |
| Local connectivity | |||
| localAddress | string | tcp://localhost:1883 | Address of the MQTT server/broker that the suite connector will connect for the local communication, the format is: scheme://host:port |
| localUsername | string | Username that is a part of the credentials | |
| localPassword | string | Password that is a part of the credentials | |
| Local connectivity - TLS | |||
| localCACert | string | PEM encoded CA certificates file | |
| localCert | string | PEM encoded certificate file to authenticate to the MQTT server/broker | |
| localKey | string | PEM encoded unencrypted private key file to authenticate to the MQTT server/broker | |
| Logging | |||
| logFile | string | log/suite-connector.log | Path to the file where log messages are written |
| logLevel | string | INFO | All log messages at this or a higher level will be logged, the log levels in descending order are: ERROR, WARN, INFO, DEBUG and TRACE |
| logFileCount | int | 5 | Log file maximum rotations count |
| logFileMaxAge | int | 28 | Log file rotations maximum age in days, use 0 to not remove old log files |
| logFileSize | int | 2 | Log file size in MB before it gets rotated |
Example
The minimal required configuration to connect the publicly available Eclipse Hono sandbox.
{
    "address": "hono.eclipseprojects.io:1883",
    "tenantId": "org.eclipse.kanto",
    "deviceId": "org.eclipse.kanto:exampleDevice",
    "authId": "org.eclipse.kanto_example",
    "password": "secret",
    "logFile": "/var/log/suite-connector/suite-connector.log"
}
Template
The configuration can be further adjusted according to the use case. The following template illustrates all possible properties with their default values.
{
    "provisioningFile": "provisioning.json",
    "address": "mqtts://mqtt.bosch-iot-hub.com:8883",
    "alpn" : [],
    "deviceId": "",
    "authId": "",
    "tenantId": "",
    "password": "",
    "username": "",
    "clientId": "",
    "policyId": "",
    "caCert": "iothub.crt",
    "cert": "",
    "key": "",
    "deviceIdPattern": "",
    "tpmDevice": "",
    "tpmHandle": 0,
    "tpmKeyPub": "",
    "tpmKey": "",
    "localAddress": "tcp://localhost:1883",
    "localUsername": "",
    "localPassword": "",
    "logFile": "log/suite-connector.log",
    "logLevel": "INFO",
    "logFileCount": 5,
    "logFileMaxAge": 28,
    "logFileSize": 2
}
4.1.3 - Suite bootstrapping configuration
Properties
To control all aspects of the suite bootstrapping behavior.
| Property | Type | Default | Description |
|---|---|---|---|
| preBootstrapScript | string[] | Path to the script/command with an optional sequence of additional flags/parameters that is executed before a bootstrapping request, optionally producing a preBootstrapFile | |
| preBootstrapFile | string | Path to the file used as a bootstrapping request data | |
| postBootstrapScript | string[] | Path to the script/command with an optional sequence of additional flags/parameters that is executed after a bootstrapping response, optionally consuming a postBootstrapFile | |
| postBootstrapFile | string | Path to the file used for a bootstrapping response data | |
| bootstrapProvisioningFile | string | Path to the file that stores the provisioning information from a bootstrapping response | |
| maxChunkSize | int | 46080 | Maximum chunk size of the request data in bytes |
| Remote connectivity | |||
| address | string | mqtts://mqtt.bosch-iot-hub.com:8883 | Address of the MQTT endpoint that the suite bootstrapping will connect for the remote communication, the format is: scheme://host:port |
| deviceId | string | Device unique identifier | |
| authId | string | Authentication unique identifier that is a part of the credentials | |
| tenantId | string | Tenant unique identifier that the device belongs to | |
| password | string | Password that is a part of the credentials | |
| clientId | string | MQTT client unique identifier | |
| policyId | string | Policy unique identifier of the digital twin | |
| Remote connectivity - TLS | |||
| caCert | string | iothub.crt | PEM encoded CA certificates file |
| cert | string | PEM encoded certificate file to authenticate to the MQTT endpoint | |
| key | string | PEM encoded unencrypted private key file to authenticate to the MQTT endpoint | |
| deviceIdPattern | string | Pattern to generate the device identifier, {{subject-dn}} and {{subject-cn}} placeholders can be part of it | |
| Remote connectivity - TLS over TPM | |||
| tpmDevice | string | Path to the device file or the unix socket to access the TPM 2.0 | |
| tpmHandle | int | TPM 2.0 storage root key handle, the type is unsigned 64-bit integer | |
| tpmKeyPub | string | File path to the public part of the TPM 2.0 key | |
| tpmKey | string | File path to the private part of the TPM 2.0 key | |
| Logging | |||
| logFile | string | log/suite-bootstrapping.log | Path to the file where log messages are written |
| logLevel | string | INFO | All log messages at this or a higher level will be logged, the log levels in descending order are: ERROR, WARN, INFO, DEBUG and TRACE |
| logFileCount | int | 5 | Log file maximum rotations count |
| logFileMaxAge | int | 28 | Log file rotations maximum age in days, use 0 to not remove old log files |
| logFileSize | int | 2 | Log file size in MB before it gets rotated |
Example
The minimal required configuration to connect the publicly available Eclipse Hono sandbox and request automatic provisioning.
{
    "address": "hono.eclipseprojects.io:1883",
    "tenantId": "org.eclipse.kanto",
    "deviceId": "org.eclipse.kanto:exampleDevice",
    "authId": "org.eclipse.kanto_example",
    "password": "secret",
    "logFile": "/var/log/suite-bootstrapping/suite-bootstrapping.log"
}
Template
The configuration can be further adjusted according to the use case. The following template illustrates all possible properties with their default values.
{
    "preBootstrapScript": "",
    "preBootstrapFile": "",
    "postBootstrapScript": "",
    "postBootstrapFile": "",
    "bootstrapProvisioningFile": "",
    "maxChunkSize": 46080,
    "provisioningFile": "provisioning.json",
    "address": "mqtts://mqtt.bosch-iot-hub.com:8883",
    "deviceId": "",
    "authId": "",
    "tenantId": "",
    "password": "",
    "clientId": "",
    "policyId": "",
    "caCert": "iothub.crt",
    "cert": "",
    "key": "",
    "deviceIdPattern": "",
    "tpmDevice": "",
    "tpmHandle": 0,
    "tpmKeyPub": "",
    "tpmKey": "",
    "logFile": "log/suite-bootstrapping.log",
    "logLevel": "INFO",
    "logFileCount": 5,
    "logFileMaxAge": 28,
    "logFileSize": 2
}
4.2 - Local digital twins configuration
Properties
To control all aspects of the local digital twins behavior.
| Property | Type | Default | Description |
|---|---|---|---|
| thingsDb | string | things.db | Path to the file where digital twins will be stored |
| Remote connectivity | |||
| address | string | mqtts://mqtt.bosch-iot-hub.com:8883 | Address of the MQTT endpoint that the local digital twins will connect for the remote communication, the format is: scheme://host:port |
| deviceId | string | Device unique identifier | |
| authId | string | Authentication unique identifier that is a part of the credentials | |
| tenantId | string | Tenant unique identifier that the device belongs to | |
| password | string | Password that is a part of the credentials | |
| clientId | string | MQTT client unique identifier | |
| policyId | string | Policy unique identifier of the digital twin | |
| Remote connectivity - TLS | |||
| caCert | string | iothub.crt | PEM encoded CA certificates file |
| cert | string | PEM encoded certificate file to authenticate to the MQTT endpoint | |
| key | string | PEM encoded unencrypted private key file to authenticate to the MQTT endpoint | |
| deviceIdPattern | string | Pattern to generate the device identifier, {{subject-dn}} and {{subject-cn}} placeholders can be part of it | |
| Remote connectivity - TLS over TPM | |||
| tpmDevice | string | Path to the device file or the unix socket to access the TPM 2.0 | |
| tpmHandle | int | TPM 2.0 storage root key handle, the type is unsigned 64-bit integer | |
| tpmKeyPub | string | File path to the public part of the TPM 2.0 key | |
| tpmKey | string | File path to the private part of the TPM 2.0 key | |
| Local connectivity | |||
| localAddress | string | tcp://localhost:1883 | Address of the MQTT server/broker that the local digital twins will connect for the local communication, the format is: scheme://host:port |
| localUsername | string | Username that is a part of the credentials | |
| localPassword | string | Password that is a part of the credentials | |
| Local connectivity - TLS | |||
| localCACert | string | PEM encoded CA certificates file | |
| localCert | string | PEM encoded certificate file to authenticate to the MQTT server/broker | |
| localKey | string | PEM encoded unencrypted private key file to authenticate to the MQTT server/broker | |
| Logging | |||
| logFile | string | log/local-digital-twins.log | Path to the file where log messages are written |
| logLevel | string | INFO | All log messages at this or a higher level will be logged, the log levels in descending order are: ERROR, WARN, INFO, DEBUG and TRACE |
| logFileCount | int | 5 | Log file maximum rotations count |
| logFileMaxAge | int | 28 | Log file rotations maximum age in days, use 0 to not remove old log files |
| logFileSize | int | 2 | Log file size in MB before it gets rotated |
Example
The minimal required configuration to enable the local digital twins and their synchronization with the publicly available Eclipse Hono sandbox.
{
    "address": "hono.eclipseprojects.io:1883",
    "tenantId": "org.eclipse.kanto",
    "deviceId": "org.eclipse.kanto:exampleDevice",
    "authId": "org.eclipse.kanto_example",
    "password": "secret",
    "thingsDb": "/var/lib/local-digital-twins/thing.db",
    "logFile": "/var/log/local-digital-twins/local-digital-twins.log"
}
Template
The configuration can be further adjusted according to the use case. The following template illustrates all possible properties with their default values.
{
    "thingsDb": "things.db",
    "provisioningFile": "provisioning.json",
    "address": "mqtts://mqtt.bosch-iot-hub.com:8883",
    "deviceId": "",
    "authId": "",
    "tenantId": "",
    "password": "",
    "clientId": "",
    "policyId": "",
    "caCert": "iothub.crt",
    "cert": "",
    "key": "",
    "deviceIdPattern": "",
    "tpmDevice": "",
    "tpmHandle": 0,
    "tpmKeyPub": "",
    "tpmKey": "",
    "localAddress": "tcp://localhost:1883",
    "localUsername": "",
    "localPassword": "",
    "localCACert": "",
    "localCert": "",
    "localKey": "",
    "logFile": "log/local-digital-twins.log",
    "logLevel": "INFO",
    "logFileCount": 5,
    "logFileMaxAge": 28,
    "logFileSize": 2
}
4.3 - Container management configuration
4.3.1 - Container configuration
Properties
To control all aspects of the container instance behavior.
| Property | Type | Default | Description |
|---|---|---|---|
| container_name | string | <container_id> | User-defined name for the container, if omitted the internally auto-generated container ID will be set |
| Image | |||
| name | string | Fully qualified image reference, that follows the OCI Image Specification, the format is: host[:port]/[namespace/]name:tag | |
| Image - decryption | |||
| keys | string[] | Private keys (GPG private key ring, JWE or PKCS7) used for decrypting the container’s image, the format is: filepath_private_key[:password] | |
| recipients | string[] | Recipients (only for PKCS7 and must be an x509) used for decrypting the container’s image, the format is: pkcs7:filepath_x509_certificate | |
| Networking | |||
| domain_name | string | <container_name>-domain | Domain name inside the container, if omitted the container_name with suffix -domain will be set |
| host_name | string | <container_name>-host | Host name for the container, if omitted the container_name with suffix -host will be set |
| network_mode | string | bridge | The container’s networking capabilities type based on the desired communication mode, the possible options are: bridge or host |
| extra_hosts | string[] | Extra host name to IP address mappings added to the container network configuration, the format is: hostname:ip. If the IP of the host machine is to be added to the container’s hosts file the reserved host_ip[_<network-interface>] must be provided. If only host_ip (the network-interface part is skipped) is used, by default it will be resolved to the host’s IP on the default bridge network interface for containerm (the default configuration is kanto-cm0) and add it to the container’s hosts file. If the IP of a container in the same bridge network is to be added to the hosts file the reserved container_<container-host_name> must be provided. | |
| Networking - port mappings | |||
| proto | string | tcp | Protocol used for the port mapping from the container to the host, the possible options are: tcp and udp |
| container_port | int | Port number on the container that is mapped to the host port | |
| host_ip | string | 0.0.0.0 | Host IP address |
| host_port | int | Beginning of the host ports range | |
| host_port_end | int | <host_port> | Ending of the host ports range |
| Host resources - devices | |||
| path_on_host | string | Path to the device on the host | |
| path_in_container | string | Path to the device in the container | |
| cgroup_permissions | string | rwm | Cgroup permissions for the device access, possible options are: r(read), w(write), m(mknod) and all combinations are possible |
| privileged | bool | false | Grant root capabilities to all devices on the host system |
| Host resources - mount points | |||
| source | string | Path to the file or directory on the host that is referred from within the container | |
| destination | string | Path to the file or directory that is mounted inside the container | |
| propagation_mode | string | rprivate | Bind propagation for the mount, supported are: rprivate, private, rshared, shared, rslave or slave |
| Process | |||
| env | string[] | Environment variables that are set into the container | |
| cmd | string[] | Command with arguments that is executed upon the container’s start | |
| I/O | |||
| open_stdin | bool | Open the terminal’s standard input for an interaction with the current container | |
| tty | bool | Attach standard streams to a TTY | |
| Resource management | |||
| memory | string | Hard memory limitation of the container as a number with a unit suffix of B, K, M and G, the minimum allowed value is 3M | |
| memory_reservation | string | Soft memory limitation of the container as a number with a unit suffix of B, K, M and G, if memory is specified, the memory_reservation must be smaller than it | |
| memory_swap | string | Total amount of memory and swap that the container can use as a number with a unit suffix of B, K, M and G, use -1 to allow the container to use unlimited swap | |
| Lifecycle | |||
| type | string | unless-stopped | The container’s restart policy, the supported types are: always, no, on-failure and unless-stopped |
| maximum_retry_count | int | Maximum number of retries that are made to restart the container on exit with fail, if the type is on-failure | |
| retry_timeout | int | Timeout period in seconds for each retry that is made to restart the container on exit with fail, if the type is on-failure | |
| Logging | |||
| type | string | json-file | Type in which the logs are produced, the possible options are: json-file or none |
| max_files | int | 2 | Maximum log files before getting rotated |
| max_size | string | 100M | Maximum log file size before getting rotated as a number with a unit suffix of B, K, M and G |
| root_dir | string | <meta_path>/containers/<container_id> | Root directory where the container’s log messages are stored |
| mode | string | blocking | Messaging delivery mode from the container to the log driver, the supported modes are: blocking and non-blocking |
| max_buffer_size | string | 1M | Maximum size of the buffered container’s log messages in a non-blocking mode as a number with a unit suffix of B, K, M and G |
Example
The minimal required configuration to spin up an InfluxDB container instance.
{
  "image": {
    "name": "docker.io/library/influxdb:1.8.4"
  }
}
Template
The configuration can be further adjusted according to the use case. The following template illustrates all possible properties with their default values.
{
    "container_name": "",
    "image": {
        "name": "",
        "decrypt_config": {
            "keys": [],
            "recipients": []
        }
    },
    "domain_name": "",
    "host_name": "",
    "mount_points": [
        {
            "destination": "",
            "source": "",
            "propagation_mode": "rprivate"
        }
    ],
    "config": {
        "env": [],
        "cmd": []
    },
    "io_config": {
        "open_stdin": false,
        "tty": false
    },
    "host_config": {
        "devices": [
            {
                "path_on_host": "",
                "path_in_container": "",
                "cgroup_permissions": "rwm"
            }
        ],
        "network_mode": "bridge",
        "privileged": false,
        "extra_hosts": [],
        "port_mappings": [
            {
                "proto": "tcp",
                "container_port": 0,
                "host_ip": "0.0.0.0",
                "host_port": 0,
                "host_port_end": 0
            }
        ],
        "resources": {
            "memory": "",
            "memory_reservation": "",
            "memory_swap": ""
        },
        "restart_policy": {
            "type": "unless-stopped",
            "maximum_retry_count": 0,
            "retry_timeout": 0
        },
        "log_config": {
            "driver_config": {
                "type": "json-file",
                "max_files": 2,
                "max_size": "100M",
                "root_dir": ""
            },
            "mode_config": {
                "mode": "blocking",
                "max_buffer_size": "1M"
            }
        }
    }
}
4.3.2 - Manager configuration
Properties
To control all aspects of the container manager behavior.
| Property | Type | Default | Description |
|---|---|---|---|
| home_dir | string | /var/lib/container-management | Home directory for the container manager data |
| exec_root_dir | string | /var/run/container-management | Root directory for the container manager’s executable artifacts |
| container_client_sid | string | container-management.service.local.v1.service-containerd-client | Unique identifier that is used for an interaction with the runtime |
| network_manager_sid | string | container-management.service.local.v1.service-libnetwork-manager | Unique identifier that is used for networking |
| default_ctrs_stop_timeout | int | 30 | Timeout in seconds for a container to stop gracefully, otherwise its root process will be force stopped |
| Runtime | |||
| default_ns | string | kanto-cm | Namespace that is used by the runtime for isolation |
| address_path | string | /run/containerd/containerd.sock | Path to the runtime’s communication endpoint |
| home_dir | string | /var/lib/container-management | Home directory for the runtime data |
| exec_root_dir | string | /var/run/container-management | Root directory for the runtime’s executable artifacts |
| image_dec_keys | string[] | Private keys (GPG private key ring, JWE or PKCS7) used for decrypting container images, the format is: filepath_private_key[:password] | |
| image_dec_recipients | string[] | Recipients (only for PKCS7 and must be an x509) used for decrypting container images, the format is: pkcs7:filepath_x509_certificate | |
| runc_runtime | string | io.containerd.runc.v2 | Runc communication mode, the possible values are: io.containerd.runtime.v1.linux, io.containerd.runc.v1 and io.containerd.runc.v2 |
| image_expiry | string | 744h | Time period for the cached images and content to be kept in the form of e.g. 72h3m0.5s |
| image_expiry_disable | bool | false | Disable expiry management of cached images and content, must be used with caution as it may lead to large memory volumes being persistently allocated |
| lease_id | string | kanto-cm.lease | Lease identifier to be used for container resources persistence |
| Registry access - secure | |||
| user_id | string | User unique identifier to authenticate to the image registry | |
| password | string | Password to authenticate to the image registry | |
| root_ca | string | PEM encoded CA certificates file | |
| client_cert | string | PEM encoded certificate file to authenticate to the image registry | |
| client_key | string | PEM encoded unencrypted private key file to authenticate to the image registry | |
| Registry access - insecure | |||
| insecure_registries | string[] | localhost | Image registries that do not use valid certificates or do not require a HTTPS connection, the format is: host[:port] |
| Networking | |||
| home_dir | string | /var/lib/container-management | Home directory for the network manager data |
| exec_root_dir | string | /var/run/container-management | Root directory for the network manager’s executable artifacts |
| Networking - bridge | |||
| name | string | kanto-cm0 | Bridge name |
| ip4 | string | Bridge IPv4 address | |
| fcidr4 | string | IPv4 address range for the bridge, using the standard CIDR notation | |
| gwip4 | string | Bridge gateway IPv4 address | |
| enable_ip6 | bool | false | Permit the bridge IPv6 support |
| mtu | int | 1500 | Bridge maximum transmission unit in bytes |
| icc | bool | true | Permit the inter-container communication |
| ip_tables | bool | true | Permit the IP tables rules |
| ip_forward | bool | true | Permit the IP forwarding |
| ip_masq | bool | true | Permit the IP masquerading |
| userland_proxy | bool | false | Forbid the userland proxy for the loopback traffic |
| Local communication | |||
| protocol | string | unix | Communication protocol used for accessing the gRPC server, the possible values are: tcp, tcp4, tcp6, unix or unixpacket |
| address_path | string | /run/container-management/container-management.sock | Path to the gRPC server’s communication endpoint |
| Digital twin | |||
| enable | bool | true | Permit the container manager digital twin representation |
| home_dir | string | /var/lib/container-management | Home directory for the digital twin data |
| features | string[] | ContainerFactory, SoftwareUpdatable, Metrics | Features that will be registered for the container manager digital twin, the possible values are: ContainerFactory, SoftwareUpdatable and Metrics |
| Digital twin - connectivity | |||
| broker_url | string | tcp://localhost:1883 | Address of the MQTT server/broker that the container manager will connect for the local communication, the format is: scheme://host:port |
| keep_alive | int | 20000 | Keep alive duration in milliseconds for the MQTT requests |
| disconnect_timeout | int | 250 | Disconnect timeout in milliseconds for the MQTT server/broker |
| client_username | string | Username that is a part of the credentials | |
| client_password | string | Password that is a part of the credentials | |
| connect_timeout | int | 30000 | Connect timeout in milliseconds for the MQTT server/broker |
| acknowledge_timeout | int | 15000 | Acknowledge timeout in milliseconds for the MQTT requests |
| subscribe_timeout | int | 15000 | Subscribe timeout in milliseconds for the MQTT requests |
| unsubscribe_timeout | int | 5000 | Unsubscribe timeout in milliseconds for the MQTT requests |
| Digital twin - connectivity - TLS | |||
| root_ca | string | PEM encoded CA certificates file | |
| client_cert | string | PEM encoded certificate file to authenticate to the MQTT server/broker | |
| client_key | string | PEM encoded unencrypted private key file to authenticate to the MQTT server/broker | |
| Logging | |||
| log_file | string | log/container-management.log | Path to the file where the container manager’s log messages are written |
| log_level | string | INFO | All log messages at this or a higher level will be logged, the log levels in descending order are: ERROR, WARN, INFO, DEBUG and TRACE |
| log_file_count | int | 5 | Log file maximum rotations count |
| log_file_max_age | int | 28 | Log file rotations maximum age in days, use 0 to not remove old log files |
| log_file_size | int | 2 | Log file size in MB before it gets rotated |
| syslog | bool | false | Route logs to the local syslog |
| Deployment | |||
| enable | bool | true | Permit the deployment manager service providing installation/update of containers via the container descriptor files |
| mode | string | update | Deployment manager mode, the possible values are: init (container descriptors are processed only on first start, new containers are deployed and started), update (container descriptors are processed on each restart, new containers can be deployed and started, existing containers may be updated, no container removals) |
| home_dir | string | /var/lib/container-management | Home directory for the deployment manager data |
| ctr_dir | string | /etc/container-management/containers | Directory containing descriptors of containers that will be automatically deployed on first start or updated on restart |
Example
The minimal required configuration that sets a timeout period of 5 seconds for the managed containers to stop gracefully.
{
    "manager": {
        "default_ctrs_stop_timeout": 5
    },
    "log": {
        "log_file": "/var/log/container-management/container-management.log"
    }
}
Template
The configuration can be further adjusted according to the use case. The following template illustrates all possible properties with their default values.
{
    "manager": {
        "home_dir": "/var/lib/container-management",
        "exec_root_dir": "/var/run/container-management",
        "container_client_sid": "container-management.service.local.v1.service-containerd-client",
        "network_manager_sid": "container-management.service.local.v1.service-libnetwork-manager",
        "default_ctrs_stop_timeout": 30
    },
    "containers": {
        "default_ns": "kanto-cm",
        "address_path": "/run/containerd/containerd.sock",
        "exec_root_dir": "/var/run/container-management",
        "home_dir": "/var/lib/container-management",
        "image_dec_keys": [],
        "image_dec_recipients": [],
        "runc_runtime": "io.containerd.runc.v2",
        "image_expiry": "744h",
        "image_expiry_disable": false,
        "lease_id": "kanto-cm.lease",
        "registry_configurations": {
            "": {
                "credentials": {
                    "user_id": "",
                    "password": ""
                },
                "transport": {
                    "root_ca": "",
                    "client_cert": "",
                    "client_key": ""
                }
            }
        },
        "insecure_registries": [
            "localhost"
        ]
    },
    "network": {
        "home_dir": "/var/lib/container-management",
        "exec_root_dir": "/var/run/container-management",
        "default_bridge": {
            "name": "kanto-cm0",
            "ip4": "",
            "fcidr4": "",
            "enable_ip6": false,
            "mtu": 1500,
            "icc": true,
            "ip_tables": true,
            "ip_forward": true,
            "ip_masq": true,
            "userland_proxy": false
        }
    },
    "grpc_server": {
        "protocol": "unix",
        "address_path": "/run/container-management/container-management.sock"
    },
    "things": {
        "enable": true,
        "home_dir": "/var/lib/container-management",
        "features": [
            "ContainerFactory",
            "SoftwareUpdatable",
            "Metrics"
        ],
        "connection": {
            "broker_url": "tcp://localhost:1883",
            "keep_alive": 20000,
            "disconnect_timeout": 250,
            "client_username": "",
            "client_password": "",
            "connect_timeout": 30000,
            "acknowledge_timeout": 15000,
            "subscribe_timeout": 15000,
            "unsubscribe_timeout": 5000,
            "transport": {
                "root_ca": "",
                "client_cert": "",
                "client_key": ""
            }
        }
    },
    "log": {
        "log_file": "log/container-management.log",
        "log_level": "INFO",
        "log_file_count": 5,
        "log_file_size": 2,
        "log_file_max_age": 28,
        "syslog": false
    },
    "deployment": {
        "enable": true,
        "mode": "update",
        "home_dir": "/var/lib/container-management",
        "ctr_dir": "/etc/container-management/containers"
    }
}
4.4 - Software update configuration
Properties
To control all aspects of the software update behavior.
| Property | Type | Default | Description |
|---|---|---|---|
| featureId | string | SoftwareUpdatable | Feature unique identifier in the scope of the edge digital twin |
| moduleType | string | software | Type of the software that is managed by this feature |
| artifactType | string | archive | Type of the artifact that is to be processed: archive or plain |
| install | string[] | Absolute path to the install script/command and an optional sequence of additional flags/parameters | |
| storageLocation | string | ./ | Path to the storage directory where the working files are stored |
| installDirs | string[] | File system directories where the local artifacts are stored | |
| mode | string | strict | Restriction where the local artifacts can be stored on the file system, the supported modes are: strict, lax and scope |
| Download | |||
| downloadRetryCount | int | 0 | Number of retries, in case of a failed download |
| downloadRetryInterval | string | 5s | Interval between retries, in case of a failed download as a sequence of decimal numbers, each with optional fraction and a unit suffix, such as: 300ms, 1.5h, 10m30s, etc., time units are: ns, us (or µs), ms, s, m, h |
| Download - TLS | |||
| serverCert | string | PEM encoded certificate file for secure downloads | |
| Local connectivity | |||
| broker | string | tcp://localhost:1883 | Address of the MQTT server/broker that the software update will connect for the local communication, the format is: scheme://host:port |
| username | string | Username that is a part of the credentials | |
| password | string | Password that is a part of the credentials | |
| Logging | |||
| logFile | string | log/software-update.log | Path to the file where log messages are written |
| logLevel | string | INFO | All log messages at this or higher level will be logged, the log levels in descending order are: ERROR, WARN, INFO, DEBUG and TRACE |
| logFileCount | int | 5 | Log file maximum rotations count |
| logFileMaxAge | int | 28 | Log file rotations maximum age in days, use 0 to not remove old log files |
| logFileSize | int | 2 | Log file size in MB before it gets rotated |
Example
The minimal required configuration that sets the software type to firmware.
{
    "moduleType": "firmware",
    "storageLocation": "/var/lib/software-update",
    "logFile": "/var/log/software-update/software-update.log"
}
Template
The configuration can be further adjusted according to the use case. The following template illustrates all possible properties with their default values.
{
    "featureId": "SoftwareUpdatable",
    "moduleType": "software",
    "artifactType": "archive",
    "install": [],
    "storageLocation": "./",
    "installDirs": [],
    "mode": "strict",
    "downloadRetryCount": 0,
    "downloadRetryInterval": "5s",
    "serverCert": "",
    "broker": "tcp://localhost:1883",
    "username": "",
    "password": "",
    "logFile": "log/software-update.log",
    "logLevel": "INFO",
    "logFileCount": 5,
    "logFileMaxAge": 28,
    "logFileSize": 2
}
4.5 - File upload configuration
Properties
To control all aspects of the file upload behavior.
| Property | Type | Default | Description |
|---|---|---|---|
| featureId | string | AutoUploadable | Feature unique identifier in the scope of the edge digital twin |
| type | string | file | Type of the files that are uploaded by this feature |
| context | string | edge | Context of the files that are uploaded by this feature, unique in the scope of the type |
| files | string | Glob pattern to select the files for upload | |
| mode | string | strict | Restriction on files that can be dynamically selected for an upload, the supported modes are: strict, lax and scoped |
| singleUpload | bool | false | Forbid triggering of new uploads when there is an upload in progress |
| checksum | bool | false | Send MD5 checksum for uploaded files to ensure data integrity |
| stopTimeout | string | 30s | Time to wait for running uploads to finish as a sequence of decimal numbers, each with optional fraction and a unit suffix, such as: 300ms, 1.5h, 10m30s, etc., time units are: ns, us (or µs), ms, s, m, h |
| delete | bool | false | Delete successfully uploaded files |
| Upload - TLS | |||
| serverCert | string | PEM encoded certificate file for secure uploads | |
| Auto upload | |||
| active | bool | false | Activate periodic uploads |
| activeFrom | string | Time from which periodic uploads should be active, in RFC 3339 format, if omitted (and active flag is set) current time will be used as start of the periodic uploads | |
| activeTill | string | Time till which periodic uploads should be active, in RFC 3339 format, if omitted (and active flag is set) periodic uploads will be active indefinitely | |
| period | string | 10h | Upload period as a sequence of decimal numbers, each with optional fraction and a unit suffix, such as: 300ms, 1.5h, 10m30s, etc., time units are: ns, us (or µs), ms, s, m, h |
| Local connectivity | |||
| broker | string | tcp://localhost:1883 | Address of the MQTT server/broker that the file upload will connect for the local communication, the format is: scheme://host:port |
| username | string | Username that is a part of the credentials | |
| password | string | Password that is a part of the credentials | |
| Local connectivity - TLS | |||
| caCert | string | PEM encoded CA certificates file | |
| cert | string | PEM encoded certificate file to authenticate to the MQTT server/broker | |
| key | string | PEM encoded unencrypted private key file to authenticate to the MQTT server/broker | |
| Logging | |||
| logFile | string | log/file-upload.log | Path to the file where log messages are written |
| logLevel | string | INFO | All log messages at this or higher level will be logged, the log levels in descending order are: ERROR, WARN, INFO, DEBUG and TRACE |
| logFileCount | int | 5 | Log file maximum rotations count |
| logFileMaxAge | int | 28 | Log file rotations maximum age in days, use 0 to not remove old log files |
| logFileSize | int | 2 | Log file size in MB before it gets rotated |
Example
The minimal required configuration that sets the file type to log.
{
    "type": "log",
    "files": "/var/tmp/file-upload/*.*",
    "logFile": "/var/log/file-upload/file-upload.log"
}
Template
The configuration can be further adjusted according to the use case. The following template illustrates all possible properties with their default values.
{
    "featureId": "AutoUploadable",
    "type": "file",
    "context": "edge",
    "files": "",
    "mode": "strict",
    "singleUpload": false,
    "checksum": false,
    "stopTimeout": "30s",
    "delete": false,
    "serverCert": "",
    "active": false,
    "activeFrom": "",
    "activeTill": "",
    "period": "10h",
    "broker": "tcp://localhost:1883",
    "username": "",
    "password": "",
    "caCert": "",
    "cert": "",
    "key": "",
    "logFile": "log/file-upload.log",
    "logLevel": "INFO",
    "logFileCount": 5,
    "logFileMaxAge": 28,
    "logFileSize": 2
}
4.6 - File backup configuration
Properties
To control all aspects of the file backup behavior.
| Property | Type | Default | Description |
|---|---|---|---|
| featureId | string | BackupAndRestore | Feature unique identifier in the scope of the edge digital twin |
| type | string | file | Type of the files that are backed up by this feature |
| context | string | edge | Context of the files backed up by this feature, unique in the scope of the type |
| dir | string | Directory to be backed up | |
| mode | string | strict | Restriction on directories that can be dynamically selected for a backup, the supported modes are: strict, lax and scoped |
| backupCmd | string | Command to be executed before the backup is done | |
| restoreCmd | string | Command to be executed after the restore | |
| singleUpload | bool | false | Forbid triggering of new backups when there is a backup in progress |
| checksum | bool | false | Send MD5 checksum for backed up files to ensure data integrity |
| stopTimeout | string | 30s | Time to wait for running backups to finish as a sequence of decimal numbers, each with optional fraction and a unit suffix, such as: 300ms, 1.5h, 10m30s, etc., time units are: ns, us (or µs), ms, s, m, h |
| keepUploaded | bool | false | Keep successfully uploaded backups locally |
| storage | string | ./storage | Directory where backups and downloads will be stored |
| Upload/Download - TLS | |||
| serverCert | string | PEM encoded certificate file for secure uploads and downloads | |
| Auto backup | |||
| active | bool | false | Activate periodic backups |
| activeFrom | string | Time from which periodic backups should be active, in RFC 3339 format, if omitted (and active flag is set) current time will be used as start of the periodic backups | |
| activeTill | string | Time till which periodic backups should be active, in RFC 3339 format, if omitted (and active flag is set) periodic backups will be active indefinitely | |
| period | string | 10h | Backup period as a sequence of decimal numbers, each with optional fraction and a unit suffix, such as: 300ms, 1.5h, 10m30s, etc., time units are: ns, us (or µs), ms, s, m, h |
| Local connectivity | |||
| broker | string | tcp://localhost:1883 | Address of the MQTT server/broker that the file backup will connect for the local communication, the format is: scheme://host:port |
| username | string | Username that is a part of the credentials | |
| password | string | Password that is a part of the credentials | |
| Local connectivity - TLS | |||
| caCert | string | PEM encoded CA certificates file | |
| cert | string | PEM encoded certificate file to authenticate to the MQTT server/broker | |
| key | string | PEM encoded unencrypted private key file to authenticate to the MQTT server/broker | |
| Logging | |||
| logFile | string | log/file-backup.log | Path to the file where log messages are written |
| logLevel | string | INFO | All log messages at this or a higher level will be logged, the log levels in descending order are: ERROR, WARN, INFO, DEBUG and TRACE |
| logFileCount | int | 5 | Log file maximum rotations count |
| logFileMaxAge | int | 28 | Log file rotations maximum age in days, use 0 to not remove old log files |
| logFileSize | int | 2 | Log file size in MB before it gets rotated |
Example
The minimal required configuration that enables backing up a directory and sets the file type to config.
{
    "type": "config",
    "dir": "/var/tmp/file-backup",
    "mode": "scoped",
    "storage": "/var/lib/file-backup",
    "logFile": "/var/log/file-backup/file-backup.log"
}
Template
The configuration can be further adjusted according to the use case. The following template illustrates all possible properties with their default values.
{
  "featureId": "BackupAndRestore",
  "type": "file",
  "context": "edge",
  "dir": "",
  "mode": "strict",
  "backupCmd": "",
  "restoreCmd": "",
  "singleUpload": false,
  "checksum": false,
  "stopTimeout": "30s",
  "keepUploaded": false,
  "storage": "./storage",
  "serverCert": "",
  "active": false,
  "activeFrom": "",
  "activeTill": "",
  "period": "10h",
  "broker": "tcp://localhost:1883",
  "username": "",
  "password": "",
  "caCert": "",
  "cert": "",
  "key": "",
  "logFile": "log/file-backup.log",
  "logLevel": "INFO",
  "logFileCount": 5,
  "logFileMaxAge": 28,
  "logFileSize": 2
}
4.7 - System metrics configuration
Properties
To control all aspects of the system metrics behavior.
| Property | Type | Default | Description |
|---|---|---|---|
| frequency | string | Initial system metrics reporting frequency as a sequence of decimal numbers, each with optional fraction and a unit suffix, such as: 300ms, 1.5h, 10m30s, etc., time units are: ns, us (or µs), ms, s, m, h | |
| Local connectivity | |||
| broker | string | tcp://localhost:1883 | Address of the MQTT server/broker that the system metrics will connect for the local communication, the format is: scheme://host:port |
| username | string | Username that is a part of the credentials | |
| password | string | Password that is a part of the credentials | |
| Logging | |||
| logFile | string | log/system-metrics.log | Path to the file where log messages are written |
| logLevel | string | INFO | All log messages at this or higher level will be logged, the log levels in descending order are: ERROR, WARN, INFO, DEBUG and TRACE |
| logFileCount | int | 5 | Log file maximum rotations count |
| logFileMaxAge | int | 28 | Log file rotations maximum age in days, use 0 to not remove old log files |
| logFileSize | int | 2 | Log file size in MB before it gets rotated |
Example
The minimal required configuration that enables the auto reporting of system metrics.
{
    "frequency": "60s",
    "logFile": "/var/log/system-metrics/system-metrics.log"
}
Template
The configuration can be further adjusted according to the use case. The following template illustrates all possible properties with their default values.
{
    "frequency" : ""
    "broker": "tcp://localhost:1883",
    "username": "",
    "password": "",
    "logFile": "log/system-metrics.log",
    "logLevel": "INFO",
    "logFileCount": 5,
    "logFileMaxAge": 28,
    "logFileSize": 2
}