The Eclipse Supervisory Control Engineering Toolkit (Eclipse ESCET™) project is an Eclipse Foundation open-source project that provides a toolkit for the development of supervisory controllers in the Model-Based Systems Engineering (MBSE) paradigm. The toolkit has a strong focus on model-based design, supervisory controller synthesis, and industrial applicability, for example to cyber-physical systems. The toolkit supports the entire development process of (supervisory) controllers, from modeling, supervisory controller synthesis, simulation-based validation and visualization, and formal verification, to real-time testing and implementation.
| You can download this manual as a PDF as well. |
This documentation includes general information related to the Eclipse ESCET toolkit as a whole, as well as its general tools. The following information is available:
The Eclipse ESCET toolkit features multiple languages and associated tools. Check the website for each of these languages for more specific information, including separate documentation for each of them:
Using the Eclipse ESCET IDE
After you have downloaded and extracted the Eclipse ESCET IDE, you can start using it. The following information is available to get you started on using the Eclipse ESCET IDE in general, and applies to the various tools in the toolkit:
Consult the documentation of the individual tools for specific information regarding their use.
Starting Eclipse ESCET IDE for the first time
When you start the Eclipse ESCET IDE for the first time, it will ask you to choose a workspace directory. A workspace directory is where all your settings will be stored. It is also the default directory for new projects, in which you will store your files.
Choose a workspace directory and continue. Make sure that you have read and write access to the directory you choose. If you wish, the Eclipse ESCET IDE can remember your workspace directory. Note that if the workspace directory you choose does not yet exist, Eclipse will create it for you.
The first time Eclipse launches in a fresh workspace, you will get a Welcome screen. It shows a number of links that can help you to get started with using Eclipse ESCET and its tools. You can close the Welcome tab by clicking the 'X' at the right of the tab, or by clicking on the 'workbench' icon (the right most icon on the welcome page).
Updating Eclipse ESCET IDE
New versions of the Eclipse ESCET IDE can be used side-by-side older versions.
To download and install a new version of Eclipse ESCET IDE side-by-side an older version, follow these steps:
-
Download and extract the new version as usual, but extract the new version to a different directory than the old version.
-
You can copy the data (projects, files, and settings) of an earlier installation to the new installation. While neither version of the Eclipse ESCET IDE is running, simply remove the workspace directory of the new installation, and copy the workspace directory of the earlier installation to the new installation.
Using these instructions, it is possible to use multiple installations side by side, at the same time, regardless of whether the installations are the same version or different versions. Simply extract them to different directories and launch them as you would normally do.
Removing Eclipse ESCET IDE
Before removing a version of the Eclipse ESCET IDE, you may want to preserve (back up) its workspace directory, to keep your data (settings, projects, files). Then, to remove a version, simply remove the directory that contains files that you extracted from the downloaded archive.
Eclipse terminology
The Eclipse ESCET IDE is based on the Eclipse IDE, a cross platform Integrated Development Environment (IDE). There is quite a bit of terminology that is used within the IDE. If you are not familiar with Eclipse terminology, it may be difficult to use the Eclipse ESCET IDE. Here we’ll explain some basic Eclipse terminology:
Eclipse workspace
Eclipse stores all its settings in a so-called workspace. The workspace is simply a directory on your computer. You can choose any directory you like to serve as a workspace, as long as you have write access to that directory. It is usually best to choose an empty directory or a directory that does not yet exist as your workspace.
Typically, and by default, a directory named workspace inside your Eclipse ESCET installation directory is used.
Eclipse will ask you to choose a workspace directory when you start the Eclipse ESCET IDE for the first time.
The actual settings are stored in a sub-directory of the workspace directory, called .metadata.
You should avoid manually manipulating this directory.
Note that because the name of the directory starts with a dot (.), depending on your operating system, file browser, and settings, the directory may be hidden.
You can easily change your workspace directory from within Eclipse, by selecting . Select one of the workspaces from the list of last used workspaces, or select Other… to freely select any directory on your system to use as a workspace directory.
It is possible to run multiple instances of Eclipse at the same time, but each instance must use its own workspace.
The workspace is also the default directory for new projects. However, projects don’t have to be physically located inside your workspace directory. They can be stored in any directory on your system. Whenever you create a project and store it outside of your workspace, or whenever you import an existing project from outside your workspace, it is linked to the workspace, but remains physically stored in a directory outside of the workspace.
Having projects stored outside of the workspace has some benefits. The most important benefit is that you can remove the workspace directory, without losing your files.
Eclipse views
Eclipse is an Integrated Development Environment (IDE) with a lot of functionality. Most of the functionality is available through views. A view is a part of the Eclipse graphical user interface. Views can be thought of as 'sub-windows'. When you start Eclipse you are likely to see the Project Explorer or Package Explorer view on the left, and the Problems view at the bottom.
Opening a view
To open/show a view, select and then choose the view that you wish to open.
If the particular view that you wish to open is not in that menu, choose Other… instead. A new dialog opens, in which you can find all available views. The views are organized into categories. Expand a category, select the desired view, and click OK.
Alternatively, in the Show view dialog, enter the name of the view (or the first part of it) in the filter box at the top of the dialog, and observe how views that don’t match the filter are no longer displayed. This makes it easier to find the desired view.
Eclipse projects
Eclipse, being an Integrated Development Environment (IDE), does not only allow you to edit a single file, and simulate it, but also allows you to manage your files.
Eclipse works with so-called projects. A project is a collection of files and directories. A project may be located anywhere on your system, even though by default project are created in your workspace directory.
A project is essentially a directory on your computer, with a special file named .project.
This special file stores the information about your project, such as the name of the project.
It is recommended to keep the name of the project as Eclipse sees it, the same as the name of the directory in which the project is stored on your hard disk.
You can see the projects that Eclipse knows about in the Project Explorer or Package Explorer <use-terminology-view,view>>.
For more information on projects, see the Working with projects, directories, and files section.
Working with projects, directories, and files
Eclipse uses projects to manage files and directories (also called folders). This section contains information on the following topics:
Creating a new project
To create a new project, ensure you have either the Project Explorer or Package Explorer view visible.
Select to open the New Project window. Alternatively, right click somewhere in the Project Explorer or Package Explorer view, and select , to open the same window.
In the New Project window, from the General category select Project, and click the Next > button.
In the next window, enter a project name, for example models.
By default, a project is created inside your workspace directory. If you want it at a different place (so you can remove the workspace without losing your projects), uncheck the Use default location option, and enter a Location. Make sure the location does not yet exist, for example by ending with the project name. It is recommended to always create a project in a directory that has the same name as the project.
Click the Finish button to create the project. Observe how it appears in the Project Explorer or Package Explorer view.
Importing an existing project
If you previously created a project, but it is no longer visible in your Project Explorer or Package Explorer view, you can import it. Imported projects are linked to your workspace, but remain in their original location on your hard disk (by default, they are not moved or copied to your workspace directory).
Importing existing projects is particularly useful if you removed you workspace directory and started with a fresh one, e.g. for a new installation.
To import one or more existing projects, select to open the Import window. Alternatively, right click somewhere in the Project Explorer or Package Explorer view, and select Import… to open the same window.
In the Import window, from the General category, select Existing Projects into Workspace, and click Next >.
In the next window, in Select root directory, point it to the directory that contains the project you wish to import. The available projects in the given root directory, and all its sub-directories (recursively), are listed in the Projects list. Select the project(s) you want to import, by checking the relevant check boxes, and click Finish. Observe how the project(s) appear(s) in the Project Explorer or Package Explorer view.
Removing a project from Eclipse
To remove a project from Eclipse, ensure you have either the Project Explorer or Package Explorer view visible.
Right click the project in the Project Explorer or Package Explorer view and choose Delete. Alternatively, select it and press the Delete key on your keyboard. The Delete Resources dialog appears. To only remove the project from Eclipse, and keep the files on your hard disk, disable the Delete project contents on disk (cannot be undone) option and click the OK button. Alternatively, to remove the project from Eclipse and also remove all the files in the project from your hard disk, enable the Delete project contents on disk (cannot be undone) option and click the OK button.
Wait for Eclipse to complete the removal operation.
Creating a new directory
You can structure large collections of files, by putting them into different directories (also called folders). Directories can only be created in projects, or in other directories.
Select the project or directory in which you want to create a new directory (by left clicking its name in the Project Explorer or Package Explorer view, and create a new directory by selecting . Alternatively, right click on the project or directory instead, and from the popup menu select .
In the New Folder window, enter the Folder name, and click Finish.
Creating a new file
Select the project or directory in which you want to create a new file (by left clicking its name in the Project Explorer or Package Explorer view), and create a new file by selecting . Alternatively, right click on the project or directory instead, and from the popup menu select .
In the New File window, enter the File name, and click Finish.
Make sure to give the file the correct file extension, for example CIF files should end with .cif.
An editor for the new file opens, and you can start editing it.
Renaming a file, directory, or project
To rename a file, directory, or project, select it by left clicking its name in the Project Explorer or Package Explorer view, and then select . Alternatively, right click on the file, directory, or project instead, and from the popup menu select . A second alternative is to select the file, directory, or project, and then press the F2 key.
In the Rename Resource window, enter the New name, and click OK.
Locating files, directories, and projects
Often, it is convenient to be able to manage files not from inside Eclipse, but from outside Eclipse, for instance in a file explorer provided by your operating system. The Properties view can be used to find out where the files, directories, and projects that are in Eclipse, are located on your hard disk. With the Properties view visible, select a file, directory, or project in the Project Explorer or Package Explorer view. In the Property column of the Properties view, look for location. The corresponding Value indicates where the file, directory, or project is located on your hard disk. Note that you can right click the location and choose Copy to copy the location to the clipboard.
As an alternative to the Properties view, you can also use the Properties window. Right click a file, directory, or project in the Project Explorer or Package Explorer view and choose Properties. In the window that shows, select Resource on the left, if it is not already selected. Then, on the right, look for the Location.
To directly open the directory that contains a file, directory, or project in your system’s file explorer, right click the file, directory, or project in the Project Explorer or Package Explorer view and choose .
Don’t forget to refresh your projects in Eclipse after manipulating them outside Eclipse.
Refreshing a file, directory, or project
Whenever changes are made to files or directories from outside Eclipse, and those files or directories are also in one of the projects inside Eclipse, the changes are not always automatically reflected in the Project Explorer or Package Explorer view. To ensure that the current state of the files and directories are properly reflected in Eclipse, a refresh is required. To refresh a file, directory, or project, right click it, and choose Refresh. Any files and directories that no longer exist will disappear from Eclipse. Any new files and directories created outside Eclipse will appear in Eclipse as well.
Checking the size of a file
When working with files, you may occasionally encounter large files. Opening large files in Eclipse can cause serious performance problems. You can use the Properties view to check the size of a file. With the Properties view visible, select a file in the Project Explorer or Package Explorer view. In the Property column of the Properties view, look for size. The corresponding Value indicates the size of the file.
As an alternative to the Properties view, you can also use the Properties window. Right click a file in the Project Explorer or Package Explorer view and choose Properties. In the window that shows, select Resource on the left, if it is not already selected. Then, on the right, look for the Size.
Editing files and executing commands
This section contains information on editing text files and executing commands (such as starting a simulator).
Editing a text file
To edit a file, double click it in the Project explorer or Package explorer view.
Whenever you open a text file, change it, or the editor receives the focus, the file is checked for errors. If there are errors (or warnings), they are displayed in the editor as shown below.
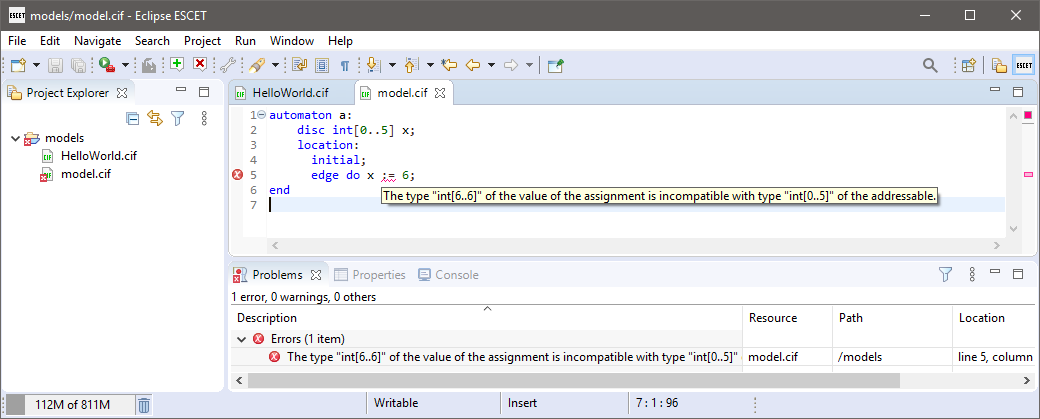
Note that you can hover over an error in the source code itself to find out what the problem is. Alternatively, you can hover over the error marker in the margin of the editor, or look at the Problems view. Also, if a file has an error or a warning, an overlay icon is shown in the Project Explorer and Package Explorer views, for that file, the directories that contain it, and the project that contains it.
Normally, text files are opened with their associated text editor that features syntax highlighting, and syntax and type checking. Large files are however opened with the default non-language-specific text editor to avoid performance issues. You can open a file in an editor of your choosing by right clicking it and selecting Open With and then selecting the editor of your choosing, or choosing Other… to open a dialog to choose from a larger selection of editors.
Executing commands
If you have a file without errors, you can execute certain commands on it. The various Eclipse ESCET tools add commands to Eclipse. For instance, CIF models can be simulated using a simulation command.
To execute a command on a file, right click the file in the Project Explorer or Package Explorer view, and select the command. Alternatively, if you have the file open in an editor, right click the editor, and select the command.
The commands that are available are determined by the file extension of the file. That is, only the commands applicable for a certain file are shown.
Besides simulation, other commands may be available, depending on the modeling language and tools you use. Consult the specific documentation for each tool for more details.
Eclipse ESCET perspective
The layout of the different parts of the Eclipse ESCET IDE, including the position and size of the various views, can be configured per perspective. Different perspectives allow you to use different layouts for different tasks.
The Eclipse ESCET IDE ships with some built-in perspectives. The default ESCET perspective is ideally suited for the use of the Eclipse ESCET software.
You can manually open the ESCET perspective (or any other perspective), by selecting . Then, in the Open Perspective dialog, select the ESCET perspective from the list, and click the OK button.
By default, the Eclipse ESCET IDE shows the opened perspectives at the top right corner of the IDE. Each perspective is a button that can be used to active it. If the button appears in a pushed state, that perspective is active. The following image shows an Eclipse ESCET IDE with two open perspectives: the Resource perspective and the ESCET perspective. The ESCET perspective is the currently enabled perspective.
By default, the ESCET perspective shows the following views:
-
Project explorer (top left)
-
Applications (bottom left)
-
Problems (bottom, grouped)
-
Properties (bottom, grouped)
-
Console (bottom, grouped)
You can manually open additional views, close some views, move views around, change the size of the different views, etc. If at any time you wish to go back to the original layout, you can reset the perspective, by selecting . Click the OK button to confirm.
Whenever a new version changes the default layout of a perspective, for instance by adding a new default view, you can reset the perspective to get the new view, or you can open that view it manually.
Applications view
The Applications view can be used to manage the applications of the Eclipse ESCET software running within the Eclipse ESCET IDE.

Opening the view
The Applications view can be opened by selecting , assuming the ESCET perspective is enabled.
Application status
The view shows a list of running applications. If an application starts another application, it is shown as a child, forming a tree structure. Each item of the tree shows a single application. In the example screenshot above, there are four running applications. The first application is a ToolDef interpreter, which is running a second application, a CIF simulator. The third application is also a ToolDef interpreter, which is running a fourth application, also a CIF simulator.
To the left of each item, the status of the application is indicated. The following statuses are available:
-
 Staring
 -
 Running
 -
 Terminating
 -
 Terminated
 -
 Finished
 -
 Failed
 -
 Crashed
When an application is started, it get a Starting state. Once the options have been processed from the command line and the option dialog (if requested), the actual application code is executed, and the status changes to Running. If the application is not terminated at the request of the user, the application will be done with its execution after some time. If execution finished without problems, it then reaches status Finished. If execution failed for some reason, it reaches status Failed instead. If the execution crashed due to internal problems, the application reaches status Crashed. If however the user terminates the application, the status is first changed to Terminating. Once the application has successfully been terminated, the status changes to Terminated.
You can also view these statuses and their corresponding icons from within the IDE, by opening the Application Status Legend dialog, which is available via the view’s drop-down button popup menu:

Termination
The Applications view supports terminating running applications. There are several ways to terminate an application using the Applications view.
When terminating an application (with a Starting or Running state), the application will get a Terminating state. Applications occasionally poll for termination requests. Therefore, it may take a while for the application to actually process the termination request. Once it has been processed, the application will have terminated, and the status changes to Terminated as well.
Applications can’t process a termination request while a modal dialog (such as the option dialog) is open, or when input is requested from the console. They will terminate as soon as possible, after the dialog is closed, or the user has provided input via the console.
The following buttons related to termination are available in the Applications view’s toolbar:
-
Auto Terminate (
 )
)Most users will only want to have a single application running at a time, including application started by that application, etc. To facilitate this, the view provides an Auto Terminate feature. This feature can be enabled and disabled from the view’s toolbar. It is enabled by default. Your choice whether to enable or disable this option will be remembered, even after Eclipse is restarted. The feature only has an effect if the view is shown in at least one of the opened perspectives.
If enabled, and a new application (not started by another already running application) is started, all other already running applications are automatically terminated. The new application starts its execution immediately. The already running applications will start to process the termination request, and will terminate as soon as possible.
-
Terminate All (
 )
)The view’s toolbar contains a Terminate All button that can be used to terminate all running applications. The button is only enabled when at least one of the listed applications can be terminated. When clicked, all running applications are given a termination request, and will terminate as soon as possible.
-
Terminate (
 )
)The view’s drop-down button popup menu contains a Terminate item that can be used to terminate all selected applications that are running. The item is only enabled when at least one of the listed applications that is selected, can be terminated. When clicked, all selected applications that can be terminated, are given a termination request, and will terminate as soon as possible.
Even when a child application is selected, all applications in the entire tree, starting from the root, will be given a termination request, if not already terminated or having finished their execution. In other words, only an entire tree of related applications can be terminated.
Removal
The Applications view can get a bit crowded, if already terminated applications are not removed from the list. To keep only relevant applications, the Applications view supports removing items from the list.
Only applications which have finished execution can be removed. That is, the root of the tree of applications needs to have a Terminated, Finished, Failed, or Crashed status, for the tree to be allowed to be removed. This prevents removing applications that are still running, which would make it impossible to terminate them, or observe their status.
The following buttons related to removal are available in the Applications view’s toolbar:
-
Auto Remove (
 )
)Most users will only want to only have applications listed in the view, that are either still running, or have just finished execution. To facilitate this, the view provides an Auto Remove feature. This feature can be enabled and disabled from the view’s toolbar. It is enabled by default. Your choice whether to enable or disable this option will be remembered, even after Eclipse is restarted. The feature only has an effect if the view is shown in at least one of the opened perspectives.
If enabled, and a new application (not started by another already running application) is started, all already terminated applications, will be removed from the list. If combined with the Auto Terminate feature, all other applications that can not be removed immediately because they are still running, will be removed as soon as possible, after they have been terminated.
-
Remove All (
 )
)The view’s drop-down button popup menu contains a Remove All item that can be used to remove all listed applications that may be removed. The item is only enabled when at least one of the listed applications can be removed. When clicked, all listed applications that can be removed, are immediately removed from the list.
-
Remove (
 )
)The view’s drop-down button popup menu contains a Remove item that can be used to remove all selected applications that can be removed. The item is only enabled when at least one of the listed applications that is selected, can be removed. When clicked, all selected applications that can be removed, are immediately removed from the list.
Even when a child application is selected, all applications in the entire tree, starting from the root, will be removed. In other words, only an entire tree of related applications can be removed, and only if all applications in that tree have finished execution.
Expansion
When one application starts another application, they are listed in a tree, with the parent containing the child. When running a single application, it may be of interest to see which child applications are being executed by the parent application. However, when executing multiple applications, this may quickly crowd the view. It may then be better to keep all root items collapsed, only showing the status of the root applications. This provides an overview over those multiple applications.
The following buttons related to expansion are available in the Applications view’s toolbar:
-
Auto Expand (
 )
)Most users will have the Auto Terminate and Auto Remove features enabled, and will thus only have a single application listed. They will want to automatically expand a parent application, to show its children. To facilitate this, the view provides an Auto Expand feature. This feature can be enabled and disabled from the view’s toolbar. It is enabled by default. Your choice whether to enable or disable this option will be remembered, even after Eclipse is restarted. The feature only has an effect if the view is shown in at least one of the opened perspectives.
If enabled, and a parent application starts a child application, the item for the parent application in the view, is automatically expanded to show its children. If disabled, no items will be automatically expanded.
Resolving performance and memory problems
During the use of the Eclipse ESCET toolkit, you may encounter performance and/or memory problems. This includes slow execution, performance degradation over time, out-of-memory errors, etc. One way to solve such problems, is to use a computer that is faster and/or has more memory. If that is not an option, or if that doesn’t help, the following information is available to help you get rid of these problems:
In particular, the Tweaking performance settings section provides information on how to give Eclipse ESCET tools more memory. This solves the most common performance problems and out-of-memory errors.
Clearing the console
In the Eclipse ESCET IDE, the Console view displays the console output generated by the applications that you run. This console keeps all the output in memory. If the application that you run creates a lot of output, this can quickly fill the available memory, and lead to out of memory errors.
By clearing the console, the output is removed and the associated memory becomes free for other uses.
To clear the console, right click the console (the part of the view that contains the actual console text) and choose Clear from the popup menu.
Alternatively, click the Clear Console button ( ) of the Console view’s toolbar.
The Eclipse Console view does not just keep the console output of the currently running application or applications in memory, it also keeps the output of all terminated applications in memory.
To look at the applications that you executed, click the small arrow next to the Display Selected Console icon ( ) of the Console view’s toolbar.
A list of executed applications will appear, that looks something like this:
) of the Console view’s toolbar.
A list of executed applications will appear, that looks something like this:

In this case, four applications have been launched. The console output for the fourth application is currently displayed on the console, as indicated by the selection indicator on the left. Clicking on any of the other applications will activate the console for that application, and show its console output in the Console view. Clearing the console of applications that have terminated can free a lot of memory for other uses, if the applications produced a lot of console output.
Note that instead of clearing the console after a lot of output has been generated, it is often better to prevent that much output from being created in the first place.
Reducing console output
Console output is expensive. Not only because of the amount of memory the generated console output uses, but also because the console output itself needs to be generated, and displayed on the console. Reducing console output can significantly increase the performance of our tools.
Therefore, instead of clearing the console, it may be better to prevent that much output from being written to the console in the first place. If your model itself generates a lot of console output, consider letting it generate less output. Alternatively, if the tool you use generates a lot of console output, consider checking its options to see if you can disable certain console output.
All Eclipse ESCET applications have an Output mode option (General category). Changing the value of this option from Debug to Normal, or from Normal to Warning may significantly reduce the amount of output that is written to the console. Note however that this is mostly an all or nothing approach. It is often much better to use application specific settings, or change your model, to reduce the amount of output that is generated, as it allows for more control over what output is or isn’t generated.
Closing running applications
One of the nice features of an the Eclipse ESCET IDE is that it allows the simultaneous execution of multiple applications, as well as the simultaneous execution of a single application on many different inputs. For instance, it is possible to simultaneously simulate two models using a simulator. The downside is that running multiple applications at the same time, costs more memory. Sometimes, if you forget to close an application, it can still consume memory, and may even still be running active computations, thus consuming processing power.
Application management via the applications view
The Applications view can also be used observe the status of running applications, and to terminate them.
Application management via the console view
The Eclipse Console view maintains the console output for all running and finished applications.
To look at the applications that you executed, click the small arrow next to the Display Selected Console icon () of the Console view’s toolbar.
A list of executed applications will appear, that looks something like this:
In this case, of the four applications that have been started, the second and fourth are still running. The console for the fourth application is currently displayed, as indicated by the selection indicator on the left. Clicking on any of the other applications will activate the console for that application, allowing it to be terminated, thus freeing resources for other applications.
The application that is currently active in the console can be terminated at any time, by using the Terminate button ( ), located at the upper right corner of the console.
Note however that if the console does not have the focus, this button may not be visible.
If the button is not visible, click somewhere in the console to make the button appear.
If even then the button is still not available, it may still appear if you Maximize the console.
Also note that the button has no effect while the application interactively asks for input from the console.
However, once the console input is provided, and Enter is pressed, the termination request will be processed.
), located at the upper right corner of the console.
Note however that if the console does not have the focus, this button may not be visible.
If the button is not visible, click somewhere in the console to make the button appear.
If even then the button is still not available, it may still appear if you Maximize the console.
Also note that the button has no effect while the application interactively asks for input from the console.
However, once the console input is provided, and Enter is pressed, the termination request will be processed.
Tweaking performance settings
If you run into errors related to running out of memory, you may need to tweak some settings. However, even if you don’t get errors, tweaking settings can significantly improve performance.
This page provides a lot of background information, to allow you to better understand the impact of the various settings. If you wish, you can skip the background information, and go directly to the Quick and dirty solution section.
The following information is available on this page:
Quick and dirty solution
This section explains a 'quick and dirty' solution that gives Eclipse more memory, resolving the most common performance problems and out-of-memory errors.
Find the eclipse-escet.ini file.
By default, it is located in your Eclipse ESCET installation directory, except for macOS, where instead it is in the EclipseESCET-vNNN.app/Contents/Eclipse directory, with vNNN the version number, inside the Eclipse ESCET installation directory.
Add the following line to the file, as its new last line, to change the maximum available memory to 32 GiB:
-Xmx32gRestart the Eclipse ESCET IDE or command line script to apply the new settings. If the instructions given here don’t fix your problem, or if the IDE or script will no longer start after you changed these settings, you should read the remainder of this page.
Managed memory and garbage collection
Before going into the actual settings, this section provides a little background on managed memory and garbage collection, to make it easier to understand the following sections. The information here is highly simplified, in order not to complicate matters too much.
The Eclipse ESCET IDE and command line scripts run on Java, a computer programming language. The Java Virtual Machine (JVM) manages all memory used by Eclipse, as well as the Eclipse ESCET tools. Not all settings may apply, as different versions of the JVM often change/tweak their garbage collector, settings, defaults, etc. As such, the information on this page should be used to guide you, but may not be completely accurate.
The JVM keeps track of all data that is maintained by the Eclipse ESCET tools, and releases (frees) the memory once it is no longer needed, so that it can be used to store other data. The JVM frees memory by means of a process called garbage collection (GC). Garbage collection is a complex process, but generally it consists of locking the memory to avoid modification during garbage collection, finding the data that is no longer used (mark the garbage), and then freeing the memory associated with that data (sweep the marked garbage).
Different types of memory
In order to understand the memory related settings, some understanding of Java’s memory architecture is essential. The following figure provides an overview of Java’s memory architecture, and the different types of memory that are used:
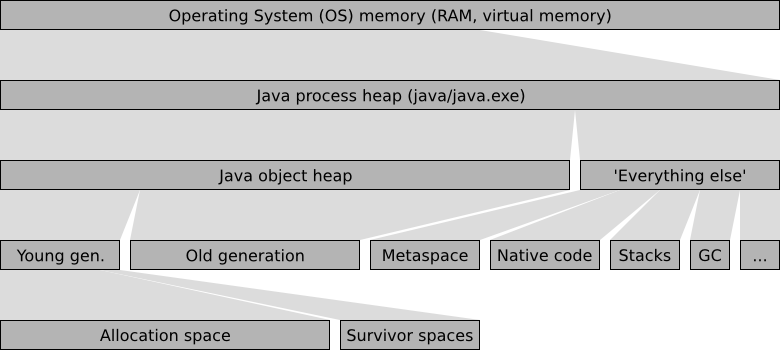
The operating system (OS) has memory available, either as physical RAM, or as virtual memory.
When Java is executed, the Java program (java executable on Linux and macOS, java.exe on Windows), becomes one of the running processes.
The process uses a part of the operating system’s memory to store its data.
This memory is called the Java process heap.
The Java process heap is divided into two parts, the Java object heap and 'Everything else'.
The Java object heap contains all data actually used by the running Java program, which in our case is the Eclipse ESCET IDE and/or Eclipse ESCET command line scripts.
The 'Everything else' part contains various data, mostly used by the JVM internally.
Java uses a generational garbage collector. New data, called objects in Java, are created in the young generation, or more specifically, in its allocation space (also called eden space). When the young generation becomes full, the garbage collector will remove all garbage (no longer used data) using a minor collection, which removes garbage from the young generation. The garbage collector uses the survivor spaces to store the surviving objects. Objects that survive a few minor collections are moved to the old generation, which stores the longer living objects, as well as the larger objects that don’t fit in the young generation, which is usually much smaller than the old generation. When the old generation becomes full, the garbage collector performs a major collection removing garbage from the entire Java object heap, which is much more work, and thus much more costly than a minor collection.
The 'Everything else' part of the Java process heap contains various data used internally by the JVM. This includes the 'Metaspace' with all the Java code of Eclipse and our own plugins, the values of constants, etc. It also includes the native code, the highly optimized code generated for the specific architecture of your machine, that can actually be executed on your processor. Furthermore, it includes the stacks of all the threads that are running in parallel. There is also a part that contains the data maintained by the garbage collector itself, for administrative purposes. The 'Everything else' part contains various other types of data, that are irrelevant for the current discussion.
Benefits of increasing the available memory
If Java runs out of available memory, our applications running in Eclipse will terminate with an 'out of memory' error message. In such cases, increasing the available memory will likely solve the problem. However, even if you don’t run out of memory, increasing the amount of memory that is available to Java can significantly improve Java’s performance.
The garbage collector performs a minor collection when the young generation becomes 'full'. Here, 'full' doesn’t necessarily mean 100%, as Java may e.g. try to keep the heap about 40% to 70% filled. Increasing the size of the young generation makes it possible to allocate more new objects before the young generation becomes 'full'. During garbage collection, program execution may become halted, to ensure that memory doesn’t change during the collection process. The longer one can go without garbage collection, the less halting, and thus the greater the performance of the program.
If an application uses a lot of data that lives for longer periods of time, the old generation may become mostly filled with data. It then becomes harder and harder for the garbage collector to move objects from the young generation to the old generation. This may be caused by fragmentation, due to some objects from the old generation being removed by the garbage collector. In such cases, if the gaps are too small to hold the new objects, the old generation may need to be compacted, a form of defragmentation. After compaction, the single larger gap hopefully has more than enough free space to contain the new objects. The compaction process is expensive, as a lot of objects need to moved. If the situation gets really bad, Java may need to spend more time performing expensive garbage collection operations than it spends time on actually executing the program you’re running. By increasing the size of the old generation to more than the application needs, a lot more free space is available, reducing the need for frequent compaction, thus significantly increasing the performance of the application.
These are just some of the reasons why increasing the amount of available memory can improve program execution times, even though enough memory was already available to complete the given task. In general, the more memory Java has, the better it performs.
Available settings
The JVM has way too many options to list here, but the settings listed in this section are of particular practical relevance. Most of the settings affect memory sizes. Each setting is described using a name, a command line syntax (between parentheses), and a description. The command line syntax is used to specify the setting, as explained in the Changing memory settings section.
-
Initial Java object heap size (
-Xms<size>)The size of the Java object heap when Java starts. Java will increase and/or decrease the size of the Java object heap as needed.
-
Maximum Java object heap size (
-Xmx<size>)The maximum size of the Java object heap. Java will increase the size of the Java object heap as needed, but never to more than the amount indicated by this setting.
-
Minimum percentage of free heap space (
-XX:MinHeapFreeRatio=<n>)Java will increase the size of the Java object heap as needed. Frequent heap resizing is costly. To prevent frequent resizing, the JVM allocates more space than it really needs. This way, a lot of new objects can be allocated before running out of space, which requires the heap to be increased again.
This setting indicates the desired minimum percentage of free heap space after each garbage collection operation. This is a desired percentage only, and if it conflicts with other settings, it is ignored. For instance, if this setting is set to 40%, but 80% of the maximum heap size is in use, only 20% free space may be allocated.
-
Maximum percentage of free heap space (
-XX:MaxHeapFreeRatio=<n>)Java will decrease the size of the Java object heap if possible, to ensure that Java doesn’t keep claiming memory that it no longer needs. Frequent heap resizing is costly. To prevent frequent resizing, the JVM allocates more space than it really needs. This way, a lot of new objects can be allocated before running out of space, which requires the heap to be increased again.
This setting indicates the desired maximum percentage of free heap space after each garbage collection operation.
-
Ratio of young/old generation sizes (
-XX:NewRatio=<n>)The ratio (1:n) of the young generation size to the old generation size. That is, with a ratio of 1:8, the old generation is 8 times as large as the young generation. In the command line syntax, the
8is specified.
-
Ratio of allocation/survivor space sizes (
-XX:SurvivorRatio=<n>)The ratio (1:n) of the survivor spaces size to the allocation space size. That is, with a ratio of 1:8, the allocation space is 8 times as large as the survivor space. In the command line syntax, the
8is specified.
-
Use garbage collector overhead limit (
-XX:+UseGCOverheadLimit)By default, the JVM uses a policy that limits the proportion of the VM’s time that is spent on the garbage collector. If the limit is exceeded, the garbage collector has trouble doing its work (usually due to too little free memory), and performance is impacted so badly, that executed is practically halted. Instead of continuing, the JVM will issue an 'out of memory' error.
-
Maximum code cache size (
-XX:ReservedCodeCacheSize=<size>)The maximum size of the code cache for native code.
-
Compile threshold (
-XX:CompileThreshold=<n>)By default, the JVM runs in mixed mode, which means that some code is interpreted, while other code is compiled to native code, which runs much faster. Since compilation takes time as well, compilation is only performed for often used code.
This setting indicates the number of method (a peace of Java code) invocations/branches before a method is compiled for improved performance.
-
Thread stack size (
-Xss<size>)The size of the stack of each thread.
The <size> part of the command line syntax is to be replaced by an actual size, in bytes.
The size can be postfixed with a k or K for kibibytes, an m or M for mebibytes, or a g or G for gibibytes.
For instance, 32k is 32 kibibytes, which is equal to 32768, which is 32,768 bytes.
The <n> part of the command line syntax is to be replaced by an integer number.
The values that are allowed are option specific.
The + part of the command line syntax indicates that the corresponding feature is to be enabled.
Replace the + by a - to disable the feature instead of enabling it.
Changing memory settings
There are several ways to supply the command line arguments for the settings to Java.
The easiest way to do it, when using Eclipse, is to modify the eclipse-escet.ini file.
By default, it is located in your Eclipse ESCET installation directory, except for macOS, where instead it is in the EclipseESCET-vNNN.app/Contents/Eclipse directory, with vNNN the version number, inside the Eclipse ESCET installation directory.
Each of the settings you want to change should be added to the eclipse-escet.ini text file, in the command line syntax.
Each setting must be put on a line by itself.
Furthermore, all these JVM settings must be put after the line that contains -vmargs.
Settings on lines before the -vmargs line are the settings for the launcher that starts Eclipse, rather than to the JVM.
Note that the default eclipse-escet.ini file supplied with Eclipse may already contain some of the settings.
If so, don’t add the setting again.
Instead, change the value of the existing setting.
The settings that are present by default, as well as their values, may change from version to version.
After modifying eclipse-escet.ini, restart the Eclipse ESCET IDE or command line script for the changes to take effect.
Miscellaneous troubleshooting
If the ECLIPSE_HOME environment variable is defined, that directory is used instead of the default directory, to look for eclipse-escet.ini.
However, most users should not be affected by this.
Using the -vmargs command line option replaces the similar settings from the eclipse-escet.ini file.
For most users, this will not be applicable.
If --launcher.appendVmargs is specified either in the eclipse-escet.ini file, or on the command line, the -vmargs settings of the command line are added to the eclipse-escet.ini file -vmargs instead of replacing them.
Practical hints to solve performance and memory problems
In general, giving Java extra memory only makes it perform better.
As such, increasing the maximum Java object heap size (-Xmx), is generally a good idea, if you have enough free memory.
If you actually run out of memory, Java will emit a java.lang.OutOfMemoryError, with a message to indicate the type of memory that was insufficient.
Below some common out of memory error message are listed, with possible solutions:
-
java.lang.OutOfMemoryError: Java heap spaceThe Java object heap needs more space. Increase the maximum Java object heap size (
-Xmxsetting).
-
java.lang.OutOfMemoryError: GC overhead limit exceededThe 'use garbage collector overhead limit' feature is enabled, and the garbage collector overhead limit was exceeded. The best way to solve this, is to make sure the limit is not exceeded, by giving Java more memory, and thus making it easier for the garbage collector to do its work. Increase the maximum Java object heap size (
-Xmxsetting).Alternatively, disable the 'use garbage collector overhead limit' feature (
-XX:-UseGCOverheadLimitsetting, note the-instead of the+). However, this doesn’t solve the underlying problem, as the limit will still be exceeded. Java will try to continue, and will either fail, or be very slow.
-
warning: CodeCache is full.
Compiler has been disabled.
This message is not a
java.lang.OutOfMemoryError, but may still be printed to the console. It is usually followed bywarning: Try increasing the code cache size using -XX:ReservedCodeCacheSize=. The warnings indicate that the code cache for native code is full. They already indicate the solution: increase the maximum size of the code cache (-XX:ReservedCodeCacheSizesetting).
-
java.lang.OutOfMemoryError: unable to create new native threadA new thread could not be created. The best way to solve this problem is to decrease the maximum Java object heap size (
-Xmxsetting), to make room for the 'Everything else' part of the Java memory, including the stack of the new thread.Alternatively, decrease the size of stacks on all threads (
-Xsssetting). However, decreasing the thread stack size may cause morejava.lang.StackOverflowErrorerrors, and is thus not recommended.
Monitoring Eclipse heap status
In Eclipse, it is possible to observe the amount of Java object heap space that is being used. In Eclipse, open the Preferences dialog, via . Select the General category on the left, if not already selected. On the right, make sure the Show heap status option is checked, and click OK to close the dialog.
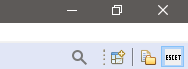
The heap status should now be displayed in the bottom right corner of the Eclipse window:

This example shows that the Java object heap (not the Java process heap) is currently 147 MB in size. Of that 147 MB, 62 MB are in use. The entire graph (the gray background) indicates the total heap size (147 MB), while the dark gray part indicates the used part of the heap (62 MB).
Clicking on the garbage can icon, to the right of the heap status, will trigger a major collection cycle of the garbage collector.
By right clicking on the heap status, and enabling the Show Max Heap option, the heap status shows more information:

The text still shows the amount of used heap memory (74 MB) out of the total size of the current heap (147 MB).
The scale of the background colors however, is different.
The entire graph (the light gray background) now indicates the maximum heap size.
The orange part indicates the current heap size.
The dark gray part still indicates the part of the heap that is in use.
If the used part of the memory gets past the red bar, it will become red as well, to indicate that you are approaching the maximum allowed Java object heap size, and may need to increase it (-Xmx setting).
Hover over the heap status to get the same information in a tooltip.
Monitoring with VisualVM
VisualVM is a tool to monitor, troubleshoot, and profile running Java applications. It can be downloaded from the VisualVM website.
Download the 'Standalone' version, and extract the archive somewhere on your system.
On Windows, start visualvm.exe from the bin directory by double clicking on it.
On Linux, start visualvm from the bin directory.
On macOS, use the .dmg file as you would any other such file.
After you start VisualVM for the first time, you may see some dialogs. Just go through the steps until you get to the actual application.
In VisualVM, you’ll see the currently running Java applications, for the local system:

Sometimes VisualVM can identify the Java applications, sometimes it can’t. This may also depend on you operating system, and the version of VisualVM. Find the application you want to know more about and double click it. A new tab opens on the right. The new tab has various tabs of its own:
-
Overview: provides various basic information, including the location of the JVM, its command line settings, etc.
-
Monitor: provides a quick overview of among others the CPU usage, GC activity, Java object heap usage, number of loaded classes, and the number of running threads, over time.
-
Threads: provides an overview of the running threads, and their status, over time. The Thread Dump button can be used to dump the stack traces of all currently running threads.
-
Sampler and Profiler: provide CPU and memory profiling, over time, by using sampling and instrumentation respectively.
The Monitor tab can be used to determine which type of memory should be increased. The Sampler tab can be used to profile an application, and figure out where bottlenecks are. This information can be used by the developers of the application to improve the performance of the application, by removing those bottlenecks.

Via you can access the Plugins window, where you manage the plugins. Various plugins are available. The Visual GC plugin is of particular interest. After installing it, restart VisualVM, or close the tabs of the JVMs you’re monitoring and open them again. You’ll get an extra tab for monitored JVMs, the Visual GC tab. This tab is somewhat similar to the Monitor tab, but shows more detailed information about the garbage collector, its various generations, etc.
Design Structure Matrix (DSM) clustering
One way to find structure in a graph is by seeing it as a collection of clustered nodes, where two nodes within a single cluster are more connected to each other than two nodes in different clusters. In addition, in a lot of cases, there is a set of nodes that connect to many other nodes in the graph (or in terms of clusters, one cluster connects with many other clusters). Such a set of nodes is named a bus.
The DSM clustering tool aims to heuristically find such a bus and clusters. The implemented algorithm is based on [Wilschut et al. (2017)].
Starting the clustering tool
The clustering tool can be started in the following ways:
-
In Eclipse, right click a
.dsmfile in the Project Explorer tab or Package Explorer tab and choose Cluster a DSM…. -
Right click an open text editor for a
.dsmfile and choose Cluster a DSM…. -
Use the
dsmclusteringtool in a ToolDef script. -
Use the
dsmclusteringcommand line tool.
Options
Besides the general application options, this application has the following options:
-
Input file path: The absolute or relative file system path to the input DSM file.
-
Output file path: The absolute or relative file system path for writing the generated DSM output file. By default, the output file path is the same as the input file path, but with the
.dsmextension removed (if it exists), and the_output.dsmextension added. By setting this option, the default is overridden by the given value. -
Evaporation factor: Factor that influences when a node is considered to be part of a cluster. Higher values leads to higher connection requirements between nodes, which leads to fewer nodes in a single cluster and thus more (smaller) clusters. Between
1.0and10.0, default value is2.0. -
Inflation factor: Factor that influences how fast large values increase and small values decrease, where the small values are eventually eliminated. Higher values of the factor speed up the process. Between
1.0and4.0, default value is2.0. -
Bus detection algorithm: The bus detection algorithm to apply. By default, no bus is detected. See Bus detection algorithms below for more details.
-
Bus factor: Factor that influences when a node is considered to be part of the bus. The actual interpretation of this factor depends on the chosen bus detection algorithm. Default value is
2. For more information, see Bus detection algorithms below for more details. -
Convergence limit: Allowed remaining numerical error before considering termination of the algorithm. Higher values end the computation sooner at the cost of less precision in the results. Values are between
0and1(where0is not achievable, and1is not precise enough). Default value is1e-4. -
Step count: Number of additional nodes to visit each iteration. Between
1and4, default value is2. Changing this values is rarely needed. -
Output groups: Whether to output the node numbers in the bus and each cluster. Default is
true.
DSM file format
A Design Structure Matrix (DSM) file is an RFC-4180 compliant CSV file that contains an N times N matrix of values.
Each line of the file contains a row of the matrix.
Within the line, values are separated by commas, and leading and trailing white space around each value is discarded.
Both integer and real values are supported, such as 0, 1, 1.5, 1e3 and 1.5e-4.
Negative values, NaN and infinite values are not allowed.
Before the first number at each row there should be a label indicating the name of the element of that row.
Optionally, above the first line of data there may be a line of column labels as well.
If column labels are present, the top-left cells of the matrix must be empty, and the row and column labels must match.
Rows that are shorter than other rows are automatically extended with additional zero values.
Zero values may be omitted.
Labels that include a comma or space should be surrounded by double quotes, like "Some text, and more text".
The following example shows a DSM for a two by two adjacency matrix of elements A and B, with column labels:
 , A  , B
A, 1  , 0
B, 0.5, 0.1
Computing a clustered DSM
Since the DSM clustering tool is based on heuristics, and typically much of the input values in the graph are not hard numbers, there are often several valid answers where some of the answers match your expectations better.
It is therefore recommended to experiment with the various factors somewhat to see what other answers are possible, and whether they make sense.
Bus detection algorithms
Bus detection uses connectivity of the nodes, which is the sum of their in and out degrees.
Currently, the following bus detection algorithm options are available:
-
Fix-point algorithm, named
fix-pointin the tool. This is the fix-point algorithm as introduced in [Wilschut et al. (2017)]. The algorithm repeatedly adds new nodes to the bus with a connectivity higher than the median connectivity of non-bus nodes multiplied by bus factor. The final set of bus nodes is obtained when such new nodes no longer exist. The value of bus factor should be between1and4(boundaries included). -
Top-k algorithm, named
top-kin the tool. This bus detection algorithm selects the nodes with the highest connectivity, where the number of nodes to select as bus nodes is bus factor. The value of bus factor should be an integer between0and the number of elements in the DSM. Real numbers are truncated. -
No bus, named
no-busin the tool. No bus detection mechanism is applied, so no bus elements are detected.
References
-
[Wilschut et al. (2017)] T. Wilschut, L.F.P. Etman, J.E. Rooda and I.J.B.F. Adan, "Multilevel Flow-Based Markov Clustering for Design Structure Matrices", Journal of Mechanical Design, volume 139, issue 12, 2017, doi:10.1115/1.4037626
Eclipse ESCET release notes
The release notes for the versions of the Eclipse ESCET tools, as part of the Eclipse ESCET project, are listed below in reverse chronological order.
See also the release notes for the specific tools for more information:
Version 3.0 (2024-03-31)
New features:
-
The Eclipse ESCET project now has a logo. You can find the logo on the ESCET website, as well as in the ESCET IDE (issues #777 and #791).
-
The Eclipse ESCET website now features a version switcher, to allow switching to websites for earlier versions of ESCET. The download page now also includes a link to a new page with links to all the websites of earlier versions of ESCET (issues #437, #775 and #776).
Improvements and fixes:
-
The Eclipse ESCET, Chi, CIF and ToolDef documentation now feature syntax highlighting for all languages, on the website and in the Eclipse ESCET IDE help (issue #740).
-
The Eclipse ESCET, Chi, CIF and ToolDef documentation now have improved styling, on the website and in the Eclipse ESCET IDE help (issue #38).
-
The Eclipse ESCET, Chi, CIF and ToolDef documentation on the website now have interactive tables of contents in their left sidebars, supporting collapsing and expanding (issue #38).
-
The Eclipse ESCET, Chi, CIF and ToolDef documentation on the website now include all levels in their tables of contents in the left sidebars (issue #38).
-
The Eclipse ESCET website has improved styling of dropdown menus (issue #437).
-
The Eclipse ESCET IDE now ships with the 'linked resources' feature of the Eclipse IDE disabled by default (issue #754).
-
The Eclipse ESCET IDE has a new splash screen, featuring the ESCET logo (issue #791).
-
The Eclipse ESCET IDE launcher for Windows now has an ESCET-specific icon (issue #791).
Version 2.0 (2023-12-22)
New features:
-
The Eclipse ESCET project now deploys 'nightlies', in-development versions of the ESCET website and toolkit. See the nightly website at https://eclipse.dev/escet/nightly/. From the nightly website the nightly releases can be downloaded (issue #699).
Improvements and fixes:
-
The Linux command line scripts for all ESCET tools no longer show a popup dialog upon exiting with a non-zero exit code (issue #89).
-
The warning and error output on the Eclipse console for all ESCET tools now use different colors. Warning output is now printed in yellow, error output still in red (issue #524).
Version 1.0 (2023-09-30)
Improvements and fixes:
-
The Eclipse ESCET project has graduated. The project has left the 'incubation' phase, and has entered the 'mature' phase. In honor of this occasion, we leave the '0.x' version numbering behind. All indications of the incubation phase have been removed. This also leads to changes in download filenames (issues #614 and #647).
-
The DSM clustering tool’s DSM input file format has been changed from a CSV-like file to an RFC-4180 compliant CSV file. Tab characters are no longer supported in the input files (issue #629).
Version 0.10 (2023-06-30)
Improvements and fixes:
-
The Eclipse ESCET website has moved from
www.eclipse.org/escettoeclipse.dev/escet. Redirects from the old URLs to the new ones are in place (issue #577). -
This release is based on Eclipse 2023-03, rather than Eclipse 2022-06 (issue #399).
-
The Eclipse ESCET IDE no longer gives warnings for projects without an explicit encoding (issue #399).
-
The DSM clustering tool’s command line script for Linux is now executable (issue #570).
-
The SVG viewer’s Save as dialog now properly starts in the directory that contains the SVG file, also on Windows. And it now properly handles paths with spaces and other special characters in them (issue #221).
Version 0.9 (2023-03-31)
Improvements and fixes:
-
The ESCET download page information for macOS has been updated to describe macOS Ventura (issue #483).
-
Eclipse ESCET is now released for the both the x86_64 and aarch64 architectures of macOS (issue #484).
-
Version-specific versions of the Eclipse ESCET website are no longer indexed by search engines. Only the current version of the website is now indexed. It may take some time for all search engines to catch up (issue #488).
-
The DSM clustering tool now outputs files with proper and consistent line endings (issue #540).
Version 0.8 (2022-12-21)
Improvements and fixes:
-
This release is based on Eclipse 2022-06, rather than Eclipse 2021-06 (issue #176).
-
Eclipse 2022-06 may show for all projects in your existing workspace a warning that they don’t have an explicit encoding set. To get rid of the warning, open the Problems view via . Then right click the warning and choose Quick Fix. In the Quick Fix dialog, click Select All to select all projects, and then click Finish to add the UTF-8 encoding to each project (issue #176).
-
Eclipse 2022-06 may automatically use a dark theme if your operating system is configured to use a dark theme. To explicitly choose either a light theme or a dark theme, open the Preferences dialog via . Then select , and for Theme select either Light or Dark. Select System to automatically select light or dark mode based on the operating system settings (issue #176).
-
The Console view now has theming support, and comes with a dark theme in addition to the existing light theme. The console now automatically uses its dark theme when the Eclipse built-in dark theme is used, and uses a light theme otherwise (issue #417).
-
The Application view’s status legend has been redesigned to support both light and dark themes (issue #417).
-
Improved the Eclipse ESCET IDE welcome screen, by making it fit better with the used theme, by adding some useful links to get started, and more (issue #32).
-
Very long lines in the Console view and text editors now render correctly on Windows (issue #76).
-
Eclipse ESCET now bundles Java 17 rather than Java 11 (issue #259).
-
The website of the current Eclipse ESCET release no longer links to version-specific URLs (issue #394).
Version 0.7 (2022-09-30)
This release contains no changes that apply to the Eclipse ESCET toolkit in general. Consult the release notes for the specific tools for their changes.
Version 0.6 (2022-07-07)
New features:
-
Added new Design Structure Matrix (DSM) clustering tool (issue #344).
Improvements and fixes:
-
The Eclipse ESCET IDE is no longer configured with a maximum Java object heap size of 4 GB of memory. The Java Virtual Machine (JVM) now decides the maximum, which may differ for different systems. It is of course still possible to configure the maximum yourself (issue #374).
-
Links in the documentation to Chi, CIF and ToolDef documentation webpages now use version-specific URLs (issue #386).
-
The issue numbers in the release notes now link to the corresponding GitLab issue (issue #396).
-
Small website style improvements (issue #367).
Version 0.4 (2021-12-17)
Improvements and fixes:
-
Introduced a brand new website (issue #35).
-
Many website URLs have changed due to various website structure changes (issues #35 and #73).
-
Various documentation/website textual improvements, style improvements and other changes (issues #35 and #54).
-
The Eclipse ESCET end-user and development documentation have been split into two separate documentation sets (issue #73).
-
SeText is now considered an internal developers tool. It no longer has a website of its own. Its documentation is now part of the Eclipse ESCET development documentation (issue #73).
-
The Eclipse ESCET IDE executable is now named
eclipse-escetoreclipse-escet.exe.eclipse.iniis now namedeclipse-escet.ini(issue #98). -
Eclipse ESCET now bundles Java 11.0.12 rather than Java 11.0.2 (issue #237).
Version 0.3 (2021-10-01)
Improvements and fixes:
-
The website and Eclipse help now use multi-page HTML rather than a single HTML file, although the website still contains a link to the single-page HTML that allows easily searching the full documentation (issue #36).
-
Enabled section anchors for documentation on the website, and disabled section anchors for Eclipse help (issue #36).
-
Fixed macOS-specific instructions for tweaking Java performance settings via
eclipse.ini(issue #179). -
Removed unsupported in-place update instructions from the documentation (issue #166).
-
Several small documentation fixes and improvements (issue #166).
Version 0.2 (2021-07-07)
Improvements and fixes:
-
Various documentation updates, including simpler installation instructions (issues #30 and #31).
-
Java 11 is now included in the release and Java thus no longer needs to be installed separately (issues #29 and #30).
-
The Eclipse ESCET IDE now includes the Eclipse Marketplace (issue #71).
-
Linux command line scripts now work properly from any directory rather than only from the
bindirectory that contains them (issue #88). -
macOS releases are now packaged as
.dmgfiles and with proper entitlements (issue #21). -
Eclipse ESCET downloads now contain a folder in the root of the archive, to properly support unpacking in e.g. a downloads directory (issue #87).
-
This release is based on Eclipse 2021-06 (issues #28 and #121).
-
Improved Eclipse ESCET download filenames (issues #87 and #92).
-
Improved Eclipse ESCET version numbers in documentation, plugin/feature versions, and Eclipse ESCET IDE about dialog (issues #92 and #103).
-
Non-release builds now indicate they are a development build in the Eclipse About dialog (issue #26).
-
Eclipse ESCET downloads for Linux previously included an 'executable'
about.htmlfile (issue #90). -
Crash reports now indicate where and how to report issues (issue #33).
Version 0.1 (2021-04-02)
The first release of the Eclipse ESCET project and toolkit. This release is based on the initial contribution by the Eindhoven University of Technology (TU/e).
Most notable changes compared to the last TU/e release:
-
A JDK is no longer bundled with the downloads. A JDK must be installed separately and manually. Future releases will again include a JDK.
This release is based on the Eclipse IDE version 2020-06 and supports Java 8.
Legal
The material in this documentation is Copyright (c) 2010, 2024 Contributors to the Eclipse Foundation.
Eclipse ESCET and ESCET are trademarks of the Eclipse Foundation. Eclipse, and the Eclipse Logo are registered trademarks of the Eclipse Foundation. Other names may be trademarks of their respective owners.
License
The Eclipse Foundation makes available all content in this document ("Content"). Unless otherwise indicated below, the Content is provided to you under the terms and conditions of the MIT License. A copy of the MIT License is available at https://opensource.org/licenses/MIT. For purposes of the MIT License, "Software" will mean the Content.
If you did not receive this Content directly from the Eclipse Foundation, the Content is being redistributed by another party ("Redistributor") and different terms and conditions may apply to your use of any object code in the Content. Check the Redistributor’s license that was provided with the Content. If no such license exists, contact the Redistributor. Unless otherwise indicated below, the terms and conditions of the MIT License still apply to any source code in the Content and such source code may be obtained at https://www.eclipse.org.
Third Party Content
The Content includes items that have been sourced from third parties as set out below. If you did not receive this Content directly from the Eclipse Foundation, the following is provided for informational purposes only, and you should look to the Redistributor’s license for terms and conditions of use.
-
Font Awesome
The Content includes parts of Font Awesome. Font Awesome is licensed under the SIL Open Font License 1.1.
SPDX-License-Identifier: OFL-1.1
-
Highlight.js
The Content includes parts of highlight.js. Highlight.js is licensed under the BSD 3-Clause License.
SPDX-License-Identifier: BSD-3-Clause
-
MathJax
The Content includes parts of MathJax. MathJax is licensed under the Apache License, Version 2.
SPDX-License-Identifier: Apache-2.0
-
Wikipedia external link icon
The Content includes the Wikipedia external link icon. The external link icon is licensed under the Creative Commons Attribution 4.0 International license.
SPDX-License-Identifier: CC-BY-4.0