
The aim of this tutorial is to guide you through the basic mechanisms of EMF Compare. The first part of this tutorial will explain you how to set up your environment. The second will help you understand the main differences that EMF Compare detects. The third part will explain you how EGit can interoperate with EMF Compare to compare model from a git repository.
EMF Compare is part of the Eclipse release train. You will find all you need in the eclipse release update of your platform. You can also find newer version on EMF Compare web site in the download section.
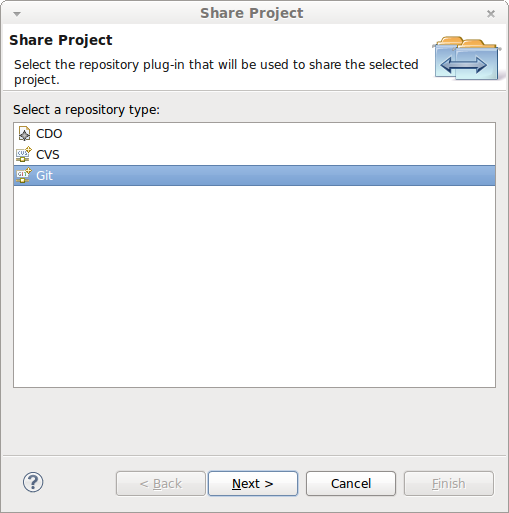
In order to install EMF Compare:


This tutorial is based on the well know ExtLibrary meta-model (available from the EMF examples). However for the needs of this tutorial we have customized those plugins. We have:
Those plugins are hosted in the EMF Compare repository. To import those plugins in your workspace you can follow the EGit tutorial. Here are the main steps:


In the end you should have your workspace looking like this:

Now that you get all you need in your workspace, you need to create a runtime platform. A runtime platform is basically a new eclipse platform built upon your current platform with the new plugins of your workspace included. To do so:
 . If you do not have this button in the toolbar you might need to switch to the Java perspective.

All the following instructions should be done on the runtime platform.
EMF Compare editor is based on the Content types mechanism. Basically, EMF Compare will be used in a comparison if the Content type of the current resource is either one of the following types(or inherits from one of them):
You can also use the "Content Types" preference page to associate your model files with EMF Compare content type.
This is the first step of this tutorial. To do so:

If you are using the basic EXTLibrary plugins (imported from examples) this step is not mandatory since a content type is already defined and it inherits from the XMI content type. However, those plugins do not generate ids, so we do not recommend you to use them.
If you have correctly followed the previous steps you should have the following environment:
Now that everything is set up, we are going to go through all the major differences EMF Compare detects and handles. To do so we will create a library model step by step. Each time that we will modify the library we will compare it with a previous version to see how EMF Compare handles each difference.
First we need to create our library model. To do so:


Your model is now open.

We are now going to fill your library with your first book.

Now that our library contains one book let's compare it with the previous state of our model:

The history view is now open.

This view will display each state of the file that Eclipse has saved for you. Each time you will save your model a new entry will appear. The item written in bold is the current version of your file. In the first part of this tutorial you will have to compare the current version of your model with its previous version.
To do so, double click on the entry just below the bold entry.
The EMF Compare editor is now open.

This comparison is a 2-way comparison. That is to say the comparison is only between 2 inputs (the current version of your file and the previous version from your local history). You will see in the second part of this tutorial that there is also a 3-way comparison.
Let's have a look at the user interface. The tool bar look like this:

This toolbar appears when you are in accept/reject mode. This mode is activated when at least one of the inputs is not writable. In our example the current version of your file can be modified whereas the previous version of it cannot (since it is provided by the local history). In this mode you can accept or reject a difference. This is obvious, but the only resource that is going to be modified is the current version of your model.
The top of the editor is filled with the "Structure Merge viewer". In it, you will find a structured representation of all differences that EMF Compare has found.
On the bottom of the editor you have a viewer called "Content viewer". This viewer displays the content of your input models. On the left, it displays the content of the current version of your model. On the right it displays the content of the previous version.
To have a full understanding of the user interface please see User Interface Breakdown.
Now let's have a look at the difference:

On this difference you find some pieces of information:
In this tutorial, you should never save the EMF Compare editor except if it is explicitly asked. For the moment, EMF Compare does not allow undoing an action if the model has been saved. Since we are going to go through every possible action we are going to make a lot of undo operations.
First accept the modification we have just created. To do so:
 .
.
Your editor should look like this:

A new overlay icon has appeared on the difference. It means that the difference has been merged. You can also notice in the content viewer of the current model version that the book isn't framed any more. This also means that the difference has been merged.
Let's try to reject the difference:
 .
.
Your editor should look like this:

The "x" overlay on the difference icon means that it has been rejected. In the content viewer of the current model version the book has disappeared. Indeed, since the modification has been rejected the previous version of this object is used.
We are now going to set the name of the book we have just created. This will change the value of the attribute "Title" to "Prelude to Foundation".

Now let's compare it with previous version (see previous chapter for explanation Compare with previous version).

On the difference you see the overlay indicating that this difference is a change. This difference is a set on the feature "Title". If you look on the content viewer of the current version, you will see the new value of the feature whereas in the previous version nothing is displayed.
If you accept the difference you will notice the same effect than in the previous chapter (see Accept a difference).

If you reject the difference the name of the book will be unset since it has not been set in the previous version (see Reject a difference).

We are going to define that this book is a Science Fiction book. This will change the value of the "Category" feature of the book from its default value "Mystery" to "ScienceFiction".

Now let's compare it with its previous version (see previous chapter for explanation Compare with previous version).

On the content viewer of the current version you see the new value of the feature "Category" whereas in the previous version the default value is displayed.
Accept the difference and you obviously see (see Accept the difference):

Reject the difference to set the "Category" feature to its default value (see Reject a difference).

To fill your library we are going to add some employees.

For this step we are not going to compare with the previous version of the model. EXTLibrary stores persons in feature maps. For the moment feature maps are not correctly handled by EMF Compare. Features map comparison will be integrated for the next Eclipse release (Mars in 2015).
Let's set the manager of "Employee" to "Chief". This will set the reference "Manager" of "Employee" to "Chief".

Now let's compare it with its previous version (see previous chapter for explanation Compare with previous version).

You can notice the change in the content viewer. However it is slightly different from the previous comparison. In the content viewer, you now have a new top image.

It means that the current difference is a non containment reference. If you look back to Compare with previous version the content viewer is not the same since the feature involved was a containment reference.
Accept this difference and you will see the same type of result than Accept a difference.

Reject this difference and you will see the same type of result than Reject a difference.

Let's say "Employee" has a new job and so he has a new manager. We have to change the feature "Manager" from "Chief" to "Master".

Accept the change to mark the difference as merged. Reject it to reset the manager of "Employee" to "Chief".

Let's say that "Employee" has reached the top of the command chain. That is to say he has no more manager.


The difference is the opposite of set a manager.


Let's open the gates of your library to the public. We are going to add borrowers to this library.

For the same reason explained in Fill the library with employees we are not going to compare the model this time.
We are going to use your newly created borrower by making him borrow "Prelude to foundation".


In this comparison you can notice two differences:
 and
and
 .
.
EMF Compare displays two differences whereas you have only made one modification in your model. The explanation is within the structure of the EXTlibrary metamodel. If you look at the feature "borrowed" in extlibrary.ecore you will see that the EOpposite field is set to "borrowers : Borrower".

This means that each time you add/remove a book to a borrower EMF will automatically add/remove the borrower to the "borrower" feature of the book (and the other way around). Modifying one feature will modify the other. It explains why EMF Compare sees two differences.
Now you may wonder what happens when you accept one of the differences? EMF Compare will give you a hint on this matter. First notice the consequences preview button
 . It can either have its icon set to
 for "Accept preview mode" or
 for "Reject preview mode".
When the "Accept preview mode" is activated (
), EMF Compare will help you understand the consequences of accepting the current selected difference. Let's try it.
).
Notice that the "Book Prelude to Foundation [borrower add]" difference is highlighted in green. This means that accepting the current difference will automatically accept this difference too. Those two differences are linked by an "Equivalence" element meaning that merging one is equivalent to merging the other. You can reproduce the same behavior by selecting the difference "Book Prelude to Foundation [borrower add]" instead of "Borrower Graham [borrowers add]".

Both differences have been accepted. Now let's try to reject the difference.
).


Both differences have been rejected.
Now that your library is growing, let's create a new branch in your library. This new library will be affiliated to the main entity but will have an independent life.


EMF Compare displays only one difference whereas you have made two modifications. You have created one sub library and one book. There must be a connection between those two differences... Indeed without the library it's impossible to create the book "1984" since it is included in the new library. For clarity purposes EMF Compare only shows one difference and hides the other one.

EMF Compare has accepted both differences. It has created the new library and the new book. On the contrary let's try to reject the difference.

EMF Compare rejects both differences.
In some use cases it can be useful to display both differences. For example if we would like to accept the creation of the library but reject the creation of the book. To do so, you have to use the filter button ( see Filtering Differences for further information).


Once the filter has been deactivated you will see both differences. Now you can separately merge each difference.
).

Notice that the library difference is highlighted. Indeed, merging the book difference will necessarily merge the library difference.
).

In this mode the other difference is not highlighted. Indeed, you can reject the creation of the book without rejecting the creation of the library. In the same way, selecting the library difference while "Reject preview mode" is activated will highlight the book difference. If the library does not exist then the book can also not exist.
).

In order to fill the new library we are going to give it one book from the main library.


With this example we have introduced a new type of change: "moving an element". This means the element already existed in the previous version but was located in a different place. In the content viewer you can see the location of this element in the current and previous versions of your model.


After an accident the book "1984" has to be removed from the shelves.


This kind of change is the opposite of an addition.


In this part of the tutorial we will continue building our model. The only difference is that we are going to create different scenarios for each new modification. To do this we need a tool called Git. It is a free and open source distributed version control system. In Eclipse world we are going to talk about JGit and EGit. JGit is a java implementation of Git. EGit is the integration of JGit in Eclipse.
Attention: Remove the book "Prelude to Foundation" from the "Borrowed" feature of borrower "Graham" before continuing. The following examples assume this relation is not set!
First of all we need a Git repository. You can either use a clone of an existing Git repository or create your own local Git repository. We have chosen the second solution for this tutorial.
 .
.


Now that your repository is ready. Let's put your model in it.


Your project has now been moved into the repository. However your work has not been committed yet. Committing a model is like taking a snapshot of it and saving it for later (see Commiting Changes for further information). To do so:

Your project has just been committed into your repository. Let's have a look at your repository and its history.
It should look like this:

Expand your repository tree in the "Git Repositories" view. In it you can see a folder named "Local" located within "Branches". This folder contains all the branches of your Git repository. In this example each branch will represent a scenario of your model. You can notice that your repository has already a "master" branch. This is your main scenario.
In the history view you can see the graph of all your commits. Currently the only entry available is the first commit you have made earlier. To better understand the changes that we are going to make in the repository, we advice you to click on the "Synchronize" button (
 ) and on the "Show all branches" button (
 ). This will give you a global point of your repository.
Let's create our first scenario. To do so:


You have just created a new scenario that will use the last commit from the master branch as starting point.
You have now two branches in your repository. Let's modify our model to write our first scenario.


This is a comparison between the current version of your model and the snapshot that you have committed earlier. Let's save this version. To do so we are going to commit it. Follow the steps as described in Commit your changes:


Let's create a different scenario. Follow the step described in Create Scenario 1 to create a new scenario called "Scenario2" from the master branch.

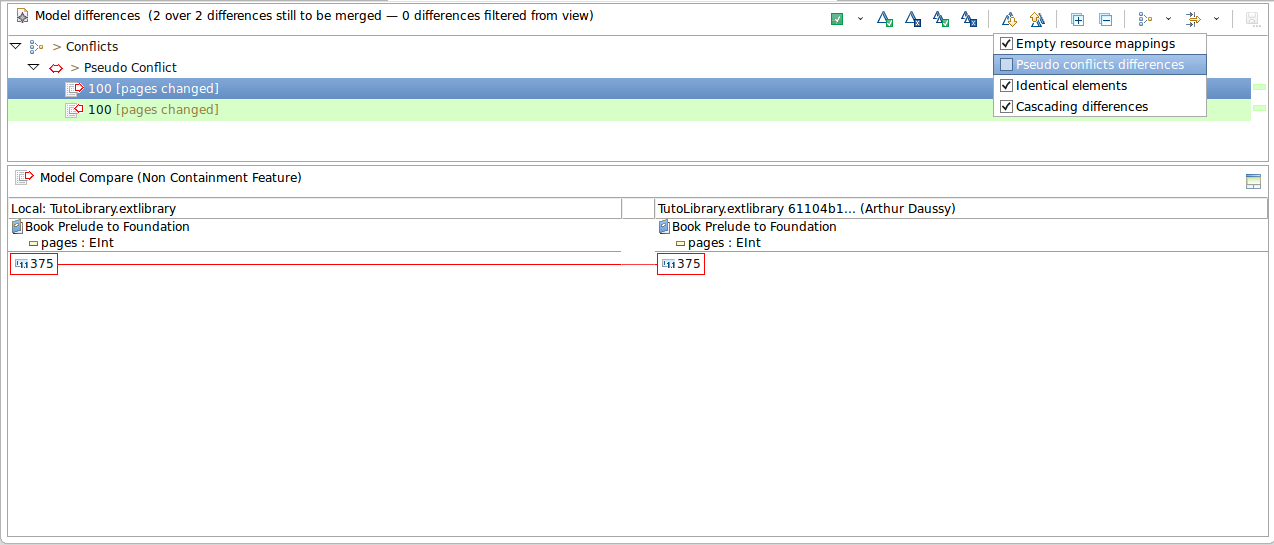
In this scenario we are going to set the number of pages of "Prelude to Foundation" to 375.


You should now have an EMF Compare editor open.

The first thing to understand is that this comparison is a 3-way comparison. This means that EMF Compare has used 3 inputs to compute the differences. The first one (in the bottom left) is the local version of your model ("Scenario2"). The second one (in the bottom right) is the version of your model from "Scenario1". And the third one is a common ancestor of the two other versions. The history view gives a picture of the situation.

Both scenario 1 and 2 used the master branch as starting point. This is why it has being used as common ancestor. We will see later on this tutorial how EMF Compare uses this third input. You can display its content in EMF Compare by clicking on the "Show Ancestor Pane" button (
 ).
).


You can notice a new type of difference: conflicts. Indeed in Scenario1 we set the number of pages to 374 whereas we set it to 375 in Scenario2. EMF Compare is telling us that it cannot be both. If you select one of the difference you will see that the other is highlighted in red. This means that if you merge this difference EMF Compare will not be able to merge the other one.
We are now going to see what will be the impact of accepting or rejecting each difference.

In this case EMF Compare has accepted the selected difference and rejected the other one since they cannot be accepted simultaneously. Let's try to reject this difference.
).
 Notice that nothing is highlighted in red. It seems that rejecting this difference has no consequence on other differences. Let's find out.

In this case EMF Compare only rejected the current difference. When you look at the value of the attribute you will see that the number of page has been set to 100. This value is the value of the same attribute in the common ancestor model (see picture "Common Ancestor 2"). In 3-way comparison you can either accept the version of an attribute from one of the two input version (Scenario 1 or Scenario 2) or return the version to its common ancestor value (master).
Obviously you can do the same actions on the difference named "374 [page changed]". It will:
Note that after rejecting one scenario you still have to handle the remaining difference. Depending on if you accept or reject it, the final value of the attribute will be the one of the common ancestor or the one of the remaining scenario.
In the previous chapter you have seen how EMF Compare handles two conflicting changes between two scenarios. In this chapter we are going to see how it handles two changes that are semantically the same. Let's create a third scenario:


At first glance it seems that no difference was detected. This is not really surprising since the two input models are semantically identical. However you will see that EMF Compare has done some work:
Blocked by
https://bugs.eclipse.org/bugs/show_bug.cgi?id=435051
EMF Compare has detected two differences. The first difference has been detected between the common ancestor and Scenario2. The second has been detected between the common ancestor and Scenario3. However EMF Compare is clever enough to consider that these two differences are the same.
Now that you have understood how conflicts works we are going to create a more complex conflict. Let's create a conflict between a book that we are going to delete in a scenario (Scenario4) and the same book that we are going to borrow in another scenario (Scenario5).


At this stage of the tutorial your Git repository should look like this.


If you select each differences you will see that:


Let's say you want to delegate the work on the sub library to one of your colleagues. To do so you want to give him a file with the sub library and nothing else. Let's extract our new branch library into a new file. In this part of the tutorial we are going to discuss the fragmentation of a model (also called control). The following steps will show you how EMF Compare reacts with models split among several files.


 In your new model you can see that two resources have been loaded (NewLibraryFile.extlibrary and TutorialModel.extlibrary). You can also notice a new overlay icon on the sub library. This means this element is stored in another file (resource).
Eclipse asks you to switch to the "Team Synchronize" perspective, accept.
Blocked https://bugs.eclipse.org/bugs/show_bug.cgi?id=435081
TODO when included in repository - Rebase two branches - Rebase your work on the work of your colleague TODO when included in repository - Merge two branches - Merge your work with that of your colleague