Server Tools Evaluation Guide
1.0 Introduction
The Server Tools component provides a comprehensive framework for supporting servers within Eclipse, as well as a
number of supporting tools. The initial contribution contains support for several versions of Apache Tomcat, an internal
Web browser for viewing Web pages inside the IDE, and a TCP/IP monitor for observing data flow between a client and a
server.
The Server Tools contribution consists of four separate components:
- Web Browser - Support for an internal (hosted within the IDE) Web browser and launching external browsers.
- TCP/IP Monitor - A TCP/IP "tunnel" that sits between a client and server and allows you to monitor the
traffic between them. The TCP/IP Monitor is also the basis for the WS-I SOAP monitor.
- Server Tools framework - A generic framework for adding server support to Eclipse. Provides a set of common
actions and wizards, and a Servers view and preferences to manage servers. It provides a number of extension points
that allow developers to extend the servers that are supported, and API to allow other plugins to access server
information and control servers.
- Apache Tomcat server support - Support for running and debugging on Tomcat v3.2, v4.0, v4.1, and v5.0.
This guide will step you through each one of these components and point out many of the useful features along the
way. There are two scenarios - the first scenario will highlight the TCP/IP Monitor and the Web Browser support, and the
second scenario will involve debugging a JSP file on Tomcat v5.0.
2.0 Getting Started
There is no setup required to run the first scenario. To run the second scenario, you will need to install two
things before you begin:
- To run a Web project on Apache Tomcat, you'll need to download and unzip a copy of the Tomcat server. You
can download Tomcat from http://jakarta.apache.org. Click on Downloads >
Binaries on the left hand side and download any version of Tomcat v3.2.x, v4.0.x, v4.1.x, or v5.0.x. For JSP
debugging support, choose Tomcat v5.0.x.
- To run JavaServer Pages on Tomcat, you will need a full JDK (not just a JRE). If you do not already use a
JDK to run Eclipse, you will need to download and install one separately.
3.0 Quick Tour
3.1 Scenario 1 - TCP/IP Monitor and Web Browser
In this scenario, we'll take a look at the TCP/IP Monitor and Web Browser support, and then use the monitor to
inspect traffic between the Web browser and an external Web site.
- Go to Window > Preferences and then select Web Browser.
- This page displays the Web browsers that have been found on your machine, and allows you to add and remove
them from the list. The checked Web browser is the one that will be used by the tools. On most operating systems
"Internal Web browser" will be checked by default.

- Using this page, you can edit the settings for each browser (see below), add new browsers, or do a search
through a particular directory.

- Select the TCP/IP Monitor preferences on the left.
- Click Add to add a new monitor. Type "www.eclipse.org" in the Host name: field and click OK.

- Click Start and then OK to exit the preferences dialog.
- Switch to the Server perspective. Note the Servers view (a server has been installed here to show the menu
actions) that shows the status of all installed servers and allows you to start, stop, and publish to any server.

- Click on the "world" icon (
 ) on the toolbar. This will open your preferred Web browser. If the Internal Web Browser was checked in
the preferences, it will open. Take this opportunity to get familiar with the internal browser.
) on the toolbar. This will open your preferred Web browser. If the Internal Web Browser was checked in
the preferences, it will open. Take this opportunity to get familiar with the internal browser.
- Type in "http://localhost/" in the location field and hit Enter.
- The TCP/IP monitor view should appear below, and fill up with the traffic between your Web browser and
Eclipse.org. When you select each request in the tree at the top left, information about the request/response is
shown, the bottom left of the view will display the HTTP request that was made to www.eclipse.org, and the bottom
right will show each response.

- Select /images/EclipseBannerPic.jpg from the tree. The response output isn't very useful in this case
because the content is a JPG image. In the response section (bottom right), select Image View from the combo box.
The JPG should now be visible.
- Close the Web browser and the TCP/IP monitor views.
3.2 Scenario 2 - Debugging a JSP on Tomcat v5.0
In this scenario, we'll create a new Web project and JSP file, and then debug the JSP on Tomcat v5.0. If you are
using another version of Tomcat, you can follow along with all of the steps, but the debugger will not stop at the
breakpoint in the JSP.
- Go to create a new project and select Web > Dynamic Web Project. Click Next.

- Type My Web as the Web project name. If you want to use an older version of Tomcat, select a supported J2EE
Web version for your version of Tomcat. If in doubt as to what version(s) your Tomcat server supports, choose 2.2.
- The target server field is blank if you have not used this workspace before. Click New... to create a new
server runtime.
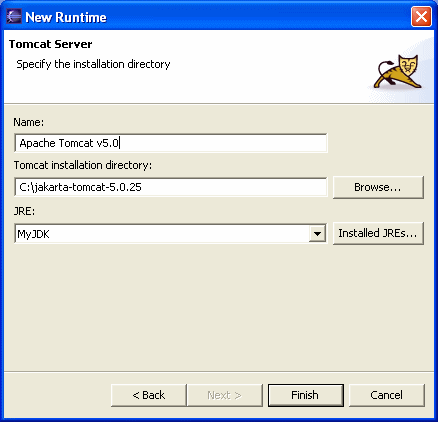
- Select your version of Tomcat from the list, and click Next.

- Use the Browse... button to locate the Tomcat installation directory (the directory in which you unzipped
Tomcat).
- Tomcat requires a JDK to be able to compile JSP files. If you are using a JRE to run Eclipse, you'll need
to install a JDK now. Click Installed JREs...
- Click Add... to create a new Installed JRE. Type MyJDK in the JRE Name: field and use the first Browse...
button to choose the directory in which you have a JDK. The default system libraries list at the bottom of the
dialog should automatically fill up.
- If you are using an IBM JDK, type -Xj9 in the Default VM Arguments: field to allow JSP debugging. (In
either case, JSP debugging is only supported by Tomcat v5.0)

- Click OK to get back to the Installed JRE preferences. Your new JDK should now be listed. You do not need
to check the JDK to have the Web project compile against the Tomcat JDK - when the project is created it will
automatically be set to compile against the correct JDK and Tomcat libraries.

- Click OK again, and make sure that MyJDK is selected in the JRE: field. Click Finish.
- You should now be back at the Web project wizard. Uncheck the Add module to an EAR project checkbox,
since Tomcat does not support EAR projects. The wizard should now look like this:

- Click Finish. The new Web project will be created in the workspace.
- Create a new file, called today.jsp. The JSP editor will be automatically opened up.
- Type
Today is: <%= new java.util.Date().toString() %>
in the editor and save.
- Double click in the margin by the text you just entered to set a breakpoint.

- Close the editor.
- Right click on the today.jsp file in the Navigator and choose Debug > Debug on Server.

- The server selection wizard is empty because there are no servers defined. Click New Server... and select
your version of Tomcat. Click Finish.

- Ensure that the server is selected and click Finish.

- When Eclipse prompts you to switch to the Debug perspective, click Yes.
- In a few seconds, the JSP file will stop in the debugger and the JSP editor will be opened. From here, you
can inspect the variables and make changes to the JSP file. Click on the Resume button in the Debug view to run the
JSP file.

- The Web browser will open, displaying the results of the JSP page:

4.0 Provide Feedback to Us
We encourage development/design feed back on the wtp-dev
mailing list. You can subscribe to the list via this link.
For usage questions, discussion of bugs, and strange behaviour please post to the eclipse.webtools newsgroup.
Information on the Web Tools Platform newsgroup can be found here.