| |
By Naci Dai
Eteration A.S.
February 23, 2005
|
| |
In this tutorial you will create a simple EJB component and a client web application. This tutorial will introduce you to Session beans and the Web Tools Platform project's support for XDoclet and server tools.
|
| Prerequisites For The Tutorial |
| |
- Web Tools Platform (WTP) project
The WTP project can be downloaded from http://download.eclipse.org/webtools/downloads/
- XDoclet 1.2.3
XDoclet is available from http://xdoclet.sourceforge.net
- JBoss 3.2.3
JBoss is available from www.jboss.org
- JDK 1.4.2
Sun's JDK is available from http://java.sun.com/j2se/1.4.2/download.html
|
| Installing The JBoss and XDoclet Runtimes In Eclipse |
| |
In order to run the EJB and Web modules from Eclipse (which will allow you to test and debug the modules) Eclipse has to be told where to find JBoss, XDoclet and where to find the JDK. JBoss requires a JDK so it can compile servlets and JSPs.
|
| |
- Select Window -> Preferences.

- Select Java -> Installed JREs from the menu on the left.

- Select Add... The Add JRE dialog will open. Select Browse for the JRE home directory and choose the location where you installed the JDK 1.4.2. Name the runtime Sun JDK 1.4.2 and click OK.

- The Sun JDK 1.4.2 now shows on the list of installed runtimes. Click OK.

- Select Window -> Preferences.
- Select Server -> Installed Runtimes from the menu on the left.

- Click on Add... Select Generic Server Runtime -> JBoss v3.2.3 and click Next. Click Browse and select the location where you installed JBoss. and click Finish.

- Select XDoclet. Make sure the builder item is selected. Click on the Browse... button and choose the directory where you have installed XDoclet. Make sure that you choose the correct version. Click Apply.

- Select XDoclet->ejbdoclet This is where you can modify the ejbdoclet generation options. You will be able to select specific application servers and their versions. XDoclet will generate deployment descriptors for these application servers only. Make sure nothing is selected. Click Apply.

- Click OK to close the preferences dialog. JDK, XDoclet and JBoss are now configured in Eclipse.
|
| Creating EJB and Web Modules |
| |
You will now create flexible projects with EJB and Web modules. In the project with an EJB module you will create a simple Session EJB, and in the project with the web module you will create a client web application to this EJB component.
|
| |
- Select File -> New -> Other. Select EJB -> J2EE EJB Module and click Next.

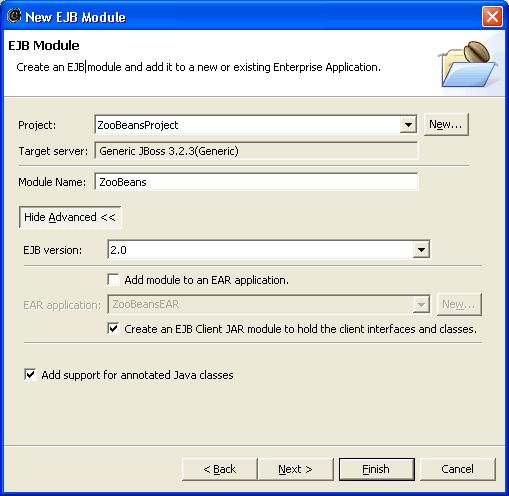
- Click New... for the project, name the project ZooBeansProject and choose the server you have defined and click OK. Enter ZooBeans for the module name. Click advanced and deselect Add module to an EAR project. Select Create an EJB Client JAR, make sure the EJB version 2.0 is selected and click Finish to accept the defaults.
- You will be prompted to switch to the J2EE perspective. Click Yes.
- The Project Explorer is populated with different types of Web and EJB
applications. Your newly created project is located under EJB
Projects. Expand your EJB project. The Deployment Descriptor
contains information about your EJB project such as the EJBs that
your project contains. Expanding the ZooBeans folder will reveal
the ejbModule folder. This is where you will store all of your Java
files including any EJBs and supporting classes you create. ZooBeansClient project holds the common classes that will be packed into the EJB client jar. We will need this project for the EJB module and the web module.

|
| |
|
| Creating a Session EJB |
| |
Here we will create the simplest of all EJBs; A stateless session bean.
|
| |
- Right click on the ejbModule folder and select New -> Other...-> EJB ->EnterpriseJava Bean. Choose SessionBean in the first tab, in the next tab. Set the package to com.zoo. Next enter the class name; class name must end with a "Bean" so name it the bean TigerBean, Click Next. Click Finish. The TigerBean class will now appear in the ejbModule folder and XDoclet builder will generate Tiger, TigerBean, TigerHome, TigerUtil and other related classes for you. TigerBean is an XDoclet annotated Session Bean and other classes are derived classes. Open TigerBean in the Java editor.

- XDoclet is an extended Javadoc Doclet engine. It's a generic Java tool that lets you create custom Javadoc @tags and based on those @tags generate source code or other files (such as xml-ish deployment descriptors) using a template engine it provides. XDoclet supports a set of common standard tasks such as web.xml or ejb-jar.xml generation. XDoclet uses special JavaDoc @tags to define
settings for each component. For example putting a @ejb.bean name="Tiger" jndi-name="Tiger" type="Stateless" in TigerBean.java
/**
 *
 *
 * A generated session bean
 *
 * *
 *
 * @ejb.bean name="Tiger"
 *           description="A session bean named Tiger"
 *           display-name="Tiger"
 *           jndi-name="Tiger"
 *           type="Stateless"
 *           transaction-type="Container"
 *
 *
 * @generated
 */

public abstract class TigerBean implements javax.ejb.SessionBean {

	/**
	 *
	 *
	 * @ejb.interface-method view-type="remote"
	 *
	 * @generated
	 *
	 * //TODO: Must provide implementation for bean method stub
	 */
	public String foo(String param) {
		return null;
	}
}
- TigerBean is the only class you will edit. All others are automatically generated and XDoclet will regenerate them each time you make a change to the TigerBean class. WTP provides code-assist for XDoclet tags. To get help hit crtl-space anywhere inside a xdoclet Javadoc. Edit the TigerBean class and change the foo method to look like this:
	/**
	 *
	 *
	 * @ejb.interface-method view-type="remote"
	 *
	 *
	 */
	public String roar() {
		return "Roar!";
	}
- XDoclet builder will start working again and update your classes.
At the end your projects will look like the following: The ZooBeansProject
that hosts the EJB mmodule will have two classes TigerBean.java and
TigerSession.java. These are server side classes. ZooBeansClient project will have
the public interfaces such as the Tiger.java and TigerHome.java. These are the classes
that will be needed by all clients.


|
| Publishing the EJB to the server |
| |
Here we will publish the newly created ZooBeans to a server.
|
| |
- Select the server view from the workbench menu Window>Show View>Other>Server>Servers. Right click on the server view window select New -> Server... Select All>Generic Server Support and then Click Next. Keep the setting for JBoss 3.2.3 and click Next.

Choose the ZooBeans project from the Available Projects list and click Add and then Click Finish.
- You have setup your server to run your EJB module. Click on the server right click. Choose Start.

- You should now observe the console output. JBoss will print a message similar to the following indicating that the EJB Tiger has been deployed successfully.
12:46:38,899 INFO  [MainDeployer] Starting deployment of package: ZooBeans.jar
12:46:39,249 INFO  [EjbModule] Deploying Tiger
12:46:39,409 INFO  [StatelessSessionInstancePool] Started jboss.j2ee:jndiName=Tiger,plugin=pool,service=EJB
12:46:39,409 INFO  [StatelessSessionContainer] Started jboss.j2ee:jndiName=Tiger,service=EJB
12:46:39,409 INFO  [EjbModule] Started jboss.j2ee:module=ZooBeans.jar,service=EjbModule
12:46:39,409 INFO  [EJBDeployer] Deployed: ZooBeans.jar
|
| Testing the Tiger! Building a client web application |
| |
Your EJB has now been defined with your EJB Project and it has been deployed. It is ready to be used. You can now build a test client to make the Tiger EJB Roar! To make this create a Flexible Project with a Web Module named ZooWebProject. Use the same server (JBoss) for this project too. You can follow the step described in the tutorials Building a School Schedule Web Application or Building and Running a Web Application if you are not familiar with the process.
|
| |
- When you have created the ZooWebProject. You will end up with a project that looks like the following:

This Web module will be client to the EJB. Therefore it needs to know about the EJB module we have created.
To do this we will set the project build path and use the Flexible projects to dynamically include the EJB client jar
with our web module.
|
| Using Flexible projects to link the web module with the an EJB Client module |
| |
We will need to access the EJB interface types such as Tiger and TigerHome in client applications. These classes are in the ZooBeansClient project, and are packaged in an EJB client jar (ZooBeansClient.jar).
We need to add the client classes to the build path and inlcude the client.jar in the web module
when it is deployed to a server.
|
| |
- In the Project or Package Explorer, right click on the ZooBeansWeb project and Choose Properties... In the Java buildpath, add the ZooBeansClient project to the project references.
This will help allows us to compile against the latest ejb client classes in this web project.

- Now we have to add a dependent module to the ZooWeb web module. We will use the flexible project support to do this.
Currently, WTP does not have a user interface to add dependent modules, so we will edit a file named ".wtpmodules", which can be found at the root of each
flexible project. However, this is a hidden file so too see it, one must use the "Resource Perspective". To go to the resource perspective
go Window>Open Perspective>Other and choose resource. Open the .wtpmodules file and edit the contents to add the following:
    <dependent-module deploy-path="/WEB-INF/lib"
      handle="module:/resource/ZooBeansClient/ZooBeansClient">
        <dependency-type>uses</dependency-type>
    </dependent-module>
Here we have asked the flexible project support to include the ejb client jar
inside the WEB-INF/lib folder of the web module during runtime deployment. Flexible
project support will do the tasks of building a new jar and including it with our web
module each time the ejb changes.

-
Now Create a file named test.jsp
Open test.jsp in the JSP source page editor.
- Add the following lines to test.jsp
<html>
<head>
<title>Insert title here</title>
</head>
<body>
<%
   com.zoo.Tiger tiger = null;
   try{
	   com.zoo.TigerHome home = com.zoo.TigerUtil.getHome();
	   tiger = home.create();

   }catch(Exception exception)
   {

   }


%>
<b><%= tiger.roar() %></b>
</body>
</html>
- Save the test file.
|
| Running And Testing The Web Application |
| |
Your web application is now complete. Now it is time to take it for a spin.
|
| |
- Right click on test.jsp and select Run As -> Run on Server...
- A Web browser window will open with the application. Beware of the tiger!.

- Experiment adding more methods and ejbs.
|
| Summary |
| |
In this tutorial you learned how to configure Eclipse to work with XDoclet and create a J2EE EJB project that has a Session Bean. You created a client Web application. This application, while simple, provides a good introduction to EJB development and some of the Web development tools available in the Eclipse Web Tools Platform project.
|
| |
|
| |
|