| Eclipse Corner Article |

Summary
This tutorial will step you through the details of deploying a Web Application to the Oracle Application Server Containers for J2EE (OC4J).By Raghu Srinivasan, Oracle Corporation.
October 27, 2005
The Eclipse Web Tools Platform project release 1.0 M8 has added support for deploying Web Applications to the Oracle Application Server Containers for J2EE (OC4J). This tutorial will step you through the details of installing and configuring the Oracle Application Server Container for J2EE (OC4J) and deploying a Web Applications from the Eclipse Web Tools Platform to the Oracle Application Server.
This section will walk you through the software that you need to download, install and configure. Following is the list of software you will need to install:
You must first install the Jaav2 Platform, Standard Edition (J2SE) version 1.4.2. You can get the latest release of J2SE 1.4.2 from the Sun's web site.. Install the JDK.
![]() Make a note of the folder in which you install J2SE. This will be required later in the tutorial.
Make a note of the folder in which you install J2SE. This will be required later in the tutorial.
You need to download and install the WTP 1.0 release build. Download the WTP all-in-one package. It includes the complete set of software to start using wtp immediately.
And finally, you need to download, install and configure the Oracle Application Server Containers for J2EE (OC4J). The server adapter in the WTP 1.0 release is certified for the OC4J 10g (10.1.3.0.0) release.
The Oracle Application Server Containers for J2EE (OC4J) zip distribution provides a complete J2EE 1.4 server environment, distributed as a simple zip file. You can download the server from the Oracle download site.
Extract the oc4j_extended_101300.zip file using any archive utility which handles zip files, including the jar utility in the J2SE.
You need to start the OC4J instance once to set the password for the OC4J administrator account. The username for this account defaults to "oc4jadmin". Set the following environment variables:
![]() Make a note of the password.
Make a note of the password.
Stop the server.From the bin directory of oc4j, issue the following command:
- Starting OC4J from C:\Oracle\oc4j\j2ee\home ...
- 05/10/20 14:09:58 Set OC4J administrator's password (password text will not be displayed as it is entered)
- Enter password:
- Confirm password:
- Confirm password: The password for OC4J administrator "oc4jadmin" has been set.
- 05/10/20 14:10:41 The OC4J administrator "oc4jadmin" account is activated.
- 05/10/20 14:10:51 Oracle Containers for J2EE 10g (10.1.3.0.0) -Developer Preview 4 initialized
![]() The following information will be required in the later part of this tutorial
The following information will be required in the later part of this tutorial
In this section you will build a simple JSP Web Application, deploy and run it on the Oracle Application Server. Following is the list of tasks:
Launch Eclipse.
Open the J2EE perspective; select Window > Open Perspective > Other menu and in the resulting dialog,
choose J2EE. The J2EE perspective includes the Servers view, which is the focus for the rest of the tutorial.
You will also need the Console view to see the output of the Server. Select Window > Show View > Console
menu.
![]() From a command prompt, you can launch Eclipse using the following command:
From a command prompt, you can launch Eclipse using the following command:
$EclipseInstallFolder\eclipse\eclipse.exe -vm "$J2SEInstallFolder\bin\javaw.exe" -clean -data "$WorkspaceFolder"
where $EclipseInstallFolder is folder where you installed Eclipse and $WorkspaceFolder is where you want
to create new or access an existing Eclipse workspace.
Figure 1 shows the Eclipse Workbench displaying the J2EE perspective. Note the Servers view and the Console view.
Figure 1. The Eclipse Workbench with the Servers view and the Console view.

Register the JDK you installed with Eclipse.
Next you register the Oracle Application Server runtime and create a server.
Right-click in the Servers View and select New > Server menu. This launches the New Server wizard.
Figure 2 shows the New Server Wizard with the Generic Oracle OC4J Standalone 10.1.3 DP4 Runtime selected.
Figure 2. The New Server Wizard
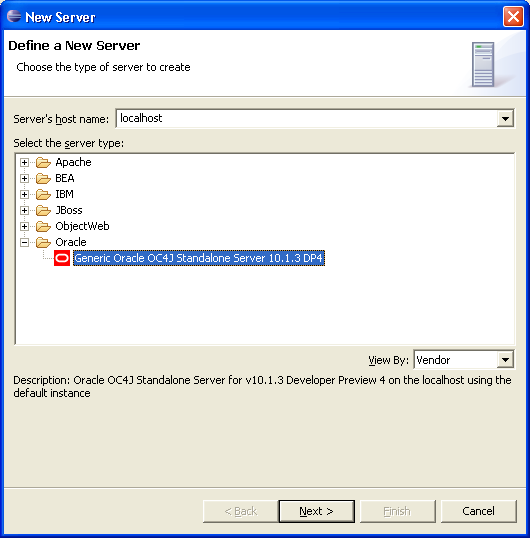
Figure 3 shows the panel to register the Generic Oracle OC4J Standalone 10.1.3 DP4 Runtime.
Figure 3. Register the Generic Oracle OC4J Standalone 10.1.3 DP4 Runtime
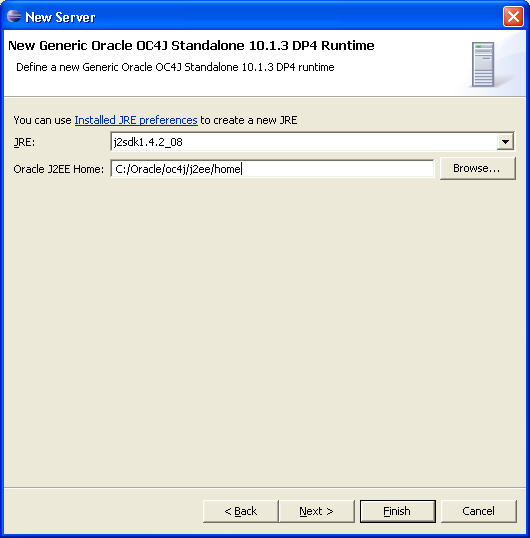
Figure 4 shows the Oracle OC4J Standalone 10.1.3 DP4 Preview server in the Servers view.
Figure 4. Oracle OC4J Standalone 10.1.3 DP4 Preview server in the Servers view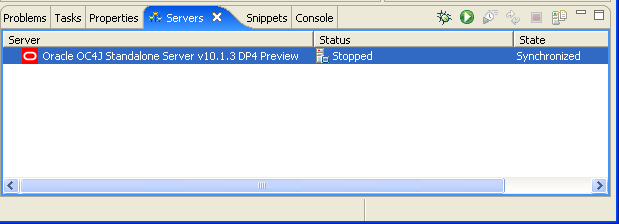
You will now build a simple JSP application that you will then run on the server. The Eclipse WTP web site has a several tutorials that can help you build sophisticated applications using the WTP tools.
The first step to build a JSP application is to create a Dynamic Web Project.
Next, you will create a JSP page.
<% out.print("Hello World!!"); %>Right-click on the jsp file, index.jsp, in the ProjectExplorer. Select Run As > Run on Server menu.
In the Run On Server dialog, ensure that the server, Oracle OC4J Standalone Server v10.1.3 DP4 Preview, is
selected. Click on Finish.
The Eclipse WTP tool will now do the following:
Figure 5 shows the application running on Oracle OC4J Standalone 10.1.3 DP4 Preview server.
Figure 5. Running the application on Oracle OC4J Standalone 10.1.3 DP4 Preview server.
In this tutorial you have learned to configure the Eclipse Web Tools Platform Project to deploy and run a web application on the Oracle Application Server. The WTP web site has articles and tutorials that explain the numerous tools provided in WTP to help you build and deploy web applications. The Oracle web site has extensive resources to help you explore the capabilities of the Oracle Application Server.