| |
By Mark Hutchinson, IBM
Last updated on May 23, 2011 by Nitin Dahyabhai
|
| |
This tutorial shows you how to set up your Eclipse
environment to develop or modify the Web Tools Platform (WTP) project plug-ins. First
we will discuss how to connect to the CVS repository to check
out the WTP source code. We will then set up our Target Platform.
Next we will make a modification to the WTP source and run
our Eclipse Application. Finally, we will create a patch
for our change, which we could submit to the WTP project.
To follow this tutorial, you will need either the Eclipse SDK or otherwise have the Eclipse Plug-in Development
Environment (PDE) installed. It will also be much simpler if WTP is
already properly installed and running. Use of the versions of Eclipse and the
Prerequisites listed on the download page is strongly encouraged. A working knowledge of Eclipse
concepts such as the Workbench, Editors, and Views, is also required.
For more information about these concepts, consult the Workbench
User Guide.
|
| |
|
| Getting the Source Code |
| |
-
Access the source code for the Eclipse Web Tools Platform
from the Concurrent Version System (CVS) repository.
To access the CVS repository select Window > Open
Perspective > Other
and select CVS Repository Exploring.
-
The
CVS Repositories view is now on the left side of your
screen. Select the Add CVS Repository icon
 and in the Add CVS repository dialog enter the following values:
Host:
dev.eclipse.org
Repository Path:
/cvsroot/webtools
User:
anonymous
Password:
You can leave this blank, but it's courteous to use your email address.
Connection type:
pserver, on the default port
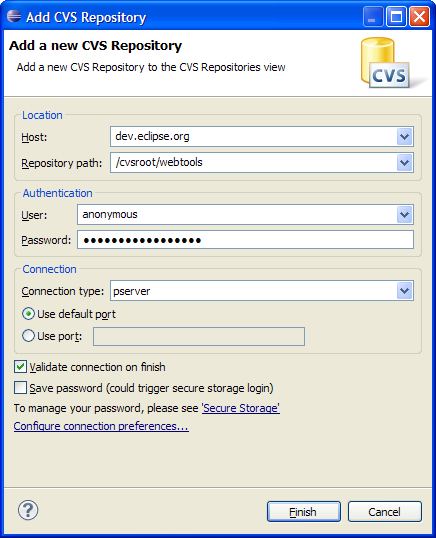
Select Finish.
-
Navigate through the folders and find the plug-ins that you
are interested in having the source for. The most recent
code is in HEAD. The subprojects listed on the
WTP home page
each have an area in the WTP CVS repository under which you'll
find their features, plug-ins, documentation, examples, and other
development goodies. For this tutorial we will modify the XML
UI plug-in, org.eclipse.wst.xml.ui, which is part of WTP's
Source Editing project.
The corresponding workspace project's folder can be found in the CVS repository as
sourceediting/plugins/org.eclipse.wst.xml.ui under HEAD.
-
Add the source into your local workspace by choosing Check Out from its context menu.

- Switch back to the Java perspective. The plug-in will now be a project
in your workspace. Although not runnable in this form, Plug-in Projects
such as this fill many a Committer's workspace.
|
| |
|
| Using a Target Platform |
| |
The Target Platform contains the Eclipse plug-ins
which your workspace projects
will be compiled against. Having all of your own plug-ins as well as their dependencies
in your workspace as plug-in projects means Eclipse will be spending time on code you aren't
actively working on.
A well prepared Target
Platform prevents this but still allows you to compile and run your modified code,
all while using fewer resources. The default target platform is the Eclipse installation you
are using. For more information on setting up Target Platforms, consult the Plug-in Development Environment Guide.
|
| |
|
| Making your changes |
| |
As an example, we are going to add a new action to the context menu
on XML files in the Navigator view. First we need to add an extension
to the plugin.xml file.
|
| |
-
Open the plugin.xml file for the
org.eclipse.wst.xml.ui plug-in project you just checked out.
-
Add the following to the source of plugin.xml:
<!--  =============================================================================== -->
<!--     My Popup Menu (the label value is externalized to allow for translations)    -->
<!--  =============================================================================== -->
<extension point="org.eclipse.ui.popupMenus">
	 <objectContribution
	 	objectClass="org.eclipse.core.resources.IFile"
	 	nameFilter="*.xml"
	 	id="org.eclipse.wst.xml.ui.actions">
	  	<action
	  		label="%SHOW_MESSAGE_DIALOG_LABEL"
	  		class="org.eclipse.wst.xml.ui.internal.actions.MyMessageDialog"
	  		menubarPath="#additions"
	  		adaptable="true"
	  		enablesFor="1"
	  		id="org.eclipse.wst.xml.ui.actions.PopUp" />
	  </objectContribution>
</extension>
- Add the following to the plugin.properties file. This will be the
text of the label that appears in your new pop-up menu.
#Label to be added to the pop-up menu
SHOW_MESSAGE_DIALOG_LABEL = Show a Message Dialog
-
In the Project Explorer or Package Explorer expand "src" and right click on
org.eclipse.wst.xml.ui.internal.actions and select New Class.

Name this class MyMessageDialog.
-
Add this source code to MyMessageDialog.java:
package org.eclipse.wst.xml.ui.internal.actions;
import org.eclipse.jface.action.IAction;
import org.eclipse.jface.dialogs.MessageDialog;
import org.eclipse.swt.widgets.Shell;
import org.eclipse.ui.PlatformUI;
import org.eclipse.ui.actions.ActionDelegate;
public class MyMessageDialog extends ActionDelegate {
public void run(IAction action) {
Shell shell = PlatformUI.getWorkbench().getActiveWorkbenchWindow().getShell();
String labels[] = new String[1];
labels[0] = "OK";
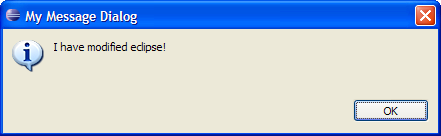
MessageDialog message = new MessageDialog(shell, "My Message Dialog", null, "I have modified eclipse!", 2, labels, 1);
message.open();
}
}
|
| Running with your changes |
| |
-
In the Java perspective, from the menu bar select Run > Run Configurations....
-
In the Run dialog select the Eclipse Application option,
then select new.
-
Enter the location of the desired workspace (or accept the default), and select Run.
|
| |
When this Eclipse Application is run, it's essentially running the configured Target
Platform, except that the plug-in projects in your
workspace are used instead of the corresponding plug-ins in the target.
|
| |
Now test out your modification:
|
| |
-
We need a project in the workspace to test this on. Select
File > New > Example > Editing and Validating XML Files.
-
Right click on any XML file, for example Invoice.xml. Notice
that the new option "Show Message Dialog" has been
added to this menu.

-
Select "Show a Message Dialog." A message dialog appears.
|
| |
|
| Creating a Patch for your Modification |
| |
To contribute an enhancement to WTP, you can submit
your code changes as a patch.
|
| |
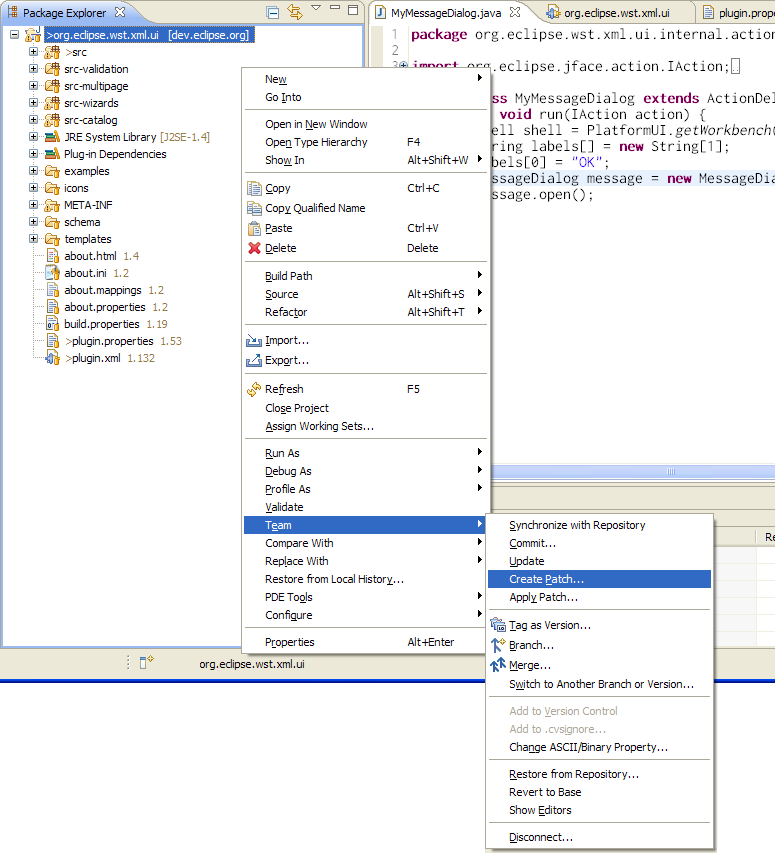
- In the Project or Package Explorer view, right click on the modified Plug-in
Project and select Team > Create Patch.
- Select "Save in File System" and enter the file name. Select Next.

- Ensure the Diff Output Format is set to "unified." Select Finish.
- The patch has been saved to your file system. If this were an actual feature
enhancement the patch could be submitted to the WTP project as an attachment using
Bugzilla
.
|
| |
|
| Summary |
| |
In this tutorial you learned how to set up your Eclipse environment to get started developing
Web Tools Platform plug-ins by creating a simple addition to the user interface.
|
| |
|
| |
|