 denotes an Action, the top level object in ATS
 denotes a Team Workflow; moves team through completion of change
 denotes a Task; lightweight workflow that is performed during Team Workflow states
 denotes the ATS targeted for release version
 denotes the ATS review
 warning that something needs to be addressed; open object for more information
 released version
 next release version
 ATS object marked as user's favorite; select "My Favorites" to load all marked
 ATS object user desires to receive email upon every state transition
 ATS object is obtaining estimated hours, percent complete, hours spent and remaining hours from tasks
 to create a new action
 to create a new task
 to refresh current view
 to print the ATS Results
 to email the ATS Results to an OSEE user
 to export the ATS Results to CSV file
 to Report a Bug.
 denotes a team configured to do work in ATS
 denotes an Actionable Item that a user can create an Action against

 to only show tasks related to the current state of the workflow.
 to delete selected task.
 to Customize Table.
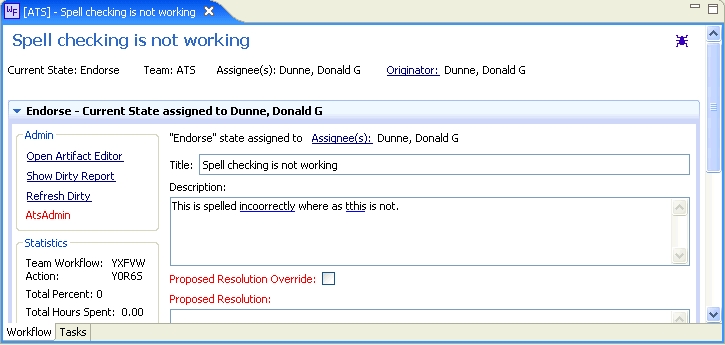


 to load ATS World with all the actions that you have work to do on.
 to Customize Table.
 to print the current window.
 to email the current results view to an OSEE user.
 to export the current table into a comma seperated value file.
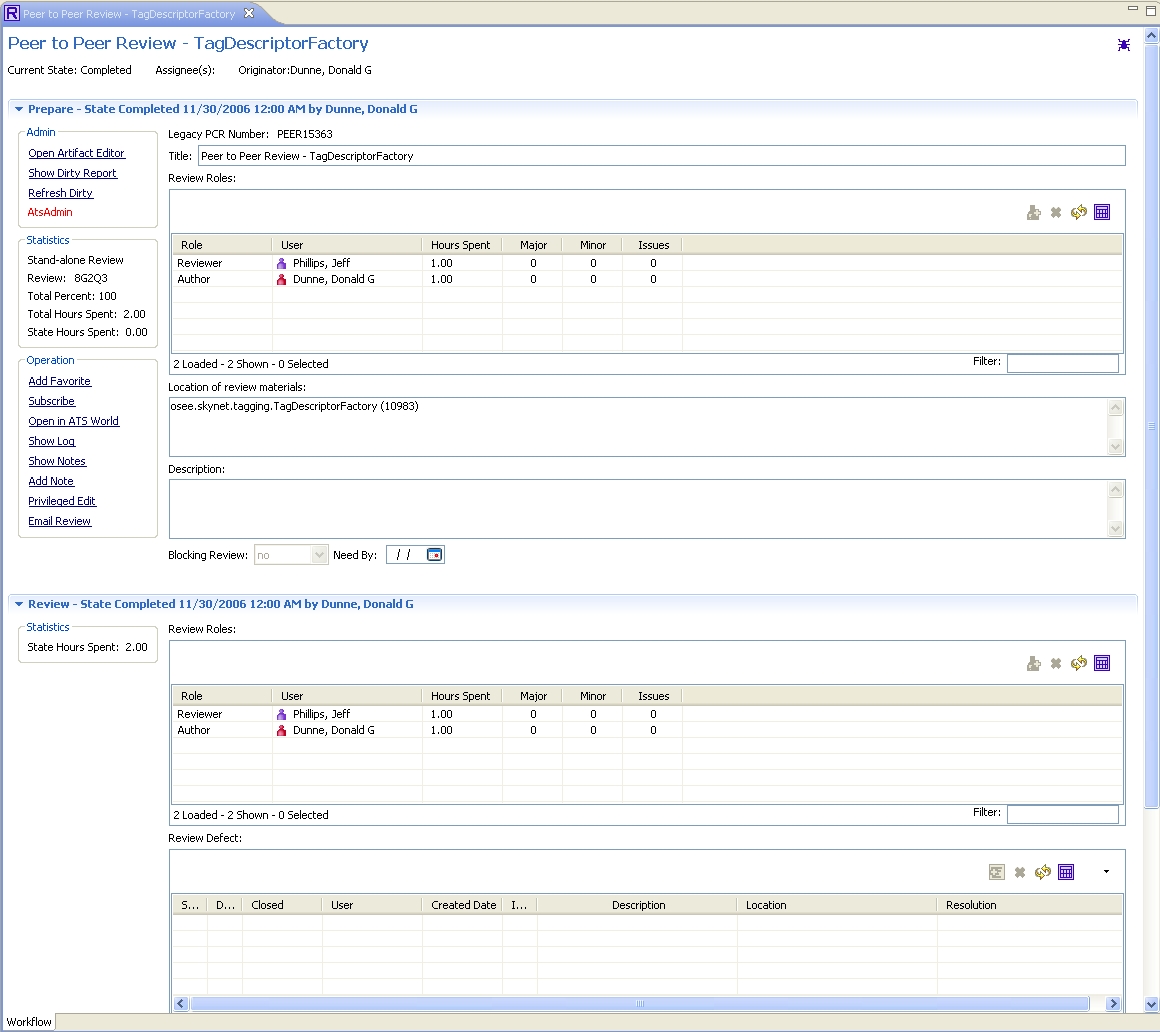


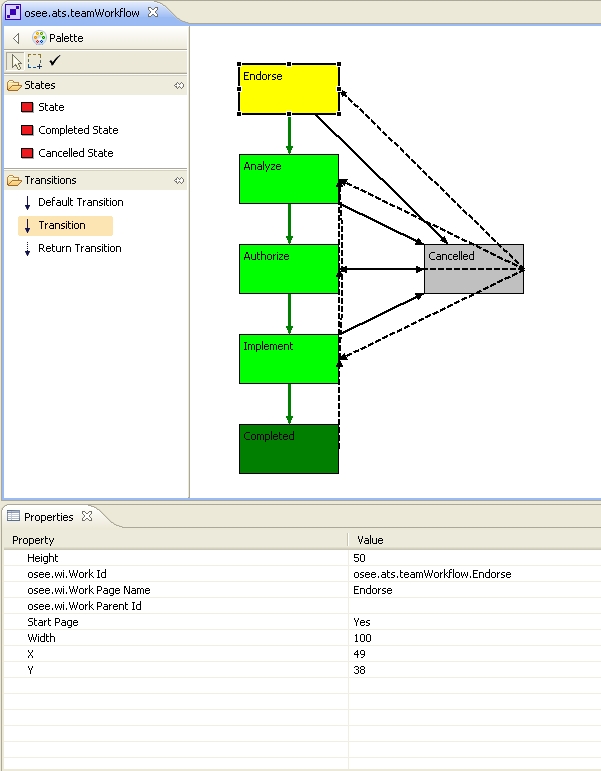
- Name:[unique namespace, usually the same as the Work Id specified below]
- osee.wi.Work Id:[unique workflow namespace] - this will preceed each state name specified in the workflow.
- osee.wi.Parent Work Id:[Work Id of Parent Work Flow Definition] - this will allow this workflow to inherit it's transitions and start state from another workflow. This can not be used with other attributes below
- osee.wi.Start Page:[namespace.state name] - this specifies the name of the initial state in the workflow
- osee.wi.Transition:[[from state name];[transition type];[to state name]] - specifies the transition from state to state where
- [from state name]/[to state name]- unique Work Page Definition Work Id comprised of [namespace].[State Name]
- [transition type] - one of the following:
- ToPageAsDefault - Transition is "Default Transition" state
- ToPage - Transition is optional transition to state
- ToPageAsReturn - Optional transition to a previously visited state
- osee.wi.Description:Optional attribute to add description of workflow
- Work Item.Parent: Relate to any Team Definition configured to use this workflow.
8.4.3. Work Page Definition Artifact
Purpose
The Work Page Definition artifact configures a single state of the Workflow Configuration.How to do it - ATS Workflow Configuration Editor
The ATS Workflow Configuration Editor will allow the editing of the three main fields of a Work Page Definition Artifact. The remaining fields, and the relations to Work Rules and Work Widgets must be done through the Artifact Editor.How to do it - Artifact Editor
Work Page Definitions are either stored as children of their Work Flow Definition artifact or under the "Work Pages" folder.On the Common branch in the Artifact Editor, Expand "Action Tracking System" and right-click on "Work Page", select New Child -> Work Page Definition, or double-click an existing Work Page Definition artifact. Edit the following attributes and relations accordingly.
- Name:[unique name matching Work Id below]
- osee.wi.Work Id:[unique workflow namespace].[Work Page Name] as below.
- osee.wi.Parent Work Id:[Work Id of Parent Work Page Definition] - this will allow this workflow to inherit it's widgets and rules from another workflow. This can not be used with other attributes below
- osee.wi.Work Page Name:State Name that the user will see. This can not have any special characters including . in the name.
- Work Item.Child: Relate to any Rules or Widgets that this state is made of.
8.4.4. Work Rule Widget Artifact
Purpose
The Work Widget Definition artifact specifies a single widget, via xml, that will be displayed on the state page in the ATS Workflow Editor.How to do it - Artifact Editor
On the Common branch in the Artifact Editor, Expand "Action Tracking System" expand "Work Widget" and double-click any existing Work Widget. Edit the following attributes and relations accordingly.- Name:[unique name matching Work Id below]
- osee.wi.Work Id:[unique id]
- osee.wi.Work Description:Simple description explaining what widget is.
- osee.wi.Work Data: XWidget=[XWidget xml specifying widget]
- Work Item.Parent: Relate to any Team Definition or Work Page Definition artifacts as appropriate.
8.4.5. Work Rule Definition Artifact
Purpose
The Work Rule Definition artifact specifies a single rule that can be applied to workflow configurations or to Team Definition artifacts. These rules are normally backed by java code that performs certain tasks like automatically creating new reviews, assigning workflows to specific users or specifying states as allowing create/commit of branches.How to do it - Artifact Editor
On the Common branch in the Artifact Editor, Expand "Action Tracking System" expand "Work Rule" and double-click any existing Work Rule. Edit the following attributes and relations accordingly.- Name:[unique name matching Work Id below]
- osee.wi.Work Id:[unique workflow namespace].[Work Page Name] as below.
- osee.wi.Work Description:Simple description explaining what rule does.
- osee.wi.Work Data:Key/Value pares of information used by rule.
- Work Item.Parent: Relate to any Team Definition or Work Page Definition artifacts as appropriate.
8.5. Configure ATS for Help
Purpose
To configure ATS workflows to use the integrated help system. ATS help useds a combination of widget tooltip, static help pages and dynamic help content configured through extended plugins.How to do it
- Workflow Page Help
- Workflow Widget Help
- Declared tooltip is shown as tooltip when hover over label
- Double-Click label pops open html dialog if help contextId and pluginId are set
- Double-Click label pops open tooltip
- Top down order of obtaining help content
- Setting tooltip in IStateItem interface
- Work Widget Definitions in Work Data attribute value of XWidget=...tooltip="put help here"
- ATSAttributes.java declarations
9.1. Branch Manager View

Purpose
The Branch Manager View is used to display all of the branches in Skynet, as well as details for the transactions on each branch.
Branches and transactions can be sorted by clicking on the column heading for the column to sort by. Initially, the data will be sorted in ascending order. Clicking the same column multiple times will toggle the sorting between ascending and descending.
Locating branches can also be aided by filtering or using favorites.
Icons
 Base image for branches
 Base image for branches that are under change managment
 Overlay to mark branch as the default
 Overlay to mark branch as a favorite
 Image for transactions
 Base image for relation links
 Base image for attributes
 Overlay to mark item as new
 Overlay to mark item as modified
 Overlay to mark item as deleted
9.1.1. Default Branch
What it is
The branch which is returned to any program that asks for the current default branch. For instance, the Artifact Explorer will use the default branch to determine what artifacts to show, and artifact searches are performed against the default branch.How to tell what the default branch is
The Branch Manager view shows all of the branches with the icon.The default branch will have a
at the top right of the normal branch icon.Most views and editors that are working with artifacts will show the branch in the status bar next to the branch icon.
How to set it
The default branch is set from the Branch Manager view. Use sorting or filtering in the table to find the desired branch. Right-click on the branch and then select Set Default Branch from the popup menu.The Set Default Branch option will be disabled if any of the following cases are true:
- The branch selected is already the default
- The item selected is not a branch
- More than one item is selected
9.1.2. Favorite Branch
What it is
A branch that the user has marked as a favorite. Any number of branches can be marked as favorite. This is used in conjunction with the Show Favorites First filter to quickly locate
branches of interest.
Show Favorites First filter to quickly locate
branches of interest.
How to tell which branches are favorites
The Branch Manager view shows all of the branches with the icon.A favorite branch will have a
at the bottom left of the normal branch icon.
How to set/unset it
A favorite branch is set from the Branch Manager view. Use sorting or filtering in the table to find the desired branch. Right-click on the branch and then select Mark As Favorite or Unmark As Favorite from the popup menu.9.1.3. Branch Filtering
What it is
A quick way to limit which branches are displayed in the Branch Manager view.How to do it
Type text in to the box labeled Filter:. As characters are typed, the Branch Manager will update to only display branches whose name contains the text, ignoring the case.If no text is entered then all branches will be displayed.
9.1.4. Show Change Report
What it is
A view that shows all of the changes made on a branch, or between two transactions on the same branch.How to do it
For a branch
Use filtering or sorting to locate the branch of interest. Right-click the branch and select Show Change Report. The change report will show all changes made on the branch since its baseline.If anything is selected in addition to the one branch, then the Show Change Report menu item will be disabled.
For a range of transactions
Use filtering or sorting to locate the branch with the transactions. Then locate the starting and ending transactions. Select both of the transactions by ctrl-clicking each transaction, then right-click and select Show Change Report. The change report will show all changes after the earlier transaction, up to and including the later transaction.If anything is selected in addition to the two transactions, or the two transactions are on seperate branches, the Show Change Report menu item will be disabled.
9.2. Change Report View

Purpose
The Change Report View is used to summarize the changes that have been made on a branch or series of transactions.
Icons
- Base image for relation links
 Base image for attributes
 Overlay to mark item as an incoming new item
 Overlay to mark item as an incoming modification
 Overlay to mark item as an incoming delete
 Overlay to mark item as an outgoing new item
 Overlay to mark item as an outgoing modification
 Overlay to mark item as an outgoing delete
 Overlay to mark an item as being new but having incoming changes
 Overlay to mark an item as having incoming and outgoing changes
 Overlay to mark an item as being deleted but having incoming changes
Branch Change Report
A Change Report can be performed for a branch two ways. The first way is by selecting right-clicking a branch from the Branch Manager then choosing the "Show Change Report" menu item. The second way is to select "Show Change Report" from the Aspect view of an ATS Action that is still in work; this will do a Change Report for the working branch of the Aspect.
This type of Change Report will display all of the artifacts on the branch that have had an attribute
or relation link modified. It will also do conflict detection on these artifacts against the parent branch.
All changes done on the current artifact will appear with a grey right arrow, while all changes from the
parent branch will be shown with a blue left arrow. Attributes and relation links with multiple changes will
provide a summarized node that shows the final effect of the changes and can be expanded to view all of the
minor changes that were made. If an attribute or relation link was modified on both
branches then the summary will show a red conflict mark to signify that a commit will cause an override
to occur.
9.2.1. Refresh Change Report
Purpose
Forces the Change Report to be recomputed. This is typically used when the Change Report snapshot has become out of date, noted by a next to the snapshot description on the first line of the Change Report.
How to do it
Select the refresh button ( ) from the toolbar on the top portion of the Change Report view.
If the Change Report view is empty then the refresh button will do nothing.
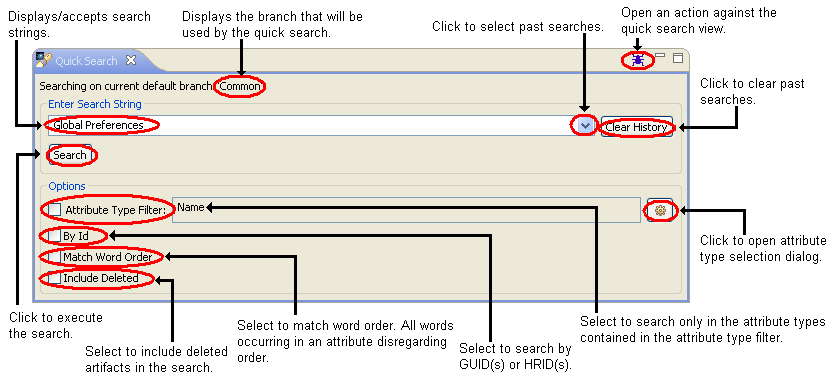
9.3. Quick Search View
The Quick Search view allows users to perform searches for information that is contained inside artifacts in a selected branch.
To find all artifacts that contain a particular set of keywords:
- Select
 Window > Show View > Other... > OSEE > Quick Search, to open the view.
Type your search string in the Enter Search String combo box, or use the pull-down list to select a previously entered search expression.
Special characters such as (' ',!,",#,$,%,(,),*,+,,,-,.,/,:,;,<,>,?,@,[,\,],^,{,|,},~,_) are assumed to be word separators unless By Id option is selected. When By Id option is selected, (,and' ') are treated as separators.For example:
- When By Id is not selected,
hello.worldwill be translated tohelloandworld. The search will match attributes withhelloandworldkeywords. - When By Id is selected, (
A+ABG7jFm+0BKaVZIxfqOQ,AFABG7jFm+0BKaVZIxfqOQ PX1FH) will be interpreted as 2 GUID(s) and 1 HRID. The search will match artifacts containingA+ABG7jFm+0BKaVZIxfqOQandAFABG7jFm+0BKaVZIxfqOQas its GUID orPX1FHas its HRID.
- When By Id is not selected,
- Finish entering your search options, (for example, to scope the search to include deleted artifacts, check the include deleted option), and click Search or press Enter from the combo box to execute the search.
- The Search view displays the results of your search. Right-click on any item in the Search view to open a pop-up menu that allows you perform various operations on the artifacts such as copy search results to the clipboard or reveal a selected artifact in Artifact Explorer. To open one of the listed artifacts, double-click it or select Open from its pop-up menu.


Attribute Type Filter Search Option
By Id Search Option
Include Deleted Search Option
Word Order Match Search Option
9.3.2. Quick Search Include Deleted Search Option
What it is
An option to include artifacts that have been deleted as part of a quick search on the default branch.
How to do it
Type in the desired words. Make sure the Include Deleted option is selected under Options, then press the Search button.
Shortcuts
Pressing enter in the text entry box is equivalent to pressing the Search button.
9.3.3. Attribute Tagging for Quick Search
When an artifact is saved, each attribute contained in the artifact is analyzed to produce a list of tags that are then associated with the artifact. Quick search is a form of keyword based searching which uses tags to perform contextual artifact searches.
For an attribute to be tagged by the system, it must meet the following criteria:
- The attribute's type must specify an Attribute Tagger to be used by the tagging system.
- The attribute must contain valid data.
- The attribute revision must be saved in the database before sending to tagging system.
To produce tags, modified attributes are sent to the OSEE application server where the tagging system processes each attribute using an Attribute Tagger specified by the attribute's type. The Attribute Tagger knows how to interpret the attribute's data and how to extract words from the content. At this point, a word is defined as a sequential set of alphanumeric characters delimited by one or more spaces. As words are parsed, they are sent to the tagging system's word encoder where the following processing takes place:
- The characters in the original word are converted to lower case.
- The lower cased version of the word is encoded and stored in the tagging system.
- The lower cased version of the word is split using punctuation characters such as (
' ',!,",#,$,%,(,),*,+,,,-,.,/,:,;,<,>,?,@,[,\,],^,{,|,},~,_) as delimiters. - Possessive words (ending in 's) are converted into regular form.
- Each word is converted from plural to singular form.
- Each word is encoded and stored in the tag system.
When encoding words into tags, the tag encoder uses an algorithm which transforms the word's characters into a bit-packed tag that will fit in a 64-bit integer. The tag will represent up to 12 characters (all that can fit into 64-bits). Longer words will be turned into consecutive tags.
Tag Encoding Examples
| Original | Keywords | Encoding | ||||
|---|---|---|---|---|---|---|
| appendeces | appendix | -220858502 | ||||
| battery(ies) | battery | 529513131 | ||||
| alternate/backup |
|
|
9.4. Mass Artifact Editor
Purpose
The Mass Artifact Editor allows the easy view of multiple artifact along with their attributes. This editor can be viewed from right-click off Artifact Explorer, Search Results page, or via ATS action. Single cells can be edited via Alt-Left-Mouse-Click. After editing any number of artifacts shown, the save button persists this data.
Note: This editor will close upon switch of default branch unless the editor is tied to the common branch.
Actions
Select to refresh the contents.Select
 to Customize Table.
Select
 to Report a Bug.
9.5. Merge Manager View
Purpose
The Merge Manager is used to resolve conflicts that arise when doing development on parallel branches. The Merge Manager makes conflicts that arise easily identifiable and then provides the means for resolving the conflicts, so that the working branch can be committed.
Icons
-
 Resolution has been started for the conflict
 -
 Conflict has been resolved and is ready to be committed, In the Merge column
it means that the Source and Destination Branches have the same value even
though they were both changed.
Conflict has been resolved and is ready to be committed, In the Merge column
it means that the Source and Destination Branches have the same value even
though they were both changed. -
 After a conflict has been marked as resolved the value changed on the source
or destination branch
After a conflict has been marked as resolved the value changed on the source
or destination branch -
 A conflict that provides the user special information but does not need to
be resolved
A conflict that provides the user special information but does not need to
be resolved -
 A conflict that can not be resolved except by reverting the Artifact or
Attribute, because it was deleted on the Destination Branch
A conflict that can not be resolved except by reverting the Artifact or
Attribute, because it was deleted on the Destination Branch -
 Shows that the item defined by the column it is in has the Destination
Branches value
Shows that the item defined by the column it is in has the Destination
Branches value -
 Shows that the item defined by the column it is in has the Source Branches
value
Shows that the item defined by the column it is in has the Source Branches
value -
 Shows that the item defined by the column it is in has a new value that is
neither the Source Branch nor Destination Branch value.
Shows that the item defined by the column it is in has a new value that is
neither the Source Branch nor Destination Branch value. -
 Shows that the conflict has not been given an initial value
 -
 Opens the Associated Artifact for the merge
 -
 Opens up the Change Report for the Source Branch
 -
 Opens up the Change Report for the Destination Branch
 -
Refreshes the Merge Manger view to find new conflicts
-
Allows the user to customize the Merge Manager tables
-
Report a bug with the Merge Manager
Overview
The Merge Manager is in place to find conflicts and help users resolve these conflicts. A conflict exists if the value of an attribute/artifact has changed on both the Destination and Source Branches. For reference the Source Branch is the users working branch. It is the branch that the user has been making changes to and would like to then add back into the Destination Branch or Baseline Branch. Both branches are identified by name in the header of the Merge Manager.
Depending upon the conflict found, the user may have several choices for resolution. These include
- Accept the value on the Source Branch and overwrite the value on the Destination Branch
- Accept the value on the Destination Branch and do not add any of the Source Branch changes, (These will still show up as merged on Change Reports)
- Create a solution that is a combination of the two changes
- Revert the changes on the Source Branch (This is the only available solution when the Artifact/Attribute was deleted on the Destination Branch, will show up as no change on the Change Report)
- Do nothing (only possible for informational conflicts)
Committing of Branches is blocked until all conflicts are resolved.
The GUI
The GUI is organized to provide the user with an ability to quickly identify conflicts.
- The Heading - The Heading contains text to help identify what is being merged. It identifies the Source Branch, and the Destination Branch. It also provides the user with information about how many conflicts there are and if they have been resolved. The Heading also contains easy launch icons for additional tools in connection with the Merge Manager.
- The Conflict Resolution Column - This column provides the user
information about the state of the conflict. A blank entry in the
column means that the conflict is new and has not had any actions performed
on it. A
indicates that conflict is in the modified state. This means the user
has begun merging the conflict but has not marked it as resolved. The
user may transition it into the resolved state by left clicking on the
icon. The
icon indicates the user has marked the conflict as resolved. This
means they have selected a value for it and have verified the value going in
is what they want. No additional changes are allowed on a conflict
once it is in the resolved state. It can be placed back into the
modified state by left clicking on the
icon. The
means that a conflict was in the resolved state but a new change has
occurred on either the Source or Destination Branch. It serves to
notify the user that the conflict was not in the finalized state when they
resolved the conflict. The user can return to resolved state by left
clicking on the
icon. The
icon indicates that an Artifact or Attribute must be reverted on the Source
Branch. This indicates that the Artifact/Attribute was deleted on the
Destination Branch and can not have a change committed onto it. The
user must abandon any change to that artifact attribute by using the revert
command. Once the Artifact/Attribute has been reverted the Merge
Manager will be refreshed and the conflict will be removed. The
icon
indicates an informational conflict. The user does not have to take
any action to resolve these conflicts. It just provides the
information that the Source Branch deleted the Artifact/Attribute but the
Destination Branch has been modified. The user is free to act as
desired based on the provided information.
- The Artifact Name Column - This column tells which artifact the conflict occurred on. If the name is different between the Source and Destination Branches, (this will show up as a conflict) it will at first showing use the Source Branch value and then use whatever the name is resolved to be after that has occurred.
- The Artifact Type Column - Simply lists what type of Artifact is conflicted
- The Conflicting Item Column - In the case of an attribute conflict it states what attribute type is conflicting. In the case of an artifact conflict it will always say "Artifact State"
- The Source Value Column - When possible this column tells what
value the Source Branch has for the conflict. It will always have a
icon. If the conflicting item is Word Formatted Content the words "Stream
data" will be shown. For artifact conflicts it will either show
"Modified" or "Deleted". Left clicking on the
icon will populate the Merge Branch with value found on the Source Branch.
- The Destination Value Column - When possible this column tells
what value the Destination Branch has for the conflict. It will always
have a
icon. If the conflicting item is Word Formatted Content the words "Stream
data" will be shown. For artifact conflicts it will either show
"Modified" or "Deleted". Left clicking on the
icon will populate the Merge Branch with value found on the Destination
Branch.
- The Merge Value Column - The Merged Value column serves to show
the user the value that has been selected for use when the Branch is
committed. The Merge value is actually kept on a new "Merge Branch"
and so any changes made to it will not affect the value seen on the Source
or Destination Branches. When the Merge Value column is blank with no
icon, the conflict is informational and no actions are provided. When
the Merge Value column contains a
icon
the value has not been set. This is the icon that should be shown for all
conflicts (Except informational conflicts, or same value conflicts) the
first time the user brings up the merge manager. The
icon indicates that the Source Value was selected as the final value.
The actual Source Value text will also be shown in this column if possible.
The
icon indicates that the Destination Value was selected as the final value.
The Destination Value text will also be shown in this column if possible.
The
icon will be shown when a new value has been selected for the final value.
This indicates that the user has modified the final value so that it is no
longer a copy of the Source or Destination, but some variation thereof.
A
icon indicates that although both the Source Branch Value and Destination
Branch Value have changed they were both changed to the same value and so
there is not really a conflict. Left clicking on the icon in the Merge Value
column will bring up the Merge Wizard or in the case of un-resolvable
conflicts a dialog offering the ability to revert the conflicting item.
- The Right Click Menu - Right clicking on any row will display a
menu with options for dealing with conflicts.
- "Set Source as Default Branch" - This selection is a quick way to set the Source Branch as the default branch. If the Source Branch is already set as the Default Branch, the menu item will be grayed out and there will be a check mark next to the option.
- "Set Destination as Default Branch" - This selection is a quick way to set the Destination Branch as the default branch. If the Destination Branch is already set as the Default Branch, the menu item will be grayed out and there will be a check mark next to the option.
- "Edit Merge Artifact" - This option is only enabled for Word Formatted Content conflicts and will bring up the Merge Artifact in Word. The Merge Artifact is a separate version of the artifact that will preserve the details of the Merge, and will be reviewable in the Merge Manager after an artifact is committed. IMPORTANT: If the user makes the changes to their Source Branch instead of on the Merge Artifact the Merge Manager will incorrectly represent the merge in future reviews.
- "Generate Three Way Merge" - Will generate a Three Way Merge for the Word Formatted Content.
- "Preview" -> "Preview Source Artifact", "Preview Destination Artifact", "Preview Merge Artifact" will show a preview in Word of the Artifact based on the version selected.
- "Differences" -> "Show Source Branch Differences", "Show Destination Branch Differences", "Show Source/Destination Differences", "Show Source/Merge Differences", "Show Destination/Merge Differences" will generate differences based upon which option is selected. Allows the user to see how different versions of the artifact differ.
- "Reveal Artifact in Explorer" - This option is only available when either the Source or Destination Branch is set as the default branch. When such is the case this will reveal the artifact in the Artifact Explorer for the Branch that is the default branch.
- "Resource History" - This option is only available when either the Source or Destination Branch is set as the default branch. When such is the case this will reveal the resource history of the artifact on the Branch that is the default branch.
Resolution Of Conflicts
For Word Formatted Content conflicts see the section below. This section addresses all other conflicts.
- Informational Conflicts
Informational conflicts are identified by the
icon in the conflict resolution column in the GUI. Informational
conflicts require no action by the user, and no actions are provided in the
GUI other than the ability to use the right
click menu to examine the artifact using the tools provided there.
An informational conflict is generated when the Source branch deletes an
Artifact or an Attribute and that same Artifact or Attribute was modified on
the Destination Branch. This is to allow the user the opportunity to
review a change that was made on the Destination Branch that might
make them want to take some action in regards to their deletion. - Un-resolvable Conflicts
Un-resolvable Conflicts are identified by the
icon in the conflict resolution column of the GUI. This conflicts require
the user to revert the Artifact or Attribute that caused the conflict on the
Source Branch. An Un-resolvable conflict is caused when the
Destination Branch deletes an Artifact or Attribute while the Source Branch
modifies that same Artifact, Attribute. The reason the user must
revert their changes is that committing in their changes would essentially
undo that deletion and bring that item back into existence. If the deletion
should not have happened the user needs to talk with the committer of the
deletion to resolve the issue. - Attribute Conflicts
Attribute Conflicts occur when both the Destination and Source branch modify an attribute. This section will cover all attributes except Word Formatted Content Attributes. The resolution of these Attribute values provide three options. Use the Source attribute value, use the destination attribute value, use a modified value that is some combination of the source and destination values. In order to use the Source Value the user may left click on the
icon in the Source Value column. This will copy the
icon and the value displayed in the Source Value column into the Merged
Value Column. In order to use the Destination Value the user may left
click on the
icon in the Destination Value column. This will copy the
icon and the value displayed in the Source Value column into the Merged
Value Column. Both of these options are also available from the
Merge
Wizard (Left click on the icon in the Merge Value column) with the "Load
Source Data" and "Load Destination Value" buttons. In order to modify
the value to some combination the user must bring up the Merge Wizard which
has an embedded editor specific to the attribute that needs to be modified.
Once the value is accurately entered in the editor the user may than select
"Finish" This will place a
icon in the Merged Value column along with the new value. The user then right clicks on the
in the Conflict Status Column so that the
icon is displayed. The conflict is resolved and will allow the
Source Branch to be committed.
The Merge Wizard
Resolution Of Conflicts (Word Formatted Content)
Resolution of conflicts is provided in two different ways. They can either copy and paste the changes into their Merge Artifact document or they can generate a Three Way Merge and accept the changes that show up in the generated document. Both approaches have their advantages and disadvantages and are best suited for different situations. They can also be combined where the situation warrants it, however the three way merge must always be done first if this is the case.
-
Manual Merging
- Usage
- When one version of the artifact has many changes and the other version has very few changes
- When both files have formatting changes
- When three way merging generates a complex document
- When both versions edit the same text in multiple places
Manual Merging is the process of combining the Source Branch changes and the destination branch changes manually by copying and pasting them into the Merge Artifact document. The Merge Artifact is a separate version of the artifact that will preserve the details of the Merge, and will be reviewable in the Merge Manager after an artifact is committed. IMPORTANT: If the user makes the changes to their Source Branch instead of on the Merge Artifact the Merge Manager will incorrectly represent the merge in future reviews.
The following procedure illustrates the functionality available to facilitate a manual merge.The user will first either launch the Merge Wizard by left clicking on the icon in the Merge Value column of the GUI or they may select the functionality from the right click menu for the conflict in question. The first thing to do is to bring up a word document comparison of both the Source Branch Version and the Destination Branch Version. These documents will show all of the changes that have been made to these two artifacts since the Source Branch was created. To launch these difference's the user either select "Show Source Diff" and "Show Destination Diff" from the wizard or "Differences"->"Show Source Branch Differences" and "Differences"->"Show Destination Branch Differences" from the right click menu. These will bring up the two difference's in different Word instances with window labels to allow the user to differentiate the files. The intention of bringing up these difference's is twofold. Firstly, it allows the user to identify the file that has the most changes. Secondly, it will come in use later when the user copy's and paste's changes into the Merge document.
Upon identifying the branch that has the most changes the user should then set the Merge Artifact to contain that branches value. This is done by either selecting "Populate with Source Data" or "Populate with Destination Data" from the Merge Wizard or left clicking on the
icon or the
icon in the Source and Destination Value columns in the Merge Manager
GUI. The user can then bring up the Merge Artifact for editing by
clicking on "Edit Merge Artifact" in the Merge Wizard or in the right
click menu. The Document that comes up contains the Merge Artifact
and any changes made to it will be reflected when the Source Branch is
committed. The user can than begin to copy the changes from the
diff report that showed the fewest changes (opposite of the one chosen
as the baseline). After all changes have been migrated into the
Merge Artifact document the user than saves the document, which will
preserve the Merge Artifact value. The user should be aware that
any changes they do not wish to preserve from either the Source or
Destination version of the Artifact need to be omitted on the Merge
Artifact. The user then right clicks on the
in the Conflict Status Column so that the
icon is displayed. The conflict is resolved and will allow the
Source Branch to be committed.
- Usage
-
Three Way Merge
-
Usage
-
When both versions have many changes or both versions have few changes.
-
When only one file has formatting changes (Must be combined with Manual Merging in this case)
-
When three way merging generates an understandable document
Three Way Merging leverages Microsoft Words ability to merge documents. At the beginning of any Word Formatted Content merge it is recommended that user generate a Three Way Merge and check the complexity of the document. In most cases Three Way Merging is a quicker way to merge two documents, however in some cases the Three Way Merge will generate a document that is difficult to use and understand. This usually arises when the Source and Destination branches have edited the same text or if one of the branches has touched a large percentage of the file. As it runs fairly quickly it is always a good idea to run it at the beginning of a Merge to check if it is useful. Three Way Merging only allows the user to maintain format changes from one of the documents. If format changes are made on both documents the Three Way Merge will prompt the user as to which format changes they would like to maintain, the user will then need to copy the format changes from the other document into the Merge Artifact document manually.
A Three Way Merge is generated by selecting Generate Three Way Merge from either the Merge Wizard or the right click menu. IMPORTANT: Generating a Three Way Merge will discard any changes made to the Merge Artifact, therefore a prompt will make sure this is the intended operation. If a user had started a Three Way Merge previously but had not completed the Merge the user is also given the option of continuing the previous Merge in the prompt (Selecting Edit Merge Artifact will also have this effect). The following is an example of a Three Way Merge in Word.

A Three Way Merge
The changes made by the Source Branch and Destination Branch are shown in different colors in the Word Document. In this particular case the changes made in Red were done by the Source Branch and the changes made in Blue were done on the Destination Branch. The color scheme is not consistent and the user needs to verify which color equates to which changes by hovering there mouse over one of the changes. A popup will be shown which will identify the author. The following Guide will explain how to resolve the changes in the document. IMPORTANT: All changes must be either accepted or rejected before the conflict can be marked as resolved. After the user has resolved all the changes it is a good idea to do generate a difference document between the Source Artifact and the Merge Artifact, and the Destination Artifact and the Merge Artifact by selecting "Show Source/Merge Diff" and "Show Destination/Merge Diff" from the merge Wizard or "Differences"->"Show Source/Merge Differences" and "Differences"->"Show Destination/Merge Differences" from the right click menu. These views will show the differences between the branch artifact and the merge artifact. For the Source/Merge difference this will show everything that is different between the source document and the Merge document. In the case where the user accepts all changes from the source and destination branches this diff will highlight all of the changes that occurred on the destination branch. In the Destination/Merge diff it will highlight all of the changes that happened on the source branch. It is always possible to use Manual Merging techniques in conjunction with Three Way Merging.
The user then right clicks on the
in the Conflict Status Column so that the
icon is displayed. The conflict is resolved and will allow the
Source Branch to be committed.
Word Formatted Content Merge Wizard
-
-
Additional Features
The Merge Wizard contains a "Clear the Merge Artifact" that is not available
from the right click menu and only available for Word Formatted Content. This will empty out the Merge artifact and
allow the user to start with an empty document for editing. It will also
place a
![]() icon
in the merge value column for that conflict.
icon
in the merge value column for that conflict.
10.1. Table Customization
Purpose
Customize the table to show desired columns, widths with specified sorting and filters. Enables loading of both personal and global customizations and provides the ability to select a customization as the default customization to be loaded upon startup.
Select Customization
Lists current personal and global customizations to be selected from. Double-click to automatically load selected customizationa and close dialog.
- "-- Table Default --" - Show the default customization for this table.
- "-- Current --" - Show the current customization as set from table alterations.
- "Other" - Shows a stored customization available for loading.
Select Customization - Icons / Overlays
- Customization.
 Default customization loaded up restart.
 Global customization available to all users.
Select Customization - Buttons
- Load - Loads the currently selected customization.
- Load+Close - Loads the selected customization and closes the dialog.
- Set as Default - Sets the currently selected customization as the default to load upon restart.
- Delete - Deletes the currently selected customization.
Configure Customization
Allows for the selected customization to be configured, loaded and saved.
- Hidden Columns - Shows the columns that are available to be displays but configured as hidden.
- Visible Columns - Show the columns that are configured to be displayed for this customization.
- (x) - shows the currently configured width of the column
- Sorter - xml representation of the column order to sort by
- Text Filter - shows the configured text filter to be applied for this customization. Enter as string.
Configure Customization - Buttons
- Load - Loads the configured customization.
- Load+Close - Loads the configured customization and closes the dialog.
- Rename - Allows the user to define an alternate name for the column.
- Save - Saves the configured customization as personal or global (if permissions allow).
12.1. OSEE Branching and Differences Diagrams
OSEE Branching DiagramOSEE Differeces Diagram