The purpose of this tutorial is to illustrate the definition of external DSLs using tools from the Eclipse Modeling Project (EMP). The main focus is on the Xtext framework. We will start by defining our own DSL in an Xtext grammar. Then we will use the Xtext framework to generate a parser, an Ecore-based metamodel and a textual editor for Eclipse. Afterwards we will see how to refine the DSL and its editor by means of Xtend extensions. Finally, we will learn how one can generate code out of textual models using the template language Xpand.
The actual content of this example is rather trivial—our DSL will describe entities with properties and references between them from which we generate Java classes according to the JavaBean conventions—a rather typical data model. In a real setting, we might also generate persistence mappings, etc. from the same models. We skipped this to keep the tutorial simple.
To follow this tutorial, you will need to install the following components
- A Java 5 or 6 SDK. Download it at [1] or use another SDK that suits your environment.
- Eclipse SDK 3.4 (From the "Ganymede" release). You can download it from [2]. Install by simply unpacking the archive.
- openArchitectureWare 4.3. Download the ZIP file from [3] or point your eclipse update manager to [4].
The source code for the samples developed in this article can be downloaded from [6].
Xtext projects are based on the well-known Eclipse plug-in architecture. In fact, to create a new textual DSL with Xtext, you'll need up to three projects that depend on each other. But fear not - Xtext comes with a handy wizards to get you up and running in no time.
To create a new Xtext project,
- Start up Eclipse 3.4 with oAW 4.3 installed (see the section called “Setting up the Environment”) in a fresh workspace and close the welcome screen
- Select File > New... > Project... Xtext Project
- Specify the project settings in the wizard dialog. Since you started in a fresh workspace, the wizard should provide sensible defaults. See the Xtext reference documentation for a detailed overview of what all those settings mean.
- Click Finish
The wizard creates three projects, my.dsl,
my.dsl.editor, and
my.dsl.generator:
- my.dsl is the language project, in which we will define the grammar for our DSL. After running the Xtext generator, this model also contains a parser for the DSL and a metamodel backing the language.
- my.dsl.editor will contain the DSL editor. Since we have not yet defined a grammar, this project is still empty. It will be filled by the Xtext generator later.
- my.dsl.generator contains an openArchitectureWare code generator skeleton. Later in this tutorial, you will write a couple of templates that process models created with your DSL editor.
Now that you have created a new Xtext project, you can define the grammar for your DSL. The grammar specifies the metamodel and the concrete syntax for your domain specific language. This allows for fast roundtrips and an incremental development of your language, as you will see later.
To specify the grammar, you will be using the Xtext grammar language. The Xtext documentation contains an extensive reference of all grammar elements. However, to make it easier for you to follow along this tutorial, we have included the relevant grammar rules here.
In this tutorial, we will develop a DSL for entities (since entities are something most developers know quite well).
- Open the Xtext grammar definition
my.dsl/src/mydsl.xtxt - And type in the following grammar definition:
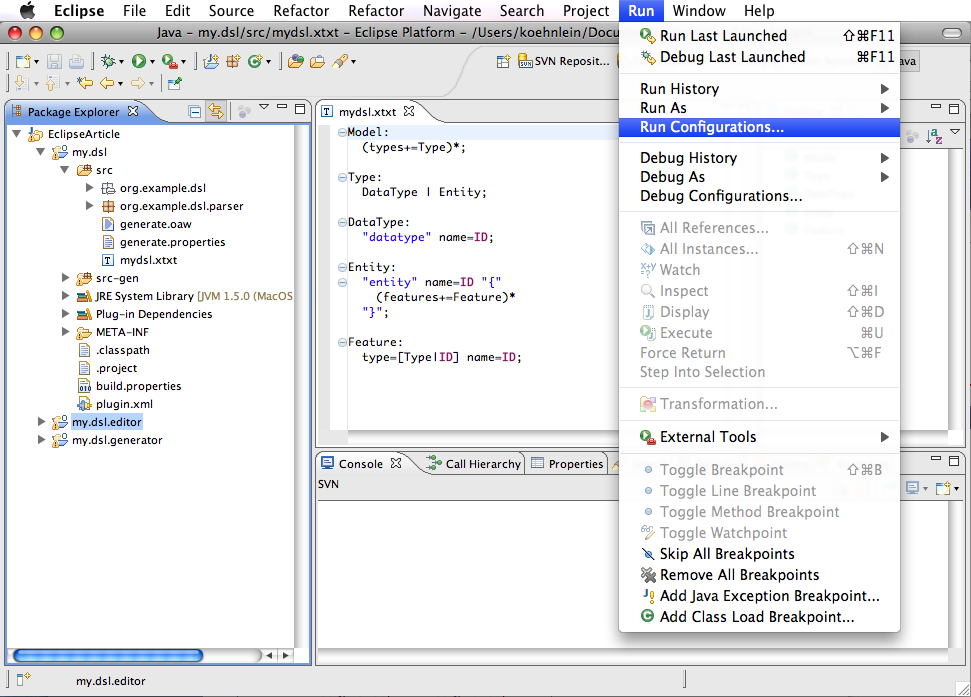
Model: (types+=Type)*;Type: DataType | Entity;
DataType: "datatype" name=ID;
Entity: "entity" name=ID "{" (features+=Feature)*
"}"; Feature: type=[Type|ID] name=ID;

| | The Model rule specifies that a model contains zero or more Types. |
| | The Type rule is an abstract rule. It specifies that a Type may either be a DataType or an Entity |
| | The DataType rule specifies that a DataType starts with the literal datatype, followed by a name. The name must comply with the (built-in) rule for identifiers (that is, only characters followed by zero or more characters mixed with any number of numbers are valid). |
| | The Entity rule specifies that an Entity starts with the literal entity, followed by the name of the entity (which, in turn, must be an identifier). An entity definition has a body which is surrounded by curly braces. The body may then contain any number (zero or more) of Features. |
| | A Feature has a reference to a Type and a name. The reference to Type is particularly interesting, because by appending the |ID modifier, we point out that the reference to Type will be determined by an ID. |
Your grammar should now look like in Figure 1, “DSL grammar”.

Having specified the grammar, we can now generate the DSL editor.
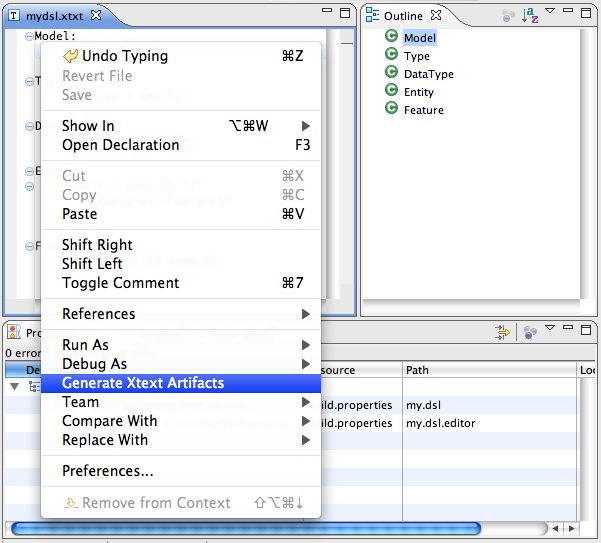
- Right-click inside the Xtext grammar editor to open the context menu.
- Select Generate Xtext Artifacts to generate the DSL parser, the corresonding metamodel and, last but not least, the DSL editor.
To run the generated editor, you have to start a new Eclipse workbench with the DSL plug-ins enabled.
- Choose Run -> Run Configurations...
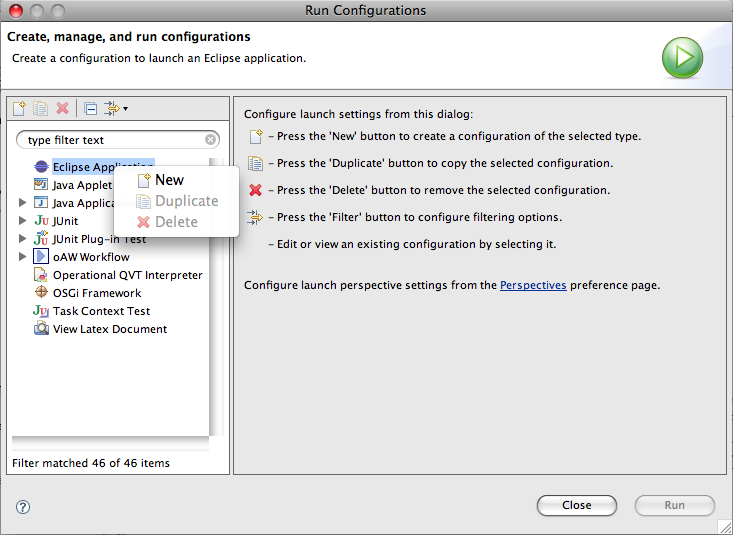
- The Run Configuraton dialog appears. Choose New from the context menu of Eclipse Application
- Choose New from the context menu of Eclipse Application.
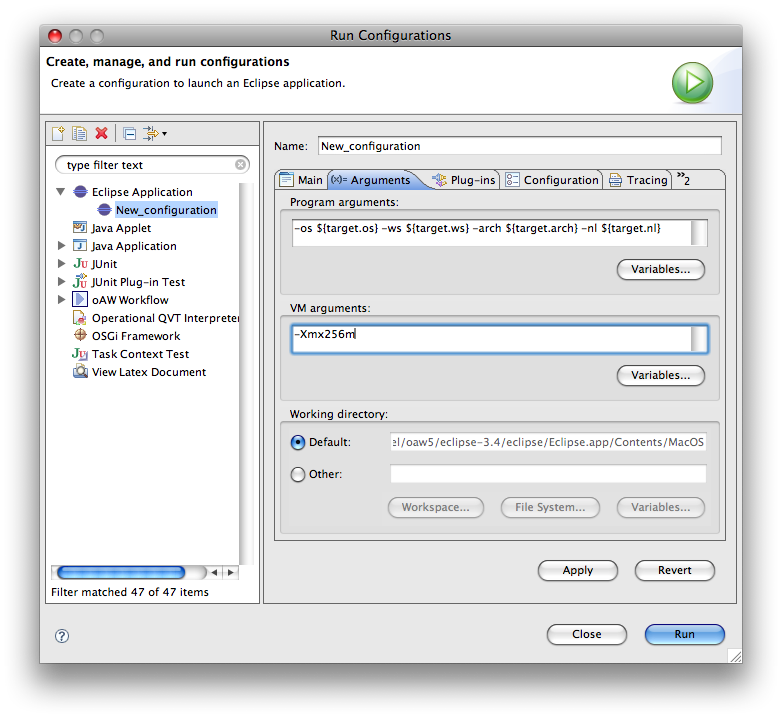
- Go to the Arguments tab and enter -Xmx256m in the VM arguments field to increase the maximum heap size of the new Eclipse workbench.
- Start the new Eclipse workbench by clicking the Run button.
You should now see the same workspace as before. To check out the DSL editor, create a new mydsl project and model in the runtime instance:
- Select File > New... > Other... > mydsl Project to create a new mydsl project.
- Click Next to proceed to the next wizard page.
- Leave the project name as is (it should read mydslproject) and click Finish to create the project.
The wizard will now create a new project for you, including an empty sample model.
Key in the following model to see your editor in action. Note how the outline reflects the contents of your model. While typing, try using the content assist feature by pressing CTRL-Space.
datatype String
datatype String

entity Person {
	String name
	String lastName
	Address home
	Address business
}

entity Address {
	String street
	String zip
	String city
}
Xtext-based editors support a number of features right out of the box:
Syntax coloring
Code completion (press CTRL-Space to invoke)
Navigation (either by holding the CTRL key and left-clicking an identifier or by pressing the F3 key when the cursor is on an identifier)
Find References (place the cursor on an identifier and press CTRL-SHIFT-G)
Folding
Outline
Quick Outline (press CTRL-O)
Syntax checking / Error markers
It is important to note that all those features have been derived from the grammar you defined earlier. If you make changes to the grammar, the generated tooling will reflect these changes as well, as you will see in a minute.
While Xtext-based DSL editors have a collection of great feature that come for free, they can be easily customized to your needs. In the following section, we will add some extra features that improve your editor's usability. As you will see, implementing those features will not cost us much effort.
First, let's enhance code completion. Let's assume you want to
assist the user of your editor in choosing the right data types. In most
projects, there's probably only about five or six different data types
in use, so why not provide them in the suggestion list for the
datatype grammar rule?
To do so, open
my.dsl.editor/src/org.example.dsl/ContentAssist.ext
and insert the following lines at the end of the file:
/* proposals for Feature DataType::name */ List[Proposal] completeDataType_name
| | The name of he extension function must match the following rule: complete<name of the metatype>_<name of the attribute to be completed>. In this sample, the extension function will be invoked as soon as the user requests content assist for the name of a DataType. |
After saving the extension file, the DSL editor display the new proposals:
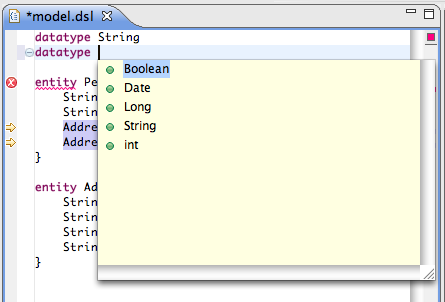
You may have noticed that although the generated DSL editor detects syntax violations in your models, it is still possible to define illegal models, e.g. by defining several datatype definitions with the same name.
The Check language from the openArchitectuerWare stack can be used to define constraints that ensure the validity of your models.
Let's define a constraint that ensures that a model does not
contain more than one data type with the same name. To do so, open
my.dsl/src/org.example.dsl/Checks.chk and add the
following contraint to the end of the file:
context Type ERROR "Duplicate type detected: " + this.name : allElements()
This constraint basically means the following:
From the collection of all model elements,
select all elements that are of type Type (i.e, all DataTypes and all Entities).
Of the resulting collection, select all elements whose name equals the name of the current Type.
Finally, check whether the size of the resulting collection is exactly one (1).
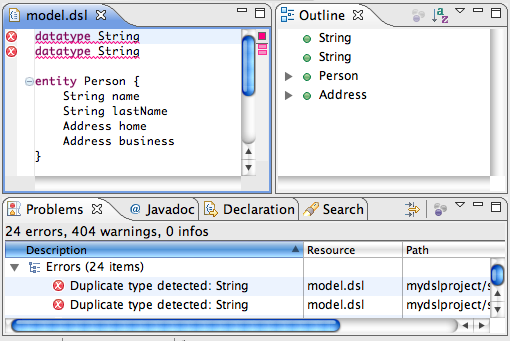
After saving the check file, the DSL editor now issues an error if you enter two types with the same name:
Now, that we have a DSL, we may want to do something useful with it. DSLs are essentially small programming languages. A programming language has to be understandable by a computer. There are basically two ways to make a language "understandable" by a computer. The first one is to write a compiler which transforms expressions made in one language into another language, which is already understandable by a computer. For example, a Java compiler transforms Java programs to bytecode programs. Bytecode is understandable, because there are VMs which translate expressions in Java bytecode into more native instructions. This is usually done at runtime. Translating a language at runtime is called interpretation (ignoring special cases like just-in-time compilation here).
With Xtext, models one can either create a compiler (also called generator) or an interpreter. Although there are good reasons for both approaches, we will just discuss how one creates a generator in this tutorial.
The Xtext wizard already created a generator project for us. We are going to write an Xpand template, which generates simple JavaBeans from our entities. It is assumed, that there is a Java data type corresponding to the data types used in the models (e.g. String). So, we do not need to care about mapping data types.
So just open the Xpand template (Main.xpt) and modify it like this:
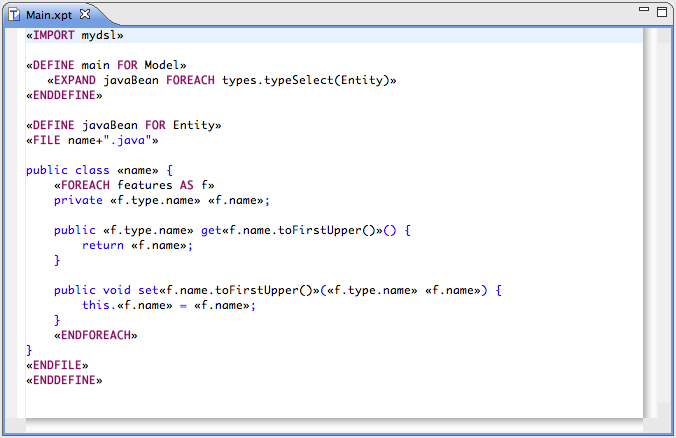
The definition main is invoked from the workflow file. It is declared for elements of type mydsl::Model, which corresponds to the root node of our DSL models. Within this definition, another definition (javaBean) is called («EXPAND javaBean...») for each model element (...FOREACH...) contained in the reference 'types' of Model which is of type Entity. (typeSelect(Entity)).
The definition javaBean is
declared for elements of type Entity.
In this definition, we open a file («FILE ...»). The path name of the
file is defined by an expression. In this case, it corresponds to the
name of the entity suffixed with '.java'. It is
going to be generated into the src-gen directory
directly.
All text contained between «FILE ...» and «ENDFILE» will go to the new file. Xpand provides control statements (FOR, IF, ELSEIF, ...), as well as evaluation of expression, in order to create the desired code. See the openArchitectureWare reference documentation for details.
To see our template in action, we have to run the code generator:
Locate the oAW workflow file mydslproject.oaw in your mydslproject plug-in.
Right-click on it and choose Run as > oAW Workflow from the context menu.
You can see the generator running and logging into the Console view.
The result will be stored in a new source folder src-gen in the mydslproject project.
If you have finished customizing the generator and the editor, you can deploy the DSL plug-ins to an Eclipse installation. For simplicity, we take the one we are already running.
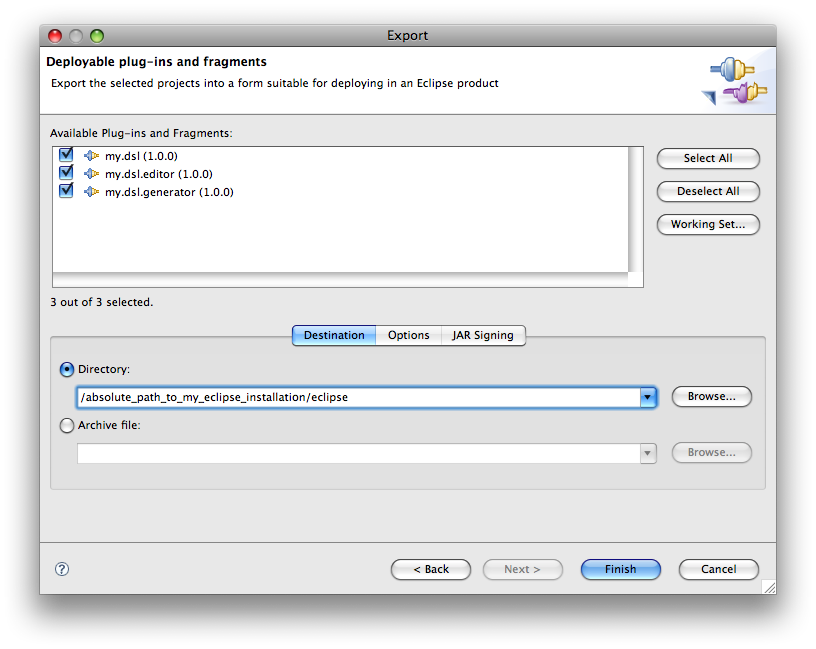
- Choose Export... > Deployable plug-ins and fragments...
- The Export dialog appears. Select the three DSL plug-ins.
- Enter the path to your Eclipse installation. Make sure the selected directory contains the Eclipse executable and a folder named plugins. Usually, the directory is called eclipse.
- Choose Finish.
- Restart Eclipse.
This tutorial ends here, but there is a lot more to know about Xtext, Xpand, DSLs and EMP, e.g.
- Advanced model customization: References to elements outside the model, configurable linking of cross-references, etc.
- Further customizing of the editor: Choosing font styles, defining multiple outline views etc.
- Integration with the Eclipse Modeling Framework (EMF), and thereby opening to the whole world of eclipse modeling.
[1] Sun's Java SDK. http://java.sun.com/javase/downloads/index.jsp .
[2] Eclipse 3.4. http://www.eclipse.org/ganymede/.
[3] openArchitectureWare download page. http://www.eclipse.org/gmt/oaw/download/ .
[4] openArchitectureWare update site. http://www.openarchitectureware.org/updatesite/milestone/site.xml .
[5] openArchitectureWare reference documentation. http://www.eclipse.org/gmt/doc/ .
[6] Source code for the sample developed in this article. mydsl.zip .
Legal Notices
Java and all Java-based trademarks are trademarks of Sun Microsystems, Inc. in the United States, other countries, or both.
Linux is a trademark of Linus Torvalds in the United States, other countries, or both.
Microsoft is a trademark of Microsoft Corporation in the United States, other countries, or both.
UNIX is a registered trademark of The Open Group in the United States and other countries.
Other company, product, or service names may be trademarks or service marks of others.