Introduction
For many people, BIRT(Business
Intelligence and Reporting Tools) may be only a reporting tool. But in fact,
the real strength of BIRT is not only its built-in reporting functionality, but
also its extension capabilities. Using extensions, a user can easily extend the
functionality of BIRT, creating custom extended report items, adding custom
emitters, and even having custom editor pages. The power of extensions enables
the user to create custom reporting features that can meet very specific requirements.
In this article, we explore how to leverage the BIRT extension mechanism to
extend the BIRT capabilities. The provided samples cover most of the essential
extension points that provided by BIRT report model, engine and designer.
In Part 1, we already learned the basics for how to create a custom extended report item for BIRT. In this part, we will further explore how to polish the extension UI, improving the usability, and enhancing the extension functionality.
Beyond the Basics
In this section, we will take a look at how to add additional UI features for custom report items, i.e. report item builder, context menu, property page, etc., which would undoubtedly improve the look and usability of your cusotm report items.
1) WYSIWYG
Remember how we implemented the look in layout editor for the RotatedText item in previous part? Yes, we just chose the simplest Label UI provider. The disadvantage of this approach is obvious: the label in layout view always shows the horizontal text, while the preview shows the angled text. This inconsistency may prevent the end users from getting an intuitive picture when designing the report. For most modern editors, WYSIWYG is already encompassed as a de facto standard. Ideally, we would also want to keep the consistent look between our layout view and preview. To achieve this, let's take a look at the other two types of the UI providers:
- Image UI Provider
- Figure UI Provider
The Image UI provider is a straightforward choice. It simply requests an image for the UI presentation. So what we need to do here is just to render the rotated text to an image and return it. This is very similar to what we already have done for the engine presentation output.
To register the Image UI provider, we need remove the original Label
UI provider first, adding the new Image UI provider extension,
and specifying the implementor class which must implement
org.eclipse.birt.report.designer.ui.extensions.IReportItemImageProvider.
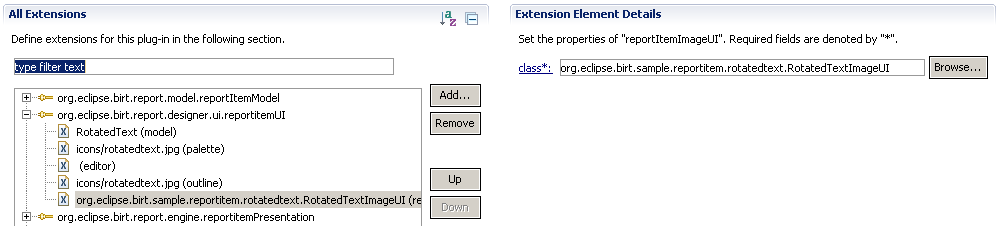
Here we specify the class as org.eclipse.birt.sample.reportitem.rotatedtext.RotatedTextImageUI,
the code looks like this:
public class RotatedTextImageUI implements IReportItemImageProvider
{
	public void disposeImage( ExtendedItemHandle handle, Image image )
	{
		if ( image != null && !image.isDisposed( ) )
		{
			image.dispose( );
		}
	}

	public Image getImage( ExtendedItemHandle handle )
	{
		try
		{
			IReportItem item = handle.getReportItem( );

			if ( item instanceof RotatedTextItem )
			{
				int angle = ( (RotatedTextItem) item ).getRotationAngle( );
				String text = ( (RotatedTextItem) item ).getText( );

				return SwtGraphicsUtil.createRotatedTextImage( text, angle, null );
			}
		}
		catch ( ExtendedElementException e )
		{
			e.printStackTrace( );
		}
		return null;
	}
}
The logic seems very trivial. Here we introduced a new class SwtGraphicsUtil.
Since the Eclipse UI is based on SWT (Standard Widget
Toolkit), to make it work, we need an SWT port for
the original SwingGraphicsUtil class. Here is the code for the new SWT version:
public class SwtGraphicsUtil
{
	public static Image createRotatedTextImage( String text, int angle, Font ft )
	{
		GC gc = null;
		try
		{
			if ( text == null || text.trim( ).length( ) == 0 )
			{
				return null;
			}

			Display display = Display.getCurrent( );

			gc = new GC( display );
			if ( ft != null )
			{
				gc.setFont( ft );
			}

			Point pt = gc.textExtent( text );

			gc.dispose( );

			TextLayout tl = new TextLayout( display );
			if ( ft != null )
			{
				tl.setFont( ft );
			}
			tl.setText( text );

			return createRotatedImage( tl, pt.x, pt.y, angle );
		}
		catch ( Exception e )
		{
			e.printStackTrace( );

			if ( gc != null && !gc.isDisposed( ) )
			{
				gc.dispose( );
			}
		}
		return null;
	}

	/**
	 * @return Returns as [rotatedWidth, rotatedHeight, xOffset, yOffset]
	 */
	public static double[] computedRotatedInfo( int width, int height, int angle )
	{
		angle = angle % 360;

		if ( angle < 0 )
		{
			angle += 360;
		}

		if ( angle == 0 )
		{
			return new double[]{ width, height, 0, 0 };
		}
		else if ( angle == 90 )
		{
			return new double[]{ height, width, -width, 0 };
		}
		else if ( angle == 180 )
		{
			return new double[]{ width, height, -width, -height };
		}
		else if ( angle == 270 )
		{
			return new double[]{ height, width, 0, -height };
		}
		else if ( angle > 0 && angle < 90 )
		{
			double angleInRadians = ( ( -angle * Math.PI ) / 180.0 );
			double cosTheta = Math.abs( Math.cos( angleInRadians ) );
			double sineTheta = Math.abs( Math.sin( angleInRadians ) );

			int dW = (int) ( width * cosTheta + height * sineTheta );
			int dH = (int) ( width * sineTheta + height * cosTheta );

			return new double[]{ dW, dH, -width * sineTheta * sineTheta, width * sineTheta * cosTheta };
		}
		else if ( angle > 90 && angle < 180 )
		{
			double angleInRadians = ( ( -angle * Math.PI ) / 180.0 );
			double cosTheta = Math.abs( Math.cos( angleInRadians ) );
			double sineTheta = Math.abs( Math.sin( angleInRadians ) );

			int dW = (int) ( width * cosTheta + height * sineTheta );
			int dH = (int) ( width * sineTheta + height * cosTheta );

			return new double[]{ dW, dH, -( width + height * sineTheta * cosTheta ), -height / 2 };
		}
		else if ( angle > 180 && angle < 270 )
		{
			double angleInRadians = ( ( -angle * Math.PI ) / 180.0 );
			double cosTheta = Math.abs( Math.cos( angleInRadians ) );
			double sineTheta = Math.abs( Math.sin( angleInRadians ) );

			int dW = (int) ( width * cosTheta + height * sineTheta );
			int dH = (int) ( width * sineTheta + height * cosTheta );

			return new double[]{ dW, dH, -( width * cosTheta * cosTheta ), -( height + width * cosTheta * sineTheta ) };
		}
		else if ( angle > 270 && angle < 360 )
		{
			double angleInRadians = ( ( -angle * Math.PI ) / 180.0 );
			double cosTheta = Math.abs( Math.cos( angleInRadians ) );
			double sineTheta = Math.abs( Math.sin( angleInRadians ) );

			int dW = (int) ( width * cosTheta + height * sineTheta );
			int dH = (int) ( width * sineTheta + height * cosTheta );

			return new double[]{ dW, dH, ( height * cosTheta * sineTheta ),	-( height * sineTheta * sineTheta ) };
		}

		return new double[]{ width, height, 0, 0 };
	}

	private static Image createRotatedImage( Object src, int width, int height, int angle )
	{
		angle = angle % 360;

		if ( angle < 0 )
		{
			angle += 360;
		}

		double[] info = computedRotatedInfo( width, height, angle );

		return renderRotatedObject( src, -angle, (int) info[0],	(int) info[1], info[2], info[3] );
	}

	private static Image renderRotatedObject( Object src, double angle, int width, int height, double tx, double ty )
	{
		Display display = Display.getCurrent( );

		Image dest = null;
		GC gc = null;
		Transform tf = null;

		try
		{
			dest = new Image( Display.getCurrent( ), width, height );
			gc = new GC( dest );

			gc.setAdvanced( true );
			gc.setAntialias( SWT.ON );
			gc.setTextAntialias( SWT.ON );

			tf = new Transform( display );
			tf.rotate( (float) angle );
			tf.translate( (float) tx, (float) ty );

			gc.setTransform( tf );

			if ( src instanceof TextLayout )
			{
				TextLayout tl = (TextLayout) src;
				tl.draw( gc, 0, 0 );
			}
			else if ( src instanceof Image )
			{
				gc.drawImage( (Image) src, 0, 0 );
			}
		}
		catch ( Exception e )
		{
			e.printStackTrace( );
		}
		finally
		{
			if ( gc != null && !gc.isDisposed( ) )
			{
				gc.dispose( );
			}

			if ( tf != null && !tf.isDisposed( ) )
			{
				tf.dispose( );
			}
		}
		return dest;
	}
}
As the SWT API and resource management are not 100% same as SWING, you can see some differences between the code styles. Nevertheless, the core logic are the same.
Now let's have a test.
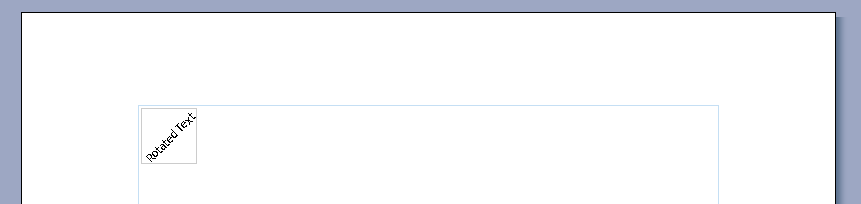
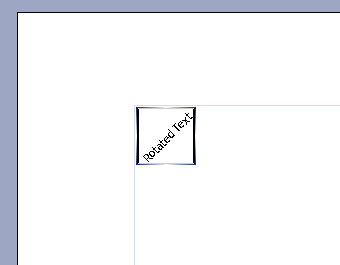
Insert a RotatedText item and specify the rotation angle as "45",
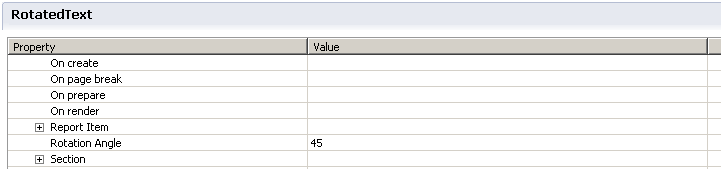
See, now the layout view looks same as the previewing result. The angle setting is reflected in the editor too. This kind of WYSIWYG can help the end user to quickly spot and identify different report items that having different settings.

The Image UI provides the basic possibility for WYSIWYG support. For most simple extended report items, this is already sufficient. While for some custom extended report items that requiring more complicated UI behavior, the Figure UI may be another choice.
2) Image VS Figure
The Figure UI leverages the IFigure interface from GEF
(Graphical Editing Framework). By using this interface, it can provide more flexibility
and interactive possibilities than the Image UI.
The table below shows a brief summary for major differences between Figure UI and Image UI:
| Figure UI | Image UI | |
| Life Cycle | The life cycle of Figure UI is divided into three parts:
The advantage of this pattern is it can support incremental and selective update. For each time Update is called, the figure instance can check the internal model state and decide if it really needs the update or only need update part of the UI. |
The life cycle of Image UI is divided into two parts:
|
| Presentation | The Figure UI allows user to create a hierarchical UI structure. This UI structure can be controlled by the GEF layout mechanism. | The Image UI can only use one single Image for presentation. |
| Interactivity | The Figure UI allows user to add listener for certain UI events. This allows custom handling for specific UI events. | No interactivity support |
Image or Figure? That's a question. However though Figure UI provides more capability than Image UI, it also requires more comprehensive understanding about the GEF framework, while Image UI needs nearly nothing new. So the decision still depends on your real needs.
Here we'll give a simple example for Figure UI practice. In this example, we show how to handle the mouse middle-button click event. For each middle-button click, we will change the rotation angle by adding 45 degrees to the original value.
Like using the Image UI provider, we first remove any existing
Label UI or Image UI provider, adding the new Figure UI
provider extension,
and specifying the implementor class which must implement
org.eclipse.birt.report.designer.ui.extensions.IReportItemFigureProvider.
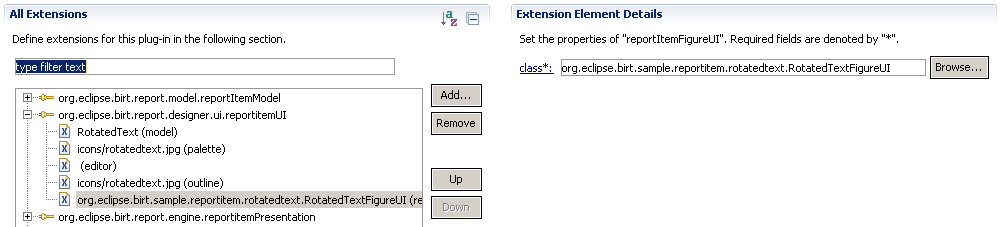
we specify the class as org.eclipse.birt.sample.reportitem.rotatedtext.RotatedTextFigureUI, the code is like this:
public class RotatedTextFigureUI extends ReportItemFigureProvider
{
	public IFigure createFigure( ExtendedItemHandle handle )
	{
		try
		{
			IReportItem item = handle.getReportItem( );

			if ( item instanceof RotatedTextItem )
			{
				return new RotatedTextFigure( (RotatedTextItem) item );
			}
		}
		catch ( ExtendedElementException e )
		{
			e.printStackTrace( );
		}
		return null;
	}

	public void updateFigure( ExtendedItemHandle handle, IFigure figure )
	{
		try
		{
			IReportItem item = handle.getReportItem( );

			if ( item instanceof RotatedTextItem )
			{
				RotatedTextFigure fig = (RotatedTextFigure) figure;

				fig.setRotatedTextItem( (RotatedTextItem) item );
			}
		}
		catch ( ExtendedElementException e )
		{
			e.printStackTrace( );
		}
	}

	public void disposeFigure( ExtendedItemHandle handle, IFigure figure )
	{
		( (RotatedTextFigure) figure ).dispose( );
	}
}
In the Figure UI provider, we create an RotatedTextFigure instance and delegate all the real logic to this class:
public class RotatedTextFigure extends Figure
{
	private String lastText;
	private int lastAngle;
	private Image cachedImage;
	private RotatedTextItem textItem;

	RotatedTextFigure( RotatedTextItem textItem )
	{
		super( );

		this.textItem = textItem;

		addMouseListener( new MouseListener.Stub( ) {

			public void mousePressed( MouseEvent me )
			{
				if ( me.button == 2 )
				{
					try
					{
						RotatedTextFigure.this.textItem.setRotationAngle( normalize( RotatedTextFigure.this.textItem.getRotationAngle( ) + 45 ) );
					}
					catch ( SemanticException e )
					{
						e.printStackTrace( );
					}
				}
			}
		} );
	}

	private int normalize( int angle )
	{
		angle = angle % 360;

		if ( angle < 0 )
		{
			angle += 360;
		}

		return angle;
	}

	public Dimension getMinimumSize( int hint, int hint2 )
	{
		return getPreferredSize( hint, hint2 );
	}

	public Dimension getPreferredSize( int hint, int hint2 )
	{
		Display display = Display.getCurrent( );

		GC gc = null;

		try
		{
			String text = textItem.getText( );
			int angle = textItem.getRotationAngle( );

			gc = new GC( display );

			Point pt = gc.textExtent( text == null ? "" : text ); //$NON-NLS-1$

			double[] info = SwtGraphicsUtil.computedRotatedInfo( pt.x, pt.y, angle );

			if ( getBorder( ) != null )
			{
				Insets bdInsets = getBorder( ).getInsets( this );

				return new Dimension( (int) info[0] + bdInsets.getWidth( ), (int) info[1] + bdInsets.getHeight( ) );
			}
			return new Dimension( (int) info[0], (int) info[1] );
		}
		finally
		{
			if ( gc != null && !gc.isDisposed( ) )
			{
				gc.dispose( );
			}
		}
	}

	protected void paintClientArea( Graphics graphics )
	{
		final Rectangle r = getClientArea( ).getCopy( );

		String text = textItem.getText( );
		int angle = textItem.getRotationAngle( );

		if ( text == null )
		{
			text = ""; //$NON-NLS-1$
		}

		if ( !text.equals( lastText ) || angle != lastAngle || cachedImage == null || cachedImage.isDisposed( ) )
		{
			lastText = text;
			lastAngle = angle;

			if ( cachedImage != null && !cachedImage.isDisposed( ) )
			{
				cachedImage.dispose( );
			}

			cachedImage = SwtGraphicsUtil.createRotatedTextImage( text, angle, null );
		}

		if ( cachedImage != null && !cachedImage.isDisposed( ) )
		{
			graphics.drawImage( cachedImage, r.x, r.y );
		}
	}

	void setRotatedTextItem( RotatedTextItem item )
	{
		this.textItem = item;
	}

	void dispose( )
	{
		if ( cachedImage != null && !cachedImage.isDisposed( ) )
		{
			cachedImage.dispose( );
		}
	}
}
You can see the core rendering logic is the same as the Image UI. We still call the SwtGraphicsUtil to create an image and then paint it to figure. The only additional logic is the part about the mouse listener, where we handle the middle-button click event, adding 45 degrees to the original value per click.
Now run and test. In layout editor, each time you middle-click the RotatedTextItem, it will automatically change the rotation angle.
Note this is just an example to show the simplest possibility for the Figure UI. Basically you can create very complex UI structures based on the GEF framework. As it is mostly related to GEF, we will not introduce more here. You can refer to GEF official site for more details.
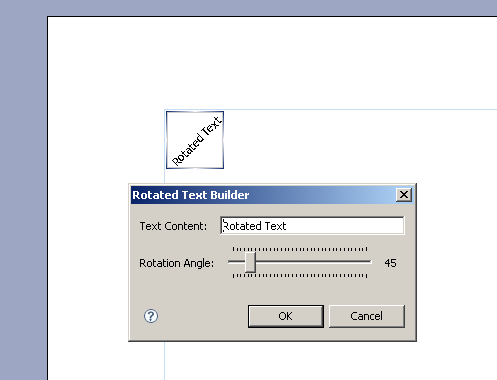
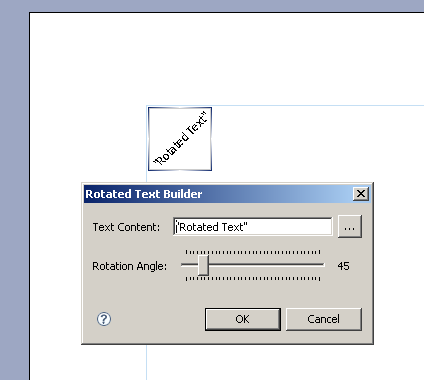
3) The Builder
One common approach for property editing is the Builder. Most built-in report items in BIRT have the builder support. Each time when you create or double-click the report item in layout editor, the associated builder for this report item will pop up and allow you to edit in a more friendly way. In following sections, we will introduce how to add the builder support for custom extended report items.
To support the builder, we need add the builder UI extension and specify
the implementor class which must implement
org.eclipse.birt.report.designer.ui.extensions.IReportItemBuilderUI:

Here we specify the class as org.eclipse.birt.sample.reportitem.rotatedtext.RotatedTextBuilder, the code is like this:
public class RotatedTextBuilder extends ReportItemBuilderUI
{
	public int open( ExtendedItemHandle handle )
	{
		try
		{
			IReportItem item = handle.getReportItem( );

			if ( item instanceof RotatedTextItem )
			{
				RotatedTextEditor editor = new RotatedTextEditor( Display.getCurrent( ).getActiveShell( ), (RotatedTextItem) item );
				return editor.open( );
			}
		}
		catch ( Exception e )
		{
			e.printStackTrace( );
		}
		return Window.CANCEL;
	}
}
The code is very simple, we just create another RotatedTextEditor class to populate the actual UI:
class RotatedTextEditor extends TrayDialog
{
	protected RotatedTextItem textItem;
	protected Text txtText;
	protected Scale sclAngle;
	protected Label lbAngle;

	protected RotatedTextEditor( Shell shell, RotatedTextItem textItem )
	{
		super( shell );
		this.textItem = textItem;
	}

	protected void configureShell( Shell newShell )
	{
		super.configureShell( newShell );
		newShell.setText( "Rotated Text Builder" ); //$NON-NLS-1$
	}

	protected void createTextArea( Composite parent )
	{
		Label lb = new Label( parent, SWT.None );
		lb.setText( "Text Content:" ); //$NON-NLS-1$

		txtText = new Text( parent, SWT.BORDER );
		GridData gd = new GridData( GridData.FILL_HORIZONTAL );
		gd.horizontalSpan = 2;
		txtText.setLayoutData( gd );
	}

	protected Control createDialogArea( Composite parent )
	{
		Composite composite = new Composite( parent, SWT.NONE );
		GridLayout layout = new GridLayout( 3, false );
		layout.marginHeight = convertVerticalDLUsToPixels( IDialogConstants.VERTICAL_MARGIN );
		layout.marginWidth = convertHorizontalDLUsToPixels( IDialogConstants.HORIZONTAL_MARGIN );
		layout.verticalSpacing = convertVerticalDLUsToPixels( IDialogConstants.VERTICAL_SPACING );
		layout.horizontalSpacing = convertHorizontalDLUsToPixels( IDialogConstants.HORIZONTAL_SPACING );
		composite.setLayout( layout );
		composite.setLayoutData( new GridData( GridData.FILL_BOTH ) );

		createTextArea( composite );

		Label lb = new Label( composite, SWT.None );
		lb.setText( "Rotation Angle:" ); //$NON-NLS-1$

		sclAngle = new Scale( composite, SWT.None );
		sclAngle.setLayoutData( new GridData( GridData.FILL_HORIZONTAL ) );
		sclAngle.setMinimum( 0 );
		sclAngle.setMaximum( 360 );
		sclAngle.setIncrement( 10 );

		lbAngle = new Label( composite, SWT.None );
		GridData gd = new GridData( );
		gd.widthHint = 20;
		lbAngle.setLayoutData( gd );

		sclAngle.addSelectionListener( new SelectionListener( ) {

			public void widgetDefaultSelected( SelectionEvent e )
			{
				lbAngle.setText( String.valueOf( sclAngle.getSelection( ) ) );
			}

			public void widgetSelected( SelectionEvent e )
			{
				lbAngle.setText( String.valueOf( sclAngle.getSelection( ) ) );
			}
		} );

		applyDialogFont( composite );

		initValues( );

		return composite;
	}

	private void initValues( )
	{
		txtText.setText( textItem.getText( ) );
		sclAngle.setSelection( textItem.getRotationAngle( ) );
		lbAngle.setText( String.valueOf( textItem.getRotationAngle( ) ) );
	}

	protected void okPressed( )
	{
		try
		{
			textItem.setText( txtText.getText( ) );
			textItem.setRotationAngle( sclAngle.getSelection( ) );
		}
		catch ( Exception ex )
		{
			ex.printStackTrace( );
		}

		super.okPressed( );
	}
}
In the RotatedText builder UI, we provide one Text control and one Scale
control, so user can easily change the "text content" and "rotation
angle" properties.
Now let's run the designer.
Create one RotatedText item from palette first. Good, right after the creation, the builder pops up. Now It's very convenient to edit the properties. And when you double-click the RotatedText item in layout, it also brings up the builder.
By this way, user can create very complicated builder UI for editing. One good example is the built-in Chart builder, basically it's the most complicated builder in BIRT so far.
Regarding the builder, there are another two extensions:
org.eclipse.birt.core.ui.tasks and
org.eclipse.birt.core.ui.taskWizards.
These two extensions are not directly related to the builder UI
extension, but providing a comprehensive way to create a wizard-like
dialog UI. This dialog UI then can be further integrated to the builder UI
extension. Chart builder is based on this technology. Since we are not going to explore the
details about these two extensions in this article, you may refer to the
Chart builder implementation for more details.
4) Context Menu
Another well-known UI feature may be the context menu. Through the context menu, user can get the quick entry points to perform specific actions. In BIRT, you can also provides a customized context menu for your extended report item by extensions.
To support custom context menu, you need implement the
extension org.eclipse.birt.report.designer.ui.menuBuilders, the
implementor class must implement the
org.eclipse.birt.report.designer.ui.extensions.IMenuBuilder interface.
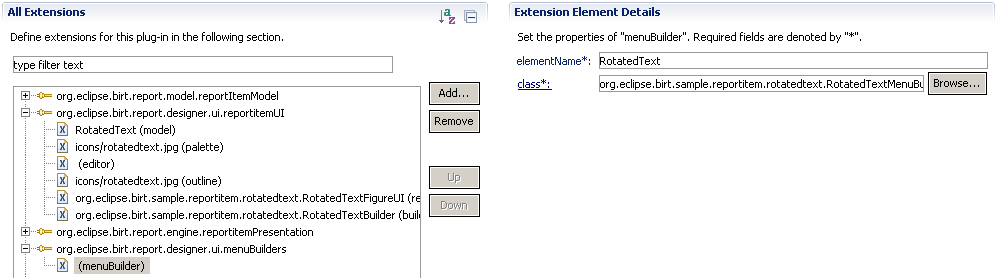
As usual, we specify the element name as "RotatedText" to bind it
to the model extension and give the implementor class name as
org.eclipse.birt.sample.reportitem.rotatedtext.RotatedTextMenuBuilder.
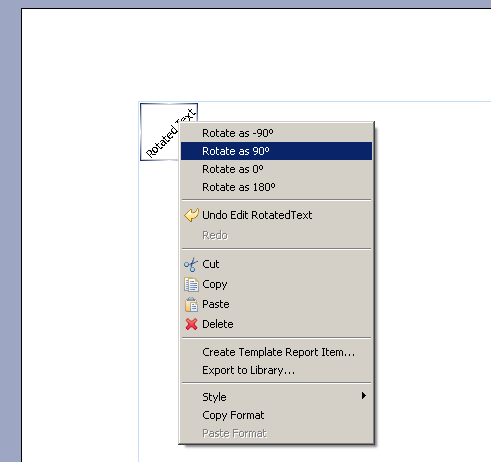
In the menu builder extension for RotatedText item, we add four custom actions to perform quick rotations, respectively, set the angle value to -90, 90, 0 and 180 degrees. The code is like this:
public class RotatedTextMenuBuilder implements IMenuBuilder
{
	public void buildMenu( IMenuManager menu, List selectedList )
	{
		if ( selectedList != null && selectedList.size( ) == 1 && selectedList.get( 0 ) instanceof ExtendedItemHandle )
		{
			ExtendedItemHandle handle = (ExtendedItemHandle) selectedList.get( 0 );

			if ( !RotatedTextItem.EXTENSION_NAME.equals( handle.getExtensionName( ) ) )
			{
				return;
			}

			RotatedTextItem item = null;
			try
			{
				item = (RotatedTextItem) handle.getReportItem( );
			}
			catch ( ExtendedElementException e )
			{
				e.printStackTrace( );
			}

			if ( item == null )
			{
				return;
			}

			Separator separator = new Separator( "group.rotatedtext" ); //$NON-NLS-1$
			if ( menu.getItems( ).length > 0 )
			{
				menu.insertBefore( menu.getItems( )[0].getId( ), separator );
			}
			else
			{
				menu.add( separator );
			}

			menu.appendToGroup( separator.getId( ),	new RotateAction( item, -90 ) );
			menu.appendToGroup( separator.getId( ), new RotateAction( item, 90 ) );
			menu.appendToGroup( separator.getId( ), new RotateAction( item, 0 ) );
			menu.appendToGroup( separator.getId( ),	new RotateAction( item, 180 ) );
		}
	}

	static class RotateAction extends Action
	{
		private RotatedTextItem item;
		private int angle;

		RotateAction( RotatedTextItem item, int angle )
		{
			this.item = item;
			this.angle = angle;

			setText( "Rotate as " + angle + "\u00BA" ); //$NON-NLS-1$ //$NON-NLS-2$
		}

		public void run( )
		{
			try
			{
				item.setRotationAngle( angle );
			}
			catch ( SemanticException e )
			{
				e.printStackTrace( );
			}
		}
	}
}
Each custom action sets the rotation angle to a most commonly used value, which is just like a shortcut for setting the values.
Run the designer and check again. Right-click on any RotatedText extended report item in layout editor, now you can see the custom actions in the context menu.
Through menu builder extension, actually you are not only able to add actions, it's also possible to remove or overwrite actions. Anyway, this offers you another chance to provide a smoother UI to the end user.
5) Property Pages
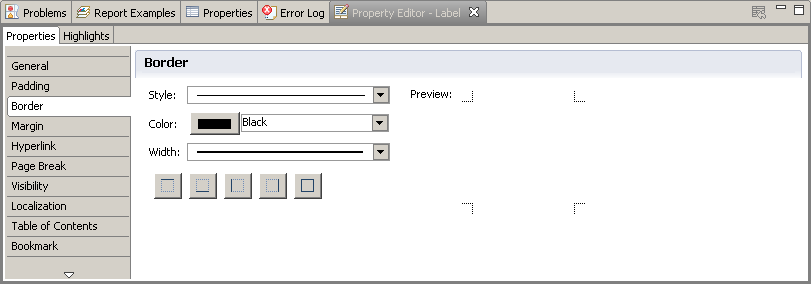
An important UI concept in BIRT designer is the Property Editor. The Property Editor view provides the UI for miscellaneous property editting. It includes both specific settings for each report item and generic settings for all report items.
So can we also create a similar property UI for our custom extended report items? And can we reuse the generic property UI for custom extended report items?
Both answers are YES. In following sections, we will introduce how to implement custom property pages as well as how to reuse built-in property pages for custom extended report items.
Before we start, let's have a brief look at the layout structure of the Property Editor view.
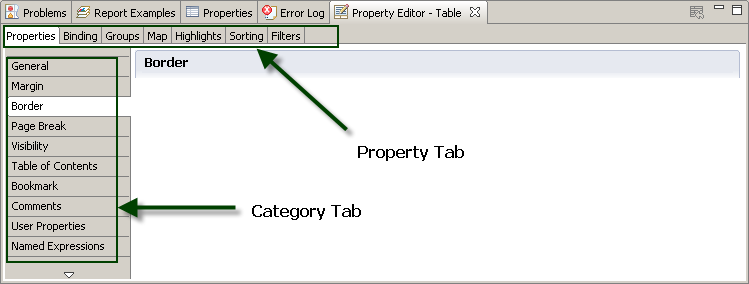
Normally the Property Editor UI is in a "Tabbed" style. There are two kinds of tabs: the "Property Tab" and the "Category Tab". The "Property Tab" divides the entire Property Editor UI into several pages, while the "Category Tab" divides a single page into several categories. By default, the first "Properties" tab page is designed to support categories and other pages not. But this is only the default behavior, user can always alter the UI style and overwrite the logic, although the default behavior in most cases already looks good.
Now let's go on. To support custom property pages, we need implement following extensions:

As you see, unlike the previous extension points, this time the
org.eclipse.birt.report.designer.ui.elementAdpaters extension point
looks a little bit different. Actually, this is a very generic extension point
used by BIRT designer. It is not only used to support property page
extension, but also a lot of other UI extensions in various places.
The first thing is to specify the adaptable class. In this case,
we always specify it as
org.eclipse.birt.report.model.api.ExtendedItemHandle, as custom
extended report items are always represented by this class in BIRT model.
The next thing is to specify the adapter settings:

Here is a brief explanation for the adapter settings:
- id
- the unique identifier for this adapter. Here we specify it as
ReportDesign.AttributeView.RotatedTextPageGenerator. - type
- the Java class type this adapter will adapt to. For property
pages, we must specify it as
org.eclipse.birt.report.designer.ui.views.IPageGenerator. - class
- The Java class type for the adapter. The class must have a constructor without any argument. As we are using the factory mode here, just leave it as blank.
- factory
- The Java class type for the adapter factory. The class must
implement
org.eclipse.core.runtime.IAdapterFactoryinterface. Here we specify it asorg.eclipse.birt.sample.reportitem.rotatedtext.views.RotatedTextPageGeneratorFactory. - singleton
- Specifies if the adapter object is a singleton or not. For singleton, the adapter object will be cached and reused for all matching adaptable. Here since we are using the factory mode, just set it to false.
- priority
- Specifies the priority for the adapter. This will be used for sorting when multiple adapters are defined for same adaptable. Just use the default value by leaving it as blank.
- overwrite
- Specifies a semicolon separated id list that this adapter want to overwrite. Here we just leave it as blank.
- comments
- An additional field to put some description text for the adapter.
Regarding the class and factory setting, there are already plenty of documents talking about them, so we are not repeating any more here. Normally the factory mode means more flexibility and extensibility. If class and factory are both specified, class will take higher priority.
This is not the end yet. As we only want to add custom property pages for the RotatedText item, we need set some additional constraints for the adaptable.
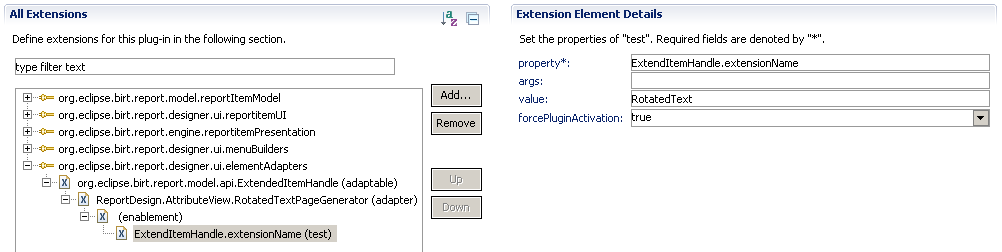
To achieve this, we simply create an enablement element with type
test under the adapter node. In the settings, we specify the test property as
ExtendItemHandle.extensionName and the value as RotatedText. As you
can conceive, this effectively restricts the adaptable object to be only
our RotatedText extended report items.
Now let's look at the code of the factory class:
public class RotatedTextPageGeneratorFactory implements IAdapterFactory
{
	public Object getAdapter( Object adaptableObject, Class adapterType )
	{
		return new RotatedTextPageGenerator( );
	}

	public Class[] getAdapterList( )
	{
		return new Class[]{
			IPageGenerator.class
		};
	}
}
The factory class simply creates a generator instance per call. Each
generator must implement the
org.eclipse.birt.report.designer.ui.views.IPageGenerator interface,
but usually we just extend it from
org.eclipse.birt.report.designer.ui.views.attributes.AbstractPageGenerator
class, which provides some basic support for the categorized styles.
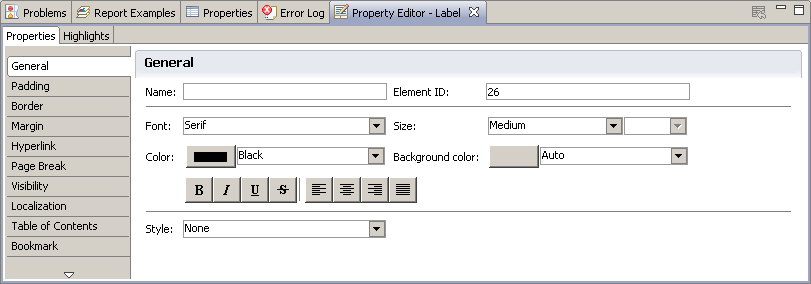
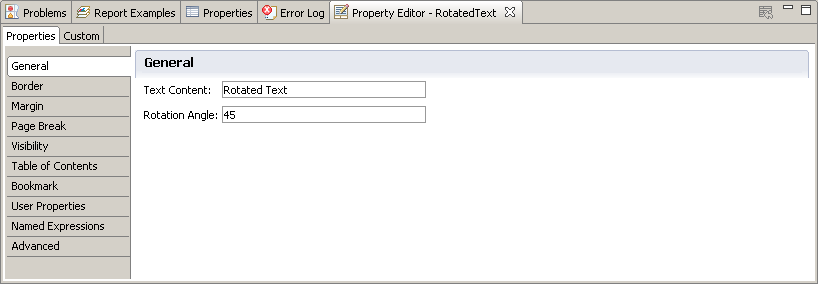
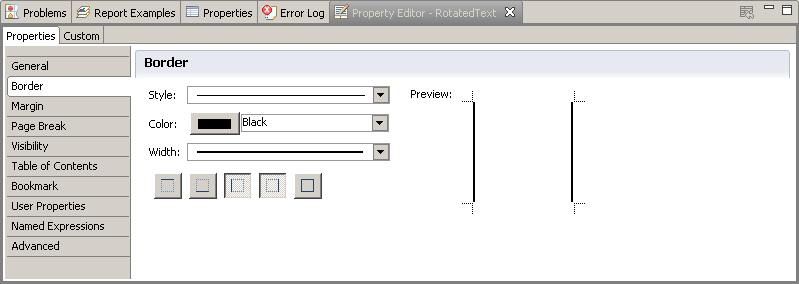
In this example, we want to overwrite the General
category page in Properties tab, and reuse some built-in categories
like Border, Margin, Page Break, etc. Also we want to add a
Custom property tab to the property editor. Here is the code:
public class RotatedTextPageGenerator extends AbstractPageGenerator
{
	private static final String CUSTOM_PAGE_TITLE = "Custom"; //$NON-NLS-1$
	private IPropertyTabUI generalPage;

	protected void buildItemContent( CTabItem item )
	{
		if ( itemMap.containsKey( item ) && itemMap.get( item ) == null )
		{
			String title = tabFolder.getSelection( ).getText( );

			if ( CUSTOM_PAGE_TITLE.equals( title ) )
			{
				TabPage page = new RotatedTextCustomPage( ).getPage( );
				if ( page != null )
				{
					setPageInput( page );
					refresh( tabFolder, page, true );
					item.setControl( page.getControl( ) );
					itemMap.put( item, page );
				}
			}
		}
		else if ( itemMap.get( item ) != null )
		{
			setPageInput( itemMap.get( item ) );
			refresh( tabFolder, itemMap.get( item ), false );
		}
	}

	public void refresh( )
	{
		createTabItems( input );

		generalPage.setInput( input );
		addSelectionListener( this );
		( (TabPage) generalPage ).refresh( );
	}

	public void createTabItems( List input )
	{
		if ( generalPage == null || generalPage.getControl( ).isDisposed( ) )
		{
			tabFolder.setLayout( new FillLayout( ) );
			generalPage = AttributesUtil.buildGeneralPage( tabFolder,
				new String[]{
					null,
					AttributesUtil.BORDER,
					AttributesUtil.MARGIN,
					AttributesUtil.SECTION,
					AttributesUtil.VISIBILITY,
					AttributesUtil.TOC,
					AttributesUtil.BOOKMARK,
					AttributesUtil.USERPROPERTIES,
					AttributesUtil.NAMEDEXPRESSIONS,
					AttributesUtil.ADVANCEPROPERTY
				},
				new String[]{ "General" }, //$NON-NLS-1$
				new String[]{ "General" }, //$NON-NLS-1$
				new AttributesUtil.PageWrapper[]{ new RotatedTextGeneralPage( )	},
				input );

			CTabItem tabItem = new CTabItem( tabFolder, SWT.NONE );
			tabItem.setText( ATTRIBUTESTITLE );
			tabItem.setControl( generalPage.getControl( ) );
		}

		this.input = input;
		generalPage.setInput( input );
		addSelectionListener( this );
		( (TabPage) generalPage ).refresh( );

		createTabItem( CUSTOM_PAGE_TITLE, ATTRIBUTESTITLE );

		if ( tabFolder.getSelection( ) != null )
		{
			buildItemContent( tabFolder.getSelection( ) );
		}
	}
}
Let's explain a little more here:
In the generator class, we extend it from the AbstractPageGenerator and
overwrite three methods. Among them, the createTabItems and
buildItemContent methods
are the central places that containing the custom logic. In
createTabItem method, we overwrite the creation logic for General
category page, adding interested built-in category pages as well as the
Custom property page. In buildItemContent method, we insert the
creation logic for the Custom property page. You can focus on the
text in bold to see how these are achieved. The remaining code are trivial,
normally you can directly use it as a template for other page generator
extensions.
Note one thing you need take care of is when using the built-in pages, you must ensure the relevant model property definitions are applicable. As for some extended report items, they will overwrite or remove some of the built-in property definitions, in this case, those built-in page may not work properly.
The last thing is the property page implementation. For
General category page, we simply create two text controls for
property editing. The code is like this:
public class RotatedTextGeneralPage extends AttributesUtil.PageWrapper
{
	protected FormToolkit toolkit;
	protected Object input;
	protected Composite contentpane;
	private Text txtText, txtAngle;

	public void buildUI( Composite parent )
	{
		if ( toolkit == null )
		{
			toolkit = new FormToolkit( Display.getCurrent( ) );
			toolkit.setBorderStyle( SWT.NULL );
		}

		Control[] children = parent.getChildren( );

		if ( children != null && children.length > 0 )
		{
			contentpane = (Composite) children[children.length - 1];

			GridLayout layout = new GridLayout( 2, false );
			layout.marginLeft = 8;
			layout.verticalSpacing = 12;
			contentpane.setLayout( layout );

			toolkit.createLabel( contentpane, "Text Content:" ); //$NON-NLS-1$
			txtText = toolkit.createText( contentpane, "" ); //$NON-NLS-1$
			GridData gd = new GridData( );
			gd.widthHint = 200;

			txtText.setLayoutData( gd );
			txtText.addFocusListener( new FocusAdapter( ) {

				public void focusLost( org.eclipse.swt.events.FocusEvent e )
				{
					updateModel( RotatedTextItem.TEXT_PROP );
				};
			} );

			toolkit.createLabel( contentpane, "Rotation Angle:" ); //$NON-NLS-1$
			txtAngle = toolkit.createText( contentpane, "" ); //$NON-NLS-1$
			gd = new GridData( );
			gd.widthHint = 200;

			txtAngle.setLayoutData( gd );
			txtAngle.addFocusListener( new FocusAdapter( ) {

				public void focusLost( org.eclipse.swt.events.FocusEvent e )
				{
					updateModel( RotatedTextItem.ROTATION_ANGLE_PROP );
				};
			} );
		}
	}

	public void setInput( Object input )
	{
		this.input = input;
	}

	public void dispose( )
	{
		if ( toolkit != null )
		{
			toolkit.dispose( );
		}
	}

	private void adaptFormStyle( Composite comp )
	{
		Control[] children = comp.getChildren( );
		for ( int i = 0; i < children.length; i++ )
		{
			if ( children[i] instanceof Composite )
			{
				adaptFormStyle( (Composite) children[i] );
			}
		}

		toolkit.paintBordersFor( comp );
		toolkit.adapt( comp );
	}

	protected RotatedTextItem getItem( )
	{
		Object element = input;

		if ( input instanceof List && ( (List) input ).size( ) > 0 )
		{
			element = ( (List) input ).get( 0 );
		}

		if ( element instanceof ExtendedItemHandle )
		{
			try
			{
				return (RotatedTextItem) ( (ExtendedItemHandle) element ).getReportItem( );
			}
			catch ( Exception e )
			{
				e.printStackTrace( );
			}
		}

		return null;
	}

	public void refresh( )
	{
		if ( contentpane != null && !contentpane.isDisposed( ) )
		{
			if ( toolkit == null )
			{
				toolkit = new FormToolkit( Display.getCurrent( ) );
				toolkit.setBorderStyle( SWT.NULL );
			}

			adaptFormStyle( contentpane );

			updateUI( );
		}
	}

	public void postElementEvent( )
	{
		if ( contentpane != null && !contentpane.isDisposed( ) )
		{
			updateUI( );
		}
	}

	private void updateModel( String prop )
	{
		RotatedTextItem item = getItem( );

		if ( item != null )
		{
			try
			{
				if ( RotatedTextItem.ROTATION_ANGLE_PROP.equals( prop ) )
				{
					item.setRotationAngle( Integer.parseInt( txtAngle.getText( ) ) );
				}
				else if ( RotatedTextItem.TEXT_PROP.equals( prop ) )
				{
					item.setText( txtText.getText( ) );
				}
			}
			catch ( Exception e )
			{
				e.printStackTrace( );
			}
		}
	}

	protected void updateUI( )
	{
		RotatedTextItem item = getItem( );

		if ( item != null )
		{
			String text = item.getText( );
			txtText.setText( text == null ? "" : text ); //$NON-NLS-1$

			txtAngle.setText( String.valueOf( item.getRotationAngle( ) ) );
		}
	}
}
Note the using of FormToolkit is just to achieve the same look and feel as
the built-in pages. You can always design your own UI styles if no need for
this consistency.
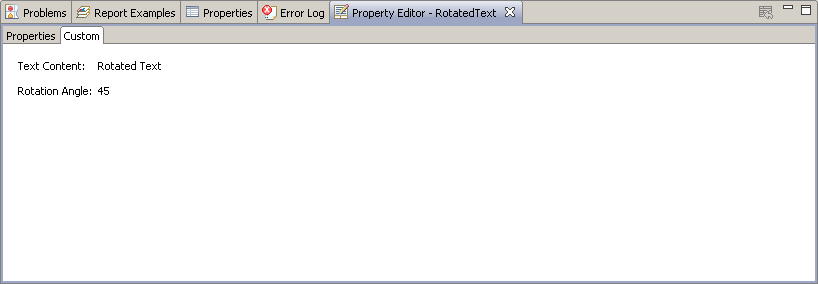
For the Custom property page, as we only want to show the
extension mechanism and the possibility, to simplify, we only give a very trivial example
by implementing a read-only version of the General
category page.
public class RotatedTextCustomPage extends RotatedTextGeneralPage
{
	private Label lbText, lbAngle;

	public void buildUI( Composite parent )
	{
		if ( toolkit == null )
		{
			toolkit = new FormToolkit( Display.getCurrent( ) );
			toolkit.setBorderStyle( SWT.NULL );
		}

		Control[] children = parent.getChildren( );

		if ( children != null && children.length > 0 )
		{
			contentpane = (Composite) children[children.length - 1];

			GridLayout layout = new GridLayout( 2, false );
			layout.marginTop = 8;
			layout.marginLeft = 8;
			layout.verticalSpacing = 12;
			contentpane.setLayout( layout );

			toolkit.createLabel( contentpane, "Text Content:" ); //$NON-NLS-1$
			lbText = toolkit.createLabel( contentpane, "" ); //$NON-NLS-1$
			GridData gd = new GridData( );
			gd.widthHint = 200;
			lbText.setLayoutData( gd );

			toolkit.createLabel( contentpane, "Rotation Angle:" ); //$NON-NLS-1$
			lbAngle = toolkit.createLabel( contentpane, "" ); //$NON-NLS-1$
			gd = new GridData( );
			gd.widthHint = 200;
			lbAngle.setLayoutData( gd );
		}
	}

	protected void updateUI( )
	{
		RotatedTextItem item = getItem( );

		if ( item != null )
		{
			String text = item.getText( );
			lbText.setText( text == null ? "" : text ); //$NON-NLS-1$
			lbAngle.setText( String.valueOf( item.getRotationAngle( ) ) );
		}
	}
}
OK, now let's wrap all things up and take a look.
Run the designer, ensure the Property Editor view is visible and select one RotatedText extended report item in layout editor.
Cool, the General category page shows exactly what we designed. You can view
and edit property values in this page
directly now.
Click the Border category, it brings up the built-in border
property page as well. You can try change some border settings.
Immediately you can see it works perfectly in layout editor.
Now try switching to the Custom page, it brings up our read-only
property page. Since this is only an example, in real practice,
you can implement any custom pages.
OK, now we get a nearly complete picture for how to create an extended report item through model, engine and designer extensions in BIRT, and the ways to polish the extension UI and improve the usablity. However there's another important topic that we'd like to talk about a little more, that is the Data Driven.
Data Driven
An essential topic in BIRT is about the data integration. In the world of reporting, data is always the first class citizen. Normally data integration can be divided into two parts: Data retrieving and Data representation. In this chapter, we will focus on the Data representation part, exploring how to make our RotatedText extended report item data-aware and capable of leveraging the common data feature in BIRT.
Before the start, we'd like to introduce a little more about the data infrastructure in BIRT. One important concept in BIRT is Binding. All report data in BIRT are actually populated through bindings. Binding is an abstract layer that connects the Data retrieving layer and Data representation layer. In other words, all report items in BIRT are actually consuming bindings instead of raw data from data source directly.
There are two kinds of bindings in BIRT: Regular binding and Aggregation binding. For Regular binding, it normally contains a JavaScript expression and a data type. For Aggregation binding, it further contains an aggregation function, aggregation filter and aggregation target information. By using JavaScript in expression, bindings are very flexible to organize the data representation logic. You can either simply write the expression like:
row["columnA"]
or like:
if ( someConditionIsOK )
{
	if ( otherConditionIsOK )
	{
		functionA();
	}
	else
	{
		resultB;
	}
}
else
{
	resultC;
}
Bindings are associated with report items. Every report item can consume its own bindings as well as its parent-level bindings in different scopes. Since 2.3, BIRT also support a new feature called Shared ResultSet, which allows one report item to share the bindings from another report item that is not necessarily in its parent tree.
Now let's continue to explorer how we can support bindings for our
Rotated extended report item. The basic idea is to change the text
property to be binding-aware, so the text value can be controlled by
bindings dynamically.
1) Model Change
To support binding for text property, the first thing we need
change is the model extension definition:
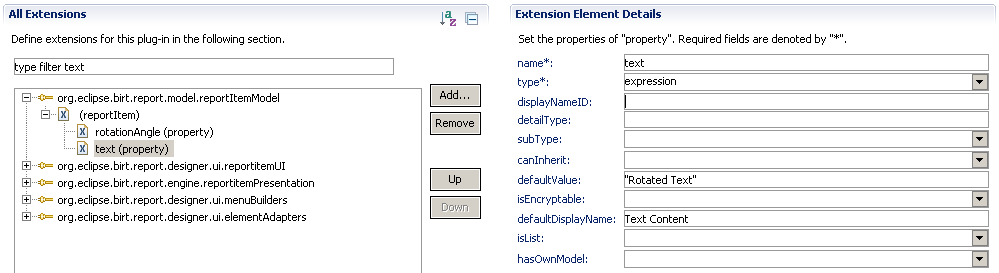
Actually the only thing we need is changing the property type of
text from string to expression and adding the quotation mark
around the
original default value. The change means now this property supports
expressions, and as the original default value Rotated Text is
not a valid JavaScript expression, we changed it so it follows the
literal string syntax in JavaScript.
That's all we need for model change, now let's look at the engine part.
2) Engine Change
To support expressions, we just need change a piece of code in the onRowSets() method
of RotatedTextPresentationImpl like this:
public Object onRowSets( IBaseResultSet[] results ) throws BirtException
{
	if ( textItem == null )
	{
		return null;
	}

	int angle = textItem.getRotationAngle( );
	String text = textItem.getText( );

	// XXX added to support expression
	if ( results != null && results.length > 0 )
	{
		if ( results[0] instanceof IQueryResultSet && ( (IQueryResultSet) results[0] ).isBeforeFirst( ) )
		{
			( (IQueryResultSet) results[0] ).next( );
		}
		text = String.valueOf( results[0].evaluate( text ) );
	}
	else
	{
		text = String.valueOf( context.evaluate( text ) );
	}
	// end new code

	BufferedImage rotatedImage = SwingGraphicsUtil.createRotatedTextImage( text, angle, new Font( "Default", 0, 12 ) ); //$NON-NLS-1$

	ByteArrayInputStream bis = null;

	try
	{
		ImageIO.setUseCache( false );
		ByteArrayOutputStream baos = new ByteArrayOutputStream( );
		ImageOutputStream ios = ImageIO.createImageOutputStream( baos );

		ImageIO.write( rotatedImage, "png", ios ); //$NON-NLS-1$
		ios.flush( );
		ios.close( );
		bis = new ByteArrayInputStream( baos.toByteArray( ) );
	}
	catch ( IOException e )
	{
		e.printStackTrace( );
	}
	return bis;
}
The new code adds the extra logic to handle the text property as an
expression, and evaluating it under current engine context to get the
final string result.
3) UI Change
Now the UI's turn. Two places need the change. The first applies to the builder, the second applies to the property page.
For the builder, we want to add a button besides the text control, so user can invoke the standard expression builder to edit the expression. The standard expression builder provides the common JavaScript support in BIRT.
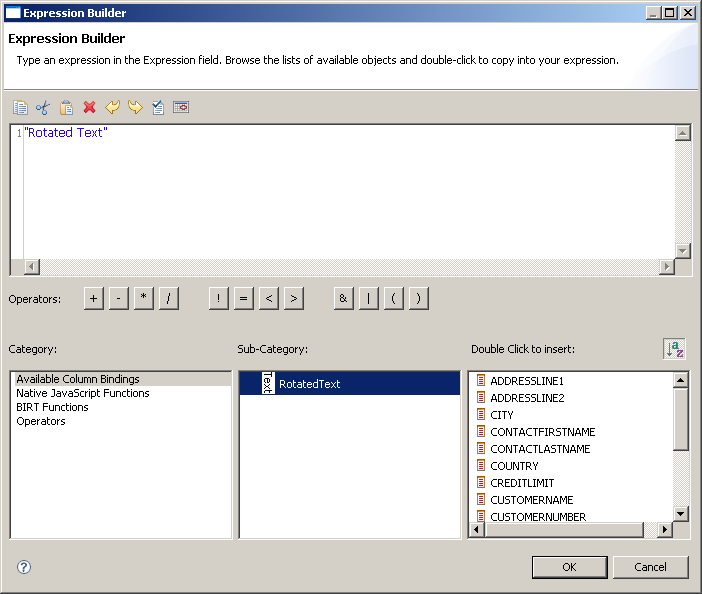
To achieve this, we change the code in RotatedTextBuilder class as following:
public class RotatedTextBuilder extends ReportItemBuilderUI
{
	public int open( ExtendedItemHandle handle )
	{
		try
		{
			IReportItem item = handle.getReportItem( );

			if ( item instanceof RotatedTextItem )
			{
				RotatedTextEditor editor = new RotatedTextEditor2( Display.getCurrent( ).getActiveShell( ), (RotatedTextItem) item );
				return editor.open( );
			}
		}
		catch ( Exception e )
		{
			e.printStackTrace( );
		}
		return Window.CANCEL;
	}
}

class RotatedTextEditor2 extends RotatedTextEditor
{
	protected RotatedTextEditor2( Shell shell, RotatedTextItem textItem )
	{
		super( shell, textItem );
	}

	protected void createTextArea( Composite parent )
	{
		Label lb = new Label( parent, SWT.None );
		lb.setText( "Text Content:" ); //$NON-NLS-1$

		txtText = new Text( parent, SWT.BORDER );
		GridData gd = new GridData( GridData.FILL_HORIZONTAL );
		txtText.setLayoutData( gd );

		Button btnExp = new Button( parent, SWT.PUSH );
		btnExp.setText( "..." ); //$NON-NLS-1$
		btnExp.setToolTipText( "Invoke Expression Builder" ); //$NON-NLS-1$

		btnExp.addSelectionListener( new SelectionAdapter( ) {

			public void widgetSelected( SelectionEvent event )
			{
				openExpression( txtText );
			}
		} );
	}

	private void openExpression( Text textControl )
	{
		String oldValue = textControl.getText( );

		ExpressionBuilder eb = new ExpressionBuilder( textControl.getShell( ), oldValue );
		eb.setExpressionProvier( new ExpressionProvider( textItem.getModelHandle( ) ) );

		String result = oldValue;

		if ( eb.open( ) == Window.OK )
		{
			result = eb.getResult( );
		}

		if ( !oldValue.equals( result ) )
		{
			textControl.setText( result );
		}
	}
}
In the above code, we create another RotatedTextEditor2 class to overwrite the UI creation
logic for the new expression button.
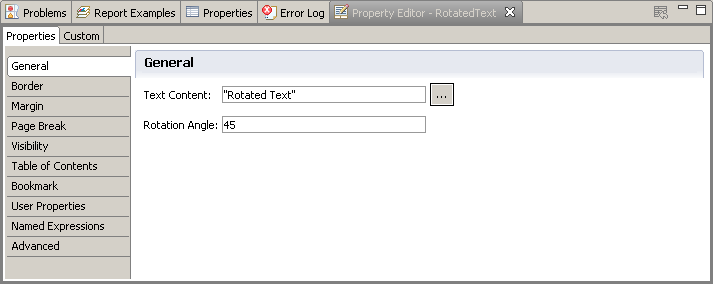
Now let's look at the property page. For General property page, we
also want to add an expression button besides the text control. Here is
the change for the RotatedTextGeneralPage class:
public class RotatedTextGeneralPage extends AttributesUtil.PageWrapper
{
	//.........

	public void buildUI( Composite parent )
	{
		if ( toolkit == null )
		{
			toolkit = new FormToolkit( Display.getCurrent( ) );
			toolkit.setBorderStyle( SWT.NULL );
		}

		Control[] children = parent.getChildren( );

		if ( children != null && children.length > 0 )
		{
			contentpane = (Composite) children[children.length - 1];

			GridLayout layout = new GridLayout( 3, false );
			layout.marginLeft = 8;
			layout.verticalSpacing = 12;
			contentpane.setLayout( layout );

			toolkit.createLabel( contentpane, "Text Content:" ); //$NON-NLS-1$
			txtText = toolkit.createText( contentpane, "" ); //$NON-NLS-1$
			GridData gd = new GridData( );
			gd.widthHint = 200;

			txtText.setLayoutData( gd );
			txtText.addFocusListener( new FocusAdapter( ) {

				public void focusLost( org.eclipse.swt.events.FocusEvent e )
				{
					updateModel( RotatedTextItem.TEXT_PROP );
				};
			} );

			Button btnExp = toolkit.createButton( contentpane, "...", SWT.PUSH ); //$NON-NLS-1$
			btnExp.setToolTipText( "Invoke Expression Builder" ); //$NON-NLS-1$
			btnExp.addSelectionListener( new SelectionAdapter( ) {

				public void widgetSelected( SelectionEvent e )
				{
					openExpression( txtText );
				}
			} );

			toolkit.createLabel( contentpane, "Rotation Angle:" ); //$NON-NLS-1$
			txtAngle = toolkit.createText( contentpane, "" ); //$NON-NLS-1$
			gd = new GridData( );
			gd.widthHint = 200;
			gd.horizontalSpan = 2;
			txtAngle.setLayoutData( gd );
			txtAngle.addFocusListener( new FocusAdapter( ) {

				public void focusLost( org.eclipse.swt.events.FocusEvent e )
				{
					updateModel( RotatedTextItem.ROTATION_ANGLE_PROP );
				};
			} );
		}
	}

	private void openExpression( Text textControl )
	{
		RotatedTextItem item = getItem( );

		if ( item != null )
		{
			String oldValue = textControl.getText( );
			ExpressionBuilder eb = new ExpressionBuilder( textControl.getShell( ), oldValue );
			eb.setExpressionProvier( new ExpressionProvider( item.getModelHandle( ) ) );

			String result = oldValue;

			if ( eb.open( ) == Window.OK )
			{
				result = eb.getResult( );
			}

			if ( !oldValue.equals( result ) )
			{
				textControl.setText( result );
				updateModel( RotatedTextItem.TEXT_PROP );
			}
		}
	}

	//..........
}
You can focus on the code in bold and the newly added methods only. Now the General property page
looks like this:
OK, time for an integrated test.
Create one Table report item first, bind it with a dataset, insert one RotatedText extended report item in the table detail row as well as several other Data items.
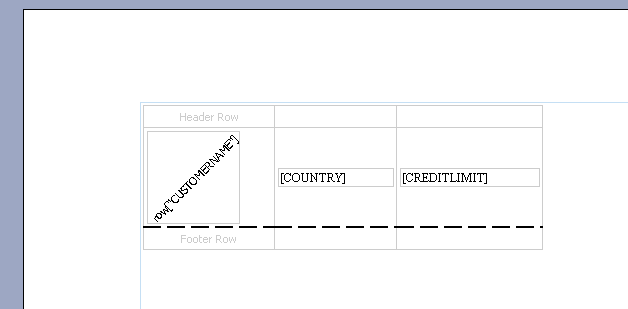
Specify the expression of the RotatedText item as:
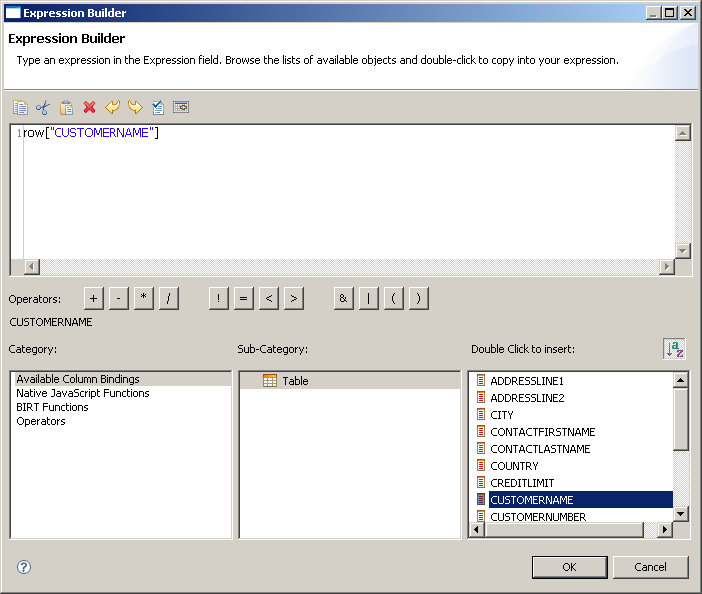
Now preview it in designer.
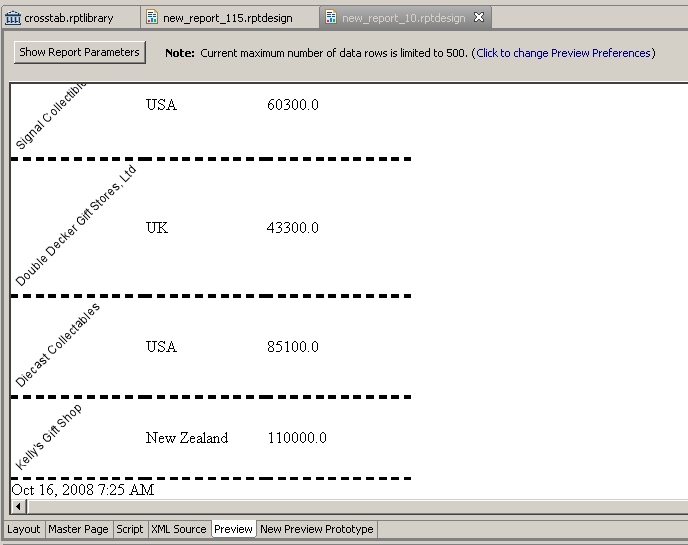
Voila! The text data now comes from the table bindings and automatically changes per row.
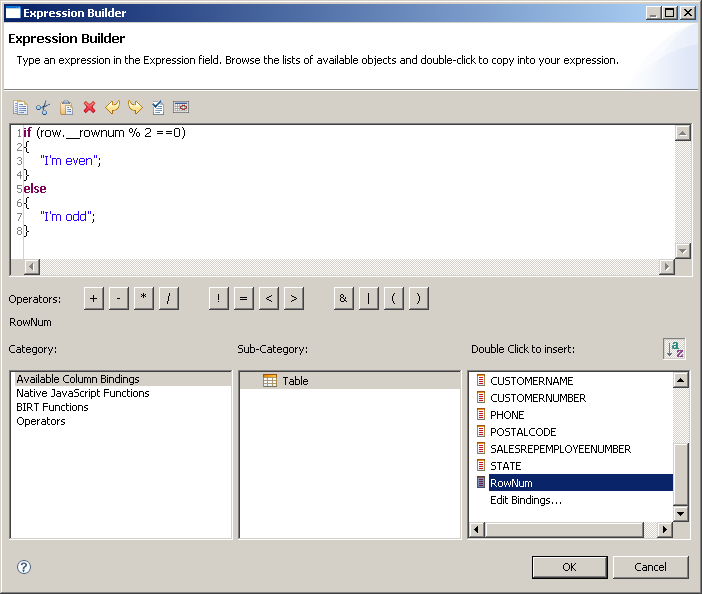
Now change the expression as:
Preview again:
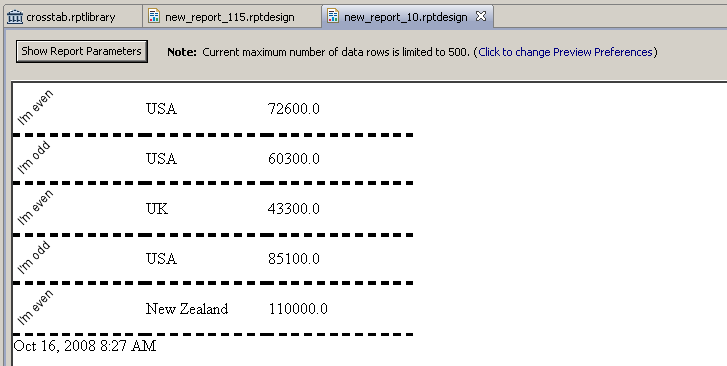
Perfect! Now we have successfully created a data-driven custom report item.
Summary
BIRT provides very good extension mechanism, which allows user to create custom reporting features. This article introduced the techniques that used to enhance the feature of custom extended report items for BIRT.
Resources
[1] The complete source code: you can extract and import it into Eclipse workspace as a plugin project directly
[2] BIRT Official Site: http://eclipse.org/birt
[3] How to access Eclipse CVS: http://wiki.eclipse.org/CVS_Howto